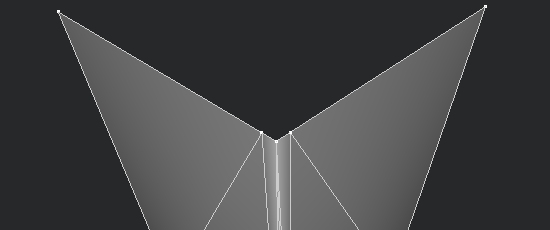
As always, I'll start the new post with an obligatory link to the new OverDose website and forums. Over the last few years our servers have had the personality of a chronically depressed lemming and have had the tendency to drop out of existence at the best of times. Thankfully, we have been on the new server for a good while now and it’s as solid as an IT nerd on the front row of a swimsuit modeling contest. So, the big shiny logo below, go ahead and play whack a mole with it:

This link will give you access to the main OverDose website where all the news gets posted first, as well as access to the [TBG] forums, which we think of as kind of our "EXTRA!" area. We post a lot of development junk, pictures and info in there that doesn't make it to the main sites, so if you want first hand access to the inner workings of OverDose, get your filthy mitts on a forum account and get posting!
Creating Next Gen Art
WELP! I need to have a PHD in astrophysics and at least a computer with 1.21 gigawatts to create next gen art! What ever will I do! Well for a start, breathe, because it’s a common problem people see these days with all these new fancy rendering options. Back when I first started modding, I was faced with the amazing task of creating 128x128 paletted textures. One single image, a diffuse, was all I needed. Shadows were painted in, light and depth were faked, and we had to work to the confines of an ambient lit world with basic lightmapping and radiosity. Good times… Good times…
But things change.
These days, you hear a LOT of horror stories about working with all this new fangled tech. How can I make a height map? How does a specular map work? WHAT THE HELL IS A GIGGAWATT?! The work load has exponentially increased over the years to such a point now where newbies can be really put off to dive in creating media for use with games. Very confusing times… But here’s the kicker. If I was to ask you the question “What tools do I need to make media for games now?” What would you answer? Max? Maya? Mudbox? zBrush? Photoshop? Common tools, right? I mean, you can’t possibly make media without the right tools………
…..Can you?
Back To Formula
Ever look at those projects online where some random Joe some how managed to make the Monalisa in MS Paint? Or some guy managed to create the Sistine Chapel in Minecraft…? Where there’s a will, there’s a way. So what I’m going to do this time, is talk a little about content creation for OverDose, which can be used to any next gen game really with the same content creation pipeline. But I’m not going to use Max, or any expensive tools. I’m going to use bog standard things you can get for free or cheap, and show you that it doesn’t really matter what you use, just as long as you have the drive to make good art and enjoy it, everything can work out fine.
So where do we start? Well, I’m going to pick a simple texture set from OverDose I made a few years back, and I’m going to remake it. Hopefully, we can see the way things work, what they do, and hopefully sneakily see if I’ve improved at all in the last year or so :p
So, let’s pick our texture. I’m going to use this one, because it’s simple enough to understand what’s happening, but also has enough depth and presentation to show us what’s actually going on:
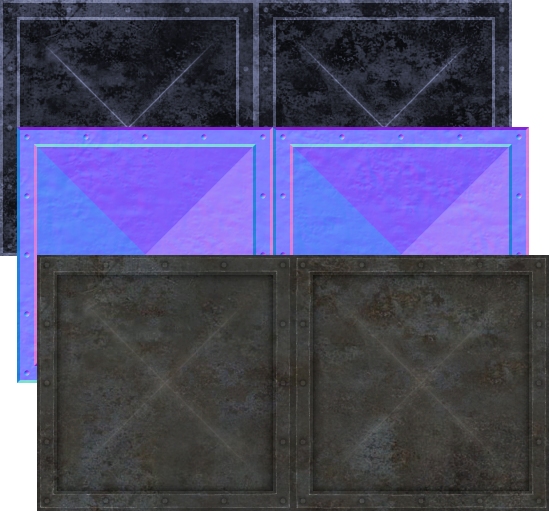
Now as a texture, this isn’t bad; it works perfectly fine in-game. It’s a tad low resolution, and some areas fall flat, but it’s usable. So where can we start? Well, textures are made up of several sections, which are:
The high poly model for Normal/Height/AO data
The Diffuse map for colour
The Specular map for reflectivity
The Local/Normal map for light interaction
The Height map (If required) for Parallax Occlusion Mapping
And it works pretty well in that order too. I wouldn’t suggest making a diffuse texture without doing the high poly first, or at least the normal map, because you simply won’t know what’s what, and things can get pretty confusing and pretty ugly quite fast.
So, onto the high poly!
Making The High Poly Model
I said earlier that for this talk I was going to use free or cheap software, none of the big expensive kit that retail companies use. Well, go download the model app of choice! Blender is free, and is improving all the time. Even Milkshape works for this. You totally don’t always need a degree to do this stuff, you just need to know where to start. And that’s an important point, because the counter point to this is that you also need to know where to STOP. High poly modelling is exactly what it sounds like, creating detail that you just wouldn’t even need in a game. You don’t need to work about polycounts, overdraw, floating geo etc here, because it’s just not needed. But I’m gonna show you a VERY cheap trick that works very well when rendering to texture; High poly models… Don’t need to be high poly.
*gasp* *shock* *awe* *sandwiches*
How is that possible, you ask? Well, because nine times out of ten, people waste polygons when creating a high poly mesh. You have to understand, this isn’t a bad thing, because it’s usually automated anyway, mesh smooth and the like. Like I said previously, the polycount doesn’t matter anyway for in-game use, and the only difference is more control and a different rendering time when rendering to texture. So how can we create high poly models, with low polycounts…? That doesn’t make sense, right? Well its all about smoothing group control. Once you understand how smoothing groups work, you can work to their confines in a much better way. Lets take a look at the following model:
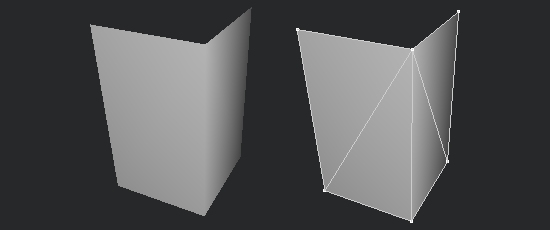
This is, for lack of a better expression, as simple as it gets. This is a 90 degree bend, something common that we run into all the time. But this would never work when rendering to texture, because the gradients are too steep. Anything “flat” on the mesh, when smooth shaded, should be a single flat colour with no gradient. I can’t teach how to look for this, it’s something you will pick up in time, but if this was rendered to texture for a normal map, we would get a gradient colour in areas that should be pure flat. So how can we change this? Well, we control the smoothing of course. To do this we have to chamfer our edges so that the smoothing is controlled in a better way. Check this example.
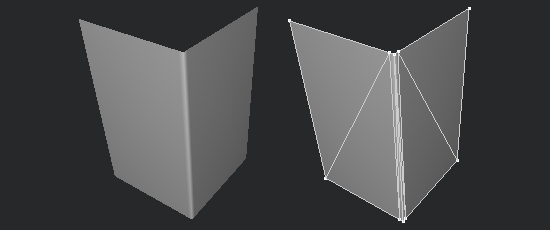
What just changed? Notice that the smoothing is now a lot better, we have pure flat colours in areas that should be flat, which means that when rendered to texture, this will come out much nicer. The problem was, a 90 degree angle is FAR too steep, and will always cause smoothing issues. So, we added a control chamfer right at the edge:
This controlled the smoothing much more. But it also gave us a strange side effect… It made it look like the corner isn’t flat at all, and is smooth/round. Even though clearly by looking at the model, it IS flat…? This is a good thing guys! You don’t WANT flat corners; they NEVER work with normal mapping and just make things come out pure flat. While we want to keep as much flat as possible when dealing with flat shapes, we also want all corners to have a little depth, so that you can tell there’s an angle there. Let’s look at a better shape, one which works much nicer with this trick:
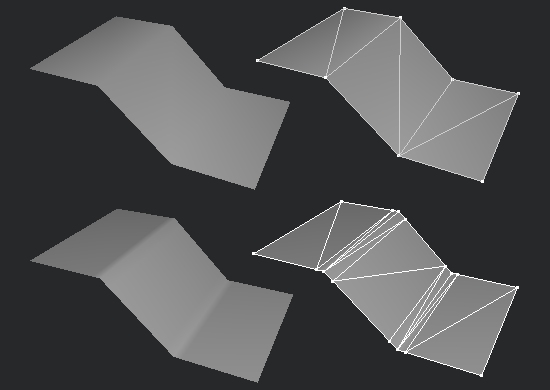
A better shape to understand, but the difference is obvious even to an untrained eye. The shape is more defined, less blobby. Areas that should be flat are flat, but we also get smooth transitions between angle changes. Now believe it or not, that would work perfectly fine if we were to render it to texture now. And yet, its not amazingly high polygon at all. See what I mean…? You don’t always NEED to make an ultra high polygon model to get something to work.
So let’s start with creating our model!
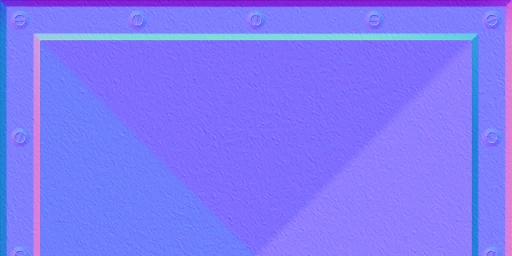
A good idea is to lay the asset you are working from down in the background. In this case, because I’m remaking an already made texture, it can work well to use the normal map as our tracing image simply because its angles and shapes are much better defined. So lay the image down, and start building the mesh around its shape.
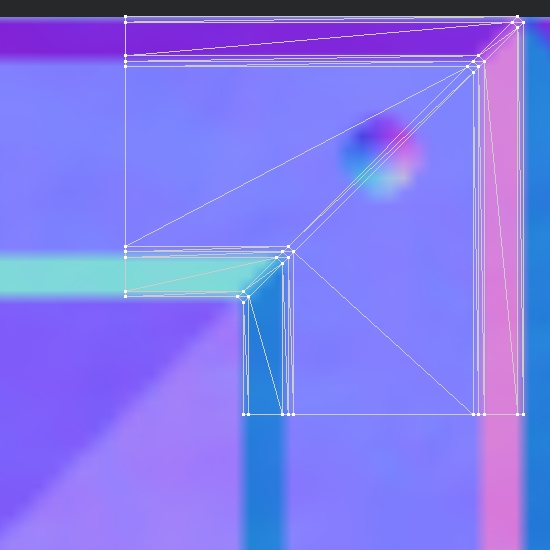
Now remember that when making models for TEXTURES, the final result will be a top down perspective on a flat plane. That means you can use floating geo if you want, because the camera takes a virtual snapshot of the plane on a single axis. Anyway, keep going, and you will find right away the model starts taking shape:
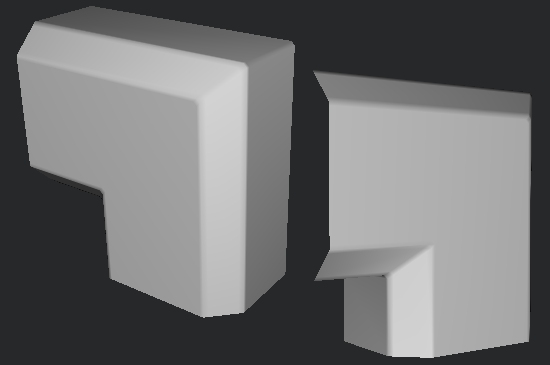
Again, believe it or not, that’s a low polygon model, just with the tricks used above. But it’s taking shape. Don’t stop now, keep it up and create the entire model in this way, and you should have something that looks like this:

Obviously I added more detail here, screws, dents for the screws etc. I also kept it all as one piece with as little floating geo as possible, but you don’t need to do that… That was just me for some reason.
So, where do we go from here? Well first of all, save this model, call it “model_high”. Then create a perfectly flat 2 polygon surface that covers the entire scale of this mesh if viewed from the front, and place it right at the back of this model. Delete the high poly work so you are left with a simple 2 polygon flat face, then save this model as “model_low”. That’s it, no more modelling required!
Creating The Normal Map/Ambient Occlusion Map/Height Map
Next up we need to download xNormal, which works amazingly well for creating normal map data from source models such as these. Open xNormal, and add our high polygon mesh to the “High Definition Meshes” tab. Then add our low polygon mesh to the “Low Definition Meshes” tab. Rocket science, right? Next we need to set up our bakes, so click on the “Baking Options” tab. Make sure you use AA!! I usually set it to at least 4xAA, that works fine. Pick a file name, a resolution and make sure that you tick it so that it outputs “normal map”, “height map” and “ambient occlusion map”.
Then… Hit generate maps. This is an automated process for the most part. The normal map will come straight out with no fuss, the ambient occlusion will take a little time to render likely but won’t need any help, but the height map will need a little tweaking. You’ll notice when it comes out, that it will look a little like this:

It’s not TOO bad, but the problem is right in the middle there. We are loosing out height data, because that should be a simple gradient but instead it looks like a white blob? In-game this would translate to some pretty poor flat section in the middle of our texture if we used parallax occlusion mapping, so make sure you tweak the min. point and max. point at the end of the bake to get the right results. It should look like this:
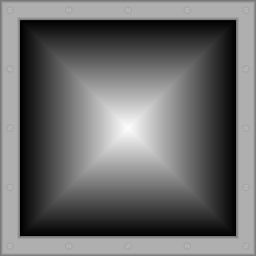
Much better. But you may need to tweak this later on anyway once we get it in-game. But for now, that’s fine.
Now then, this next part is totally up to you, but this is something I always like to do for a little bit of free visual detail. Don’t over use it however, because it can make textures look like pure concrete and give that old bubbly unreal engine look everybody hated. So what I like to do, is overlay a really subtle effect over the normal map. If you are going for a clean look to the texture, I would advise against this, but if the texture is old and rough it can help sell the effect more in combination with lighting. Anyway, to overlay a texture is simple. Download CrazyBump, its free to try for 30 days and makes it so easy to do. Simple load your original normal map into CrazyBump and pick “Show The Mixer…” and add another map. Pick a nice level so that it doesn’t stand out too much, and the final normal map should look something like this:
That’s it! Normal map is done :)
Creating The Diffuse And Specular Maps
Rather than sit and talk about how to step by step make these textures, I’ll at least presume you have an understanding of art and how to create it and instead give you some tips. Take these tips with a grain of salt, these are from my work flow, and not everybody works the same.
On Diffuse Creation:
• Remember to use that ambient occlusion bake, even if it’s just slightly. A little faked depth can help flatter textures pop more visually in-game.
• Don’t always rely on a single source texture to make things from. Use rust, grime and dirt maps to help sell a surface more, even more so if working with a texture that’s supposed to be old and dirty.
• Don’t over do the scratches! Nobody wants an image full of pure white scratches. We had enough of that with Rainbow Six Vegas. Subtly is key and sells it much more.
On Specular Creation:
• A specular map is not just a contrast changed diffuse map. Remember that white shines most, black doesn’t at all, so play with your levels so that the texture has fighting shades. This will create an uneven shine in-game, which for rusty old textures can help sell the effect. Make sure rust is very dark, if not next to black, and metal should always be lighter.
• Use colour… Yes, really. Colour specular helps sell surfaces much better, and I find that for metal, blue tones usually work amazingly well.
• Don’t worry about making pop out areas on the texture a little brighter. I like to make screws and things lighter on the specular map so that they catch the light a bit better in-game and stand out more.
• Always think about areas on the texture than would catch against things easier. Make these areas brighter.
Ok, so that’s a few basic tips, but everybody does things differently when creating their media. Anyway, if you followed the above correctly, you should end up with something like this:


Ad you can see, I doubled the horizontal tile in this texture simply because it will likely tile this way in game and adds a little variation to an otherwise very obvious repeating texture.
In Conclusion
Things didn’t go too bad in this test. All in all I completed it in around 30minutes, including the modelling etc and hopefully those few year difference from the last one have changed things up a bit. I hope this random chats been at least some what useful to somebody, but it’s really important to know that you don’t need ultra expensive kit to make next gen media, that’s just a myth.
Thanks for reading!


Very nice textures you have created!
I don't know about everyone else, but I found this somewhat useful. :)
Thanks for sharing this guys. It was really informative. I wish more developers would share their development routine. It would save a lot of time for us newbies asking "How did they do that?"
I didn't know that trick, very much thanks!
Very intering and well written. Nice tricks, also.. even for one beeing not a newbie