Before we talk any further, below are two videos which shows the comparison of the game before and after optimization.
Before reaching to a solution, it is very important to understand the problem. This is very crucial when it comes to optimizing games in unity. At first we need identify the problem. What is causing the framerate to drop? Which part of code is taking the most time? Is the problem on the rendering side or due to the physics? Or is it something else? Unity has a very handy tool called Profiler which helps us find the root cause of the problem. I must again stress that in case of optimization, finding the cause is 50% of the work done. The root cause can vary from game to game and hence it is important to use the profiler well and find out the bottleneck. Once that is done the focus shifts to solving the issue.
Optimizing “Break It”
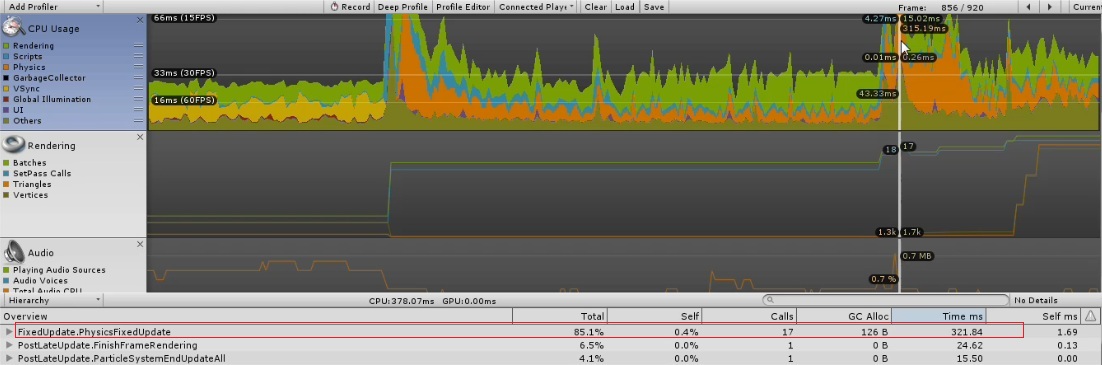
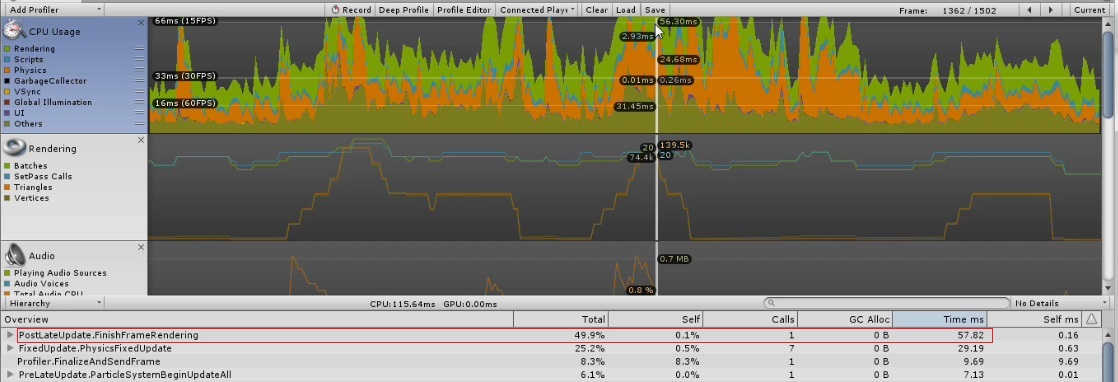
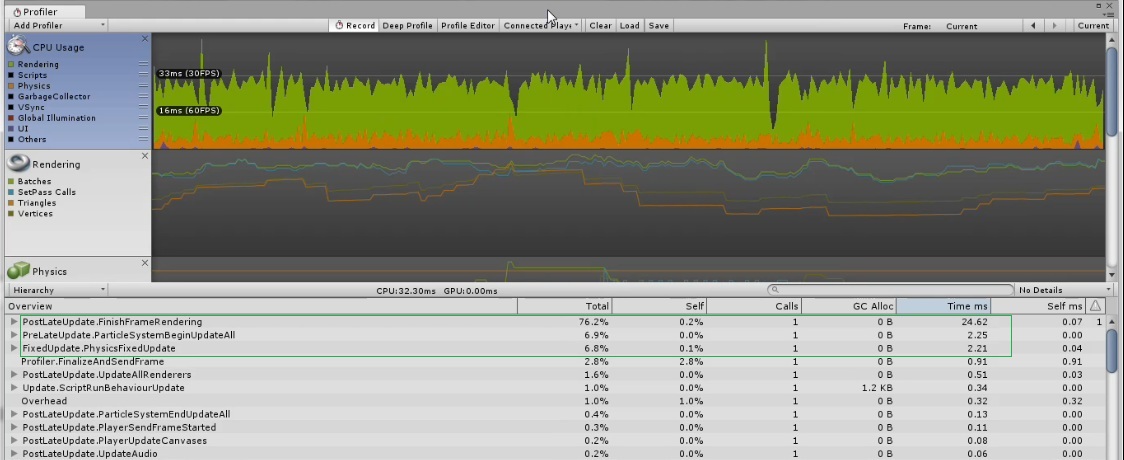
Upon profiling, we found that it is the physics calculations of the game that is taking up the chunk of our time and hence reducing the fps. The second most expensive operation was rendering.
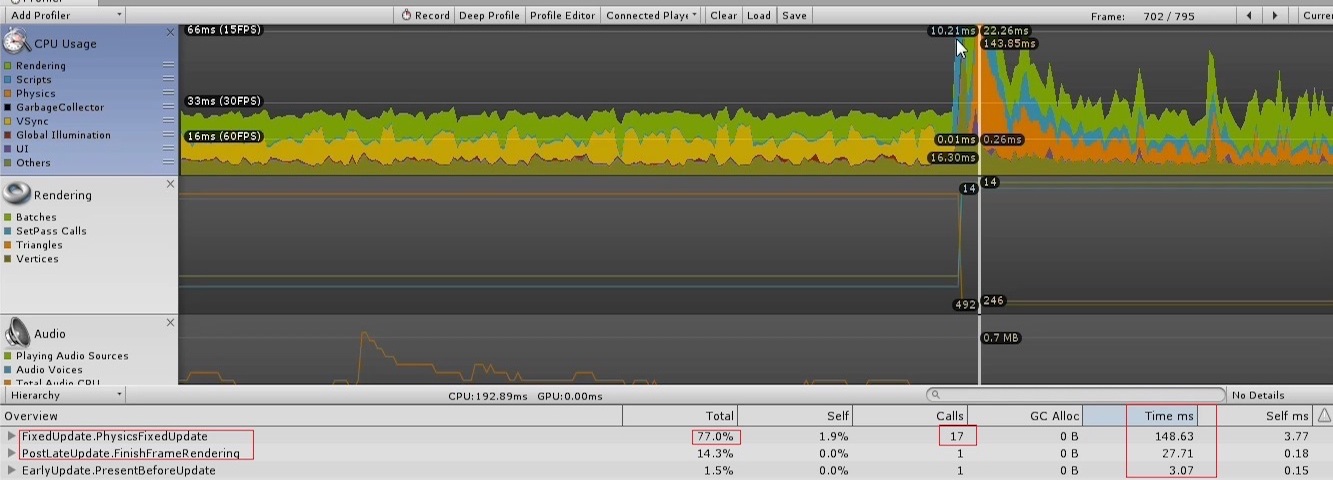 Profiler before optimization
 Profiler before optimization
 Profiler before optimization
This is how we went about fixing the issues. A big lesson that was learned over here is that there are a lot of things which we could have standardised and implemented right from the beginning. Of course there will be specific issues that one encounters only after profiling, but most of what is written below shall be incorporated in the development process right from the beginning.
Object Pooling
Initialising and destroying gameobjects can be a very expensive operation. And if a game has a lot of them, it might hamper the fps. For example creating and destroying multiple bullets. Or in this case the ball which is created when the player touches or swipes the screen and is destroyed a few seconds later. Object pooling suggests that instead of creating and destroying several gameobjects of the same type, we create a pool of them when the scene loads and set them all to inactive. And when the object is required, we just enable them from the pool and instead of destroying them, we just disable them and put it back into the pool. This decreases the expensive operations during the gameplay as we are not required to instantiate and destroy frequently used gameobects. There is an excellent tutorial about this on the Unity website.
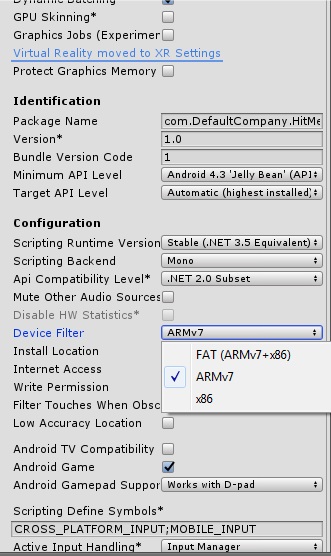
Device Filter
This was a bit strange but it did affect the performance of our game. Under the android player settings we have an option for device filter. We used to leave it default to FAT as we wanted it to run on as many android devices as possible. This is still possible if we create separate builds based on architecture because play store has multiple apk support. It automatically selects the apk to be downloaded based on the user’s device. So we created separate builds for Armv7 and x86 . Our low end testing device was an Asus phone of 2014 model running android 4.4 . The architecture was x86 although the instruction set supported were both x86,armv7.
So running an x86 build on this device showed an improved performance. An added benefit of this approach is that the overall build size will be less since specific code would be compiled depending on the architecture.

Mobile device info
Physics Calculations
This was the most expensive operation in our profiling. We tackled it in the following ways.
1. Decrease the number of joints – We had a few scenes which used a lot of character joints and hinge joints. That is how our chains were made. We decided to reduce it by increasing the scale of individual links and hence using fewer links which resulted in fewer joints.
2. Mesh colliders – Mesh collider is a costly component. If the scene is using a lot of them one should try to replace it with default ones (sphere, box etc.). In our cases the broken pieces of the cubes were using mesh colliders, we decided to replace them with box colliders.
3. Static colliders – Static colliders are a big no and one should avoid them in all possible ways. To quote unity’s documentation “it’s extremely inefficient to attempt to move static colliders, as it forces the physics engine to recalculate the physical world all over again.” Game objects without a Rigidbody component are considered as static colliders, so if we plan to move a gameobject which has a collider attached, make sure it also has a Rigidbody component.
4. Layer Collision Matrix – We should always use this and set it appropriately so that the collision detection is minimised. There are often many objects in the scene which are not affected by collision, hence we should not waste the processing time on those calculations. Use of appropriate layers for gameobjects and then setting a proper collision layer matrix is very important. This is how we set it up for Break It.
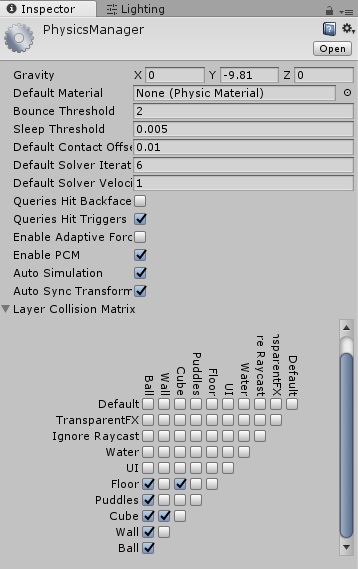
Layer collision matrix
5. Particle collisions – Our game uses a lot of particle effects and to be honest we do not require all of them to have collisions in the game. One should use particle collisions only when it is necessary and provides some value to the game. Also when using the collision, we should set ‘Collides with’ to appropriate layer so that it reduces the calculation.

Particle collision settings
In this game we needed to detect collisions for water drops from the ceiling (to create a ripple when they touch the puddle on the ground). However the dust and pebbles emitting from it (when the ball hits the wall) did not require any collision.
Rendering
The game relies heavily on the post processing stack and we could not compromise on that but we did find out a few things that could be tweaked in case of Break It.
1. Disabling shadows – The theme of the game is predominantly dark with contrasting glowing cubes. The ambient is mostly dark and hence we decided to do away with the shadows for they were not very prominent and visible.
2. Baked Lighting – We disabled realtime lighting and used only baked lighting for our scenes. Again since the scenes are indoors and in most cases, the ambient light is the only light source in the scene, the changes were not too drastic. But the performance improvement of baked over realtime lighting is significant.
Miscellaneous
There are a couple of other things we did to optimize the game.
1. Limit the target frame rate – We limited the frame rate to 30fps which works well for mobile devices and the gameplay is smooth. Also the vsync (quality settings) was set to off otherwise the vsync would override it. More info here.
2. Update – Minimise the code in the Update block. If possible loops and conditional statements should be taken out of it. And if not required one should remove the Update function altogether instead of just keeping it blank. In fact one should remove any monobehaviour methods which are not used (Start, Awake etc.).
Result Achieved
Profiler screenshots once the optimization was completed.
 Profiler after optimization
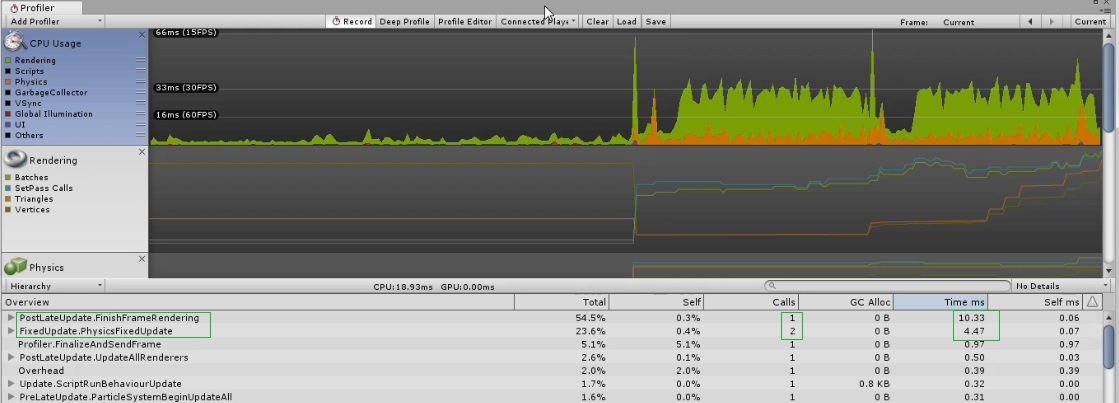 Profiler after optimization
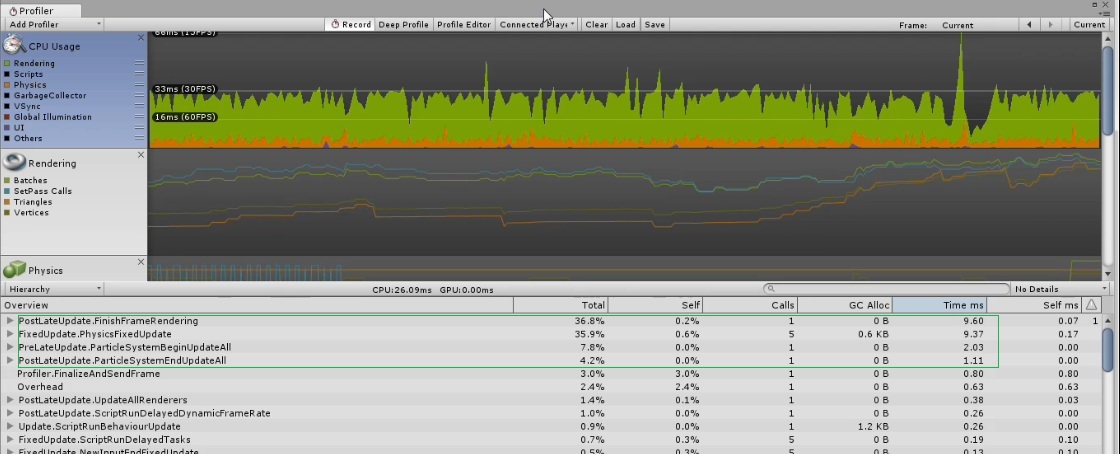 Profiler after optimization
Bonus
Decreasing the overall build size and the time taken to build is also very important. Though this does not affect the performance per se yet is an integral part of optimization of any game.
1. Uber Shader – With the new Unity post processing stack comes the Uber shader which really bumps up the look and feel of the entire scene. Break It is heavily dependent on it. We initially found the build size to be very large and it would take long time to build the game. Analysing the build logs we found that Uber.shader is taking up a lot of space. ~50% of the entire build size. The fix is to comment out the part of code for the features that are not used in the post processing profile. In our case we just used Bloom and Vignette. So we commented out the code for the rest and it drastically affected the build size as well as build time.
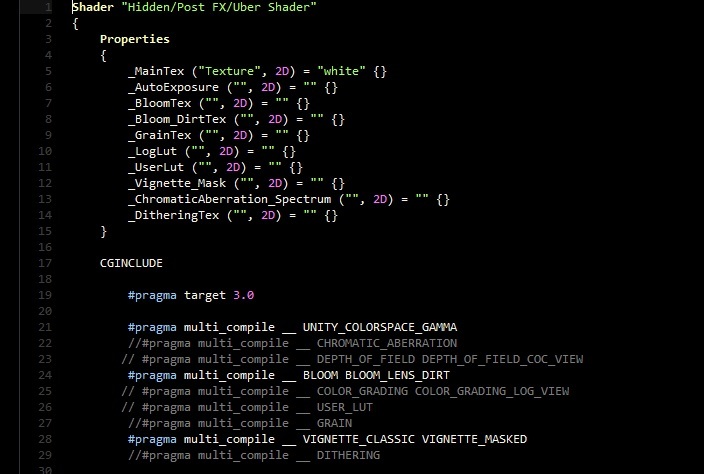 Non required code commented out from Uber.shader
2. LightMap settings – Mobile games generally do not require a high resolution lightmap. For most scenes the difference is negligible if we reduce the resolution and size of the lightmap. This speeds up the baking of the light drastically and a minor improvement in overall build size.

LightMap settings
I hope you found this article helpful. Your comments and suggestions are highly valued.
Suggested reading:


This comment is currently awaiting admin approval, join now to view.