[page=Tutorial: FPS Weapons Workflow]
Written & originally hosted by Game-Artist.Net ( Game-artist.net ), the community to grow as artist. Monthly contests, many tutorials and interviews with industry experts.
Welcome to an article on production work flow, more specifically, FPS weapons. This piece is geared towards Mod teams. What it will do is try to explain on how you can optimize your processes as well as help you in making the right choices, it is not an article designed to teach how to model, texture, animate or code weapons in any depth.
The modding community has two major restraints compared to professional studios:
- Time. Most people modding either have a day job or go to school. Modeling, texturing, animating, mapping, whatever they do, they have to fit it in somewhere between work and family, and that free time is often plagued with interruptions or other distractions resulting in fragmented & short spurts of work.
- Skill. This can be broken down further into two parts. On the first hand, the quality of an amateur's final product compared to time spent is on average significantly lower than that of a professionals. Second, the breadth of their skills is usually limited to 1 or 2 sets, which is why we often see teams recruiting “UV Mappers”, something which doesn't exist in the industry.
Taking this into consideration, you as Project Lead or Art Lead on a mod team need to make tasks available to your team as fast as you can as well as cut down on the time taken executing these tasks.
Below you will see two charts, the left depicts a typical mod work flow whilst on the right we propose an optimized variant.

When analyzing the typical model, the first thing which should jump out to you is the lack of flexibility. Everybody in the chain is dependent on the other and this can quickly lead to blocks when say your animator is going on vacation. Although he could have gotten his hands on the asset earlier, people somehow feel that the asset needs to be complete with all textures before it can be animated. This thought process where every task has to be done one by one is only in part applicable to what you are trying to accomplish here. You need to break out of this mentality and act upon the opportunities presented to you.
Let's take a look at the Optimized Process step by step:
1. Creating the 1st Person Model
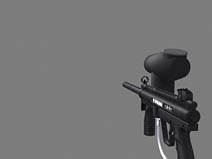
First thing you need to recognize is that a player is only going to see <40% of a weapon in first person view, so spend your time wisely and more importantly, on visible faces. Modeling non-visible faces is one issue which will not only waste time at the beginning, but as a result also waste time when unwrapping and creating a diffuse, spec, alpha, normal and if the occasion arises, a glow map. A modeler should understand or discuss what animations will be used before modeling. In addition, you will be able to use more polygon's where it counts (back of weapon, weapon sights, etc.). An example of eliminating non-visible faces can be seen below:
 In most cases you will find opportunities to re-use art assets, even for 1st Person pieces. This usually ranges from magazines to scopes/sights. Identify what these items are in your design document before beginning with production. For some assets you'll only end up producing the body of the weapon.
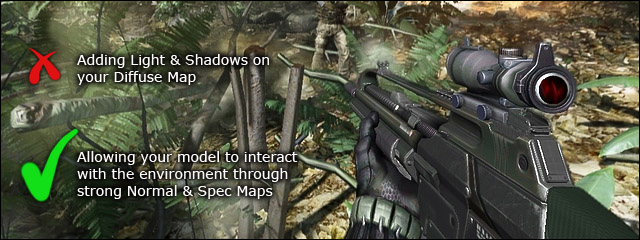
 Another aspect of 1st person models which is recommended are Normal Maps. We are all aware of what they are and how they work but do we really put them to use? You as artist have a decision to make here, do you want the texture artist working hours on end to get the lighting right on a diffuse texture map just so that it interacts incorrectly with lights in-game? Or do you wish to have players carrying a weapon which is an active part of the environment, reacting to all light sources? Beware that it can be a time consuming process with a lot of trial & error if the artist has little experience in this area.
2. First Distribution
Before the modeler unwraps his model, he can send it to the animator. UV or not, Texture or not, the elements and proportions of your model will remain the same. After all is done, your weapon will still be X units long and will still consist of a Body, Magazine, Trigger, Slide, Hammer, etc. So if it needs to go to an animator, do it now ! He/She might be going on vacation in 2 weeks!
In regards to unwrapping, the UV can now focus entirely on visible faces. This not only gives your texture a significantly higher resolution, but also means you can arrange your faces in a more meaningful manner which in turn results in less seams. You've just increased the potential quality of the texture whilst having spent less time!
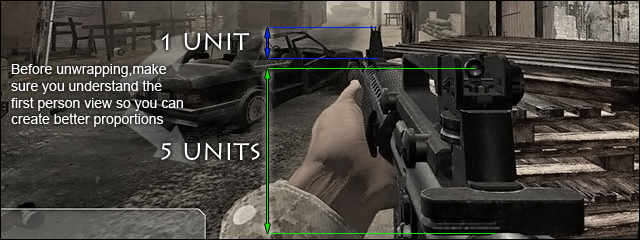
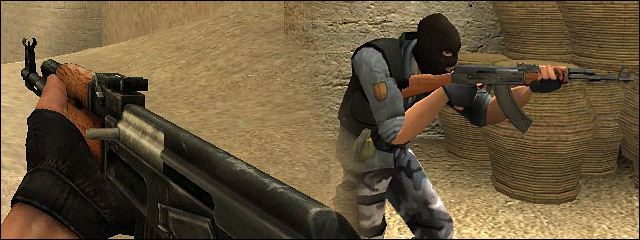
When unwrapping first person models, people often assume that a proportionate UV map is one which is equally balanced. This is technically correct, but the deciding factor is perspective and a first person view is extreme in that respect and has little to no flexibility. So balance your UV from the first person perspective. Take the example below, the front and back sight in real life are of equal height yet in-game the front sight is 5 times smaller from this perspective! Bad UV's can't save great textures, play it smart.
3. Second Distribution
At this point, instead of handing off the work just to the texture artist, you also want to get the coder in on it. With the Model and UV's in hand the coder can begin setting up the structures & hierarchies required to be able to import the file. Depending on how easily you can replace your import file with an updated model, you might even give it to the coder before the modeler unwraps it!
All of the above has been in relation to the 1st person model, it's now time to take a look at the 3rd person model.
4. World Model
Now that the Modeler has done his work and all other positions are working hard on their newly acquired first person model, we can put this artist back to work.
The world model or 3rd person model is of significantly less detail both in terms of model and texture. Whilst a 1P model can be 5000 Polygons and have a texture of 1024 x 1024 pixels, a 3P model will usually fall down to anywhere between 20%-50% of that value. Also take into consideration that that is for a full model, all faces are visible. A world model can be derived through many different ways. A simple method would be to take your 1P model, remove unnecessary detail, cut it down the middle and then mirror it to the other side. Weapons with a different other half can have the necessary details carved out of this reflection.
Once the modeler is done with this piece, they can pass it on as they did with the 1st person model.
The texture artist doesn't need to go out of his or her way to now complete this piece: taking high resolution orthographic renders with 100% self-illumination from the sides can be used to in a copy paste fashion in order to keep the style the same as the 1st person model. You can even apply the same technique to transfer your 1P normal map by projecting it as a diffuse map. This clearly gets more complicated if your weapon is full of curves which often isn't the case.
Closing remarks
Although the above shows you how you may optimize your processes, it takes more than that to really succeed in such optimizations:
- Coordination. Someone on your team needs to supervise & coordinate the timely and accurate execution of tasks. They have to be able to identify such time-saving opportunities, be able to look down the road 2 months in advance and make sure a suitable infrastructure is in place (Forums, Repository, FTP, Project Management tool, etc.).
- Quality vs. Quantity. As supervisor, make sure that quality reaches the level you require and stop there! Do not spend 80% of your resources on making the final 20% of an art asset perfect! Focusing your energy on creating assets which are accurate to the millimeter will result in a mod which will never release! Use your common sense and know when to say “Alright, this piece is done, let's move on”
I hope this article was beneficial to you and your team and that it will help speed up your production line. Mods are time consuming to build and require a lot of dedication, but don't make it harder on yourself ! Identify time saving opportunities and make use of them! Good luck!
Written & originally hosted by Game-Artist.Net ( Game-artist.net ), the community to grow as artist. Monthly contests, many tutorials and interviews with industry experts.
Image Credits:
Crysis (PC)
Insurgency - HL2 Mod
Counter Strike Source - HL2 Mod
Good stuff! I'm no artist, but I know smart advice when I see it, and this is smart advice :)
Same here, looks very professional.
Interesting article. I think it shows that Mod-Teams should start considering using some of the professional workflow methodologies that you see in other areas of Software Development. The first graph shows the typical waterfall model, the second model is more realistic (Rational or Spiral Model).
I've never been a member of a mod-team, although I'm hoping to get my modelling skills up to scratch by the end of this year so I can join one, and I will certainly be recommending that we follow the advice from this article.
Cheers !
...for any mod leader, especially if he doesn't know anything about any of the processes involved in modelling.
Very useful tutorial. Thank you.
I can use this, especially I'm right where I need to start modeling and animation. Thanks.
A very good overview and optimization!