Tutorial originally posted to Massassi.net. Mirrored here for archival purposes.
Rain
So, you want to add rain to your level? You should already be familiar with how to add entities to your level, and create a background. If you're here to learn about creating lightning, or other weather effects, turn back now! This tutorial will only be covering the following items:
- Extracting items from .gro files
- Adding the effect of rain into your world
- Adding sounds to your world
The first step you have to take is to make sure you have your skybox setup correctly. Once you're sure that your skybox will work, drag a world settings controller entity from your basic entities menu into your skybox (We will be placing all of our entities in the skybox for this exercise, simply because it's easier to keep track of what's happening where). Now, this is where it gets tricky. If you haven't already done this, pay close attention:
All of the game resources are kept in .gro files, which are just .zip files in disguise. Find your 1_00.gro file in your Serious Sam directory. Copy it, and then paste it in the same folder. Rename it to 1_00.zip. We're doing this instead of renaming the original file, because I discovered some errors with the serious Editor while attempting to do this. Now, open up your newly renamed file with winzip, and make sure that winzip classic is running. Browse through the list of items until you find RainMap.tex (the actual rain) and rain.wav (the sound of the rain we will implement later). Extract the two files into your Serious Sam folder. Each item will be automatically placed in its own directory, so if you have a few new folders, don't worry. You can now use your 1_00.zip file to extract any materials you will need in the future.
Now, go back into Serious Editor, select your world settings controller entity and in the properties pulldown select "Height Map (R)". Press the "..." button to bring up a browser. Locate RainMap.tex (it will be in textures/levels/Hatshepsut) and hit OK. Now to make the skybox recognize that it's supposed to be raining, simply select your background viewer, and in the properties pulldown select World Settings Controller. Choose your world settings controller, and deselect your entity.
Your skybox knows the rain is there, but now it has to wait until we tell it to rain. In your additional entities directory, pull out a storm controller. Place it somewhere in your skybox, and leave it there. The storm controller controls some advanced stuff like lightning, but it just has to exist, and be triggered for our rain to work. To trigger the storm, bring out a trigger entity from your basic entities list, and place it once again, in your skybox. Now, you can have many things trigger your rain, but for now, lets just stick with an auto start. Select auto start from the trigger pulldown and check it. For "Event Type Target 01 (G)" select "Start Event", and for "Target 01 (T)" select your storm controller.
Now your map will have rain when you start your level, but we all know that rain makes a sound, so lets give it one. Remember when you extracted rain.wav from your resource file? Well now it's time to use it. Pull out a sound holder entity, and in the properties box, select sound. Browse for rain.wav, which will be under the sounds folder somewhere, and double click it. Select Volume, and set it from 1-4, 1 being very quiet, and 4 being pretty noticeable. You won't be able to hear your sound if you aren't in range, so pull down "Fall Off", and set it to a high enough number that it will engulf the entire area where it's raining. The final step is to set your sound on looping, so pull down "looping" from the properties box, and check it.
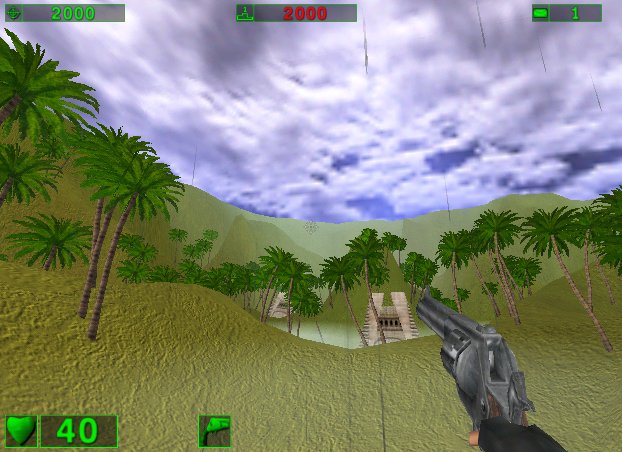
Now everything should be set, so it's time to test out your map. Hit 6 on your number pad so that full rendering is enabled, and test out your map. Voila! It's raining! If everything worked out, your level should be looking a bit like this:
NOTE: The fog and haze effects were not covered in this tutorial, but they do add a nice touch. For an effect like this, look up a fog or haze tutorial.
-Hoard