Download MCX Original - Mod DB

MechCommander 1 / Gold
Original campaign walkthrough
Operation 1 - Beachhead
Operation 1 - Mission 1 Original Mission 01/01
Mission Objectives:
+ Destroy the HQ and the Gas Tower at point Alpha (8.000 RP)
+ Destroy the three Garrison Buildings at point Beta (16.000 RP)
+ Destroy the HQ (20.000 RP)
* Capture Crate Group West (5.000 RP)
Maximum Tonnage: 85 tons
Maximum Units: 3
Artillery: 1 small
Logistic Phase: Deploy all 'Mechs you have, and assign Hunter, the MechWarrior with the highest Gunnery value to the FireStarter W, and "sell" Hawk, you won't need this "pilot". Assign Linx to the Commando W and Beast to the Commando A.
Combat Phase:You'll start above the three objective counters. Start to head left until you reach a road, and destroy the sport car just for fun (?_?...), and follow the road ahead toward the first objective; it will be guarded by two Armored Cars (a single PPC hit from afar will blow them). The first champ has a laser turret defending it, though you won't need to engage it. Coming from the North there is a ridge you can use to fire at the Tanker near the Gas Tower. This will blow nearly everything. If you need to finish off something, use the Firestarter's PPC to hit from a safe position. Then head North-West, toward the little peninsula. You'll find two J.Edgars guarding a container with 2 Lasers inside.
Now head toward the second objective; you'll need your Firestarter's PPC to disable the Laser Turret. Make Hunter fire from a safe distance. This should bring up the Commando A guarding the three garrison buildings. Concentrate fire on it, and don't bother to replay the mission if you don't salvage the 'Mech. After your first 'Mech to 'Mech battle, step into the champ and reduce all three buildings to rubble.
Now head toward the third and last objective. Destroy the turret near the area, the circle it to reveal an Uller W guarding the last objectives and some vehicles without crew. The Uller is a good piece of battlefield salvage, so try to hit its head or its leg. Engage it at short range with your Commandos first, then order your Firestarter to fire its PPC from afar. This should allow you to finish the Uller quickly. After this battle, destroy the small building near the vehicles.
Operation 1 - Mission 2  Original Mission 01/02
Mission Objectives:
+ Capture bondsmen prison-ban (6.000 RP)
+ Escort the APC to the extraction point (12.000 RP)
* Capture the Mobile HQ to reveal the prison position
Maximum Tonnage: 80 tons
Maximum Units: 4
Artillery: 1 Small, 2 Large
Logistic Phase: Just repair 'Mechs.
Combat Phase: The Dropship will position your three 'Mechs and one APC in a little forest in the northest part of the map. It is vital to guard the APC throughout the mission. Start by setting on fire a small number of trees. The APC carries a Laser, so use it to avoid ammo wastes. Now head left, and destroy all Armored Cars following you. Cross the brige, and destroy it. If you don't do it fast, other Armored Cars, J.Edgars and one Hollander A will be on you; as these units will follow you until you destroy them or they destroy you, heading left and destroying the bridge will keep enemies busy for the whole mission.
Now head south toward the last know position of the enemy's Mobile HQ. This vehicle will be guarded by a Striked and a J.Edgar; take out the Striker first, then maul the J.Edgar. During this battle, send one Commando or the APC to capture the Mobile HQ. There is also a container with 4 ACs in the area.
After you captured the vehicle, the area sorrounding the prison will be revealed. There are two Commandos, one W and the other A. Use your available artillery strikes to hit the Commandos. DO NOT place the artillery marks directly on the Commandos, or the artillery will destroy the prision. The large artillery attack should be enough to badly damage or even destroy both 'Mechs; after you hit the 'Mechs with artillery strikes, they'll begin to come after you (if still alive). Few well-placed shots, especially from the Firestarter's PPC, will destroy them. Now it is time to position the APC near the prison and escape to the extraction point. If you have enough armor left to fight the Hollander, three Armored Cars and one J.Edgar, position the APC near the trees sorrounding the point and move your 'Mechs toward the extreme East of the map. The Hollander might also be relatively near you, just pay attention to the contacts your MechWarriors report. Do not try to engage the Hollander at long and medium ranges, the Gauss Rifle can destroy your light 'Mechs with few shots; instead keep your 'Mechs close with the 'Mech, and ignore vehicles until you ahve destroyed it. Now finish off the vehicles, and coast along the small lake to find a warehouse with two Clan Streak SRM Racks. Now return to the extraction mark and be ready for the third mission.
Operation 1 - Mission 3 Original Mission 01/03
Mission Objectives:
+ Find the Raven (9.000 RP)
+ Escort the Raven to the extraction mark (9.000 RP)
Maximum Tonnage: 115 tons
Maximum Units: 4
Artillery: 2 Small, 3 Large
Logistic Phase: You should be able to buy a new Firestarter W and Siren, a good MechWarrior, will be available. Use her on the Commando A, and move Beast on the Commando W and Linx to the new Firestarter. Useless to say that you must repair all damages suffered by your 'Mechs. Deploy the two Firestarters and the two Commandos.
Combat Phase: You start in the west. Quickly capture the container (2 LRM Racks), the move your 'Mechs toward the forest to the North. Do not try to cross the bridge or get near it, several air strikes will reduce it to rubbles. Not enough a Saracen will try to fire at you with its long-range guns, so be quick to move your 'Mechs.
Begin to follow the road until you see some fuel tanks. Move all but one 'Mechs away from them, and keep this 'Mech at a safe distance from them, though it should be able to fire at the tanks. Two vehicles are patrolling the area, and the quickest way to destroy them is to hit on tank; the hockwave will destroy all other tanks and everything near them. Now move right. and climb the hill. Being at the top of the hill will reveal a small champ with two Commandos (W version) guarding two containers, and one Saracen patrolling the area. Use your two small artillery strikes to attack directly the Commandos. Now move near the trees east to the hill; the Commandos (it is unlikely that the two strikes will kill the 'Mechs) will begin to move toward you, like the Saracen mentioned before. Finish them, and move to capture the two containers (1 Large Pulse Laser, 1 Streak SRM Rack).
Now it is time to head to west, and locate the Raven. Your friend is shutdown, and you do not have access to Beagle Probes for now, so you must visually localize it, and approach it to start it up. The Raven you'll get (and will keep throughout the game) is a W variant, and is piloted my Mistyque, a good MechWarrior (not excellent, but can be useful on light and medium 'Mechs). Now you have to take her and the 'Mech to the extraction point. As the bridge was destroyed at the beginning of the mission, you must complete your clock-wise turn on the island. Before doing so, head west. You should have noticed vehicles patrolling the western part of the island, and in fact their are guarding some containers. If are good enough at calculating artillery's lag, use one large strike to destroy the Striker and the J.Edgar patrolling the area together, but be ready to engage other vehicles.
After this little detourn, return to head right, until you reach a paved road. Position your 'Mechs near the small island, and send one 'Mech (whatever...the Raven is the best, though this is going to be risky) where the road does a 90? turn; while you are doing so, to Commandos-J will begin to move toward your reinforced lance, but they will stop just before the road. The scouting 'Mech should be able to have a clear line of sight to the Commandos, or just have uncovered the map to place an artillery strike (a big one) very near to the two enemies. This attack will put the 'Mechs out of commission, though they won't be salvageable...continue to move right until your Raven picks up two unknow signals. Begin to move along the lake/sea's coast, until you find a small champ with 4 AC turrets and the relative Control Tower. Use one of your Commandos to capture the Twoer, then the small container (1 SRM Rack). Position all of your 'Mechs, except one within the champ's perimeter, and move the remaining one tworad the tow previous signals and when they begin to move, order your 'Mech to take position with the others. Thw two signals are 2 Firestarters-A, and the AC turrets will help to bring 'hem down. Have you did so, move on of your 'Mechs where the Firestarters were, and capture the large resuppling base (3 Heavy Flamers, 1 Pulse Laser, 2 LRM Racks, 1 Pulse Laser and 1 LRM Rack).
Now move all of your forces toward the lower left edge of the map, on the small hill; at the very edge of the map there is a small island connected with a bridge to the main area, sorrounded by fuel tanks. On this small islans there is a Mad Cat A, and your five 'Mechs won't be able to face it, even if you use the previously captured AC Turrets. To destroy it, place one Firestarter within effective PPC range near the first fuel tank, and use one other 'Mech to attract the Mad Cat away from its position, and let the Firestarter use its PPC on the fuel tank: the resulting explosion will destroy all other tanks, the Mad Cat and the bridge. It is also possible to simply issue an artillery strike on the bridge or directly firing on the fuel tank, but you won't get the kill mark for this Clan OmniMech.
Now it's time to destroy the Saracen patrolling the extraction zone, capture a container with one PPC inside and escape from this island by walking on the extraction mark.
Operation 1 - Mission 4 Original Mission 01/04
Mission Objectives:
+ Destroy Clan HQ (9.000 RP)
+ Retreat to extraction marker (12.000 RP)
* Defend allied supply base (7.000 RP)
Maximum Tonnage: 200 tons
Maximum Units: 6 (4/2)
Artillery: 3 Small
Logistic Phase: Repair your 'Mechs, and make all your wounded pilots to rest and buy Countess. From this mission, examining the map before entering combat is vital. You start in the upper-left edge of the map, and your objective is on the lower edge, near the horizontal center of the map; the HQ is located on a small island connected by two bridge to the land; the main bridge, in the south, heads directly to the base main gates, while the second, from the east, to a small plain near the south wall of the base. Between these two bridges there is a small hill. Other terrain features aren't important for the mission.
Combat Phase: You begin in the supply base you can defend. Though this is an optional objective, the RPs of this objective will be useful, and you won't have too much to do. If you deployed the Raven, its pilot will spot 5 contacts, 2 at the right an 3 directly in front of you. Move to intercept the two contacts, they are going after the base. As these contacts are Saracens, close quickly with them and hammere them away with short range weapons.
Now it's time to destroy the three contacts at the south; they are 2 SRM Carriers and one J.Edgar. Try to destroy them all now, or all retreating units will reinforce the enemy base defense force. Continue to follow the road directing south, and you'll find an Uller A; try to salvage it, then move toward East; there is also a small hill that allows you too see the northest part of the enemy base. From what you see, the Clan HQ is at its center, with fuel tanks and a power generator to its right. At its left there is a crew barrack, one Bulldog without crew and one Striker (active). Though it would be easy to destroy the HQ with the artillery strikes, use one of the strikes on the fuel tanks; this will destroy a portion of the perimetal wall and the power generator. Without this generator the laser turrets sorrounding the base won't be active. Then use the second strike on the crew barrack (the bulldog won't be activated) and the third on the Striker. Continue to move toward east until one of your MechWarriors spot 3 contacts, then head toward them. Destroy the 2 SRM Carriers and the single J.Edgar, and cross the nearby bridge. Once you have stepped over the small island, several (about 10) Armored Cars will swarm you. This attack will pose some problems, as the Cars won't stop to move to hit your backs; do not order to all 'Mechs to attack a single Car, but instead order a single 'Mech to engage a single Car; this will allow you to destroy the group faster. Now take care of the previously hidden Striker, and then of the remaining Uller A. Try to salvage it. Now the base is free of enemy presence, except the inactive Bulldog. If you want destroy it and capture the two containers (4 SRM Racks, 2 ACs, 2 Sensors-Basic); destroy the Clan HQ and return to your base.
Operation 1 - Mission 5
Original Mission 01/05
Mission Objectives:
+ Defend both farms (45.000 RP)
Maximum Tonnage: 240 tons
Maximum Units: 10 (4/4/2)
Artillery: 5 Small, 1 Large
Logistic Phase: I hope you salvaged at least one Uller in the previous missions. Repair your 'Mechs and buy Hitman and Scarab. Buy a Minelayer too.
You start in the upper-right corner of the map; to reach the first farm proceed in a straight line; for the seond, turn left at the first farm. Both farms are sorrounded by forests which limit movements and access points, except a wide area on the second farm's north side. On the upper edge of the map there is a small champ with some containers defended by vehicles, but do not try to capture it if this is the first time you play the mission. Not so far away, on the west there is a railroad.
Combat Phase: Start by mining the road where you start, and move all of your 'Mechs except two to the second farm. After the minelayer finished in mining the road, move it to the small passage between the two forests, and mine the sorrounding are, passage included. If you aren't fast enough to mine this are 4 Saracens will begin to fire at your minelayer. If this happends, move the minelayer to the second farm, and let the Saracens walk on the mines. If something survives, finihs it off with the two 'Mechs guarding the first farm, and them move all 'Mechs in the second farm's area, which is under attack by four Condors.
Near the second farm, on the east, there is a small passage, which will be used by enemy vehicles, usually 2 LRM Carriers; send you minelayer to mine the area, and then move it to the big cultivated area, and begin to mine it, especially where the trees form a natural passage between the farms and the other parts of the map. While you are doing so, to SRM Carriers will attack the first farm, but if you mined the areas I told you, they won't be a trouble. Returing to your minelayer, when the LRM Carriers begin to close and/or when you spot an Hunchback A and two SRM Carriers, move it to the second farm and mine the are sorrounding the farm. Your enemies will begin to step on the mines: the LRM/SRM Carriers will be destroyed at the first contact, while the Hunchback will need some mines to go down; hopefully, it will be badly damage when it will reach the farm; to engage it, fire your long range weapons as many times as you can, and if it closes on your 'Mechs, keep them moving.
Now it's time to repel an attack by two couples of light 'Mechs, nominally a Cougar A with an Uller A and an Uller W and a Firestarter A. The attack directions and timings of these couples differ slightly, though the will attack from the railroad, and will come after your 'Mechs and the second farm. Note that these 'Mechs will try to "engage" the farms instead of your 'Mechs, so you'll have to jump from target to target. After these four 'Mechs have been destroyed, the mission is finished.
Operation 1 - Mission 6
Original Mission 01/06
Mission Objectives:
+ Destroy all 'Mechs defending the industrial complex (10.000 RP)
Maximum Tonnage: 350 tons
Maximum Units: 8
Artillery: 1 Small
Logistic Phase: For this mission you'll need at least one medium 'Mech. If you salvaged the Hunchback in the previous mission, replace all damage equipment, and buy a new Centurion (maybe a W variant). Repair all 'Mechs and assign your best pilots to the medium ones. If you captured the Mad Cat during the third mission (or installed the Mad Cat patch, whihc gives you a Mad Cat A for free...), deploy it immediately, the mission contains 7 'Mech and more than 10 vehicles, and they are not Armored Cars. This mission is staged on a small peninsula: you start in the south and your obejctive is in the north. There are two roads which goes directly to the industrial complex, and there is a concrete wall acting a guard point before the real wall sorrounding the complex. On the right you have some hills, but if you haven't jump-capable 'mechs you won't be able to move on them. On the right there is a forest. Intelligence reports that a Clan captain piloting a Catapult is in the area.
Combat Phase: It is foolish to force the two blockades: turrets and vehicles will make your life very difficult, and you need all of your weapons and armor for the industrial complex. Begin to enter the forest, and follow the ideal road that the trees create. You may need to set on fire some trees. Be careful, this way is the most secure, but it has few pop-up turrets. When you spot a clearing, you will notice rectangels with the same colors of the background, though their perimeter is clearly visible. Have your 'Meches fire when these turrets are still hidden; theorically you need only to destroy three of them.
When you leave the forest, you'll be on the west-most part of the wall closing the industrial complex. All the perimeter is guarded by AC Turrets, but you won't need to destroy them, there is the possibility to capture them and use for your mission, but you must first penetrate into the perimeter. Destroy the two nearest turrets with long and medium-range fire, the destroy two section of the wall, and send the fastest 'Mech you have to capture the Control Tower. This will bring on your side the remaining turrets, but not all. Now six vehicles, two SRM Carriers, and four J.Edgars will begin to attack you, but won't be a real problem. After this skirmish enter the perimeter and move along the wall to reach the main gates (on the right). Quickly dispatch the Rommel tank and the Striker. The Rommel has an AC as short-range weapon, so pick it out with long-range weapons, then close with the Striker and send it to its creator (Kali Yama Weaponries, Vehicle Dision...ah ah ah ah...ehm ?_?...).
Capture the Gate and Turret Control towers, and group your 'Mechs near the barracks, but not so close, try to keep a safe distance from the fuel tanks. Two Harraser will try to attack you, but the closed gates and the turrets will blown them, so turn your attention to the several contacts near the objective counter. These contacts are 6 Firestarters (5 W variants and a single A). Send the fastest 'Mech you have to lure these 'Mechs into a trap: once they are near the fule tanks, fire at them and destroy/damaged them with little effort. Finish the 'Mechs with concentrated fire.
Now it is time to destroy the last 'Mech, a Catapult A, patrolling a hill on the northest edge of the map, piloted by the Clan captain. Once again, send your fastest 'Mech near the contact, and let the Catapult fire one LRM volley; this will reveal the map sorrounding the firing position, eventually giving you a place where setting your only artillery strike. Place it near the two other vehicle contacts, this will destroy the Catapult's close-range escort. Now move all your 'Mechs to engage the Catapult; it is foolish to try to start a long-range fight with it, whatever 'Mechs you have. Move on the hill (the access ramp is located on the north side), and slug its armor with close-range weapons. If you have only light 'Mechs this battle will last for a while, but with a Centurion and other medium 'Mechs (who said Hunchback?) you'll get the upper hand faster. Congratulations, you have just finished operation Beachhead!
Operation 2 - Skyhook
Operation 2 - Mission 1
Original 02/01 - Op2 Start
Mission Objectives:
+ Escort the Hunchback IIC to the extraction marker (25000 RP)
Maximum Tonnage: 150 tons
Maximum Units: 4
Artillery: 4 small
Probes: 1
Logistic Phase: Repair your 'Mechs, and deploy the light and medium 'Mechs you have. Enemy opposition won't be so strong to require heavy 'Mechs. The map has a river running through it from north to south, with two bridges: the first (coming from the north) is unprotected, while the second has a wall section protecting it. Near the extraction point there is a small paved area.
Combat Phase: You begin on the left shore, while the HunchBack IIC A piloted by Falcon on the right one. It is imperative to get the Hunchback with your lance ASAP: as you move the captured Clan 'Mech formations of 2 vehicles (usually Harrassers or Condors) will try to stop it; the Hunchback IIC has a large-bore AC, but it won't have enough ammo to destroy them all. Begin to move your lance toward the south, and try to keep your 'Mechs on the left side of the map, to cross the hills and avoid enemies. After half a minute begin to move the HunchBack IIC toward the first bridge.
Now you 'Mechs (the ones you deployed) should have picked up vehicle contacts:
the first bridge is guarded by one Aerospace Spotter and 4 Harrassers. Use one or two of your artillery strikes to take care of them, especially of the Spotter. Now move the Hunchback IIC across the bridge, and be sure to destroy the second Spotter it will encounter. Once all your 'Mechs are on the same shore (the left one), destroy one bridge section and return on the hills, and proceed south, toward the extraction marker.
Once you reach the second bridge, use one artillery round to destroy the Strikers and the fuel tanks. Ignore the Rommel tanks, they will stay there.
Continue to head south, until you see the small paved area I mentioned in the logistics phase. This paved area contains three 'Mechs (two Hunchbacks W and one Hollander A) and two tankers. Try to ignite all fuel tanks in the area by using your artillery rounds on the four pressure tanks; if you are lucky, the round will arrive when one tanker is between the pressure tanks and the smaller fuel tanks (at the south of the base), destroying or badly damaging the 'Mechs in the area.
Now move in and finish all 'Mechs. If you didn't blow the smaller tanks, just wait until the first Hunchback and the Hollander are near them, and destroy one fuel tank with a direct hit. If the 'Mechs don't explode, be sure to engage the Hunchback first, from medium/long range, and keep your 'Mechs moving. If the Hunchback IIC still has rounds for its Heavy AC, send it to destroy the Hollander while the other 'Mechs fight with the enemy Hunchback. Now you have to fight the other Hunchback.
Once all 'Mechs have been destroyed, explore the paved area: you'll find (near the river) some warehouses with 2 Flamers, 2 Light Ultra ACs, 4 LRM Racks, 3 Clan Streak SRMs, 1 Clan ER Laser, 2 Sensors Standard. Once you have finihed capturing enemy supplies head to the extraction marker.
Operation 2 - Mission 2
Original 02/02
Mission Objectives:
+ Destroy all power generators (10000 RP)
+ Retreat to extraction marker (5000 RP)
Maximum Tonnage: 200 tons
Maximum Units: 4
Artillery: 2 small, 1 big
Logistic Phase: Deploy medium and heavy 'Mechs only. You won't need fast 'Mechs for recon duties. The terrain of this mission features some hills and a single river which divides the map into two areas: the first, and the biggest, features your main objective and the majority of the enemy units; the second area has the extraction marker, and it's connected to the main part with a long bridge. The area is fitted with perimetal sensors.
Combat Phase: You'll start near a road. Follow it until you spot 2 vehicle contacts. These two vehicles are Bulldog heavy tanks, and you can take them out with concentrated long-range fire. Shortly after, or during the battle with the Bulldogs other four vehicles, 2 Strikers and 2 Harrassers, will reach your 'Mechs. Dispatch them too, and continue along the road until you reach a passage formed with two forest sections. Follow this passage until you reach four vehicles guarding a container; the vehicles are two SRM Carriers and two Strikers; the container has 2 Pulse Lasers inside.
Now proceed right, through a nearby passagge (formed by forest sections) to an other small supply base, this time guarded by a single Harrasser; destroy it and capture the three LRM Racks inside the container. Now return on your steps, and continue along the road until the terrain turns from grass to sand: from this point, bgin to move near the forest on the lowest edge of the map, until you see some ridges; among these ridges there is a natural ramp leading toward an hill. Climb on that hill: this will reveal a small vehicle supply base with five vehicles: 2 Bulldogs, two Strikers and one Harraser; all of these vehicles are inactive except one Striker. Use one small artillery strike to desstroy the active Striker and then destroy the barrack containing the vehicle pilots with long-range fire.
Now return on the road you was following, and be sure to move near the hill, or you will step over a minefield. Moving in this way should expose you to a single sensor only. By following that road, you'll enter the main enemy base from the west, the side with less enemies: you'll encounter 1 Bulldog and one Striker, backed by three AC turrets. You can easily pick them out with long-range fire.
Move past the destroyd turrets, and capture the Control Tower; this will bring the remaining three turrets located on the north side of the base. These turrets will also take care of the Bulldog and the Commando A. You may need to fire a salvo or two to the Commando.
Continue to proceed right: you'll find two vehicle repair bases and one HQ. Destroy the repair bases, and capture the HQ: this will reveal positions of two other small supply bases, one on the main continent, near the other two, guarded by a Centurion J and the second near the extraction marker, guarded by 2 Harrasers and one Bulldog. Use your large artillery strike on the Centurion (do not place the counter directly on the 'Mech, or you'll destroy the container) and the remaining small strike on the vehicles. The container guarde by the Centurion contains 1 Flamer, 2 Streak SRM Racks and one sensor-Intermediate. To reach the last supply base, you have to enter a road between two forest section, and it is mined. Use medium- and short range weapons to fire on the terrain. You can recognize by the small cans positioned at the beginning and at the end of the minefield.
You will reach this area at the end of the mission, however, so let's return to the previously captured HQ: continue to head right: your MechWarriors will spot a 'Mech contact guarding the power generators: this 'Mech is a Catapult W, but won't fire until you are very near, so you won't have to worry about its LRM launchers. Once you have destroyed it, capture the nearby warehouse (1 PPC, 1 Clan Gauss Rifle, 1 Flamer and 1 Clan Streak SRM Rack) and destroy the power generator.
Now head to the bridge, and take care of the two vehicles guarding it, a Rommel and a LRM Carrier.
Once you land on the island, you'll be assaulted by 2 SRM Carriers, one Bulldog and one Hunchback J. Try to move the battle near the upper-right edge of the map, where several fuel tanks awaits only one shot to destroy your enemies with ttheir shockwave.
Folow the paved road until you reach the Clanner's barracks, and destroy the five Elementals, then mve into the base and conquer 2 Pulse Lasers, 2 Flamers and 1 SRM Rack inside a warehouse.
Now head to the last supply base (the one guarded by the three vehicles, described above) and then to the extraction marker (you'll need to destroy the trees around it).
Operation 2 - Mission 3
Original 02/03
Mission Objectives:
+ Destroy the convoy (30000 RP)
Maximum Tonnage: 300 tons
Maximum Units: 8 (4/4)
Artillery: 2 small
Probes: 1
Recon: 1
Logistic Phase: Deploy medium 'Mechs and Clan heavies if you have. You'll need both firepower and speed for this mission. The map has a river running through it from north to south. The river forms an arc few meters from its ideal beginning, and its ideal end divides itself into two smaller rivers with a small island between them. on the left shore there is a city in favour of the Clan government, and it is possible that people in it will try to stop you.
Combat Phase: You have to destroy a convoy composed of 6 truks plus one tanker, at the end of the convoy. It is escorted by two Hunchback IIC J, one Cougar J, an Aerospace Spotter at the head of the convoy and other vehicles, mostly Rommel tanks and Strikers.
Quickly move all yur 'Mechs away from the shore, or enemy's jump-capable Hunchback IICs will attack you. Though deploy jump-capable 'Mechs can be a good idea, keep in mind that they should have at least a medium/short jump distance, and probably you'll have very few 'Mechs able to reach to other shore jumping.
In this phase you can also fire your two artillery shots trying to it the convoy vehicle; targeting the 'mech is quite uneffective, as the Hunchback IICs' armor is too thick and the Cougar is too fast to track it. Place the recon camera at the possible end of the river, to reveal the final part of the convoy's route or on the city or on the island between the two rivers' branches.
Keep moving south until your 'Mechs pick up several vehicle signals: these contacts are at least eight Savannah Masters waiting for you. Do not order all of your 'Mechs to engage a single vehicle, and order a single 'Mech to engage one vehicle at once. Continue to move south, and when you encounter a sensor tower, destroy it ASAP: this will allow you to move with more stealthness. The tower is guarded by a group of vehicles: 1 Aerospace Spotter, 2 Strikers, 2 Bulldogs and 1 Harasser: engage the Aerospace Spotter first, then go after the Bulldogs then the Strikers and finally fight against the Harasser.
Continue to head south one more time: you should now reach the city: on the right there is a vehicle contact, but do not attack it: it's a minelayer, and you risk to step over a minefield if you try to attack it. Move on the west side of the city, and try to engage the fewest vehicles you can: you'll need all your armor for the end of the mission. At the beginning of the city there is a storage depot eith one Heavy AC and a Gauss Rifle inside it. The city is lightly garrisoned, with only a LRM carrier guarding the center.
Outside the city there is a contact with a sensor circle: it is not a 'Mech, it's a Swiftwind, and it's useless to attack it. on the south of the city you can see some fuel tanks: do not destroy them, they won't destroy any vehicle, but will destroy a warehouse.
Move past them, and capture the three warehouses with 2 Heavy Flamers, 3 Pulse Lasers and 1 Large Laser inside them.
Proceed along the paved road and destroy the Bulldog and the two Strikers guarding the access to the bridge leading to the other shore.
Cross the bridge, and be sure to have one of your medium 'Mechs leading the way: on the small island before the other shore one Bulldog and 2 Strikers will wait you. Once you have dealt with them, finish to cross the bridge and begin to head north when you see a small road. Proceed until you find two ridges coasting the road, and place your 'Mechs on them. Burn one section of trees on one ridge, and place your 'Mechs there.
Wait until the convoy arrives: immediately destroy the Aerosapce Spotter, then concentrate on the convoy vehicles, and ignore escorting vehicles and 'Mechs. To destroy the convoy and maybe damage/destroy its escort, target the tanker at the end of the convoy.
Patch 1.9 note: even if the train is destroyed, the mission won't end until all 'Mechs and vehicles are destroyed.
Operation 2 - Mission 4
Original 02/04
Mission Objectives:
+ Destroy all Smoke Jaguar HPGs (25000 RP)
Maximum Tonnage: 400 tons
Maximum Units: 8 (4/4)
Artillery: 2 small
Probes: 1
Time limit: 15 minutes
Logistic Phase: For this mission, deploy at least one heavy and four medium 'Mechs; light 'Mechs aren't strictly needed, though they can help. Note that this mission must be completed within 15 minutes; you have to move across a dense city and penetrate in an heavily defended Clan base and destroy the two HPGs in it. The area is fitted with perimetal alarms, and the north and south areas of the city are mined. The whole area is sorrounded by forests. Be sure to deploy some LRM-equipped 'Mechs.
Combat Phase: You start in the west. Move along the road, and destroy the sensor on the left and continue until you see the first houses. Begin to circle the city in a clockwise order: enter from the west and destroy the alarm and the SRM Carrier you'll see. Capture the nearby warehouse (2 Heavy Flamers, one Beagle Probe) and move toward east. Near the center of the city there are several vehicles backed up by an Uller J. Pick out the LRM Carrier with long range fire (primary LRMs...you pilots aren't smart enough to move in to use other weapons...) and wait the Uller. It should attack you with Light AC shells, and won't pose big problems: the place where the Uller is is relatively open, and your pilots will be able to fire with direct-fire weapons such as Lasers and PPCs. It's safer to engage it from long range, to keep the nearby Rommel out from the battle for now. After the Uller, use the same tactic with the Rommel.
Now continue moving toward south: you'll find a warehouse (2 Streak SRMs, 2 Intermediate Sensors) guarded by an Elemental point (5 battle armors). Then move east, and destroy the alarm tower and the LRM/SRM Carriers protecting it. There is a Cougar nearby: though it has LRM Racks, don't worry, you 'Mechs will destroy it even in a LRM slugfest, but it's better to move into direct line of sight to criplle it faster.
It is time now to move out the city, and begin to plan the assault to the HPG station. This station is heavily defended by an other Uller J, an Hunchback IIC A, AC turrets all along the perimeter and a large vehicle continget.
Circle the outer walls and begin your attack from the north, by destroying the turrets on this side. You should also be capable of seeing behiond the medium wall sorrounding the base (at least for the side you are): there is an LRM Carrier and one of the five turret Control Towers of the base: pick them out from your position: this will power up the Uller J: pick it out with massed long-range fire too. After you destroyed the Uller the Hunchback IIC will power up: guess what kind of tactic you should use against it? Massed long-range attacks, of course. Do not let it come too close, or its Heavy AC will cause you problems. After the Hunchback, destroy the gate control tower: the vehicles inside the base will attack the gates, revealing themselves: place both artillery strikes on them, and destroy some wall sections to enter the base:
the best position is the norther angle of the base, which has no vehicles and a turret control tower very near: it is better to take out control towers than trying to capture them for this mission.
When you step in the base, all remaining vehicles will come after you: most of them are LRM Carriers and Strikers, though there are few SRM Carriers and Rommel tanks: destroy the SRM Carriers first and then close and destroy all remaining vehicles. Now capture the two warehouses in the base (worth 3 Pulse Lasers, one Standard Sensor, 1 ER Large Laser, 1 Light AC and 1 Advanced Sensor), destroy/capture the remaining turret and gate control towers (two gate towers for the two HPGs; turret towers are 5 in total) and destroy the two HPGs.
Operation 2 - Mission 5
Original 02/05
Mission Objectives:
+ Destroy the train (45000 RP)
Maximum Tonnage: 240 tons
Maximum Units: 8 (4/4)
Logistic Phase: Nothing much to say. Deploy a good number of medium 'Mechs with fast weapon cycling (Pulse Lasers, ACs). The map has a railroad across it from east to west and two big hills, each on one side of the road, and both are high enough to reveal big portions of the map. There is also a very small river near the railroad, and there is a bridge south of your starting position. The train travels twoard west and it's composed of one locomotive and other 10 cars; none of these cars is explosive.
Combat Phase: You'll start over the hill north of the railroad. You can notice three Hunchbacks J near you. They shouldn't have noticed you due to their limited sensor range, and if you want you can attack them; these three 'Mechs will rendez-vous with the train and its escort (three Ullers A), so having one or two of them down will help when you reach the train.
Now move toward the bridge (you can deirectly see it): there are 5 Rommels (3 clearly visible and 2 hidden, but you will pick their contacts): quickly dispatch it and move across the bridge and move toward the other big hill. Climb the hill to its top: this will reveal an other great portion of the map. Once you have reached the top, move toward the railroad few meters.
Now wait for the train. Once the first Uller is within weapon range, fire a salvo of long-range weapons. If this doesn't destroy it, do not mind, and quickly destroy the train's locomotive: this will stop the other cars; ignore all 'Mechs escorting it, and keep your 'Mechs moving to avoid enemy fire and in the meanwhile target the remaining cars. Once the train is destroyed, the mission is finished.
Patch 1.9 note: even if the train is destroyed, the mission won't end until all 'Mechs (the Ullers and the Hunchback IICs) are destroyed.
Operation 2 - Mission 6
Original 02/06
Mission Objectives:
+ Capture Clan HQ (16000 RP)
TIME LIMIT: 6 minutes
+ Defend captured HQ (16000 RP)
Maximum Tonnage: 400 tons
Maximum Units: 8 (4/4)
Artillery: 2 small, 2 big
Logistic Phase: For this mission you should have at least two heavy 'Mechs with long-range weapons. Other 'Mechs should be within 45 tons; you'll need armor protection and firepower for this mission.
The HQ you have to capture is in the south-west, guarded by several AC turrets and other vehicles and 'Mechs. The hill where you start will allows you to directly see the Clan base and part of its garrison force. Other parts of the map will be useless to you, but there are two sensor towers you can use to detect incoming enemy forces.
Combat Phase: Move toward the base. Remember that you have a temporal limit of 6 minutes to capture the HQ. Approach the base from the east: this will alert two of the three Rommels and the single Uller W protecting it; do not destroy turrets on this side, you'll need them later.
After you destroy the three enemies, move toward the north side of the base:
there are tow access ramps: one in the north-east corner of the base, and the biggest, in the center of the norther side. Use the second ramp, destroy the two turrets and access the base. There should be the third and last Rommel garrisoning the base, so pick it out.
Now move to capture all structures inside the base: the HQ first, the sensor control tower (will bring online the two sensor towers in the north and east side of the map), the 2 turret control towers and the five warehouses containing 2 Large Pulse Lasers, 1 Heavy AC, 2 PPCs, 3 Clan ER Medium Laser, 1 Pulse Laser, 1 Light AC and 6 Clan Streak SRMs.
After you captured the HQ, enemy forces in the area will begin to move to destroy it: the first group of enemies is composed of three Strikers, coming from the north.
The second is a mixed 'Mech/vehicle group with two Commandos J and four Harassers. With the base AC turrets on your side and your medium/heavy 'Mechs this base will be very easy.
The next two attacks will be staged by couples of 'Mechs. The first two 'Mechs you'll see will be two Hunchbacks A from north-east. Try to use one small and one big artillery strike to reduce their armor, and wait them in the base. Let the turrets attack the 'Mechs first, and then fire with concentrated fire on a single 'Mechs at time.
The second couple of 'Mechs is composed of the Hollanders J, from the east. For these 'Mechs is better to move out the base and engage them at short range.
Last, but not least, three Centurions W will come from the east; return to the base, and let the turrets engage the 'Mechs first. You can also fire the remaining two artillery shots to make your job easier.
Operation 3 - Vanguard
Operation 3 - Mission 1
Original 03/01 - Op3 Start
Mission Objectives:
+ Escort two ambulances to extraction marker (10000 RP)
* Escort five ambulances to the extraction marker (25000 RP)
Maximum Tonnage: 150 tons
Maximum Units: 4
Artillery: 4 small
Recon: 1
Logistic Phase: Mhm...with such a limited weight you have to deploy light and medium 'Mechs only. Three mediums will work fine, though this will limit your movement capabilities. You are going to hate thids mission, though.
There is a paved road where the ambulances (5) will move on, and will follow it until they reach the friendly base, located in the upper-left corner of the map. The road runs through a city and a small lake, though there's no bridge:
the road is built on a small portion of land running through the lake. Intelligence reports that a Vulture is in the area.
Combat Phase: To ambulances will begin to move 10 or 15 seconds after the start of the mission, and won't stop to move even under fire. Begin immediately by moving your 'Mechs along the road. Some meters after your start position three jump-capable 'Mechs (J variant), a Commando and two Firestarters will attack you. Try to destroy this 'Mechs ASAP, you'll need to rush: two Aerospace Spotters wait for the convoy near the first bend. After these two vehicles, two Rommels will try to stop the convoy: near them there is a small hill: climb it to reveal a mobile HQ: if you have fast 'Mechs, try to capture it: this will reveal a container with two Ullers (one A and one W variant) in the lower-left corner of the map: place to artillery strikes on them, and place the recon camera near the friendly base, slightly to the south: the Vulture W position will be revealed, and place an artillery strike directly on it.
You should be now near the first two bends: detroy the three pop-up AC turrets and then move into the city and destroy the 10 Elementals in it. There is an other container on the north of the city (2 Large Pulse Lasers); be sure to capture it.
Move out of the city, and position your 'mechs on the ridge on the north of the road, and move: this will allow you to destroy a LRM Carrier with direct fire weapons; now head to the ridge on the other side and destroy a second LRM Carrier trying to ambush the convoy.
There is an other threat to destroy: a Cougar W is rushing from behind: move one or two 'Mechs to engage it, and try to place an artillery strike on his path; the Cougar slows down when enetering the path protected by the pop up turrets, and do not follow the road when inside the city.
Now you should be at the bend leading to the base: move to engage the two Ullers, and capture the container if you have a fast 'Mech or the convoy os relatively behind you.
Return on your main path, and destroy the two Armored Cars blocking the way.
After these cars, group your 'Mechs and begin to move toward the base: it'snow time to face the Vulture. The best tactic to use against this 'Mech is to quickly close distances, and duke it out at short ranges. After this 'Mech has been destroyed, wait until the remaining ambulances (at least two) reach the base.
Operation 3 - Mission 2
Original 03/02
Mission Objectives:
+ Destroy two Industrial complexes (4000 RP)
+ Destroy Major Piotrev's unit (20000 RP)
+ Destroy primary power generator
Maximum Tonnage: 300 tons
Maximum Units: 8 (4/4)
Artillery: 1 small
Recon: 1
Logistic Phase: Deploy medium and heavy 'Mechs only. The map has the industrial complexes in its center, and on the south the power generator. There are three sensor towers in the lower part of the map, linked to the sensor control building in the main enemy base. Near the cost there are two paved areas. The enemy main base is sorrounded by hills, while the power generator by woods.
Combat Phase: Begin to move south near the coast: you'll find a mobile HQ protected by 2 Strikers and one AeroSpace Spotter. Quickly disable the mobile hQ's escort and then capture it: this will reveal the enemy base. Continue to head south to reveal a second paved area with one warehouse (2 Large Lasers). You should also be able to see the forest sections on the south side of the base contaning the power generator. Burn some sections and destroy the wall, enter the base but DO NOT destroy the generator. Take care of the 5 (three on the east and two on the north sides) AC pop-up turrets and move out of the perimeter.
Move in a straight line from the generator's main gates toward one of the hills sorrounding the main base: there you'll find two Ullers (one W and one A variant). As they powerup when you're near them, you'll probably be able to destroy one of them before it can fire back. After the Ullers, go after the two Cougars W coming from your rear.
It is time to begin to pick out main base defenses: there are 5 Condors, 1 SRM, 1 Saracen and three Ullers (two A and one W) in total, plusa pletora of LRM and Laser turrets. The base has hardened walls circling it. Three Condors are patrolling the base outside the walls, while the Ullers inside. Begin to pick out the Condors patrolling the base, but stay outside from LRM turrets' range and try to attract the Ullers outside the base.
Now send one of your 'Mechs to destroy the power generator, and move the remaining ones inside the base, and destroy all remaining enemies inside.
Capture all structures in the base, but do not destroy the industrial complexes. The base contains 2 'Mech Repair Hangars (capture them immediately and reapir your 'Mechs), 4 turret control towers (capture them, and do not destroy any turret, especially on the west side), one warehouse with 1 Ultra AC and 3 Clan Streak SRM Racks inside and one sensor control building. After you captured the first building, Major Piotrev's unit will begin to move in: this unit is composed by 5 'Mechs, four JagerMechs (two J, one A and one W) at full strenght and one Awesome A at yellow armor conditions; they enter the map from the lower-left corner, and will walk toward the gates on the west sside of the base. Use you recon camera to spot them, and place the only artillery strike on them; try to target the Awesome, the JagerMechs aren't good in close-range fighting and their thin armor will collapse if you didn't destroy the turrets outside the base.
To engage this assault Star, place you 'Mechs on the upper-left corner of the base, and order to fire holding the position until the first Jagermech will fire back. Then the battle will become a free-for-all; eventually you'll made it.
After you destroyed Piotrev's Star, repair your 'Mechs and then destroy the two industrial complexes to end the mission.
Operation 3 - Mission 3
Original 03/03
Mission Objectives:
+ Capture 4 trucks (10000 RP)
+ Capture 7 trucks (20000 RP)
Maximum Tonnage: 300 tons
Maximum Units: 8 (4/4)
Artillery: 2 small
Probes: 2
Logistic Phase: You'll need fast 'Mechs for this mission, though an heavy one won't hurt. Assign four 'Mechs to the first group. and be sure that all of them have at least a top speed of 20 m/s. Assign all other 'Mechs to the second group. This time deploy medium 'Mechs, you'll need more firepower than speed for this group.
The map has a river running from west to east, and has two bridges: one on the upper-right corver of the screen, and the second opposite of the first. Near the second brdige there is a paved area.
Combat Phase: Your 'Mechs start in norther area of the map. Use your two probes and place one on the right and one on the upper side of the map: now you can see where the vehicles and their escorts start.
Here's a little description of the three convoys (7 vehicles in total): the first starts from east-south-east and will travel to west to reach the second bridge: it this convoy there are 2 trucks, escorted by a Hunchback A, an SRM Carrier and a Rommel. The second convoy starts from the same position but will take the first bridge and then proceed west to cross the paved area; this convoy provides 2 trucks, one Cougar W, one Striker and one Rommel. The third convoy (3 vehicles) starts in the uppe-right corner of the map and willmove toward the upper-left corner. It is escorted by two Cougars W and one Rommel. Move your first group toward the second bridge: you'll find some turrets plus the appropriate control tower: capture it and destroy the turrets protecting the warehouse (3 Pulse Lasers, 2 Standard Sensors). Now cross the bridge and at the bend of the paved road turn east: you'll encounter the convoy: destroy the escort first, then capture the two trucks.
Head back to the paved area, and wait for the second convoy. Move your second lance (F2) toward the third convoy (simply move on an ideal horizontal line toward east), but not too much: it is beeter to explore the area a bit and then return to your original position: you'll may want the support of your first lance for the last part of the mission. The secod convoy will arrive in about half a minute: destroy the escort and capture the two trucks.
Now the primary objective is completed; you can complete the secondary one by moving your first lance near the second one a wait for the third convoy:
quickly destroy the escort as soon they enter visible area, then capture the last third trucks. If a truck exits from the map area, and you captured at least four trucks, the mission will automatically ends.
Operation 3 - Mission 4
Original 03/04
Mission Objectives:
+ Capture enemy HQ (10000 RP)
TIME LIMIT: 15 minutes
+ Escort prisoners to friendly base (10000 RP)
+ Protect friendly base (10000 RP)
Maximum Tonnage: 425 tons
Maximum Units: 8 (4/4)
Artillery: 1 small, 1 big
Probes: 1
Logistic Phase: Deploy heavy and medium 'Mechs only. Though the resistance in this mission is composed of light 'Mechs and vehicles, you'll need some serious firepower to destroy them quickly. Deploy at least six 'Mechs.
The map is set on a hilly country wich will limit movement capabilities of both sides, though there are several "roads" running through the hills. Your base is the east, while the enemy prisoner champ is in the west.
Combat Phase: Both lances begin in he base's perimeter; your base is protected by 4 AC and 2 LRM turrets. Move the first lance and leave three 'Mechs to protect the base. Move your assault force toward the enemy base by placing them in the "road" in the lower edge of the map. By doing so, you will already know what kind of terrain the APC containing the prisoners will use to reach your base: this "road" passes through the small forest in the south of the map, so be sure to cross it with your 'Mechs.
The road will be free of enemies if you took the right one, except a recon group composed of two Cougars A and one Uller W just outside the forest.
Outside the woods there is a small hill with its top outside the map, but explore it: you'll need this later.
By now, 2 Ullers J and one Cougar J will attack your base: destroy them with the 'Mechs you keep near your base.
Continue to move toward the enemy base: two Rommels will try to stop you, like 2 other Cougars J. Once you're near the enemy base, you'll notice 2 Lase turrets with a Rommel backing up them. Destroy the Rommel first, then go for the turrets.
Move past the turrets, and engage the remaining enemy forces before capturing the HQ that will free the prisoners. There are 3 Bulldogs and three 'Mechs (one Uller W, one Uller J and a Cougar A) protecting it. Try to keep a these 'Mechs relatively stationary and place one big artillery strike on them. Now move into the champ, destroy all turrets and capture the warehouse (2 Clan ER Lasers, 1 Extended Sensor); before capturing the HQ, move the slowest 'Mechs in your assault lance outside the base, nad have the fastest capture the HQ. Move your second lance in the forest your 'Mechs visited before, and destroy the strike group attempting to destroy the base (2 Rommels, one LRM Carrier and 4 Savannah Masters).
Once the HQ is captured, an APC containing the prisoners will depart from it and will try to reach the friendly base. New groups of enemies will appear from outside the map, trying to stop the convoy. The first group is composed of four vehicles, one AeroSpace Spotter and 3 Saracens, coming from the small hill I told you to explore. They will station for half a minute or so awaiting the APC: place the small artillery strike on the Spotter, and use your 'Mechs to take care of the remaining Saracens.
Now it is time to repel the attack of three Ravens J coming from a ridge near the forest: use your second lance to destroy them, and have your first lance destroy one other AeroSpce Spotter coming from the east. As the APC reaches the base, the mission is over.
Operation 3 - Mission 5
Original 03/05
Mission Objectives:
+ Protect firendly HQ (20000 RP)
* Protect Sensor array (2000 RP)
* Protect northern power generator (1500 RP)
* Protect southern powert generator (1500 RP)
Maximum Tonnage: 400 tons
Maximum Units: 8 (4/4)
Artillery: 4 small
Probes: 1
Logistic Phase: Heavy and assault 'Mechs only. Be sure to use at least one Heavy AC on assault 'Mechs and a good number of LRM-equipped 'Mechs. As you begin the mission, one minelayer and 2 Pegasus hovertanks will help you.
Nothing much to say about the map: the base you have to protect is in the center, sorrounded by sensor towers; there is a small hill on the right.
Combat Phase: Immediately move your 'Mechs IN the base, near the two repair bases and have one of the Pegasus to scout the sorrounding terrain, especially the west area and the hill on the right. Mine the entire north area of the base and the terrain outside it. After the first Pegasus finished its recon, move both vehicles near the sensor array and let the minelayer mine the west area.
The first attack will come from east, by 4 jump-capable Firestarters. They'll jump directly into the base, where your 'Mechs are waiting.
The second wave will composed of 3 Cougars W and 2 Ullers W, plus one Centurion W and 3 Hunchbacks W, coming from the hill on the bases's right. The light 'Mechs will try to destroy as many turrets as possible and some wall sections, to enter the perimeter. Combined fire from the turrets and your 'Mechs should be able to stop them before doing serious damage, but the Centurion and the Hunchbacks will pose a great threat: they'll destroy the walls first, then will begin to enter the perimeter.
While you're dealing with these forces, 6 Rommels will approach the base from the north, bu if you mined the area, their life will be short. Remember that you have tow Pegasus hovertanks to use if the Rommels pass the minefield.
After this wave, you'll have a short period of peace where you can repair all of your 'Mechs; after you did that, move on the west side and be prepared to fend off the last attack.
3 Hunchbacks W, 2 Catapults W and 5 LRM Carriers will try to destroy the turret control towers and the nearby fuel deposit, so go out from the base and engage them before they can deal serious damage. If you mined the area, the vehicles won't be a problem, and the 'Mechs will be damage. Engage the Hunchbacks first, and then the Catapults.
Operation 3 - Mission 6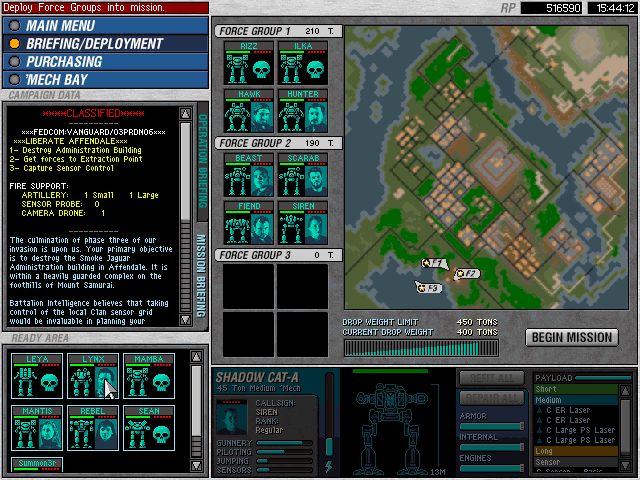
Original 03/06
Mission Objectives:
+ Destroy Clan Administartion Building (25000 RP)
+ Retreat to extraction marker (5000 RP)
+ Capture Sensor array (10000 RP)
Maximum Tonnage: 450 tons
Maximum Units: 8 (4/4/4)
Artillery: 1 small, 1 big
Recon: 1
Logistic Phase: Deploy heavy and assault 'Mechs as main force, but one fast 'Mech with one ECM suite will help. Be sure to keep this 'Mech away from combat, however.
The map has a city in its center, and your objective is on the west, protected by an hardened wall and a lot of vehicles and 'Mechs. The Sensor array is between the city and the objective. There are two islands on the south, and the Clan citadel is on a isle. There are two bridge, one from the south and one from the west.
Combat Phase: You'll begin in the lower-left corner of the map, in the extreme west. Move toward the city until you see the first houses, then move right until you spot four 'Mech contacts. Use your recon camera on them: there are four Jagermechs (two W and two A) protecting a small depot. Use your large strike on them, and after the attack, the four 'Mechs will begin to attack you. Destroy them and the two Catapults W coming from the north to reinforce their friends.
Now move into the depot, capture the repair base and dock, then exit and return to the city, where two Strikers await their fate.
Do not move toward the sensor base for now, but take the paved road heading east: two Catapults will try to destroy the bridge connecting the isle to the mian land: destroy them ASAP and do not let them destroy the bridge. Move on the conquered island, destroy the three LRM Carriers and capture the warehouses containing 2 Light ACs and 2 Basic Sensors.
It is now time to destroy the power generator in the depot were the Jagermechs were, and head toward the sensor array: destroy the 2 Catapults W and capture everything in it, including the turret control towers; some Jagermechs protecting the admin buildings may decide to come after you. Wait one or two minutes before leaving the base, and go toward the two Catapults A; destroy them from long range, and then head toward the repair base, dock with it and approach the enemy stronghold from the south.
2 Strikers are guarding the entrance, and after you entered the perimeter, 5 Jagermechs W will attack you. On the right there is a power generator, but it is better to keep the active, capture the nearby control tower and use them against the Jagermechs.
Now move north to find the admin building (ignore it for now) and a warehouse (one Guardian ECM and 2 Flamers). Ignore the turrets and the control tower, they won't hurt you in any way.
Return to the admi building and begin to climb the hill: there are one Mad Cat W, 4 Bulldogs and 2 Hunchbacks A protecting the extraction marker. Place the remaining artillery strike on the Mad Cat and them move to engage all remaining forces, Bulldogs first.
Move to the repair base, dock, return to the admin building, destroy it and go to the extraction marker.
Operation 4 - Linchpin
Operation 4 - Mission 1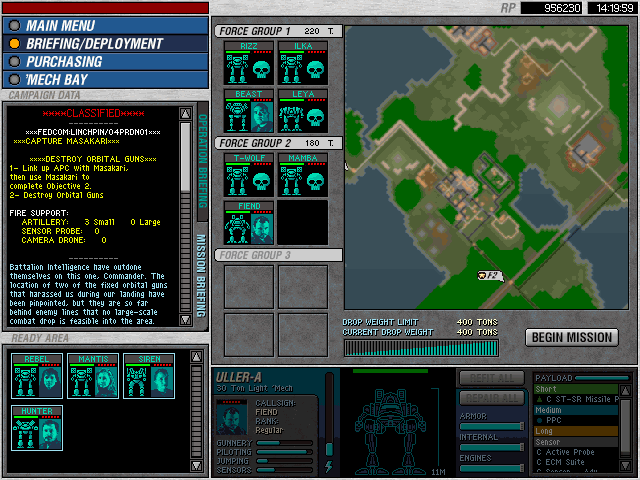
Original 04/01 - Op4 Start
Mission Objectives:
+ Escort APC to the Masakari (2000 RP)
+ Destroy orbital guns (18000 RP)
Maximum Tonnage: 15 tons
Maximum Units: 1
Artillery: 3 small
Logistic Phase: You need a vehicle there. Even a Swiftwind will work fine, as the APC has a laser, though the ideal is a Pegasus hovertank.
The map has a city in its center, and you start on the west, your objective in the north-east, while the Masakari is on the east.
Combat Phase: Immediately move your two vehicles along the road, and when you see an hill, climb it: there's a small vehicle base with 3 Harrasers and one AeroSpace Spotter guarding the road, so you need an other route to reach the city. MOve toward the water, and move aslong the coast, and when you passed the champ, get into the city. During your travel an AeroSpace Spotter and a Swiftwind will notice you and will begin to stalk you, like all other units in the area.
In the city there are 6 Elementals, plus one other Swifwind and an other AeroSpace Spotter. Do not try to fight them, your vehicles will be destroy in seconds. Instead, try to head toward the Masakary: you'll road will beblocked by trees. Put them on fire with a single weapon hit (the APC's laser will work) and while the fire does its work, continue to escape from your enemies. When the road is free of obstacles, exit from the city at full speed and do not worry about your stalkers: they won't follow you.
Head for the Masakari: there are 3 Saracens and one Condor protecting it, but you should be able to get the APC near the Masakari. After your MechWarrior, Firestorm, activates it, destroy the four vehicles, capture the repair base and dock if necessary. Though the Masakari is a J variant, YOU'VE GOT THE POWER!
Now begin to move toward the orbital guns. Climb the hill, and you'll be able to see the vehicles guarding it: there are several LRM Carriers, Condors and Saracens, but the artillery strikes on the most populated groups will do fine. Finish them with your new Masakari and enter the first perimeter. One Rommel with two Ullers J are waiting for you. Disable the vehicle first, the go for the Ullers.
Before destroying the guns, move near the ridge on their norther side, destroy the two AC turrets and the turret control tower, jump on the ridge and capture the warehouses (4 LRM Racks, 1 ER PPC). Now head back to the repair base, dock, and then destroy the orbital guns.
Operation 4 - Mission 2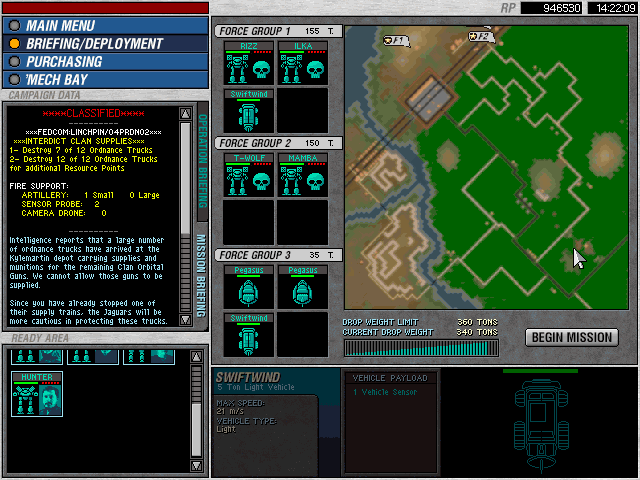
Original 04/02
Mission Objectives:
+ Destroy 7 of the 12 supply trucks (22000 RP)
* Destroy all 12 trucks (15000 RP)
Maximum Tonnage: 360 tons
Maximum Units: 12 (4/4/4)
Artillery: 1 small
Probes: 2
Logistic Phase: You'll need at least six 'Mechs with a minimum speed of 18 m/s. If you can, deploy a light 'Mech with one ECM suite. Half of your forces will be F1, while the other half F2 or F3.
In this mission, F1 will begin at the north of the base, on a hill, while F2 and F3 on its east. The whole area is covered by trees, except few roads and a small river on the left.
Combat Phase: Begin by ordering F2 to destroy the perimetal sensor and the pop-up turret near their positiom, and if you have the ECM equipped unit in this unit, move it near F1 and move your first lance near the bridge on the west. Keep F2 where is it.
The base is well protected by LRM turrets and has four 'Mechs inside: one Hollander W, one Hunchback IIC W, one Firestarter A and one Cougar W, plus three Rommels, without crew, near the barracks.
Once you've positioned your lances, place the only artillery strike you have on the Rommel's crew barracks: this will also destroy a truck. After the artillery strike hit, the alarm will sound and the trucks will begin to move: 4 will try to reach the bridge on the west, just where F1 is. Other four trucks will try to escape from the southern gates of the base, and if you have a third lance, place it near the gate and wait for the trucks. The other four trucks will try to escape from the east gate, where F2 is: two trucks will follow the road, but the other two will turn to south.
Though completing this mission in all of its objectives will bring you a moderate number of RPs, I reccomend to ignore the second group of trucks (the one escaping from the south gate) and capture all buildings inside the base, especially the warehouses: here is it whta you'll find: 2 Standard Sensors, 1 Clan ECM Suite, 2 Ultra ACs, 1 ER Large Laser, 2 Pulse Lasers, 2 Light ACs and 3 Clan SRM Racks.
However, if you want to track down the trucks after this, head south from the base at your maximum speed: the trucks from the south gate will head toward the lower edge of the map, in the center, while the other two trucks (the ones from the east gate which turned south) will exit the map at the lower-right corner of the map.
There are several forces on this map, including LRM Carriers, one Cougar J, one Firestarter W, one Centurion W and one Hunchback IIC W.
Operation 4 - Mission 3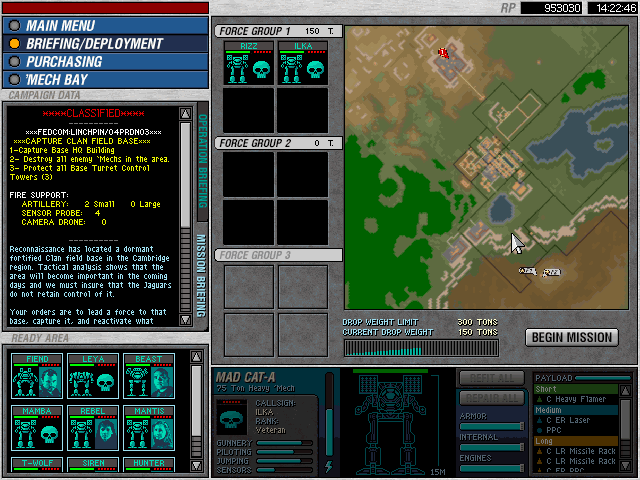
Original 04/03
Mission Objectives:
+ Capture the HQ ( RP)
+ Destroy all 'Mechs in the area ( RP)
* Protect all turret control towers ( RP)
Maximum Tonnage: 300 tons
Maximum Units: 8 (4/4)
Artillery: 2 small
Probes: 4
Recon: 1
Logistic Phase: Deploy 6 fifty tons 'Mechs. Heavier 'Mechs, with their limited number, and light 'Mechs, because they're light, won't be effective as a group of Hunchbacks and Hunchback IICs.
The map has the base on the north, while you start on the south. In the middle there's a city, and there are only to ways to reach the base. One is protected by turrets, while the other is free of stationary defenses. You start on a small hill.
Combat Phase: Immediately move your 'Mechs toward the turret-protected road:
from the lower-right edge of the maps 5 Hunchback IICs (all W configuration) and 3 Swiftwind will begin to move toward the base. Engaging them now will be pure madness, wait to capture the base. The other road is protected by 6 Von Luckers and 4 LRM Launchers, and will lead you toward the city, protected by Condor hovertanks and LRM Carriers.
Use one artillery strike on the first turret control tower, and use your recon camera to reveal the other, and use your second strike on it, then move past the turrets and head toward the base.
DO NOT enter the city, or the vehicles will begin to follow you, and having more enemies at the end of the mission won't be a good idea.
Once you've reached the base, destroy the gates and capture all buildings in it, except the HQ. The warehouses contain 3 Clan Streak SRM Racks and 2 Large Pulse Lasers.
Now the Hunchbacks should be at the base's gates. The LRM turrets will damage them, and if they enter the base, use your 'Mechs to repeal the attack. Be sure to keep all turret towers online. After you repelled the Hunchbacks, repair your 'Mechs and wait for the 'Mechs coming from the upper-right corner of the map.
Let the LRM turrets attack the 5 Ullers J, and finish them with your 'Mechs only if they enter the perimeter. Now it's time to take care of the three Vultures (two A and one W); they should have destroyed most of your turrets, and engaging them won't be easy: try to repair as many 'Mechs as possible, the move out and engage them at short range to negate their advantage over long and medium distances.
After all 'Mechs have been destroyed, go to the repair bases, dock and then capture the HQ. If you want, go to the city, destroy all vehicles, capture the warehouses inside it (4 SRM Racks, 2 Large Lasers, 5 Pulse Lasers, 2 PPCs, 1 Advanced Sensor, 1 Beagle Probe, 1 Guardian ECM), then return to the base, repair and capture the HQ.
Operation 4 - Mission 4
Original 04/04
Mission Objectives:
+ Capture all industrial complex (10000 RP)
+ Defend the captured complex (10000RP)
+ Destroy all enemies in the area (15000 RP)
Maximum Tonnage: 480 tons
Maximum Units: 10 (4/4/2)
Artillery: 1 big
Probes: 6
Logistic Phase: Deploy heavy and assault 'Mechs only. Be sure to have at least one unit equipped with an heavy AC.
The map has the industrial complexes (2) on the north, a small hill on the upper-right corner of it plus a small city. There is a small river partially dividing the north part from the south one. Near the river, on the east there is a paved area protected by an hardened wall.
Combat Phase: You start in the south; on the right there is an hill. Climb it, and this will reveal 2 Lokis W and two Thors W proceding to the industrial complexes. Engage them now, and do not waste the artillery strike attempting to hit them.
Now follow the paved road until the bridge; cross it and you'll reach the repair base. Dock with it and then head north-east, toward the hill on the upper-right corner.
Climb it. You'll notice that some enemy forces are entering the area: in sequence, one Loki A, 2 Firestarters J, one Bulldog and one Von Lucker, a Loki A, two Hunchback IICs (one W and one A) and finally a Thor W.
After you destroted these reinforcements, head toward the city (just follow the railroad) and capture the three warehouses (1 ER PPC, 1 Gauss Cannon, 2 Pulse Lasers) and try to reveal the units protecting the industrial zone without powering them up, and place the artillery strike directly on them. They'll move to attack you. The group of 'Mechs protecting the base consist of at least 8 Firestarters (most J variants) and 4 Hunchback IICs (two A and two W).
After these 'Mechs immediately move into the industrial zone and destroy the four Von Luckers and the three Bulldogs threating the two complexes. If they destroy even one of them, the mission won't be completed and you'll have to play it again. Before capturing the two industrial complexes, be sure to repair your 'Mechs and to capture the eight warehouses in the industrial zone (2 ER Large Lasers, 1 Large Laser, 2 Flamers, 3 Pulse Lasers, 3 LRM Racks, 2 Streak SRMs).
There is an other way to attack the industrial complex: after you visited the city, head back to the starting position, and head north, this time passing from the west. You'll engage the vehicles first, and then the 'Mechs; there is a major drawback however: the enemy 'Mechs outnumber you, and they'll go after the complexes first, and with such a large number, they'll destroy them in seconds.
Operation 4 - Mission 5
Original 04/05
Mission Objectives:
+ Destroy all 'Mechs in the area (20000 RP)
Maximum Tonnage: 500 tons
Maximum Units: 10 (4/4/2)
Artillery: 3 small, 4 big
Probes: 2
Logistic Phase: Only heavy and assault 'Mechs, with a good number of high-power long-range weapons.
The first two lances will begin in the east part of the map, while the third (only two 'Mechs) can be deployed on the west. Deploy two assault 'Mechs with a good speed (18 m/s) here, and the rest as F1 or F2. The east and north parts of the map have dense forests on them, while the west one is desert with a lot of hills and ridges. A river runs through the whole map, and in the east-south-east there is a paved area.
Combat Phase: Begin by moving the F3 'Mechs on the hill at your right to reveal a bridge. Place them near it and have you remaing 'Mechs reach F3 as fast as you can. 5 Cougars (2 A and 3 W) will cross it; destroy them all, and do not let them escape.
After these 'Mechs, place your 'Mechs in the valley on the west, near the city, but in the sand area: the 'Mechs coming from the extreme west (first four Jagermechs, 2 A and 2 W, and then four Lokis, 2 A and two W) will try to escape by taking the road leading north.
Before dealing with these 'Mechs, however, place one big artillery strike on the bridge from where the Cougars came when the four Catapults (using the same vector used by the Cougars) are near them. The first has to be placed at the beginning (the part near you) and then at the end, to trap the Catapults on the bridge; if you are fortunate, these attacks will kill some 'Mechs too.
It is now time to attack the Jagermechs: do not try to intercept them with your artillery strikes, it is better to try to stall them and place an artillery strike directly on them. While you're dealing with the Jagermechs, the Lokis will try to escape: make th first 'Mech of the line fall, and the go after the 'Mechs standing still as the fallen 'Mech tries to regain its feet. Be sure to destroy them all before going after the remainign Jagermechs: the Lokis will try to escape, while the Jagermechs attacks you.
If you where able to trap the Catapults, you may want to visit the paved area at south-west: it is protected by two sets of LRM turrets with two control towers, and the single container has 3 Intermediate Sensors and 3 Streak SRMs inside it.
Operation 4 - Mission 6
Original 04/06
Mission Objectives:
+ Destroy Orbital Gun alpha (7500 RP)
+ Destroy Orbital Guns beta (15000 RP)
+ Destroy Orbital Guns charlie (22500 RP)
Maximum Tonnage: 560 tons
Maximum Units: 8 (4/4)
Artillery: 3 small
Logistic Phase: Heavy and assaut 'Mechs only one more time, with a good mix of long and short range weapons.
There are three areas with orbital guns in them: one, sorrounded by forests, the second, on an island and a third on a highlands. There are several small hills, plus a small river, sorrounding the island where the second guns are.
Combat Phase: You'll begin near a small hil, on the west. Climb it and destroy the three LRM Carriers nearby. Continue west and destroy the two other vehicles, Von Luckers tanks. Capture the container they were guarding (2 Light ACs) and go for the small hills, at north-east.
After you climbed them, you'll see how the first and the seconds guns are protected, plus a small paved area and 4 vehicles (2 Bulldogs and 2 Von Luckers).
I reccomend to go for the second area first: it is protected by 3 Von Luckers, 2 AeroSpace Spotters, 1 Vulture J and 2 Thors W (plus four LRM Carriers standing still). Try to take out one AeroSpace Spotter first, then go after one Von-Lucker and the Vulture; if you attack not from the bridge, but from the east, the Von-Luckers will block the bridge, allowing you to place one artillery strike on the remaining units; if you are fortunate enough, this strike will take out the remaining vehicles and damage the two Thors; destroy with your 'Mechs all remaining forces, cross the bridge and cripple the LRM Carriers. Capture the Sensor Control building and then the two Reapir Bases. Do not destroy the guns (there are tow guns, one north and one south from the Sensor building) for now, and repair your 'Mechs before going for the first objective.
Before attacking the first orbital gun, destroy the tanks protecting the container (2 Pulse Lasers).
To attack the first area, place two artillery strikes on the four Von Luckers on the east, and attack from the west, where several tankers are.
Go near the tankers, and the force protecting the gun, three 'Mechs (one Vulture J and two Atlases A) and 2 AeroSpace Spotters, will begin to travel toward you. Fire at the tankers to destroy as many units as possible and then destroy all remaining enemies.
Destroy the gun and the Mobile HQ (this will reveal the base previously visited).
Now return to the base for repairs and head south-east to find one container (two Clan ER Lasers) guarded by the usual 2 Von Luckers and 2 Bulldogs. Now proceed in the opposite direction to find the last paved area, this time with 3 Von Luckers and two LRM Carriers; the container has 3 Streak SRMs inside. It is time now tho head for the contacts sorrounding the third place: the four contacts you see are four Atlases (all A variants). After these 'Mechs, repair one more time and begin to approach the objective: the first thing you'll encounter is a perimeter composed of perimetal sensors and pop-up LRM Turrets forming a very thigh circle. Destroy two or three sensors and turrets, and then go for the two Thors A. After these two 'Mechs destroy the two Orbital Guns on this hill, go for repairs the last time and destroy the remaining guns.

Do you want to play it?
Download MCGold.iso and mount it (more MC download in the description)
Download MCG Original pre-installed gamefolder (and start game from here while iso is mounted)
or try MCG Darkest Hours Free Fullversion by RizZ
Beginner's Guide
Player's Guide
Install instructions
Keyboard controls Manual