Tutorial originally posted on Jediknight.net. Mirrored here for archival purposes.
Level Editing Oasis
by Jeff Walters
I've spent most of the past month furiously creating levels like a madman and have learnt a ton of new stuff. Some of this has already been used extensively in levels, but for the newbies out there - here's how to do add some really cool and easy features to your levels :-
Weapon Traps
Now lets take a look at how to create a weapon trap like the thermal detonator trap in Narshadda Loading Terminal. Changing the TD trap to a Mine trap or a concussion rifle explosion trap (like in Cardia) is very easily done by changing the template used in the COG - but we'll look at that later. First lets just make ourselves a normal switch activated TD trap.....
Ok, to start with - let's make the switch. Simply cleave a switch and pick one of the many switch textures like 00T_4.MAT, etc.Once that's done all you need to do to finish the switch is to set the face's Surface Flag to 6 so that 'Used in Cog' is selected. Setting this flag is critical in making any switch. Failure to do so will often cause big probs. Finally remember to jot down the Sector and Surface number for the switch face which will be used later.
Next, you'll need to add four (in this example) Things that will specify where the TD's will be generated. Typically 'ghost' objects are used here - but there's no rule against experiementing with other objects. So if you want the TD's to drop down into a corridor - place the four Things near the corridor's roof. Once these Things are placed - quickly jot down there numbers.
Now, time to add the COG. The COG file for the TD trap is located in JK's Multiplayer mission GOB. So load jk1mp.gob into ConMan and extract the file m2_dettrap.cog into your JED project directory. Then flip back into JED and add it to the Placed Cog list. You'll notice that this COG uses 8 different variables -
switch - enter the Sector and Surface numbers for the switch here (eg. 56 3)
tdg1-tdg4 - these four variables are the four points where the TD's are generated (or spawn spots). So enter their thing numbers here.
rounds - this specifies how many waves of TD's are generated at each of the spawn spots. For example set this to 3 and 12 TD's will be generated (in 3 sets of 4)
rate - this variable is the gap between each round. So if you had 2 rounds and a rate of 2, then when the switch is activated 4 TD's would drop and detonate and would be followed 2 seconds later by the second round.
delay - this specifies how long it is after the trap has sprung that it can be used again. so if you set it to 120 - the trap could only be used once every two minutes.
Once all that is set - you're finished! Ok, now let's take a look at how to change the TD trap to a mine trap, etc. Below is an extract from m2_dettrap.cog. The bit circled in red is the only thing you'll have to mess with to change the trap to a different type of weapon :-
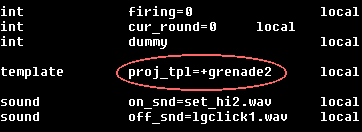
Here's an example - changing +grenade2 to +seqchrg2 will result in mines dropping into the corridor example above instead of TDs. This mine template is the secondary fire one and so the mines would arm themselves once they hit the ground (this trap is seen in Cardia 2.0). There are dozens of different traps you can make by just messing with this template variable.
One idea I used in Cardia 2.0 was to put the spawn points at ground level and use a weapon explosion template to create a very deadly explosion trap. The template I used was +conc_exp, but there are many different types of explosion templates that can be used. This cog file (m2_dettrap.cog) has since proven to be one of the most interesting I've come across. I strongly recommend that all serious level authors check out this file, as it's potential is endless.
Sector Thrusts
Ok, so what are sector thrusts? Using sector thrust COG basically makes it so the player will be pushed in a certain direction when a sector is entered. This has been seen in many add-ons so far like Frag Factory, Cardia 2.0 and Jedi Sanctuary. Unless you want to do something tricky like link it to a switch or detach the player from the ground, then the COG file to use for this effect is 00_sectorthrust.cog
To add this COG, go into the Placed Cog screen in JED and click 'Add Cog'. You will find 00_sectorthrust in res2.gob. Once it's selected and in the Placed Cog list you'll see that the COG requires a bunch of values -
vec0(vector) - This controls the direction of the thrust
speed - strength of the thrust, and
sector0 -> sector7 -these specify the numbers of all sectors you want this specific thrust to be used in. You don't have to enter sector numbers in ALL of these. If your sector thurust only effects four sectors, then just enter their numbers into the first fout slots and leave sector4 -> sector7 as -1.
Ok, you will most likely be looking at the box for vec0 and thinking, "Huh, what's this format?". In the vec0 box you'll see the default value as (0.0/0.0/0.0) and the format is basically (X/Y/Z). Still confused? Well, here's an example. If you set the vecotr(vec0) to (0.0/0.0/1.0) then the direction of the thrust would be straight up (ie. +Z). If the value was (0.0/1.0/0.0) then you would be moved sideways across the ground in the direction of +Y....if you had -1.0 instead then you would move in the opposite direction. You can also mix values - for example (-1.0/0.0/1.0). This would move you -X and also straight up (+Z). Pretty easy aye? The range of values (as you've probably already guessed) is from -1.0 to 1.0.
Cameras
Though cameras are a terrific effect - they are actually also exceptionally easy to use. The COG file you'll need to make a camera is called c3_cameraff.cog and is located in the GOB for JK's CTF levels. So just load jk1ctf.gob into ConMan and extract it into your JED project directory. Then add it to the Placed Cogs list. You'll see that the COG uses the following variables -
console - all this variable is is the number of the Thing that will act as the trigger (eg. usualy a console object, but doesn't have to be)
camera - this is the Thing number of the camera. Whatever object you specify will be your POV (point-of-view) when the camera is triggered. Be sure to aim and align this object so you get the view you want. I usually use 'ghost' objects as cameras, but there are no rules :)
delay - this value simply specifies how long the player will stay at the camera's POV. Remember not to make this too long or the player maybe killed by the time they are 'returned' to their normal POV.
Done. Now just GOB and test. It may take you a little while to align the camera perfectly though.
Making COGs Local
One of the biggest problems with COGs is that they often suffer badly from lag in MP internet games. One way to improve the performance of COG is to make a COG file 'local'. This means that it will be run by your PC in an MP game - not by the host. BUT - you can only do this with certain COGs. For example - simple sectorthrusts, scrolling skies and flashing lights would work perfectly run locally because they require no interaction with players, but COGs like elevators, doors and traps will not work well.
If you were to make, say, a thermal detonator trap like the one in Nar Shadda Loading Terminal local - then the TD's would only be generated on your PC. This means that though it may look like your opponent is being hit by TD's - they will be infact totally unharmed and will not see any TD's. This is why you have to be careful. The general rule is that if a COG requires a player to trigger it and it will effect other players - it can't be made local.
Anyway, enough blathering - how do you make a cog local? Simply add 'flags=0x240' above the word 'symbols' in the cog file. See example below -
__________________
# C3_CAMERAFF.COG
#
# This script will briefly show the effect of using the
# forcefield console to the player...
#
# [YB]
#
# (C) 1997 LucasArts Entertainment Co. All Rights Reserved

flags=0x240

symbols

thing       console       desc=console
thing       camera        desc=camera_ghost
..............
___________________
Breakable Glass
Breakable glass windows is a terrific COG effect that was surprisingly infrequently used in JK. It's also a very easy thing to setup. The procedure for setting it up is very similar to the slashable grates of last issue. NOTE - this 'glass' tutorial is really for SP levels. There is another way for MP levels which reduces the bandwidth load.
First thing we need to do is prepare the two faces that will serve as the window. So select one of the two faces to begin with. Selecting the texture for the window is critical, as only a select few will work as a window. In this example we'll use 00WGLAS2.MAT. So enter that in as the texture for that face. Next we need to make it so that JK will 'draw' that adjoining texture which, as you may remember from last issue. is done by setting the GEO value to 4.
Next we'll need to set the Adjoin Flags to 5 so that the adjoin is impassable. Finally we need to make the glass texture translucent - which is easily done by setting the Face Flags to 2. Terrific, that surface is now ready. Do the exact same changes to the other surface in the adjoin. Now, onto setting up the COG....
First jot down the Sector and Surface numbers for each of the faces in the adjoin. This time you'll need to use 00breakingglass.cog from res2.gob. Once it's in the list select it and you'll see it uses four variables -
glass - one of the faces in the adjoin. If the surface is the 4th face of sector 29 - then enter '29 4' in this box.
glass2 - the other face in the adjoin.
spawnpoints - this specifies the number of places shards of glass are generated from when the glass is broken. the bigger the window - the more you need.
density - this controls how many shards of glass are generated from each spawnpoint. 5 (the default) is really enough.
Remember not to overdo the number of spawnpoints or density, as this will lead to increased lag when the glass is smashed.
Cleaving Stairs Properly
Last month I talked about the best way to cleave stairs and after doing some work on a new level, I think it's important to really hammer home this technique. Below is a screenshot from a very early beta of the city level I'm working on (ignore the red striped textures). It shows a staircase I made using the technique outlined in last issue.....check out the framerate number at the top of the screen - 35.122...and that's on a crappy P100 as well. The stairs have 0 impact on framerate - zip, nada. I would have had the same framerate if I'd just had a one sector ramp there.
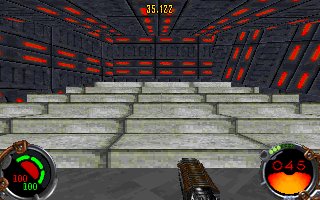
The technique for doing this is simply cleaving diagonally along the top of the stairs, then cleaving the edges of the step and extruding downwards. Finally all you have to do is cleave the sector of each step so it is a triangle instead of the box created when first extruded. If this sounds a little confusing, below is the layout of the stairs pictured above as seen in JED.
I strongly recommend to all level authors out there who use stairs in levels to create them this way. Stairs, if done the wrong way can cause major framerate problems - but this technique has the same effect on framerate as a simple ramp would. (Thanks to CogKing for showing me this technique of cleaving stairs).