What you will need:
Installation
Install Visual Studio (2010, 2012, 2013 or 2015) (you are required to create a free account)
Note: The Half-Life SDK available on Github was built using Visual Studio 2010 so it will run out of the box with that version. Newer versions require that the Solutions be converted to work with these newer versions of the IDE. The IDE will tell you when it performs this conversion.
Download the Half-Life SDK from Valve’s Github repository, You can place and extract the downloaded ZIP anywhere you like.
Note: For those using Visual Studio 2015 changes to the C Library have caused many warnings in Valves Half-Life SDK. Community member Malortie has created a fork which compiles for Visual Studio 2015. I would suggest using it until Valve makes changes to support Visual Studio 2015 in the official repository.
Mine is located here:C:\_Projects\halflife-masterOpening the Project and Configuring
C:\_Projects\halflife-master\projects\vs2010\projects.sln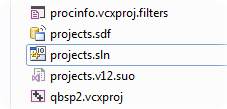
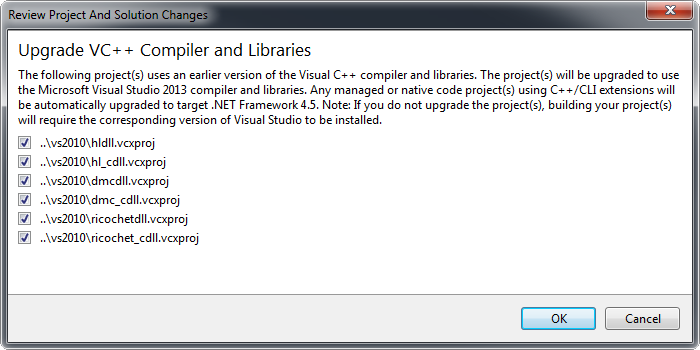
Note: You may see the following if you are using a version of Visual Studio newer than 2010 Simply click OK and let it work. This is the conversion process I noted earlier.
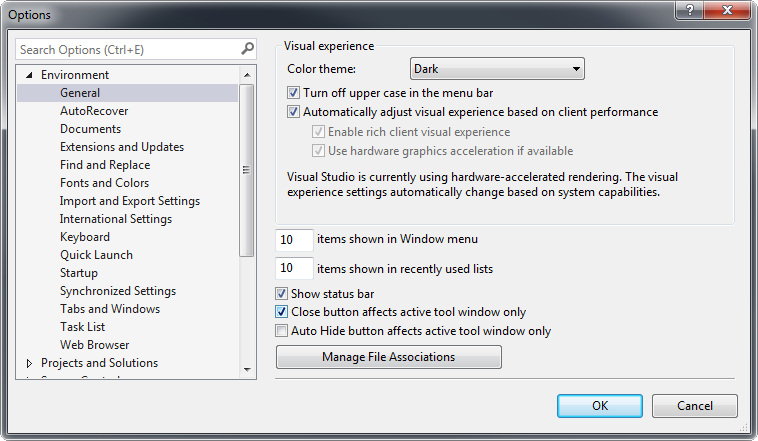
I also suggest you change the color scheme to Dark to make viewing and editing the code easier. This can be done from Tools > Options > Environment > General and setting Color Theme to Dark
To the right hand side of the IDE note the Solution Explorer which should have 6 projects included:
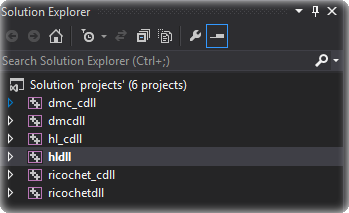
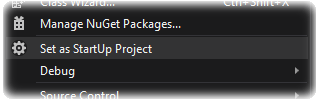
The one of interest to us is hldll as highlighted in bold ( Bold highlighting indicates that it is the start-up project )
If it is not highlighted in bold simply right click on it an Select Set as StartUp Project.
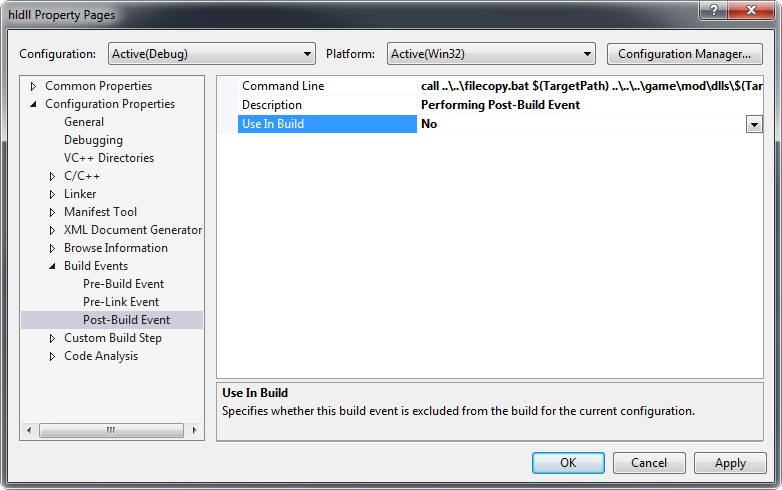
We need to make some changes to hldll’s properties. To access these simply right click and select Properties.
Firstly let’s change Configuration in the top left corner to “All Configurations”. This means that changes we make to the properties page will propagate through all project configurations in this case both Debug and Release.
Then we should turn off the post Build process which can be disabled by setting Use In Build to No in Configuration Properties > Build Events > Post-Build Event ( This command when it works correctly would have copied the complied DLL to the Mod directory, simply put for the scope of this tutorial we do not need it )
Next we must Change under Configuration Properties -> General the Output Directory from:
$(Configuration)\$(ProjectName)\D:\Programs\Steam\SteamApps\common\Half-Life\valve\dlls\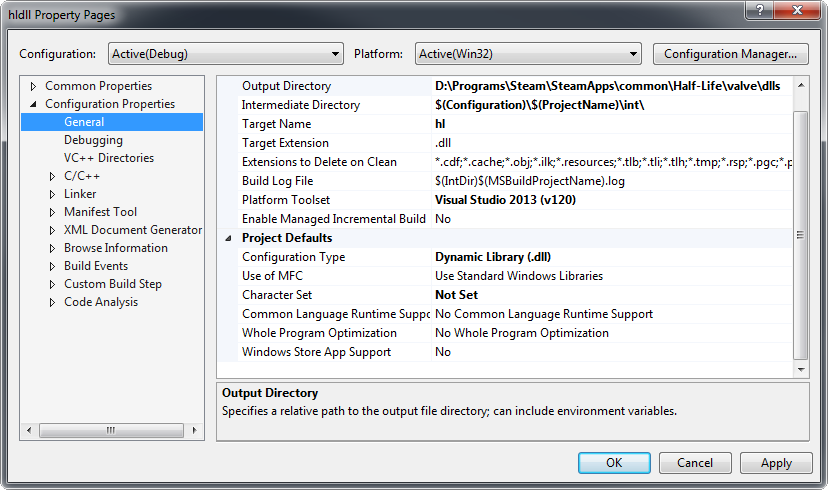
If we want to be able to debug our code within Visual Studio we need to tell Visual Studio where hl.exe resides.
Under Debugging -> Command provide the path to hl.exe.
For me this is:
D:\Programs\Steam\SteamApps\common\Half-Life\hl.exe-windowed -debug -devin my case:
D:\Programs\Steam\SteamApps\common\Half-Life\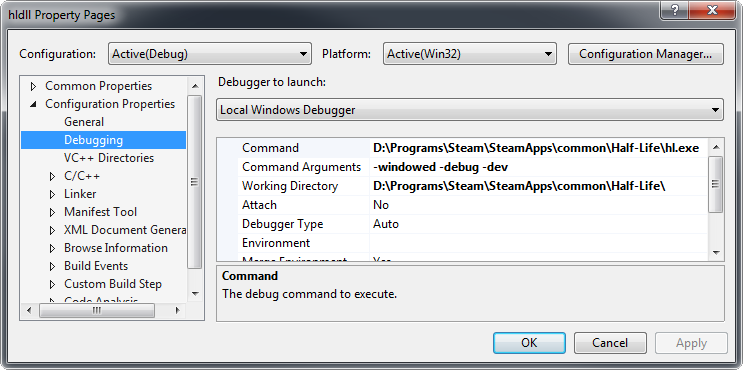
We should Unload the remaining Projects in the solution that we are currently not using. Right click on all unwanted projects (hl_cdll, dmcdll, etc..) and select Unload from the menu. hldll should be the only remaining “loaded” project.
Build the Project
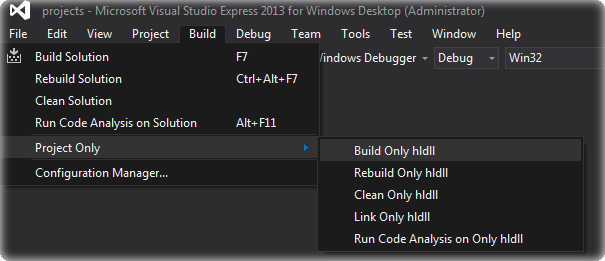
Under Build Select Project Only > Build Only hldll ( saves time compared to building all projects )
If you unloaded all other projects you can simply click under Build “Build Solution”, it will build the remaining loaded projects.
It should take a few minutes and you will probably get quite some warnings in the Output towards the bottom of the screen, This can be ignored (These errors occur due to changes to C++, Visual studio and the source code down through the years)
The SDK was developed originally in the mid-nineties and was not updated for new C++ standards when it was released on Github in 2013
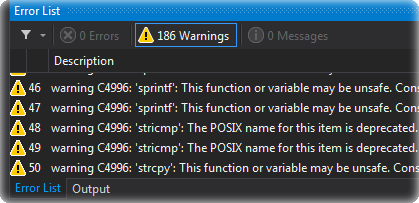
Let’s disable these common warnings.
Right click on hldll and under Properties navigate to Configurations Properties -> C/C++ -> Advanced, (Make sure to set “All Configurations” so that it affects both Debug & Release)
For “Disable Specific Warnings“ add the following:
4028;4058;4996You should see that the build has succeeded, You can now double check the generated hl.dll file’s timestamp to ensure that it created a fresh Library in the right location.
For me it can be located here:
D:\Programs\Steam\SteamApps\common\Half-Life\valve\dlls\
You will get the following error if Steam is not running:
Failed to Initialize authentication interface. Exiting...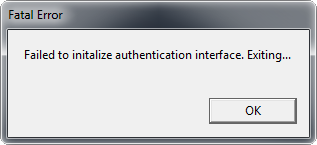
Start up Steam, Half-Life should then run and you should be able to play through the original game without issue.
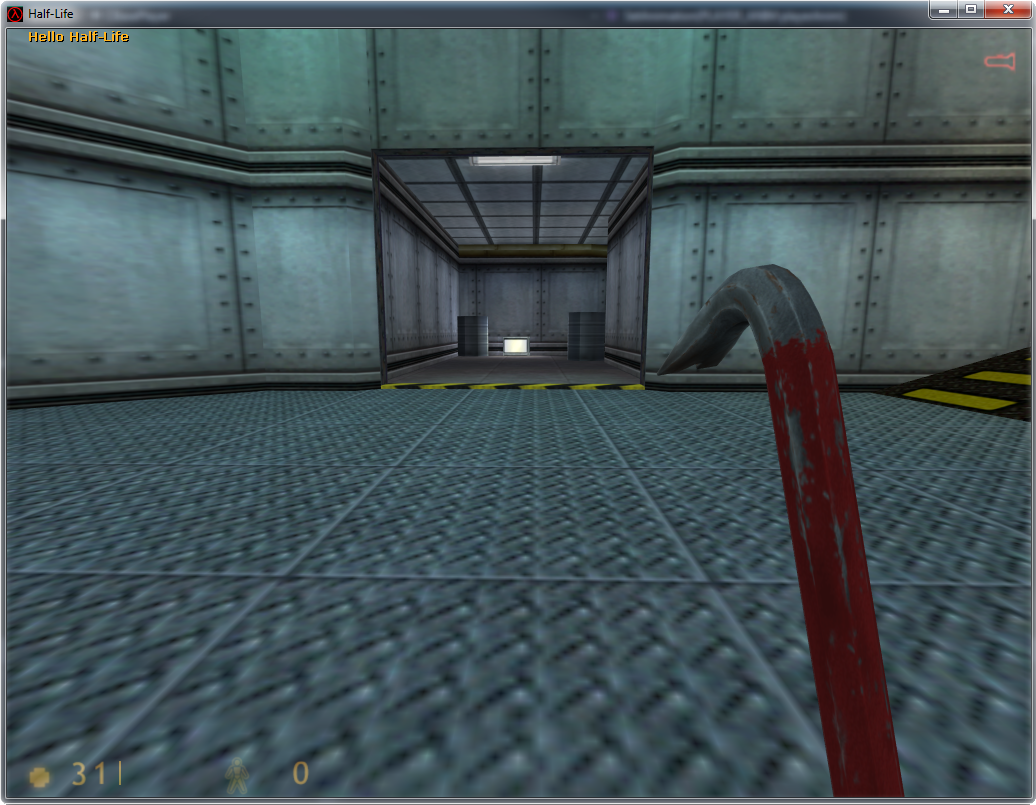
Hello Half-Life
Let’s add a message for when the player jumps.
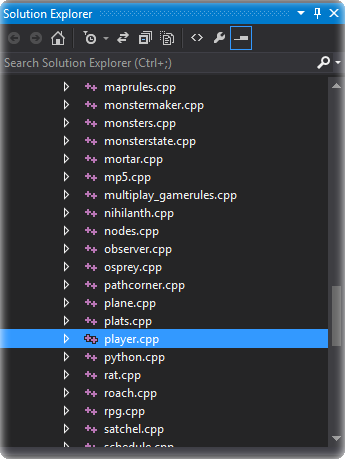
To do this locate player.cpp inside hldll > Source Files > dlls in Visual Studio
Ctrl – F to Find the word “Jump”
Locate the following:
case PLAYER_JUMP:
	m_IdealActivity = ACT_HOP;
	break;
Let’s append a line that outputs a custom message when the player jumps in-game
case PLAYER_JUMP:
	UTIL_ClientPrintAll(HUD_PRINTNOTIFY, UTIL_VarArgs("Hello Half-Life")); // Message
	m_IdealActivity = ACT_HOP;
	break;
Save the changes and build hldll, Then enter the game and jump. You should see in the top left hand corner the message “Hello Half-Life”
Post Build Notes
Printing to the Console Only:
If you want to print to the console and not the console & HUD as described above use the following commands
For printing to the server (hldll) console this is:
ALERT( at_console, "Hello Half-Life\n" );The \n is important because it adds a line break so that the next call to this method doesn’t simply stick text to the end of your statement but rather creates its own newline.
The equivalent in the client (hl_cdll) is:
gEngfuncs.Con_Printf( "Hello Half-Life\n" );Server Vs Client:
The Client (aka hl_cdll) contains all the code that is specific to each player, Things such as the HUD, events system, input processing, VGUI (MOTD, TFC team/class selection, command menu) as well as some items for rendering.
You can learn more about this kind of game architecture here.
Release Binaries:
This will create a Release folder next to your Debug folder in the solution (code) directory. If you set your settings to affect all configurations as described earlier the newly compiled dll will have copied to the correct mod folder.
When compared to the Debug binaries the Release binaries are typically smaller in size and contain optimizations to improve performance at runtime.
Further Reading
Thanks
I want to thank Malortie for his Visual Studio 2015 compatible version of the Half-Life SDK which I am sure many of you will find useful.
And finally I want to thank you the reader who took the time to read this, I hope this short tutorial helps you in some small way. If you find any issues or if you know of anything this tutorial should include please feel free to send an e-mail onto me concerning it.
The support thread for this tutorial can be found over at the forums.


Nice man.
Now that's what I call a good written tutorial.. Excellent work..
Off topic:
Btw. in regards of coding you and everyone else that qualifies should help out this guy:
Twhl.info
If you do have a neck for coding and seeing issues others don't help him. He is enhancing Half-Life beyond everything I've seen to date. Fixing so many glitches Valve & Gearbox left etc. it's unbelievable. He is some sort of coding genius to give you a simple example. He is the 1st person ever in the History of Hl1 who successfully recreated the Op4 Rope. That was something of a holy grail for the hl1 coders. There are still plenty of issues to find in his code enhancements. Help him on the bug hunt if he succeeds Spirit Half-Life will be a trash can in comparison.
he seems to be rebuilding the engine from the very bottom, but I wonder if I could borrow that sexy rope for an SDK2.3 build
@Foxtrop: As far as I know you can. His intend is it to enhance Half-Life and then releasing what he has as some sort of Spirit like enhanced free to use build. However if I were you. I would wait not just for the rope but for all of his fixes. For instance there were also many enhancements he made for the weapons. Apparently some of them didn't even play their proper animations code wise. So things we barely or never saw before are suddenly fixed. Not to mention new additions to the engine such as velocity when you jump onto moving objects or op4 monster replica which are identical in their behavior and visuals to the original op4 etc.
It would be even better if you play test his builds and report bugs so he can fix em. We all will benefit from his work. Yes this entire remaining community would benefit, I'm sure of it. :)
I strongly suggest you read through the entire discussion Foxtrop. Unlike you I'm not a coder but even I find it extremely interesting what he is writing there.
As for the Rope you just can't copy and paste it as he changed the code. He uses Anglescript and a whole lot of new references. He practically re-codes Half-Life based upon the limitations of the engine itself of course.
Good Find! I must add it to sourcemodding's sdk and source code section. He is the same guy that made an up to date model viewer for Half-Life recently. Gonna put a pin in this and watch his progress :), Thanks.
Thank you so much for this, I've been waiting for an up to date tutorial related to coding for HL1.
Really interesting. :)
Excellent tutorial, well written and easy to digest. A small side-note I wish to add however about Debug mode, is that it causes small sprites to appear above AI's heads.
Its just worth noting that for anyone who has compiled their code and wonders why
people are emitting sparks. Had this happen to me once and forgot it was due to
Debug mode. Needless to say I was worried for a bit.
I only tested this on SDK2.3 converted to VS2008 but I assume it still applies to the modern source code release.
Thank you :)
That's good to know, I haven't noticed it yet because I haven't delved into AI yet but I will keep it in mind when I do :)
Heya! Great tutorial man, I just got some errors that I'm not sure how to solve
A bunch of files, mostly bmodles.cpp have "'abs': ambiguous call to overloaded function" and thus, it won't build
Thanks in advanced!
Really great tutorial, I have a question though. Is there any way to execute a console command inside the code? For example, if something happens it rebinds a key.
error:
the command "call .. \ .. \ filecopy" came with code 1.
Visual studio 2017
error:
the command "call..\..\filecopy" came with code 1.
Visual studio 2017.
a very long line from the directory indicating hl.dll
Hope someone doesnt mind helping me this much later but I get the following error when trying to build hldll:
1>PostBuildEvent:
1> Description: Performing Post-Build Event
1> 'p4' is not recognized as an internal or external command,
1> operable program or batch file.
1> The system cannot find the file specified.
1> 'p4' is not recognized as an internal or external command,
1> operable program or batch file.
1> The system cannot find the file specified.
1>C:\Program Files (x86)\MSBuild\Microsoft.Cpp\v4.0\Microsoft.CppCommon.targets(113,5): error MSB3073: The command "call ..\..\filecopy.bat C:\Program Files (x86)\Steam\steamapps\common\Half-Life\valve\dlls\hl.dll ..\..\..\game\mod\dlls\hl.dll
1>C:\Program Files (x86)\MSBuild\Microsoft.Cpp\v4.0\Microsoft.CppCommon.targets(113,5): error MSB3073: call ..\..\filecopy.bat C:\Program Files (x86)\Steam\steamapps\common\Half-Life\valve\dlls\\hl.pdb ..\..\..\game\mod\dlls\hl.pdb
1>C:\Program Files (x86)\MSBuild\Microsoft.Cpp\v4.0\Microsoft.CppCommon.targets(113,5): error MSB3073: :VCEnd" exited with code 1.
1>
1>Build FAILED.
1>
1>Time Elapsed 00:00:22.50
========== Rebuild All: 0 succeeded, 1 failed, 0 skipped ==========