Getting Ready
Have you ever played Empire at War and thought "man these vanilla trooper models dont look so good" or thought "imagine if I could add this custom model into the game" or wondered in general how adding new units and animating them worked? Or perhaps you just wanted to learn how some of the magic behind the scenes works? Well this guide is for you!Before you proceed, you first have to make sure you have everything you need. So what do we need?
Here is a List:
- Autodesk 3DSMax 6,8, or 9
- Alamo Importer and Alamo Exporter plugins for 3dsmax
- Existing donor unit skeleton/animations from the base game of Empire at War. Here is a link containing the EAW Vanilla stormtrooper skeleton and animation preimported and saved as a ".max" file
- A new model you want rigged/animated
- Light knowledge of 3dsmax and know how to get around its menu's.
- Time and patience
Important things to note: The alamo exporter only works with 3dsmax version 6, 8, and 9 ONLY. Important things like file names and buttons will be either underlined, bolded, or italicized in this tutorial! Additionally if the pictures from this tutorial appear small in your web browser, you can right click on them to view them in full size.
Anyways lets get onto the tutorial itself.
Lets Start, Import, and ready the model for Rigging
For this tutorial, I will be using the EAW stormtrooper skeleton and animations as the doner, and will use a phase 2 clone trooper model as the custom model that will rigged. Though while I use these specific choices for this tutorial, this tutorial should work with other models and other eaw unit animations/skeletons. And before we begin some terms will need to be defined. Donor refers to the EAW model that is imported and whose animations/skeletons are applied to the new mode.
X_LOD0 refers to the mesh of the donor unit (with x refering to the name of the imported donor unit). Skeleton refers to the system of bones which are used to to help animate a model.
Now to the tutorial
1) First thing that needs to be done is to install 3dsmax 9 and apply any updates/service packages to it. Next the alamo importers/exporter plugins should be put inside the correct folder (both tell you where they go, and make sure you use the correct version for 3dsmax). With that set up, start up 3dsmax.
2)Next thing you should do is to use the alamo importer to import a model from the Empire at war/FOC game (EI_TROOPER.ALO in this example). Or you can just load up the EAW Vanilla stormtrooper Imperial_stormtrooper_template.max file I provided in the Getting Ready part of the tutorial. In addition to the animations/skeleton, importing/opening these will also give a X_LOD0 model (in the case of the eaw stormtrooper model its called Storm_Trooper_LOD0).
3) After you successfully opened the stormtrooper skeleton/animation file, it is time to import the model you want rigged. An important thing to note is that you want a model that is in T-pose, as that way its eaiser to work with and rig (as the vanilla EAW units also had their skeletons made while they were in T-pose). OBJ file is also what I would say is the best model format to import from as OBJ will most likely just contain the model itself and nothing else.
Below this is a picture showing the donor stormtrooper skeleton/animations (on the left) and the new model that will be rigged on the right:
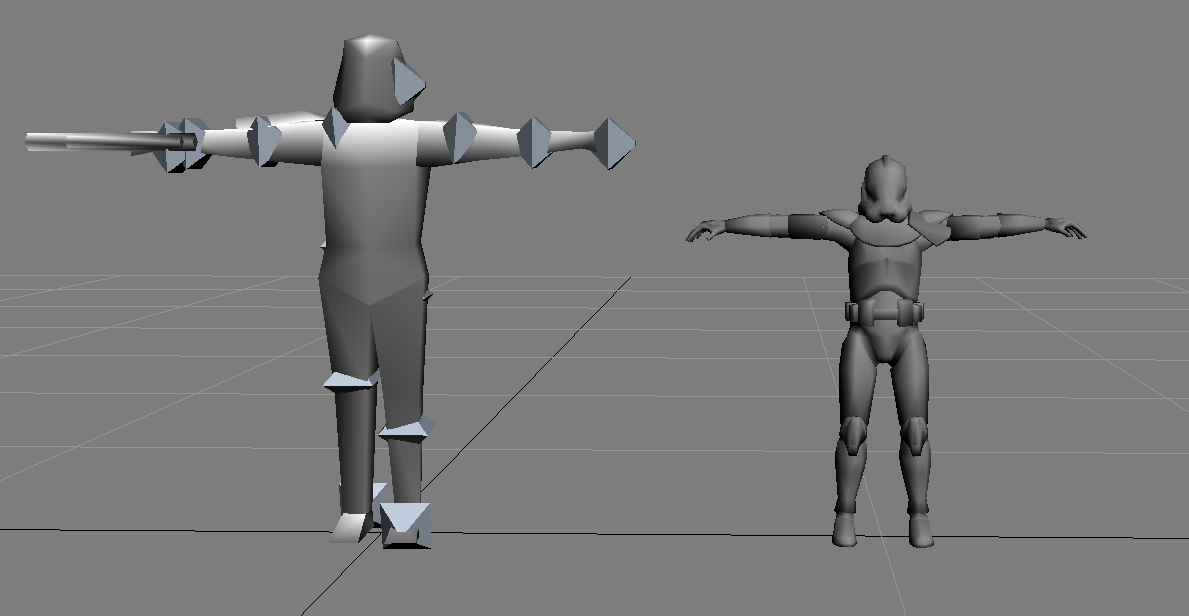
4) Most likely the custom model you import will either bigger or smaller than the vanilla stormtrooper skeleton, thus you'll have to make some adjustments to the imported model. First you will click on the imported model, then you will position it at the center of the max window. After you center it, it is time to resize the new model so its around the size of the donor skeleton. What I recommand doing here is switching the camera view to Front and activating WIREFRAME VIEW as these will make it easier to match up the imported models size and position with the skeleton/_LOD0 file. One the size and position looks fine, delete the _LOD0 files of the donor skeleton/animation unit. The following picture shows roughly the new model being matched up in position/size to the skeleton/animation donor:
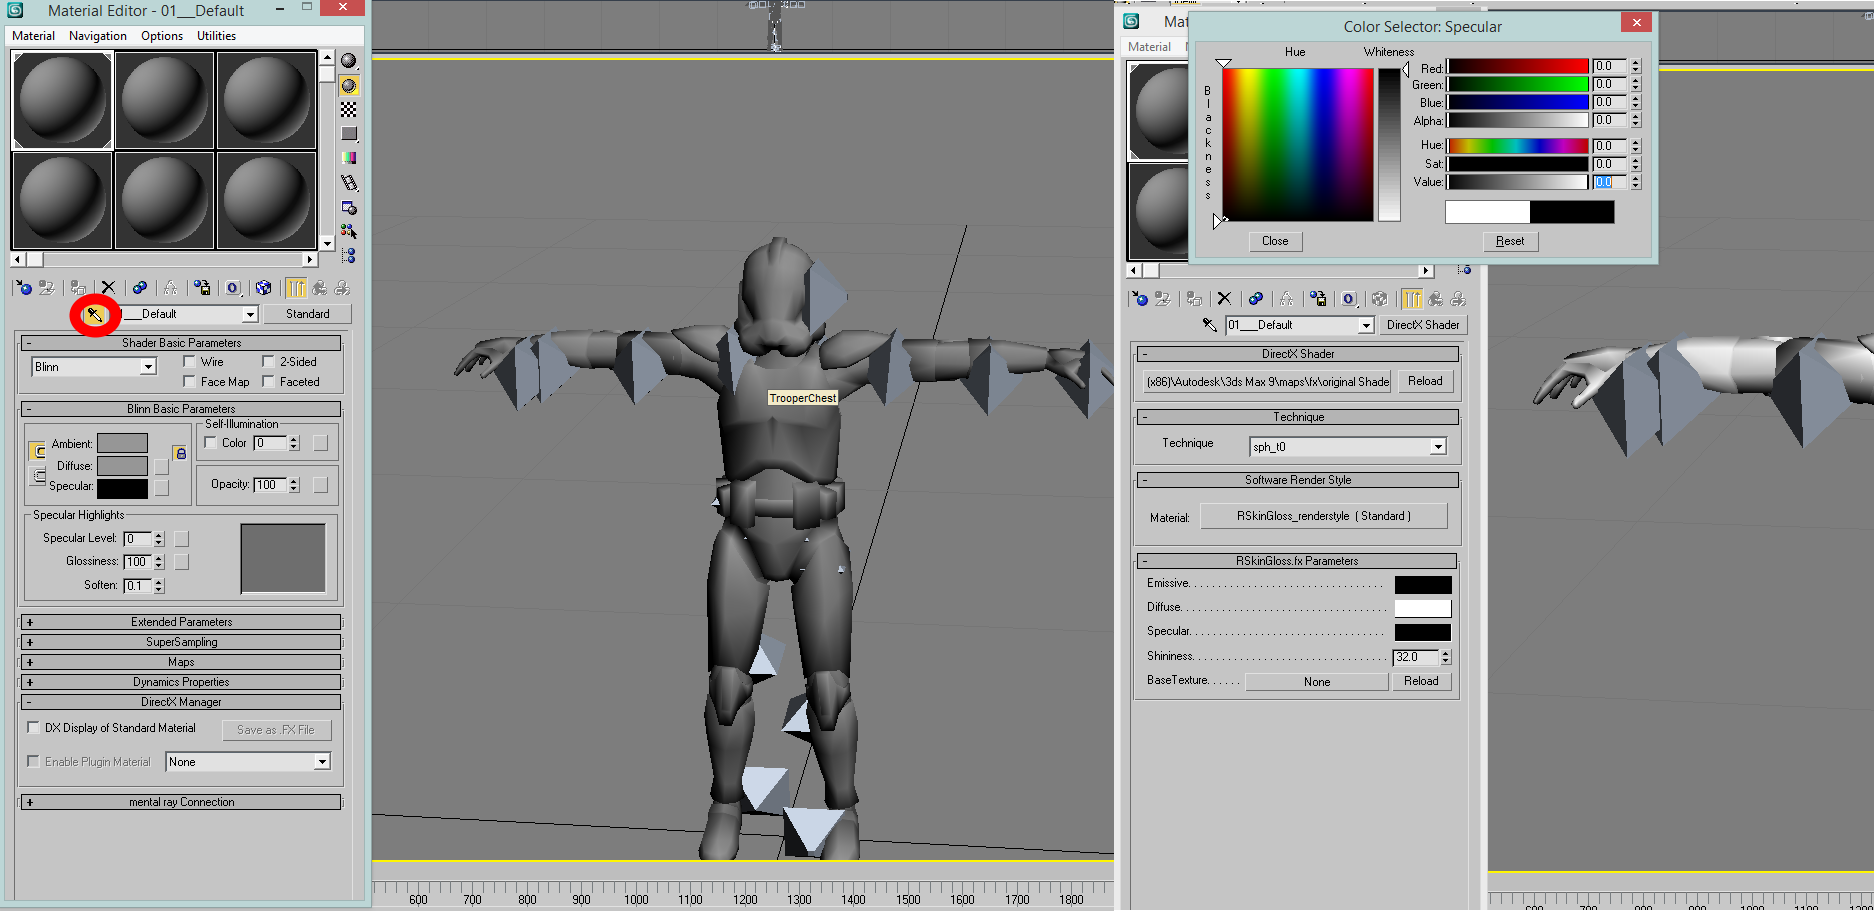
5) Before moving on to the rigging part, I believe this is now time to apply the new models textures. The reason being that it usually makes it easier to work with the model than having just a fully grey model, and it can help visualize better what part of the model should be affected by what bones. To do this:
- A) click on the M button on your keyboard, and this will bring up the material library.
- B) Next click on the eye dropper symbol (called Pick Material from Object), and click on the new model. This will bring up the texture editor for the unit.
- C) Click on the [Standard button] in the right side of the material editor, then click [DirectX Shader], Click Discard old Material and ok.
- D) With that selected, click on the button under where it says DirectX Shader. Select the RSkinGloss.fx. After that click on Technique and switch to the sph_t0 technique. After that under RSkinGloss.Fx parameters go to the Specular setting. Under the Color Selector:Specular go to Value and set it to 0.0 then click the [Close] button; note that the specular value changes the glossiness of the model, and you need to set it to 0 if you want the model to look normal.
If a unit (such as infantry) has animations, you have to use the RSkinGloss.fx; while for units without any animations (such as spaceships), you can use MeshGloss.fx. - E) In BaseTexture, click the [None] button and select your new models texture files.
This picture shows the shader and texture applied to the new model:
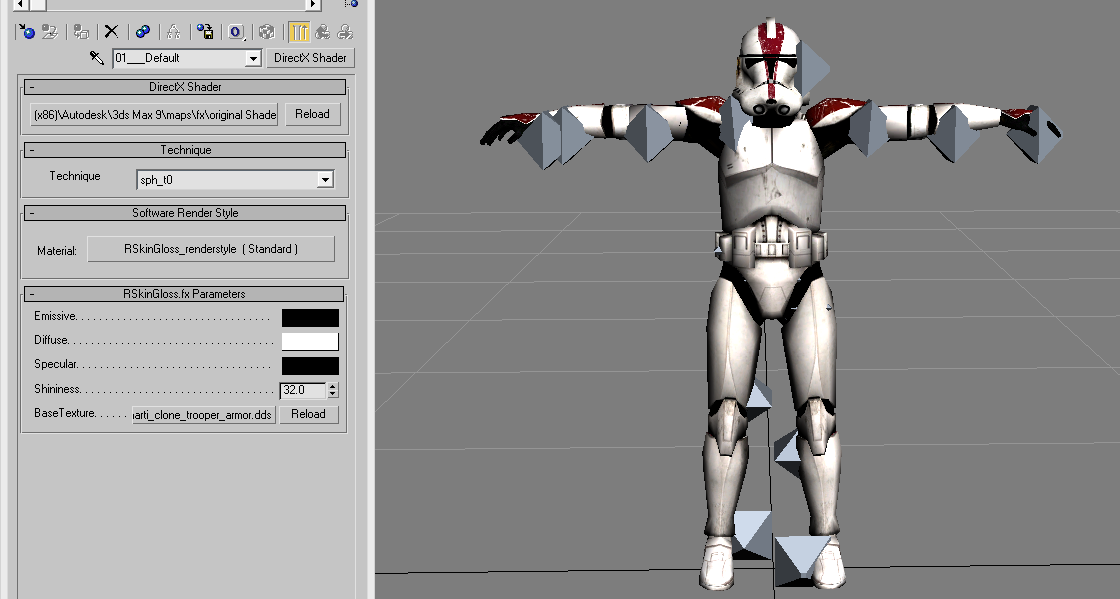
6) The model is now texture, positioned, and ready for rigging.
Here is the textured model:
7) Its time to move onto the Rigging part of the tutorial.
Rigging the Model
While we are not grave robbers, in this section we will still be playing with bones. This section will cover the basics of rigging the prepared model. Before we proceed I recommand that if your new model is one mesh, to separate the head and neck part of the model into a separate mesh as that will make the rigging process simplier. Additionally we will also refer to your new imported model as Trooper.
Now lets rig!
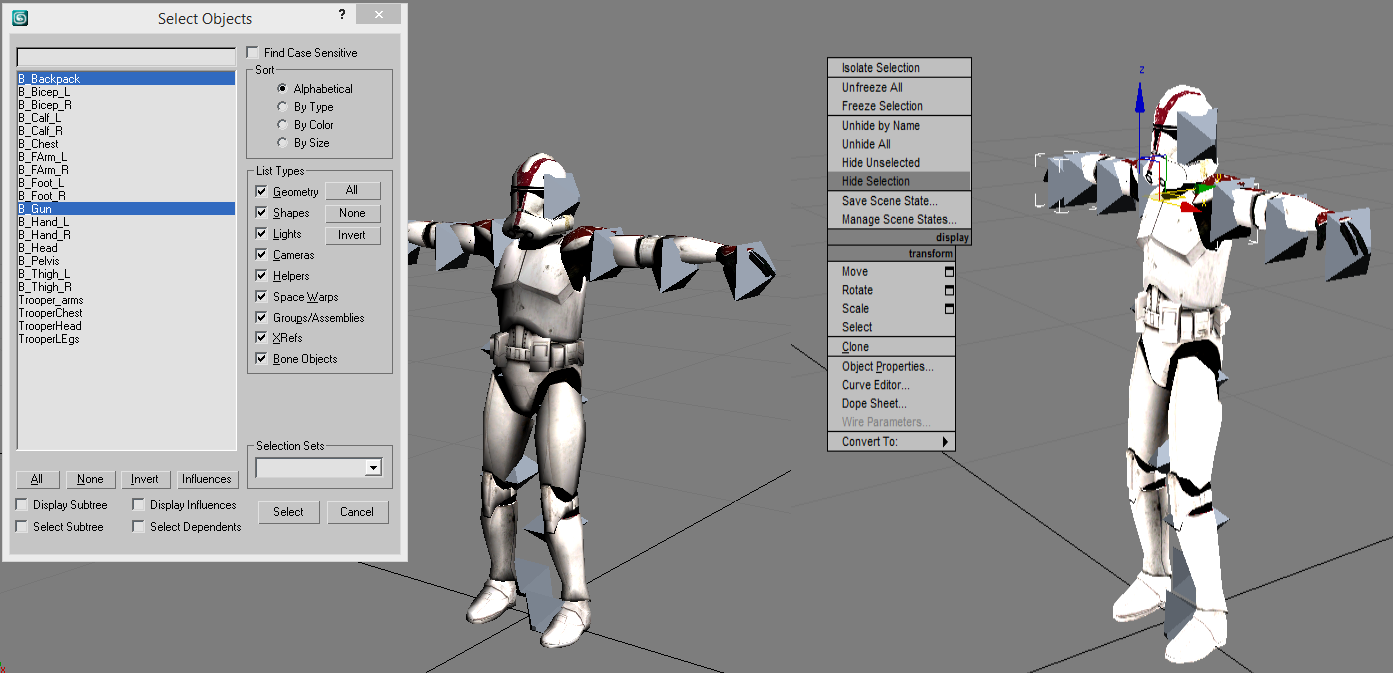
8) Lets have a look at the bones of the donor unit. Most bones such as Bicep, FArm, Chest, Foot, Thigh, Calf, Foot are shared between most models. Though certain bones such as Backpack and b_gun are unique to certain EAW vanilla models. Though since we are using the stormtroopers skeleton, we need to click the H button on your keyboard to bring up the Select Objects screen. When there Ctrl + left click the B_Gun and B_Backback bones, then click the select button. This will select both buttons. After this, right click and select Hide Selection to hide those bones.
9) Now select your new Imported model (lets call it Trooper from now on) and go to to the modify Tab. Next click on the Modifier List, and scroll down until you find the Skin modifier, and then apply it to the model.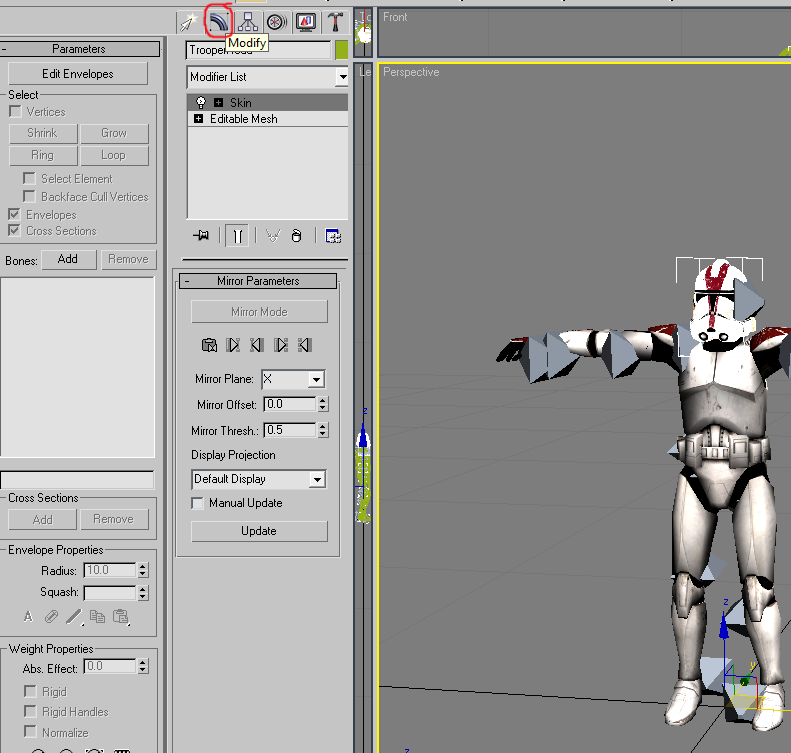
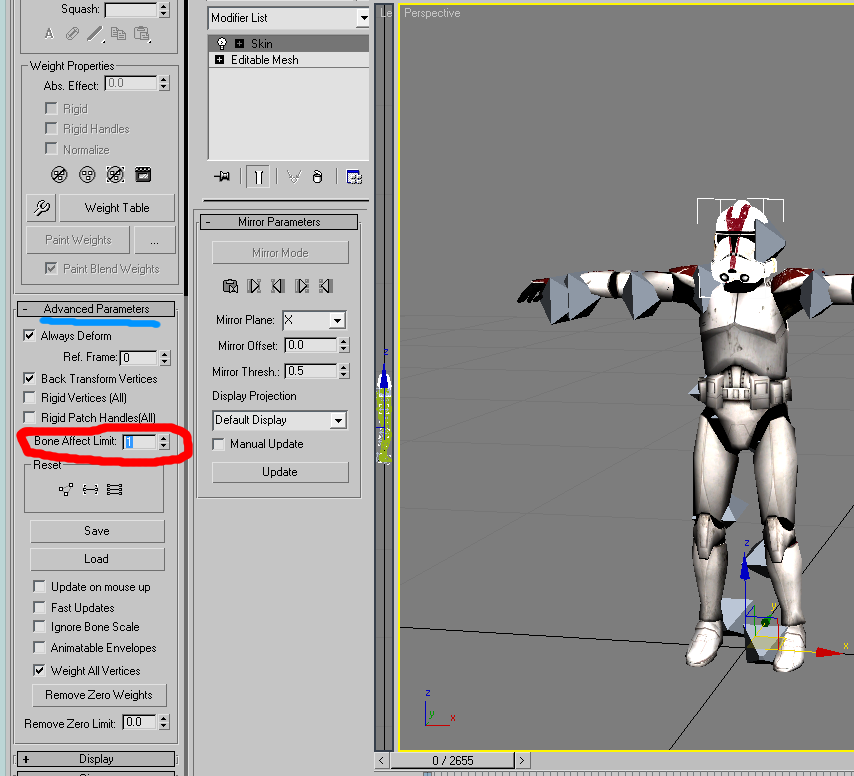
10) While in the Skin Modifier, go to the Advanced Parameters tab under it. Scroll down till you find the Bone Affect Limit catagory, and change that value to 1. The reason for this is that in alamo format of Empire at war, each vertice on a model can only be affected by 1 bone.
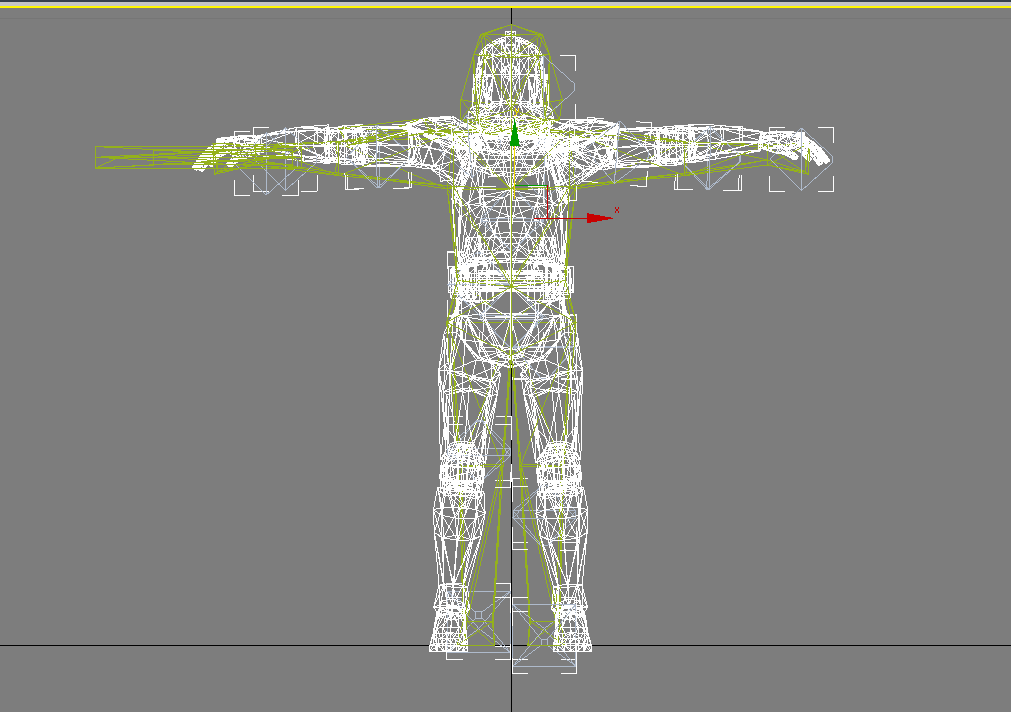
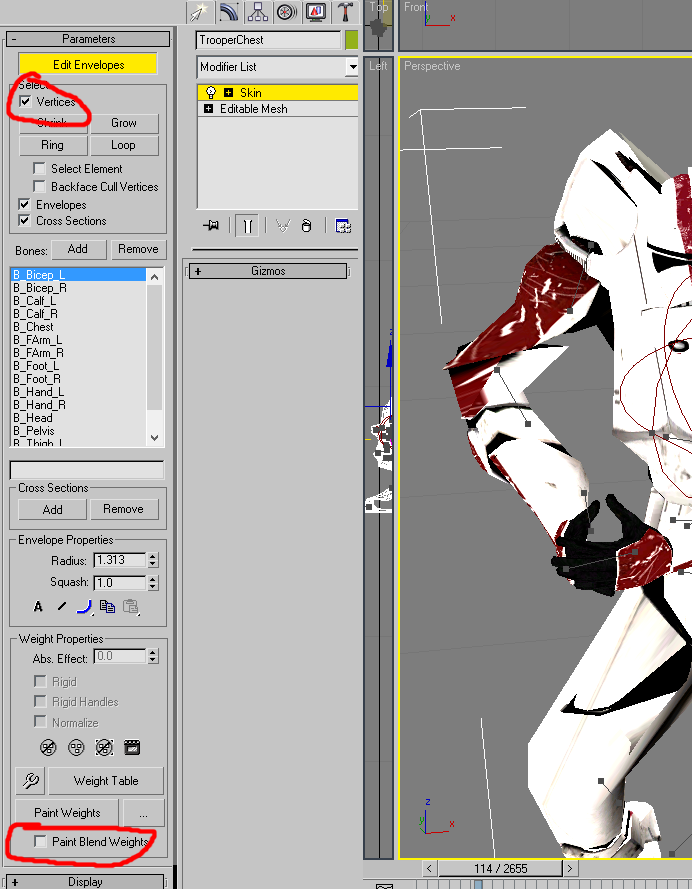
11) It is now time to add the bones to the mesh. To do this we need to remain inside the Skin modifier tab, but now we go to the Parameters part of the Skin modifier. We click on the Edit Envelope Button. Then we move to where it says Bones: and click the Add button. A new menu should pop up that is called "Select Bones", and its purpose is obvious as this is where you select bones. If your model is one mesh (like trooper), select all the bone names that show up and then click the Select Button. This will apply the bones to the model and 3dsmax will autoweight them. The following picture shows this:

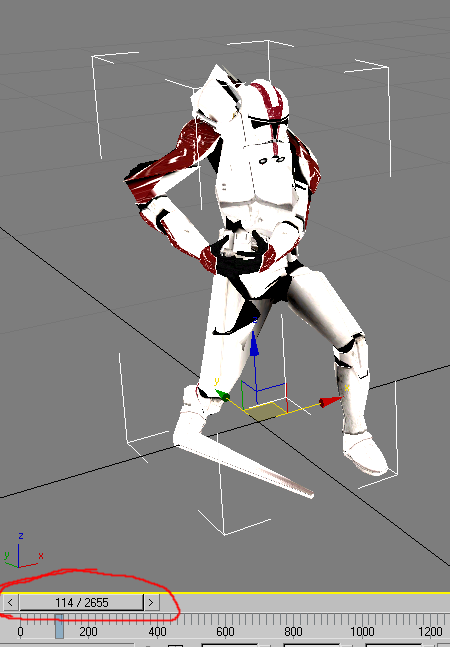
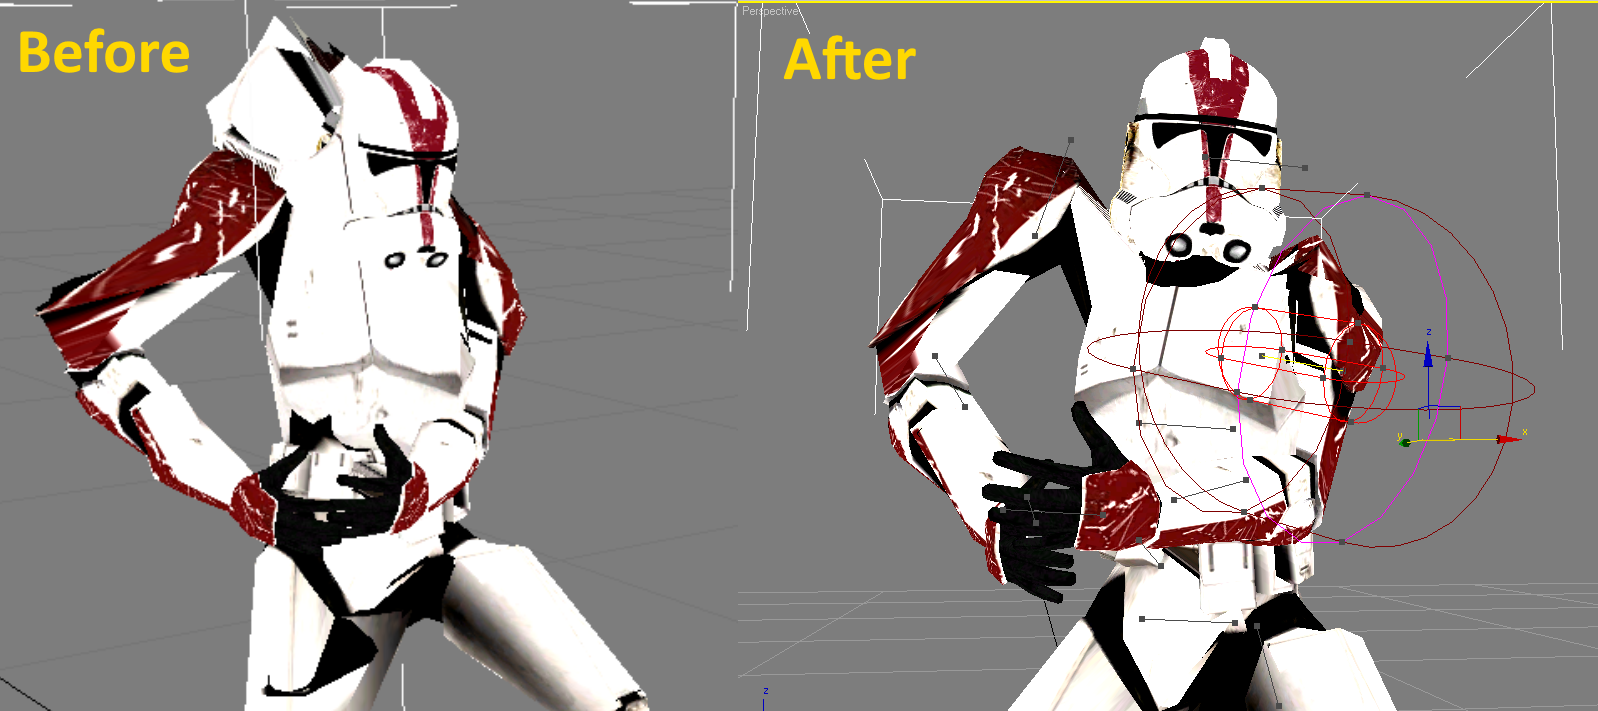
12) Test how well 3dsmax weighted the bones to the model. You can do this as you already have animations attached to the skeletons due to you having used a donor unit from Empire at war. To do so, move the timeline slider over the timeline. More than likely 3dsmax didnt properly weigh the bones to the correct vertices. Thus we will manually have to fix this. There are 2 methods you can use to fix this weighting problem, which ill cover in the next section of this tutorial. The picture here shows that the trooper is in fact not properly weighted:
Weighing and Painting the model the Model
As mentioned in the previous section, more than likely you will have to correct the weighting of the model. Note that this will be the part of rigging that will take you the most amount of time, and it is important if you want your unit to look nice. You can fix the weights via 2 methods. The first is by using Paint Weights tool and the other is by selecting vertices and and using Weight table. Paint Weights tool works similar to a paint brush in that you select a bone and then paint over the vertices you want affected by it. Also since you'll want to see the locations of the vertices on your model, I recommend using wireframe display for this part (though you can switch back to Smooth/highlight view to see how your reweighting progress is going). Additionally this part will only show how Paint Weights tool and Weight table work on part of the trooper model. Once the gist is shown, you can use both these tools on other parts of your model.
13) This is based on personal preference but when weighting the bones to the models vertices, I like go into the display tab and select Bone Objects in the Hide by Category menu. Though if you don't know the bone names, you can always leave the bones visible.

14) As we saw earlier, the trooper model doesn't look that nice at all. It looks like it went through a lawn mower. But we can fix this! The first thing we have to do now is once again select the model, go to Modify tab, and enter the Skin modifier. click the Edit Envelopes button and make sure that Vertices box is checked, and that Paint Blend Weights box is unchecked; both of these are under the Parameters category of the Skin modifier.
15) With this we are ready to move on to fixing the weights. The first tool Ill show you how to use is the Weight table tool. This tool works based by selecting vertices (thus why the vertices box was checked in the previous step). You can either select one vertices, or you can select multiples by holding the left mouse button and scrolling across multiple vertices.
- A) For the trooper model, Ill demonstrate how to use this by selecting the vertices of his upper chest.
- B) First the vertices are selected.
- C) Next the Weight Table button is clicked under the parameters part of the skin modifier
- D) In Weight Table click on the button that says [All Vertices] on the Bottom Left corn of the Skin Weight table and select the [Selected Vertices] button. This will make it so that only the selected Vertices will be modified.
- E) Click Edit in the Upper left corner of the table, and click Select All.
- F) Scroll till you find the bone that is supposed to effect the vertices. Then press Ctrl and Right mouse button to make that bone affect those vertices.
- G) See if those vertices are now affected by the correct bone. If not try with other bones.
- H) You can repeat this with other parts of the model. If you want to be more accurate you can do this one by one with each vertices. This is one of the more powerful and effective ways to correct the weights of the bones and make sure they correct the vertices. But its not the only way as Paint Weights tool exists
The stuff with the weight table from step 15 in picture form:

16) The trooper model seems to look a bit better now, but more work still needs to be done. to fix it. Heres how it looks like before and after the weight paint was used:
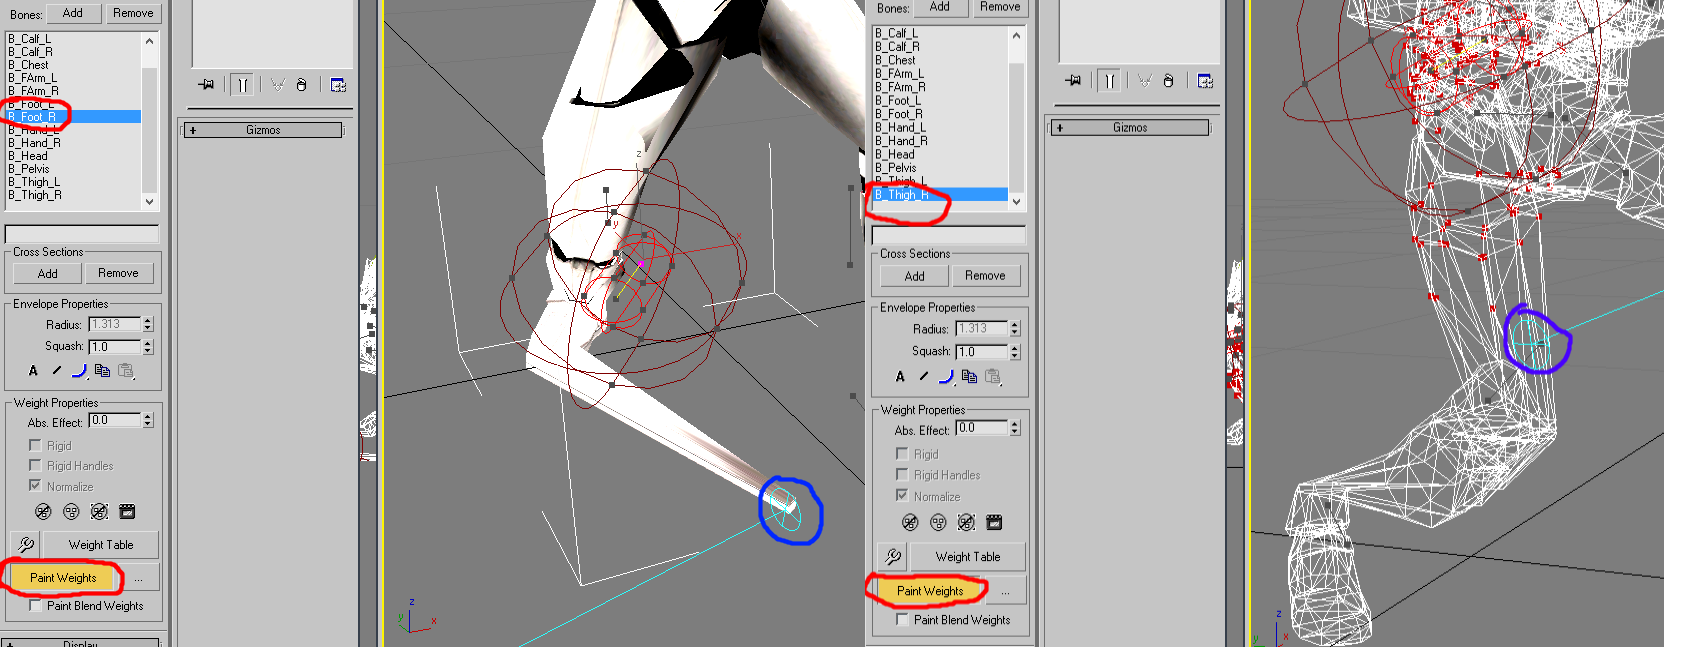
17) Now with that the Weight table was shown off, its time to show how the Paint Weights tool works. Before we use the Paint Weights tool, we have to change certain settings about it. We do this by clicking the [...] button next to the [Paint Weights] button. What we are concerned about in here is changing the brush size. To change the brush size, we go tot he Max Size category and since we are using a donor animation/skeleton from EAW, we should set the Max Size of the brush to 0.2. Once we do that, we close that menu.

18) We now move on to using the Paint Weights tool.
[list]
- A) First we Click on the [Paint Weights] button. Once we do that, a blue reticule will appear. This reticule is what is used to "paint" a vertices to be affected by a specified bone.
- B) To select what bone you want it to paint, go to the Bones category and select which bone you want to influence the vertices you'll paint.
- C) Once you selected that, move the reticule over what vertices you want affected by that bone and hold the mouse's left button. While holding the mouses left button, move the reticule across the vertices you want affected. If you are in wireframe view, you should now see that those vertices are now being affected by the bone you are painting with!
- D) For instance with the trooper model, I wanted to fix the right foot. So I selected the Foot_R bone, then painted the stretched out part of the troopers right foot, and it went back to looking normal. I then did the same with the Thigh_R bone and fixed the upper part of his right leg
19) As you can see there are 2 methods to help rig your model. If you want to make your models animations look nicer, you need to make sure you properly rigged and weighted the model! Thus you will have to use both Paint Weights tool and Weight table. You will have to use both tools to fix any problems you see on the models. Its a time consuming process, but not that complicated. Additionally this part of the tutorial can be applied if you use a custom skeleton of bones to your models, though in that case you will move the bones yourself to see if they distort any vertices they shouldn't.
20) Patience is a virtue. This part can take a while, from minutes to hours, sometimes even days. It can be frustrating. Anyways once you done with rigging and weighting the unit, it is time to prepare it for export! This i will cover in the next section.
Preparing the model for export and Exporting
With most of the other stuff out of the way, we draw closer to finishing the model and now need to ready it for export and to work with Empire at War!
21) First thing you will want to do now is to right click and then select the [Unhide All] button. And if you hid bones from being visible earlier you can now go to the Display category and uncheck Bone Objects under Hide by Category. And also go back to Smooth view if you were in wireframe view.
22) Import a weapon model and move it to your models arm. In this case we were using a trooper, so we will import a blaster rifle.
23) Lets texture the blaster using the MeshGloss.fx.
- A) click on the M button on your keyboard, and this will bring up the material library. Then select an unused material sphere.
- B) Next click on the eye dropper symbol (called Pick Material from Object), and click on the weapon model. This will bring up the texture editor for the weapon.
- C) Click on the [Standard button] in the right side of the material editor, then click [DirectX Shader], Click Discard old Material and ok.
- D) With that selected, click on the button under where it says DirectX Shader. Select the MeshGloss.fx. After that under MeshGloss.Fx parameters go to the Specular setting. Under the Color Selector:Specular go to Value and set it to 0.0 then click the[Close] button; note that the specular value changes the glossiness of the model, and you need to set it to 0 if you want the model to look normal.
- E) In BaseTexture, click the [None] button and select your weapons texture files.
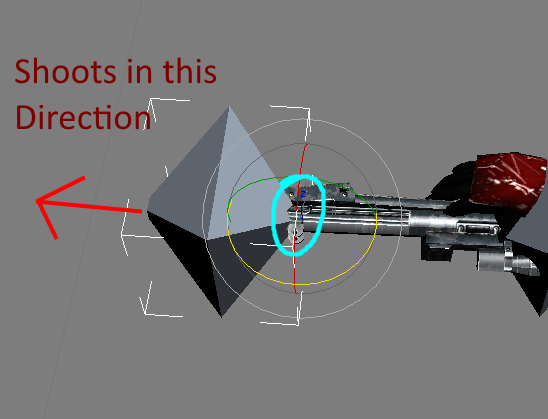
24) Create a new bone by going into the Create tab, then select the systems tab, then click on the [Bones] button. Create 2 bones and delete one of them. The one that is left you need to rename MuzzleA_00 exactly. Next resize the Muzzle bone and position it in front of the blaster from where you want the laser bolt to shoot out from. Note that depending on the rotation of the muzzle bone, thats where the blaster will shoot from so make sure it faces away from the blaster!
Picture here shows how to create the bone and to position it in front of the blaster:
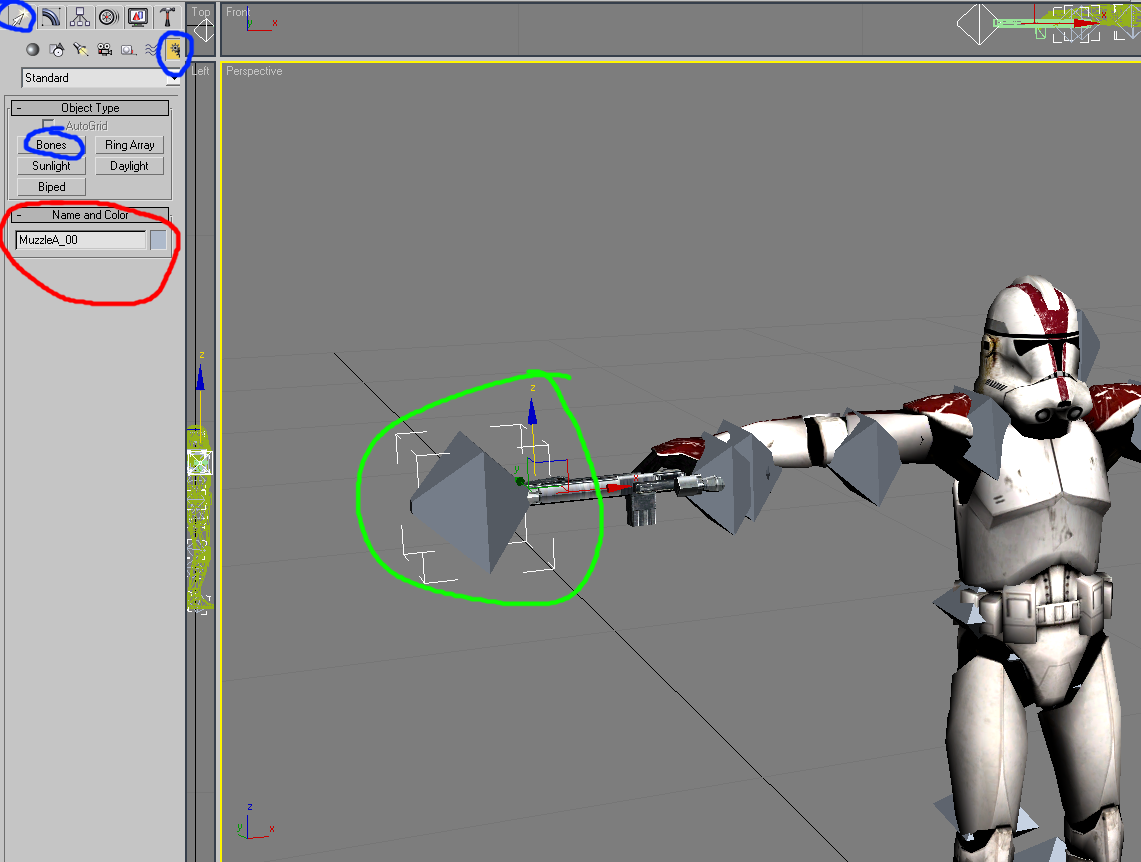
Picture here shows which direction the blaster will fire from (this is also how the ship weapon bones work):
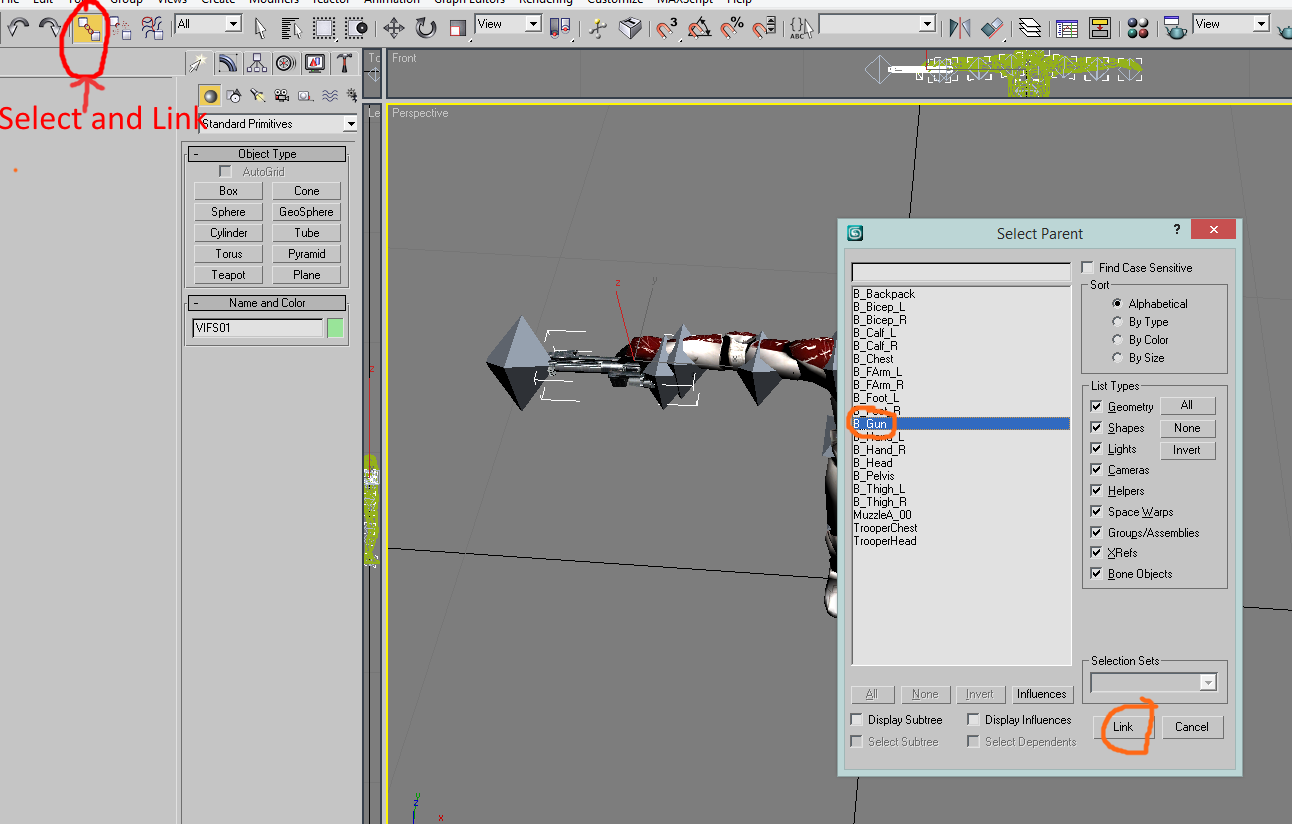
25) You need to link both the weapon and the MuzzleA_00 bone to the B_gun bone. This will make it so that when the trooper moves his arms, the blaster/weapon will move with the arm.
To do this click the weapon model, then click the [Select and Link] button in the upper left corner of 3dsmax. Next click the H button on your keyboard to bring up the Select Parent menu. There click on the B_Gun bone then click the [Link] button. Repeat the same with the MuzzleA_00 bone.
This picture shows this:
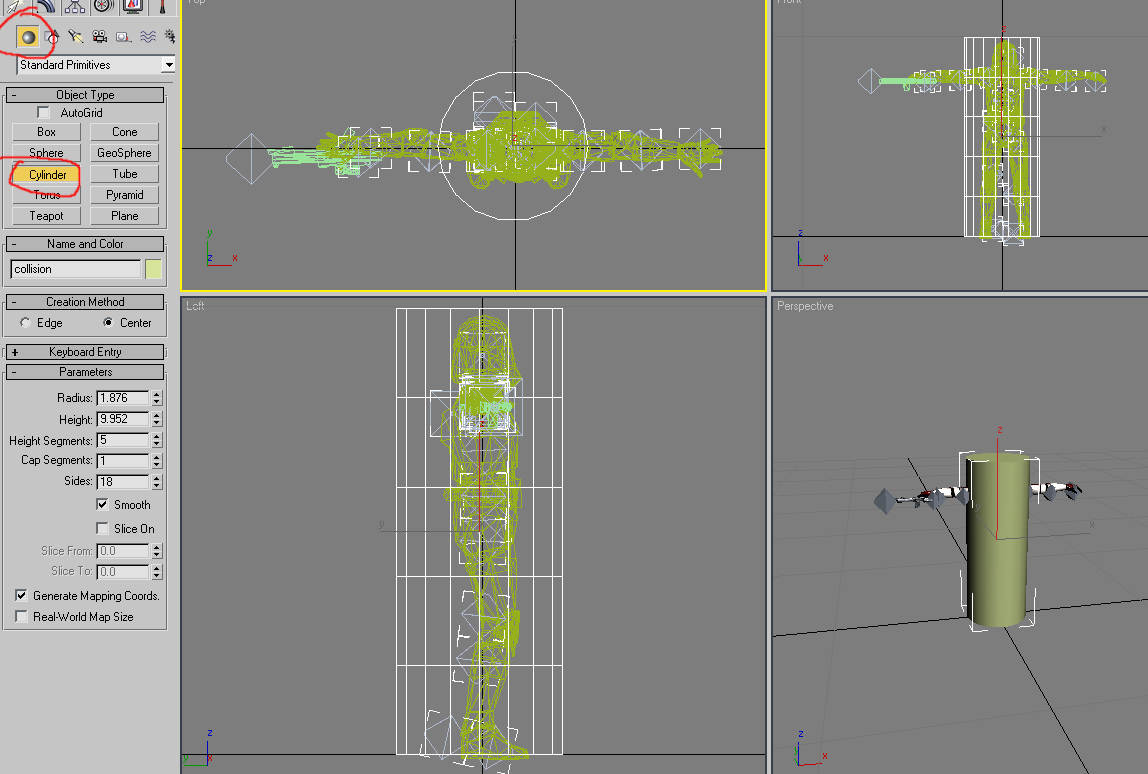
26) Its time to create a collision mesh. To do this, go to the geometry tab, then click the [Cylinder] Button. Create a cylinder that covers the center of the model and name the cylinder Collision.
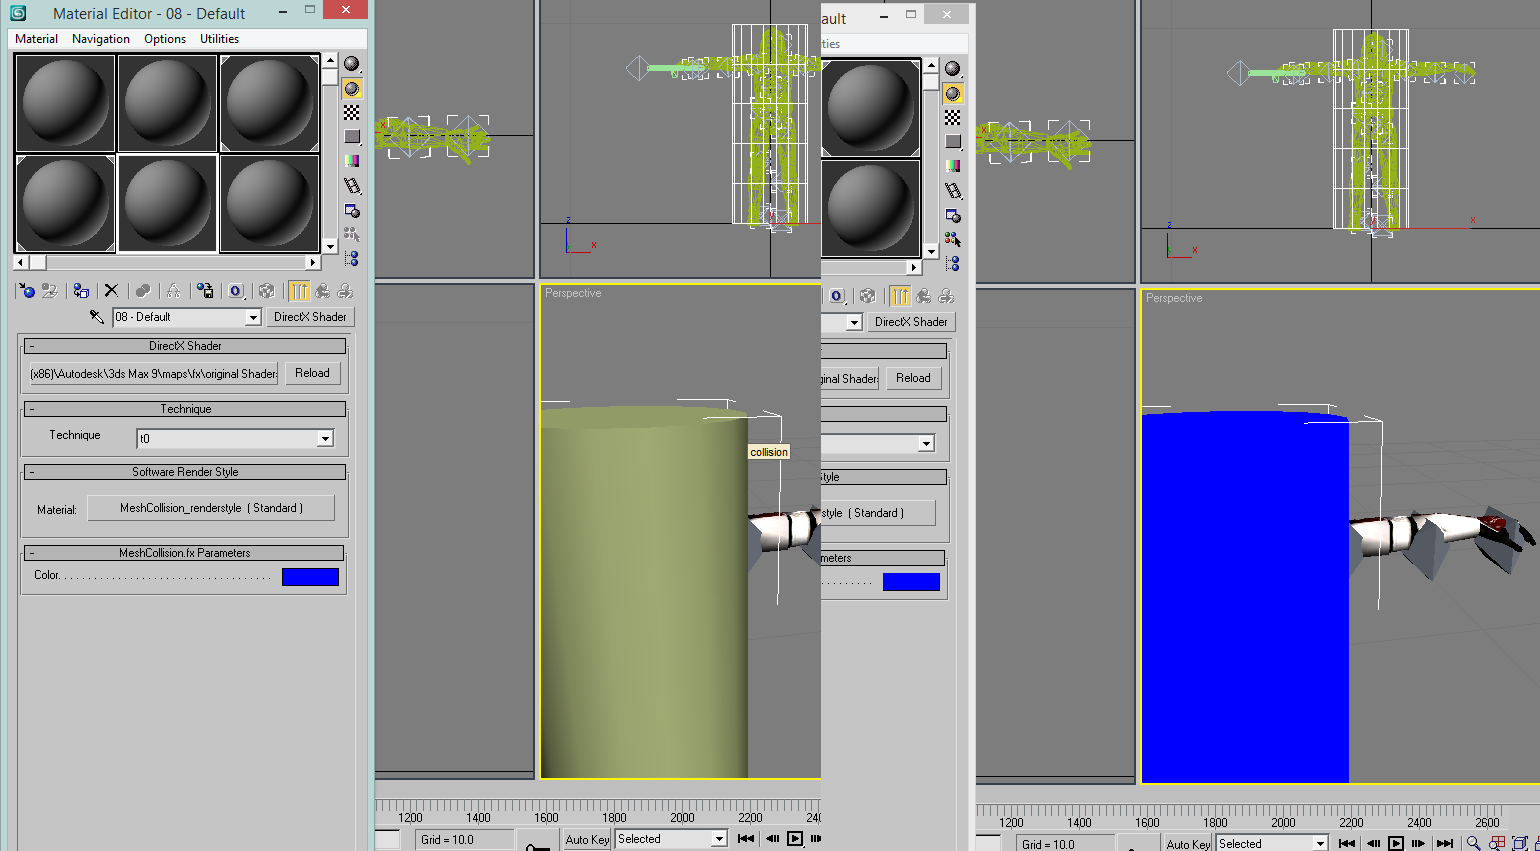
27) Lets apply the collision shader to the cylinder!
- A) click on the M button on your keyboard, and this will bring up the material library. Then select an unused material sphere.
- B) Click on the[Standard button] in the right side of the material editor, then click[DirectX Shader], Click Discard old Material and ok.
- C) With that selected, click on the button under where it says DirectX Shader. Select the MeshCollision.fx shader.
- D) Drag the material sphere onto the collision cylinder.
28) [list]
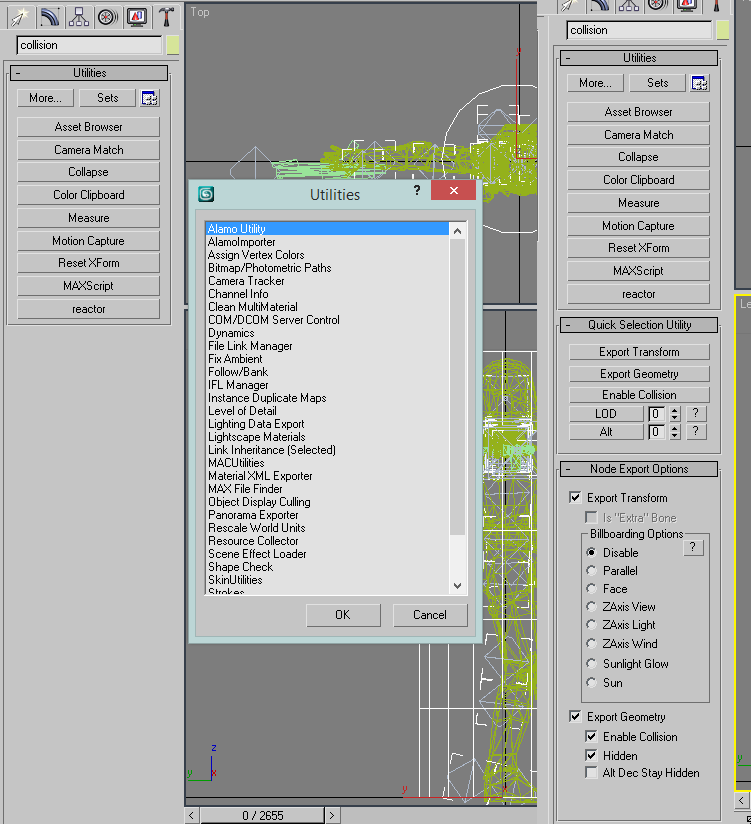
- A) Click on the collision cylinder. Next go to the Utilities tab
- B) Under the Utilities Category, click the [More] Button. There select theAlamo Utility and click the [ok] button.
- C) Under the Node Export Options, check both Hidden and Enable Collision.
- D) Hidden will make sure that the Collision cylinder isnt visible when the model is exported, and the Enable Collision part will make sure your model, and now new unit will have a collision box!
29) Your new infantry model is now ready for export! To do so:
- A) Click the File > Export Button
- B) set save as type to Alamo Object(*.ALO)
- C) Give your object a name.
- D) Not that if your new infantry model is named trooper.alo, then all animations for it will be named trooper_animationName.ala
30) Create an xml code for your new unit. What weapons, armor, hp, stats, and abilities you want your new unit to have is up to you! Though you can base the code off already existing empire at war units. Lets say you want to use your new custom model/unit to replace a vanilla empire at war infantry unit, you would locate the units code in the xml files, then look for . Then insert the .alo file name of your new unit there!
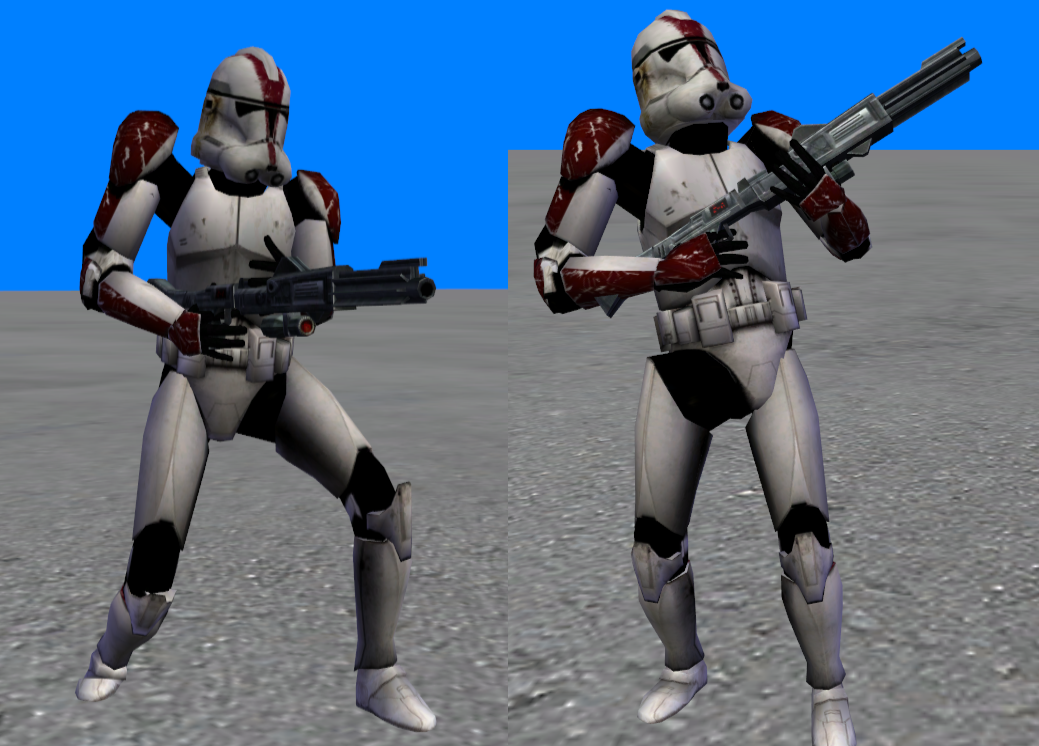
31) Here is the Clone trooper model shown in this tutorial fully rigged/animated:
32) Also heres a few infantry units I rigged earlier using these steps and methods: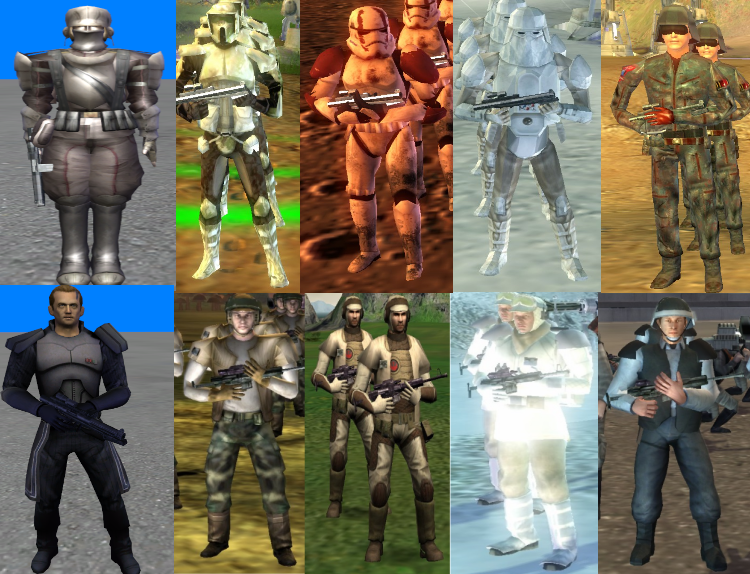
Additionally I also uploaded a similar tutorial to steam EAW Guides
Video version of Tutorial
I know this was a long read, this tutorial took a lot of time to write as well. Perhaps you'd prefer to see a video version of this tutorial? Though the tutorial in writing has more depth in it. Anyways heres a video version of this tutorial. Be warned though that although in the video I show a different model being rigged, the overall the concepts are the same in both tutorials.
Conclusion
Thanks a lot for taking the time to read this guide! I hope that you enjoyed reading it or benefited or learned from reading it! Thus I thank you sincerely and kindly for going through the guide. I wish you good luck in your own modding endeavors!

i find this tutorial very helpful but ive unfortunately been trying to find a version that will let me use the alo exporter but to no avail could not find it.
I do agree its becoming difficult to find max 6/8/9.
Though heres a link to 3dsmax8:
Moddb.com
This comment is currently awaiting admin approval, join now to view.