Prepariations:
1. You will need Gimp: Gimp.org
2. You will need the Gimp .DDS-Plugin: Code.google.com
Editing:
1. You have to open a Texture file you want to edit. For this example i use my Kingtiger HD-Skin.
After you opened it in Gimp you have to overlay it with a camo pattern (it has to be in the same resolution as the Basetexture you want to camouflage. For the level of the camo pattern you have to add an Alpha-Channel (Red in the Pic.)

(right Click and "show file" to see in full resolution)
2.
Choose the overlay mode for the Camo pattern level. (Red in the Pic.)

3.
If the it isn't colorfull enough you have to overlay it with the same camo pattern again and choose the "Color-Mode" (Red in the pic). Then decrease the opacityuntil you think it's fine. (Also Red in the Pic)

4.
Now cut all the stuff out from the camo-levels you dont want to color. Like in this example the Balkenkreuz (Red Square in the Middle). You will have to cut it out from all camo levels. (Red in the pic. (on the right side you can choose which level you want to edit)).
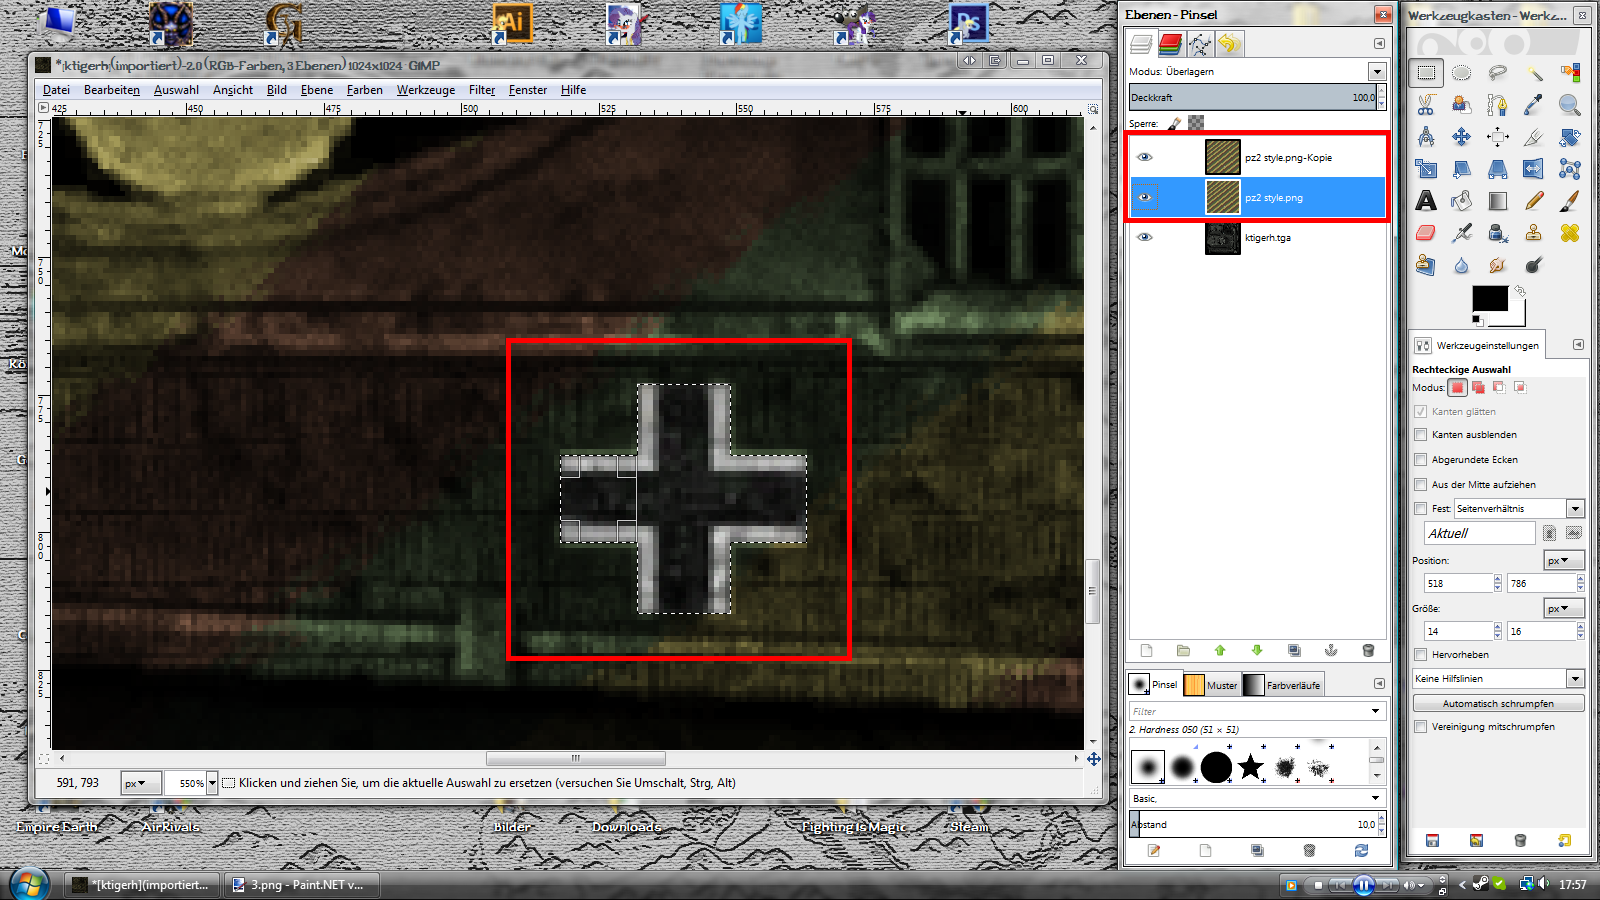
5.
That's it, you got a Camo Skin now!
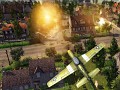
The Result:

That's it with my Tutorial, i hope it will be helpfull for you! ;)
PS: For questions use the comment-section.


I use adobe photoshop
any way, thanks!
Maybe try out another programm, or adapt the way you see here to photshop ;D
I like gimp too, btw. Gimp is just like easy version of photoshop
I use photshop just for post-producing, but as you see at the top i also got photshop elemts and photoshop :D
Oh. I haven't noticed it.
WTF!!!! Are you kidding me? GIMP is more complex, feature-rich, innovative, 20% cooler as Photoshop and free!
I make them like this already :D But nice tutorial anyway
It's for the beginners ;)
:D Yay it is :D It will use good for them ;)
It would be better if it would be in English :D :D XD
Do you think i will reinstal gimp in english for ONE tutorial? :P NO!
Ok :3 but it would be better i said :3
I did the same things for camos for guns :)
Good tuto that work perfectly for a very simple camo but this method work only if the base of the tank skin is one color, but it's not so simple if you want to adjust the rays of the camo between the body and the turret for example, that should be done only manually if you want a realistic result..
Anyway, good idea to propose this tuto.
Cheers,
Bass
Actualy i think it should be clear that it has to be a basic skin that is actualy without any camo. And not every tank crew cared about if the patches are pass over 100% exactly ^^
Very good tutorial. Works splendid on humanskin camos too.
I'm glad that it's usefull for you ;)
How do you add them into game.? (=
good tutorial btw
the most skin are in the e2.pak of the main recource of the game, if you make a skin you add a #(title) behind the filename. (the title will be the name of the textmod) then you have to make in a mod the same folder path and put your skin into there. then you should be able to choose it in the editor :)
Thank you i love your HD skins.
Thx & Glad to help, write me a PM if you got any more questions ;)
i cant find texture file :(
some texture files are in the texture/common/vehicle folder, but most ones are in the folder of the vehicle.
well , i want to edit Js-2 skin . when i open e2.pak -> vehicles -> tank_heavy -> Js-2 . i see many file and there is no .pdf file :(
PDF? oh please. As mentioned: .DDS, and the .DDS file is in exactly the folder. (is2.dds)
ehm..... how to install gimp .dds plugin ?
as far as i know there are insturctions... else.. you should maybe look up a gimp plugin installing tutorial? =)
i have read the instal insturction , but i didn't see any setup :(
cause you copy the plugin into the gimp plugins directory? ^.^
maybe ._. , i download "gimp dds 3.0.1 tar bz2" and i didnt see any setup in that file
I SAID; YOU HAVE TO COPY IT INTO THE GIMP DIRECTORY, YOU SAID AGAIN THERE'S NO SETUP. ARE YOU RETARED?
ou..... :o ok ok , i'll copy it
glad to help ;P
copy to "program files -> GIMP 2" right ?
Wtf? How old are you?
you've been asking about two times whys there's no setup, and then, merhabi told you that you have to copy the plugin into the gimp directory...
here, are you too retarded to google??
En.wikibooks.org
On Windows, go to folder GIMP is installed in (usually somewhere in Program Files). Once in the GIMP's main folder navigate to lib\gimp\*version*\ where as *version* represents the version of The Gimp. Then double click the "plug-ins" folder. Not all plugins will run in Windows if the OS is 64bit, "normalmap" is one.
ok , thank you :D
hey ! it works ! thank you very much :D
Does this method work with AS2 as well? when i open up a texture file there are multiple layers of different sizes for different distances and when ever i save a file in the right format, even if i open and save it, the areas that are suppose to have negative space (or see through) are black and have boxes through them. Maybe I'm just noobing it up all over the place.
In gimp, rightclick on the files you are overlaying and add an alpha channel, then the transparency shouldnt be a problem anymore.
Ah, completely forgot about those dang alpha channels. Works like a charm now. Thanks merhabi. It's also kinda funny how all you have to do is open up and export already existing vanilla skins and they look so much crisper.
Well, there are also HD skins and other stuff to do, but noone ever asked for a tutorial ;P
glad to help btw ;D
I realize I sound like a noob right now, but I have GIMP2.8 as of a recent download and I can't seem to mess with layers. I just want to make a German Field Gray skin for my Königstiger... And from that work to make more. Anyway, I can't seem to get the layers to work with 2.8. Any thoughts?
This comment is currently awaiting admin approval, join now to view.
This comment is currently awaiting admin approval, join now to view.
I can't open skins with gimp
you need DXTbmp
i sound like a noob right now but, i cant find the texure file for MOWAS. Because i went to programfiles/Steam/SteamApps/Common/ and then open MOWAS and i just cant find the texure file.And on gimp
How to get a texture??
gamefiles. most are in the e2.pak under resources. (you can open it with winrar)
Hi merhabi, I have one question to you. I were read very carefully your tuto but, I still don't know how to make my skin works. Could you explain what should I do after editing, step by step. What do you mean by " then you have to make in a mod the same folder path and put your skin into there" Should I creat "mod.pak" in the same place where is "e2.pak" or what ? Please help mate. I try do skin for veteran tiger for Men of War Assault Squad 2.
i answered your pm (: