Welcome to the Mod DB page for Skeleton Boomerang! If you're reading this, you're likely interested in starting your own mod, which is what this guide is here for. This tutorial will cover the basics of creating a mod for Skeleton Boomerang, converting it to a sharable file, and releasing it! More complicated processes like code editing and adding larger sprites will not be covered here, though feel free to experiment on your own or ask over on the Skeleton Boomerang discord for additional help (https://discord.gg/EDYTbD5w). Without further ado, let's begin!
First, it's important to download two things: UndertaleModTool and Delta Patcher. UndertaleModTool is the way we'll be opening up and editing the game itself, and Delta Patcher is required to convert your mod into a sharable patch that can then be released. Download and extract both before you continue, and make sure you have them saved somewhere you can find them later.
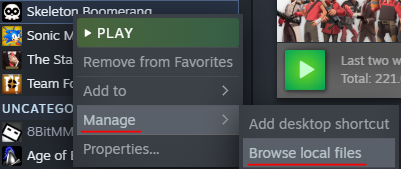
Next, let's open up the game's files itself. The file you're looking for is a data.win, which you can access by going to your copy of the game in Steam, right clicking, and going to Manage > Browse Local Files.
IMPORTANT!!! It is required to back up your data.win file before modifying it so that you may return to the unmodified game at any point, as well as to create a patch using Delta Patcher. If you choose not to do this, you'll have to use Steam's "Verify Integrity of Game Files" feature, which will remove any modifications to the game files. Modifications will also be removed when you update the game, so it is recommended to also back up any mod files you wish to keep in a separate folder.
Now that you have the data.win, open it in UndertaleModTool. This should be simple, and after loading for a moment you should see something like this:
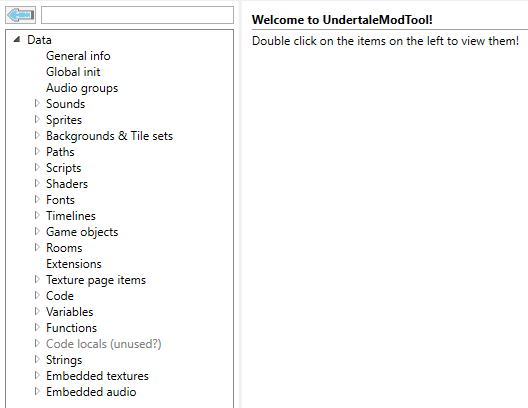
Each of the categories on the left contains various game data that can be searched through by name with the above search bar. To open a category to browse its contents, click the arrow on the left of its name, and to open a specific item in that category for editing, double click the item. Keep in mind that items may be named differently then the normal game, or use underscores or nothing at all instead of spaces.
Let's go over the main sections, what they contain and details about modifying each:
Sounds - Contains all sound files for the game. Sound files can be played and stopped with the respective buttons, and imported or exported by either double-clicking the area with "(UndertaleEmbeddedAudio#[number])" or clicking the three dots to the right of said area. If the area that should have the UndertaleEmbeddedAudio label instead displays "(null)" then those files are stored outside of the data.win in the game's folder and can be replaced easily.
Sprites - Contain most sprites for the game. The "Textures" section contains each frame of an animation, along with a preview beneath. Clicking once on a frame will select it and display it in the preview below, and double-clicking will open the sprite to be imported or exported. You can export all frames of an object to a folder of your choosing with the "Export all frames" button. WARNING! It is heavily recommended that imported sprites are the same size as the original object, as lower sizes frequently mess up the centering of the object and higher sizes cause issues if not further modified to be recognized as larger by the game, which is a more complicated process not covered in this guide.
Backgrounds & Tilesets - Effectively the same as Sprites, except containing backgrounds, tilesets, and other objects not in Sprites. The only thing of note is that the "Textures" section is now simply "Texture".
Code - Contains all the code for the game. This guide will not go in depth on code editing, however as long as you make sure to keep a backup of your data.win, there's no harm in experimenting with the code, and it could help you learn how it works yourself.
Strings - Contains all text in the game. This includes both the internal labels for objects as well as, more importantly, the text displayed in-game. The only thing to remember while editing is that # signs force the text to move to the next line.
When you're ready to save and test your changes, you can do so by clicking File and then navigating to either Save or Run Game. Make sure to save your data.win to the game folder!
Now comes the sharing of your mod. This is where Delta Patcher comes in. Within the Delta Patcher download is a normal and "Lite" version. To create a patch, you'll need to use the normal version. You should see something like this when opening:
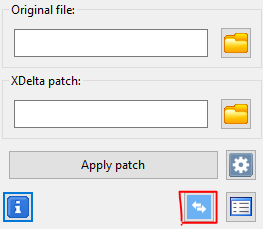
Click on the icon outlined in red first. This should switch the "XDelta patch" area to say "Modified file" and add two additional areas labelled "XDelta patch" and "Description" respectively. Add your unmodified data.win in "Original file", and your modified one in "Modified file". For the "XDelta patch" section, enter a name in the text field and then click on the save icon to select a folder on your computer to save the patch to. If desired, write a description of your mod in the "Description" section, and finally click "Create patch" to save your mod as a patch.
And now, there's only one thing left! Preparing your mod for release! Put your patch in a folder along with a copy of Delta Patcher Lite and (optionally) a short text file on how to install, right click the folder and select "Send to > Compressed (zipped) folder", and you're ready to go! Uploading to Mod DB should be a relatively simple process that guides you through itself, so it won't be covered here, but besides that, your modding journey is complete here! Thanks for reading, and I hope this was a helpful guide. If you have any questions, feel free to join the Skeleton Boomerang discord, as linked in the beginning of this tutorial.