Tutorial originally released on Running With Scissor's Postal website. Was taken down more than 10 years ago. Mirrored here for archival purposes.
POSTAL 2 Editor and Modifications
Doors and Movers
This tutorial covers how to place create,place and pathnode around a DoorMover in Postal 2.
It assumes you have some understanding of and experience with PostEd and you have some knowledge of pathnoding. If you are unfamiliar with these we suggest you familiarize yourself with these using tutorials available on other sites.Concerns: DoorMover, SplitMover, Door, MoverExplanations:
DoorMover: extends Actor::Mover::SplitMover
Gameplay:
This defaults to a double-hinged door. The player will bump the door and it will open and stay open as long as nothing touches it. If the player bumps it again, it will close. If the door is opened up against a wall the door will be able to be closed again by the player. Keep this in mind when designing how far open the door opens. Perhaps you’ll only make it open about 70 degrees, so the dude could get back behind it if he wanted. A pawn that bumps it will cause it to open, it will stay open for StayOpenTime and then close again
Static Mesh Creation:
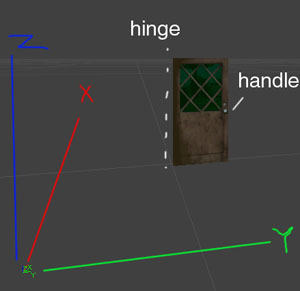
There is a specific pivot point and orientation with which to create the static mesh to be used for doors. It is as follows: The pivot point is next to the hinge side and at the bottom, in the center of the thickness of the door.
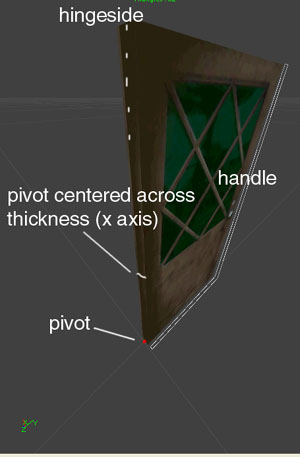
Here’s another pivot helper view:
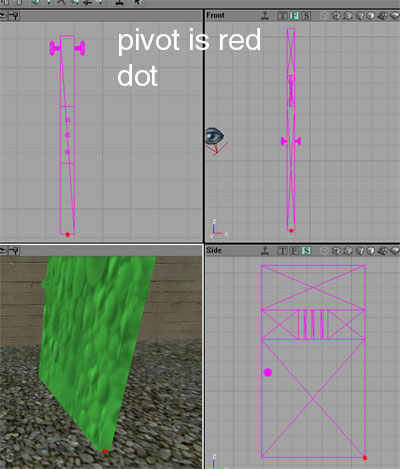
The orientation should be such that the hinge is at the origin while the side with the handle/door knob is further out in the Y direction. The thickness is in the X directions. ANY other orientation could break. It might work, but most likely there will be weird side effects for your door. So follow this design closely and you’ll do fine.
Once placed in the level, you can rotate the doormover to any orientation around the Z- axis that you wish (rotating it). You just have to build it at this certain rotation for things to work.
Placement:
This is what you use to make a double-hinged door. Place this in the level where you want the physical door. Select Display and set the DrawType to StaticMesh and then set your static mesh for your door. The default size is for a 208 high door that is 112 wide. That’s not some radius crap, that’s the full height and width of the door. If you’re door is a different size, you must set the collision height and radius yourself.
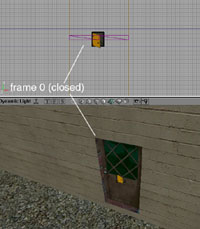
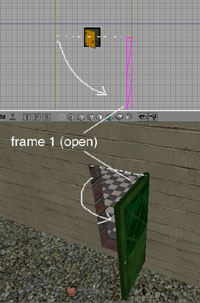
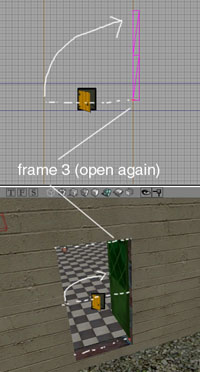
Now that you can see your door, you must set it’s key frames. This is specially ready for a hinged, rotating door with its pivot point at the bottom and on the side of the hinge. Move it to where you want it. Make sure to the get the Z correct. From the top view it’s easiest to set the rotations. This will use frame 0 and frame 1 for first rotation. Set frame 0 as the base, THEN set frame 1, and then rotate the door outward to where you want frame 1 to be. It locks when you select another frame. This is how the door will swing one way.
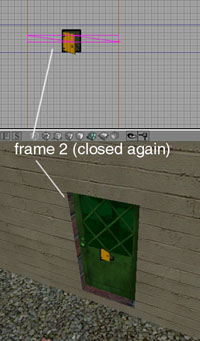
To make the other way, select frame 2 and rotate it to the closed position again. Now select frame 3 and then rotate it open, in the opposite direction. In the properties set it to frame 0 for the starting frame, so it’ll be closed when you start.
Advice:
If your door is rotating toward you on both sides, swap the paths by resetting everything but rotating in the opposite directions and try again (so start with frame 0 at the center, but set frame 1 open the other way, frame 2 the same at center and frame 3 flipped).
As with all movers, after placing them, setting the frame points is simple, but the order may be confusing. You must set the frame number BEFORE you move it to where and how you want that frame to be. Say you place a mover/door. It is in frame 0. However you rotate it, or move it, that gets saved into frame 0. Now to create frame 1, go to Mover:KeyNum property (or the nice little right-click Mover:Key settings) at set the Key to 1. Now move it to where/how you want KeyNum 1 to be. Frame 1 is done. You can continue to mess with it, but it will only be saved you select another frame. So make frame 2, set it now, then move it into position, and so on.
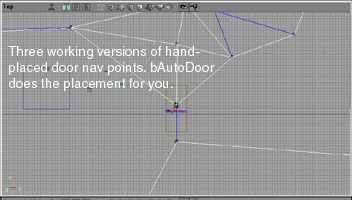
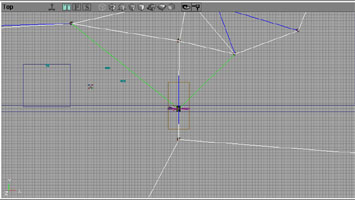
Build all and make sure the paths connect to the door point. If your autodoor node complains about being inside the door, simply build the path nodes again and it should take. If your autodoor navigation point gets placed well below your doormover, this may be because you have terrain below the BSP under that door. You must turn off bAutoDoor
bMakeBuffer is by default set to true. This will cause a DoorBufferPoint to get automatically generated and linked to your door. This will help out multiple people at a time get through your door. This is good for doors on the outsides of buildings. Turn it off for buildings in doors if you don’t expect a lot of people going through them.
SplitMover: extends Actor::Mover
This is where the new DoorMover comes from. The SecondPathKeyNum says where the split path will start. If you set NumKeys in Mover to 8 and set SecondPathKeyNum to 4, you will have perfectly split all available points for your mover. So the first path will go from 0 to 3 and the second will go from 4 to 7.
The two paths are triggered based on what direction you hit the mover at. If it seems backwards, then swap the paths and try again.
Door: extends Actor::NavigationPoint
NOTE: Door only needs to be used if you have Mover:AI:bAutoDoor set to false. DoorMover.uc defaults this to true, so most of the time, you won’t need to screw with this.
This is not an actual door, but more of a door navigation point. The name is misleading. From now on I will try go call this a ‘door point’. These are to be placed inside of, or on either side of but very close to the mover you have as your physical door. I will call this your ‘door mover’. If you rebuild now, no pathnodes will connect through this door mover. First, you have to set your Events:Tag on your door mover. Set it to say, DoorMover1. Then inside your door point, under Door:DoorTag set that to DoorMover1. This links your door point to your door mover. Rebuilding geometry and paths will should cause the paths to connect through your door. If they aren’t connecting make sure you check the tag names, check the distance of your surrounding pathnodes (they must be within about 1200 units), and then lastly try moving around your door point a little, inside your door mover.
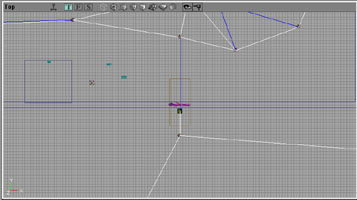
1: ‘above’ (these are top down views though)
2: ‘inside (these are top down views though)
3: ‘below’ (these are top down views though)