Originally posted here: www.planetavp.com/modmaker/
Created by: William "modmaker" Bostjan
Mirrored here for archival purposes
Using a camera
- complex movement of objects
- base and keys
- Setting the path
Changing the aspect ratio for a truly cinematic experience. Basically a point and shoot system. You can easily switch the camera on and off. rs to make a truly unique mapping accomplishment. inevitably make.
Setting up a camera is as simple as rotating, point and shoot.
You might want to set up a new sample level for this.
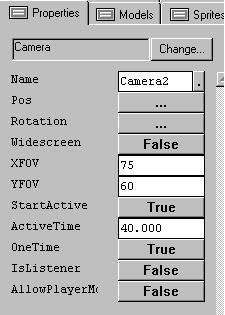
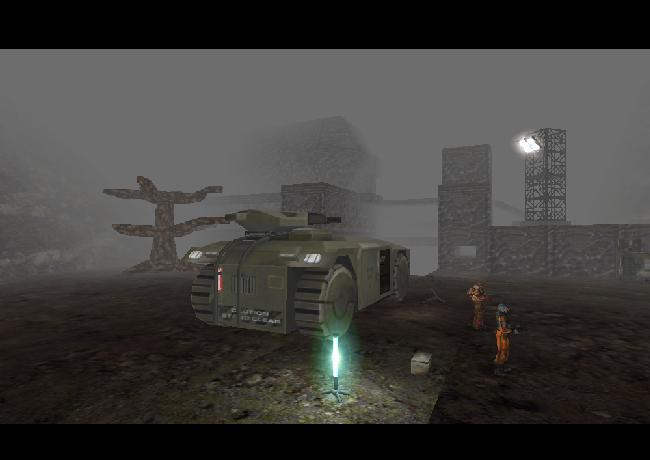
This is an example of the letterbox format or WIDESCREEN. It changes the aspect ratio. Gives it more a of a cinematic look. You can choose not to use it. This is taken from my level Breakdown.
The important thing with a camera is it overrides the player view. Guaranteed. So if you start a camera it take precedence. This is important that you dont set up a camera to play in a situation where your player can be in the process of being attacked. Cause he won't be able to defend himself. It should also be remember that in a Multiplayer game if the camera gets switched on, every player in the level gets to see the same cinematic.
The camera can be set to a ACTIVE TIME, in this case 40 seconds. If you set the time to -1 , it sets the camera to infinte, and then you can switch it on and off using messages.
msg camera 34 On;
msg camera01 Off;
Based on experience, I would suggest you always place an ACTIVE TIME on the camera object, so it shuts itself off at some point. Eventually.
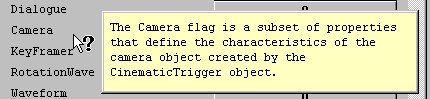
Most the other flags are self explanatory. If you rightclick on the fields you'll get a run down. The ALLOWPLAYERMOVEMENTS isn't coded so you can't do much with it. Leave it false.
The camera object is the poor cousin to the next object we are going to have a look at, the cinematic trigger. But it can serve a purpose. it is a quick unencumbered different point of view that you can easily set up in game for a variety of purposes.
Plus all you guys with filmmaking aspirations. Machinima and Lithmation are a great way to delve into moviemaking and animation to create your next epic. Its easily the least expensive piece of quality movie making potential you can get your hands on. Take advantage of it.
A Cinematic
- Using the Cinematic Trigger
- Setting Dialogue
- Opening up the cres.dll
Cutscenes help make a game interesting. They tie together the actions sequences.. Can't really teach cinematic ability, thats a whole course in itself, to decide angles and shots, but making a dialogue sequence is easy enough.
Start up a new level in dedit. Call it my first movie.
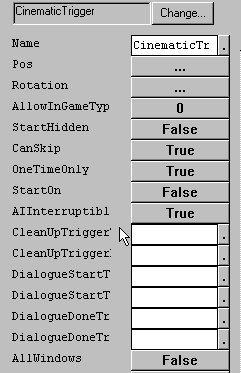
Along with the camera Dedit offers the CINEMATIC TRIGGER to make cut scenes.
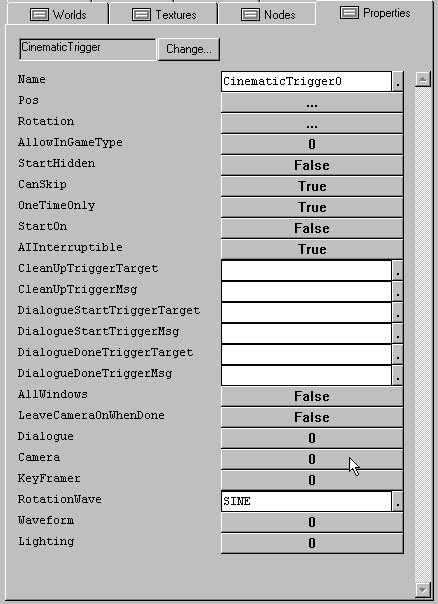
As you can see, it takes many of the best features from a few other objects and groups them together into a super powerful object that can produce quite a bit. It gives you an option to create a camera, it has many of the same options a trigger features, and it has a built in Keyframer.
Different styles of filmaking have different techniques mixing it up with standard triggers and the camera object, but the advantage of using the CINEMATICTRIGGER is a couple of the flags that give extra interaction.
THE MOST IMPORTANT BONUS of CINEMATIC TRIGGER CAMERA over a regulr camera is the players ability to turn it on and off.
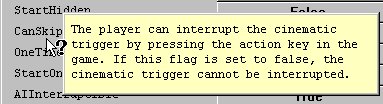
CAN SKIP is every important. Think about, a player finds himself in the same area and has to watch your cinematic for the 12th time.
OneTimeonly, if set true can only be played once.
Start on=TRUE, the cinematic starts up on load of the level. So if you want a nice cut scene to start your level set it TRUE.
THE TRUE GEM of the Cinetrig is the dialogue menu
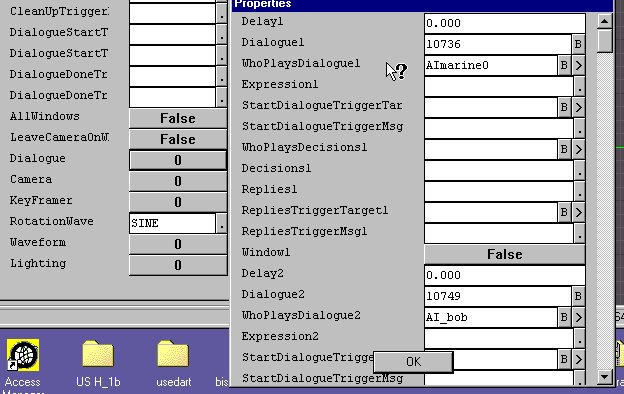
Its very straight forward and easy to use. You set up a scene, lets say two Marines facing each other. We'll leave one with the default name AImarine0 and the other one we will name AI_bob. simple enough.
We add a cinematic trigger. The one thing we could need though is a copy of Visual C++ so we can open the cres.dll, to have a look at all the dialogue option. Luckily we can also go into the SOUNDS tab on the left and look into the DIALOGUE folder.
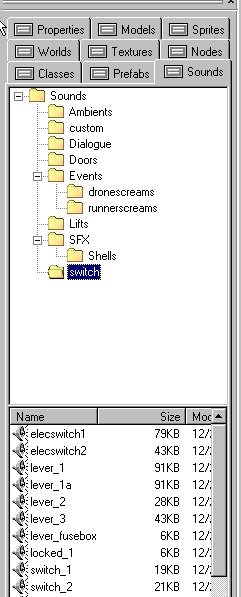
In there you will find a corresponding NUMBER for each dialogue .WAV file in the game. Choose a couple. and add them in the coressponding field, Dialogue1, dialogue2.
NOW if you wanted to add some truly amazing things.
You could add animations for your characters as they say the lines. and then proceed with some other actions. You can literally do anything that your mind's eye desires.
WHEN ITS OVER, WHO's GOING to CLEANUP
The cinematics work with the characters having their GOALS set to Script. When AI have their goals set to script they don't react to threats. That is why the CINEMATIC TRIGGER gives you the option to CLEANUP after a cutscene sequence. The CLEANUP TRIGGER, usaully resets the senses of the AI, or removes them completely, or sets new goals like attack, and perhaps some additional messages.
The things you can do with this object could fill an entire course of study. Have fun, and remember to thank me when you get an oscar for your cinematic brilliance, for teaching the basics. heheh ;-)
Giving AI a script
- Choose your AI
- Set your nodes and volumes
- Syntax for AI scripting
- Openning Medit for animations
Cutscenes help make a game interesting. They tie together the actions sequences. Can't really teach cinematic ability, thats a whole course in itself, to decide angles and shots, but making a dialogue sequence is easy enough. Making Ai do things its just a question of openning up ModelEdit and studying some animations.
This is a section from another Tutorial written by a user named "Ras" on AVPUnknown. Also mirrored here for archival purposes since I couldn't find documentation on how to do any of this anywhere else.
Originally posted here: Avpunknown.com
In this tutorial I will, assuming you have prior knowledge of DEdit and working with AI, explain how to work with a dialogue selection system (sample files are included).
----------------------------------------------------------
What is a dialogue selection system, exactly?
Well, you can see pretty much how all of it it works in the .ed file supplied - but I'll give a rough explanation of the setup.
When you press use on an AI, you'll be paused (via the "swap" command) and then a box with three selections of what to say will pop up, controlled by the 1, 2 & 3 keys, respectively.
These are the choices and responses I've set up for the sample file.
- CHOICE 1: "Nevermind."
- RESPONSE 1: "No problem, sir."
- CHOICE 2: "Come with me."
- RESPONSE 2: "Yes sir."
- CHOICE 3: "Stay here, guard this door."
- RESPONSE 3: "Yes sir."
In order to edit this for your own purposes, you must modify the reply triggers (nevermind, comewith, guardhere), these pretty much allow you to have anything said, happen, occur and so on - you could have one of the choices have the AI say "Yes sir." then have an explosion blow half your map, it's really quite flexible in what you can do with it.
In the CinematicTrigger named "GuardChat" you'll find that it's pretty straight forward, they align together down the properties list and stringboxes - for example: (look at the .ed first and this will make sense.)
- Player;Player;Player - This controls who says the dialogue clips that go with the text (read on for explanation).
- 29510;29511;29512 - The strings which display the player's choices (in text) - if there's a dialogue clip with an identical name to the string numbers then the player should speak based on which one you choose, given that this system is how subtitles work - the string number in cres.dll with it's text corresponds to a .wav file in the sounds/dialogue folder.
- NONE;NONE;NONE - If you want an option but don't want anyone to speak the dialogue clip that goes with the string to play then set the target value to none, you can set a clip for any one of the strings, for example NONE;Player 20510;NONE - this makes only the second choice play a dialogue clip.
- nevermind;comewith;guardhere - This determines what objects should be targeted for the messages below, corresponding to the option keys 1, 2 and 3, respectively.
- TRIGGER;TRIGGER;TRIGGER - This sends the message to the specified entities, corresponding to the option keys. They are all trigger entities (nevermind, comewith, guardhere) so they will accept this command, though you can set this to be anything like opening a door or deactivating an AI - what I've done here is set up three triggers to act as responses from the AI when you make a choice.