This is a series of tutorials on making a Crysis map using the Sandbox 2 editor. Created by konakona in 2007. Mirrored here for archival purposes as his website has been offline for 10 years now.
CryEngine2 Sandbox2 Basic Tutorial
By konakona (aka Firebird) 2007
Designed in Firefox and coded in Notepad Welcome to the Sandbox2 basic tutorial! I hope you come away from here knowing much about the basics of the Sandbox2 editor.
I should put in the Special Thanks section here because I reckon these people deserve more than being pushed to the bottom of the document - and I'd probably forget otherwise.
So anyway, Very Special Thanks goes out to:
NBtX, for hosting this tutorial and many other crysis-related things of mine.
Pul5eh, for those excellent Time Of Day tips: Thanks!
kalvo, for being a lab rat.
crab, for being one too.
If you are an absolute beginner and have never even installed Sandbox2 before, you may want to follow these instructions.
First of all, navigate to where you installed the Crysis SP Demo (Most likely C:\Program Files\Electronic Arts\Crytek\Crysis SP Demo) And then open the Sandbox2 Installer folder. Run the installer in there, and then you can find the editor at C:\Program Files\Electronic Arts\Crytek\Crysis SP Demo\bin32\editor.exe - you may want to create a shortcut on your desktop or in the start menu for this.
Creating a new map
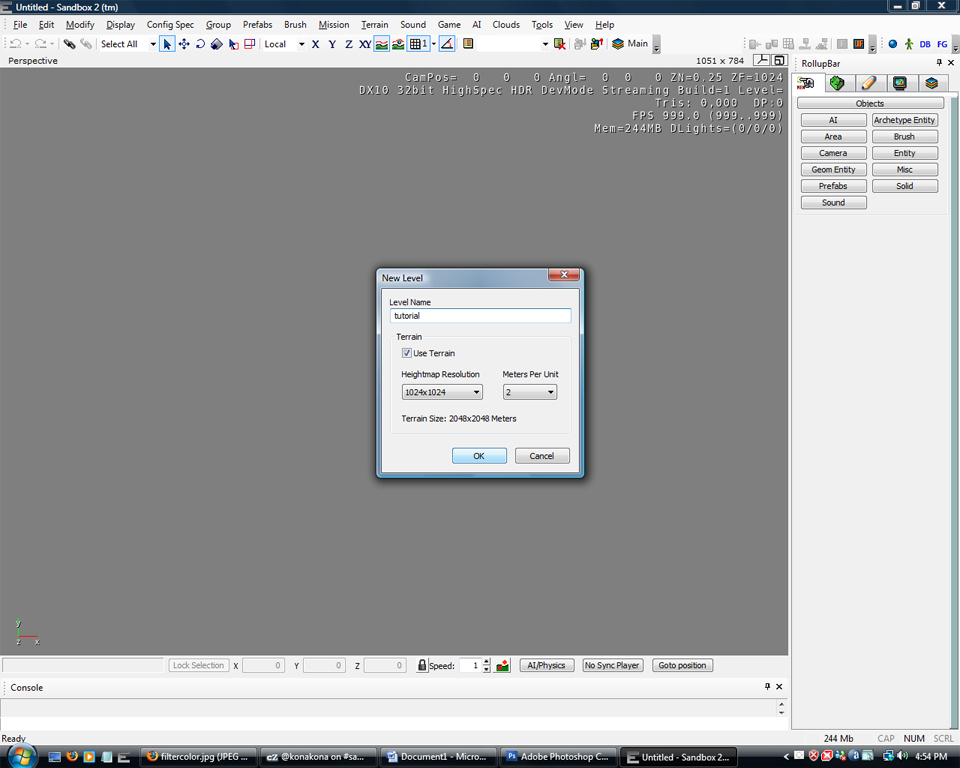
First things first. To create a new map, go to File > New and call your new map 'tutorial'. The other options are just fine so leave them be.
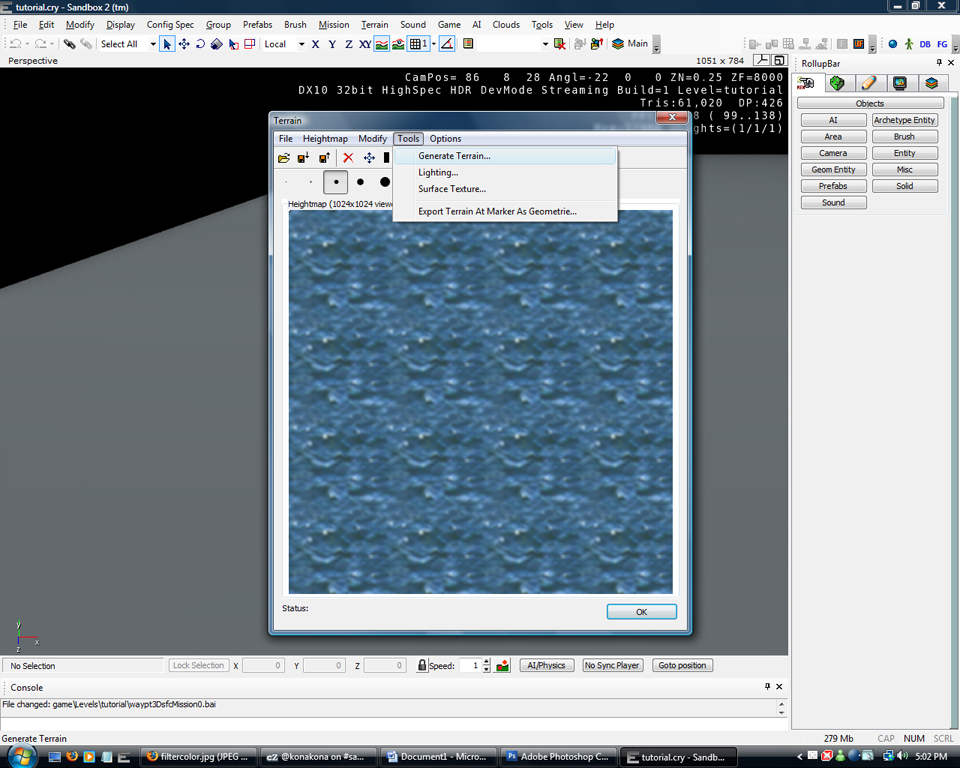
And the first thing we'll want to do is generate some terrain so that we may walk on it. So open the Terrain Editor window by going Terrain > Edit Terrain. once you're there, go Tools > Generate Terrain to generate some random terrain. When you've done that, click OK.
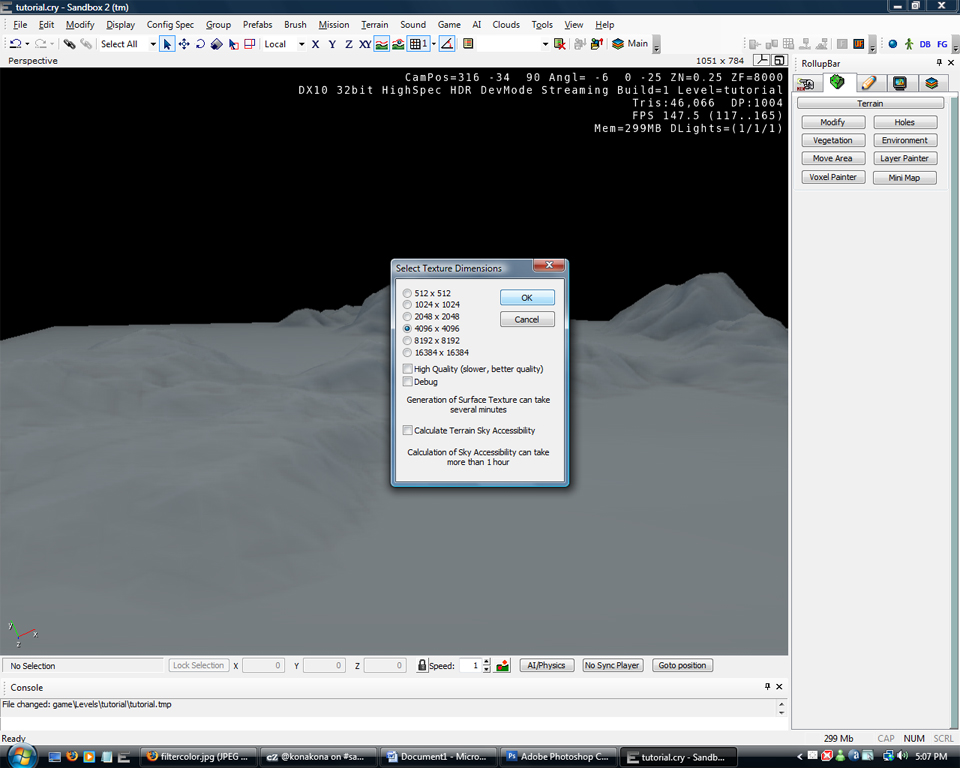
Now we need to generate the surface texture, so go File > Generate surface texture. When the dialogue pops up, you can just click OK.
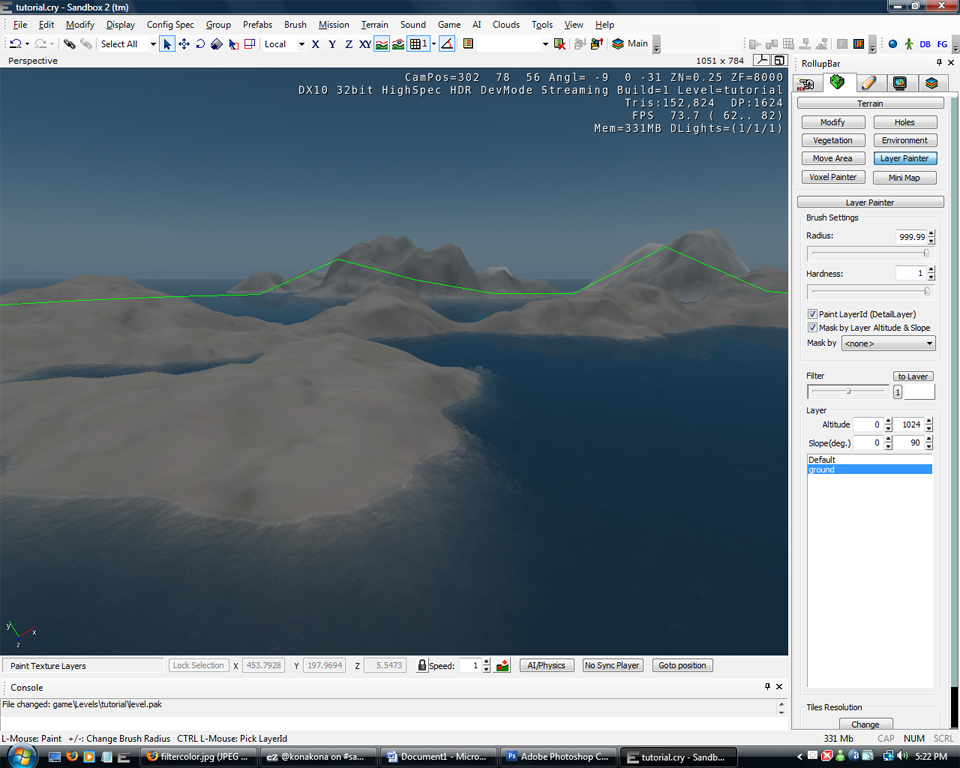
Now you should have some islands surrounded by water. The islands are quite boring at the moment, so let's liven them up and give them a texture. Open Terrain > Texture and click on the New Layer button (it's next to the red X). Call this layer 'ground'.
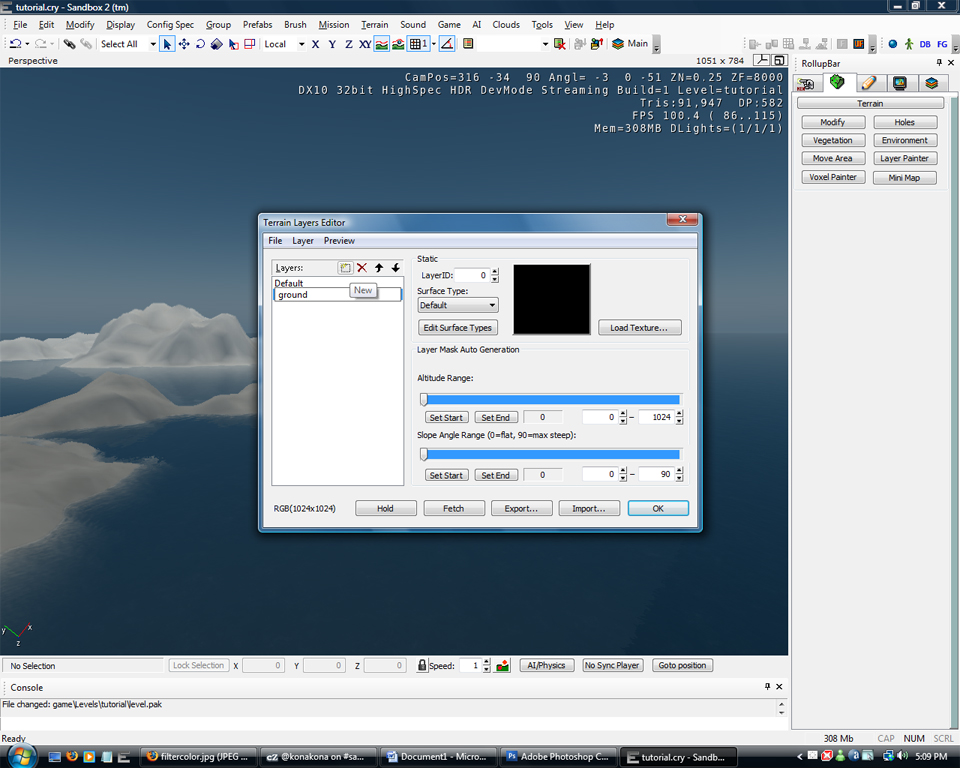
Press Enter to finalize the layer name and then select your layer by clicking on it. Now click on the Edit surface Types button. Create a new surface type (click the add button) and then double click to rename it. Rename it to 'ground' - reflective of our layer name.

Now click on the Material Editor button to open it. Navigate to the Materials > Terrain directory, and select beach_white_sand.
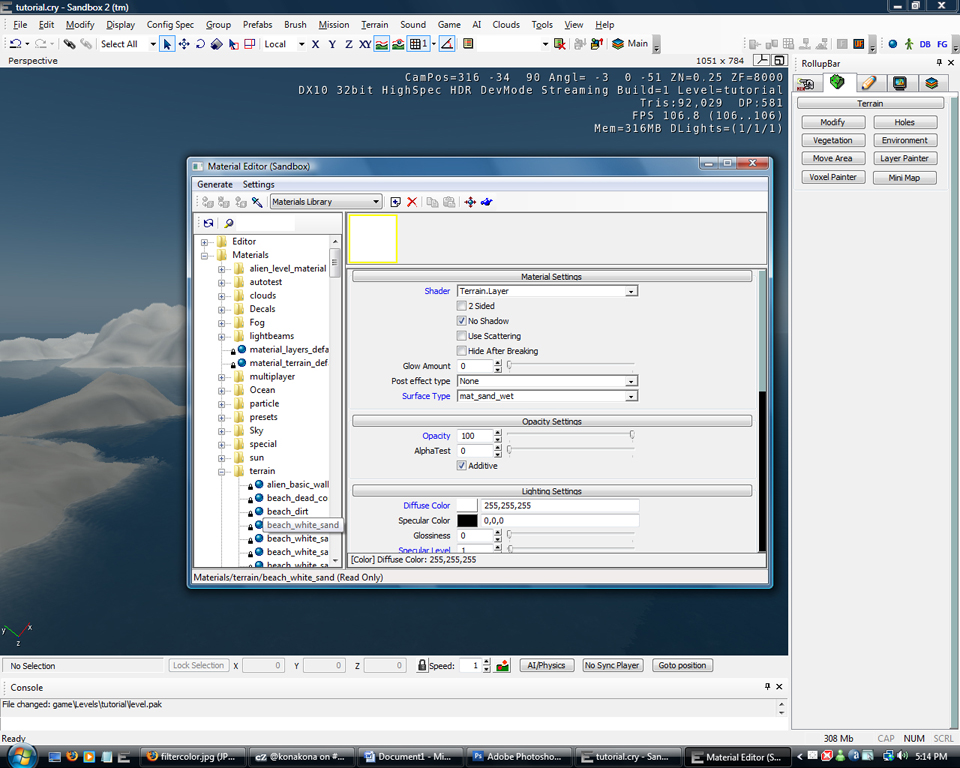
When you have selected it, close the Material Editor and in the Surface Types editor, click on Pick Selected. Then click OK. Now back in the terrain layers editor, select the ground layer and select 'ground' from the surface types dropdown box.
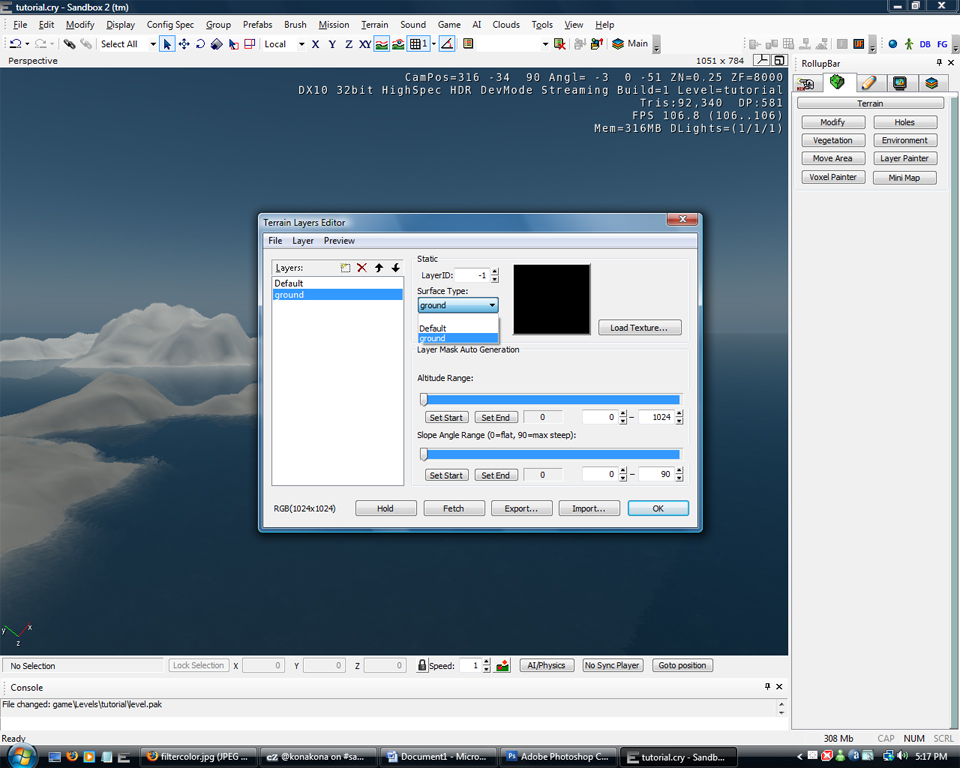
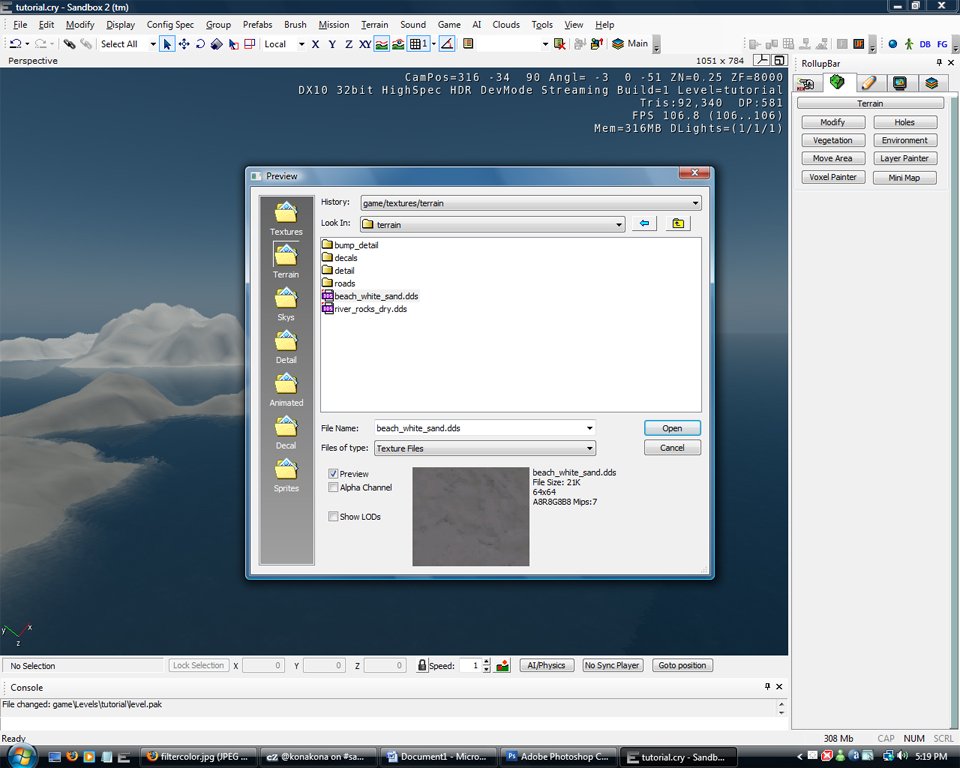
Once you've done that click on the 'load texture' button. You should end up in the /game/textures/terrain directory - if not, click on the terrain button to the side. Open beach_white_sand.dds.
Now click OK in the terrain texture editor. Click 'Layer Painter' on the RollupBar (the sidebar) and move the radius slider all the way to the right, and make sure 'ground' is selected as the layer. Move your mouse into the perspective view (the 3D view) and left-click to paint your layer.
Now our terrain is textured - so let's see if we can jump into the map and walk around in it. Go File > Export to Engine, save your map (File > Save) and then restart Sandbox2. Reopen your map. Now place your camera over some terrain and press CTRL+G (or Game > Switch to game). You should now spawn in your map where the camera was, and you can move around. Play around for a while if you want.
Vegetation
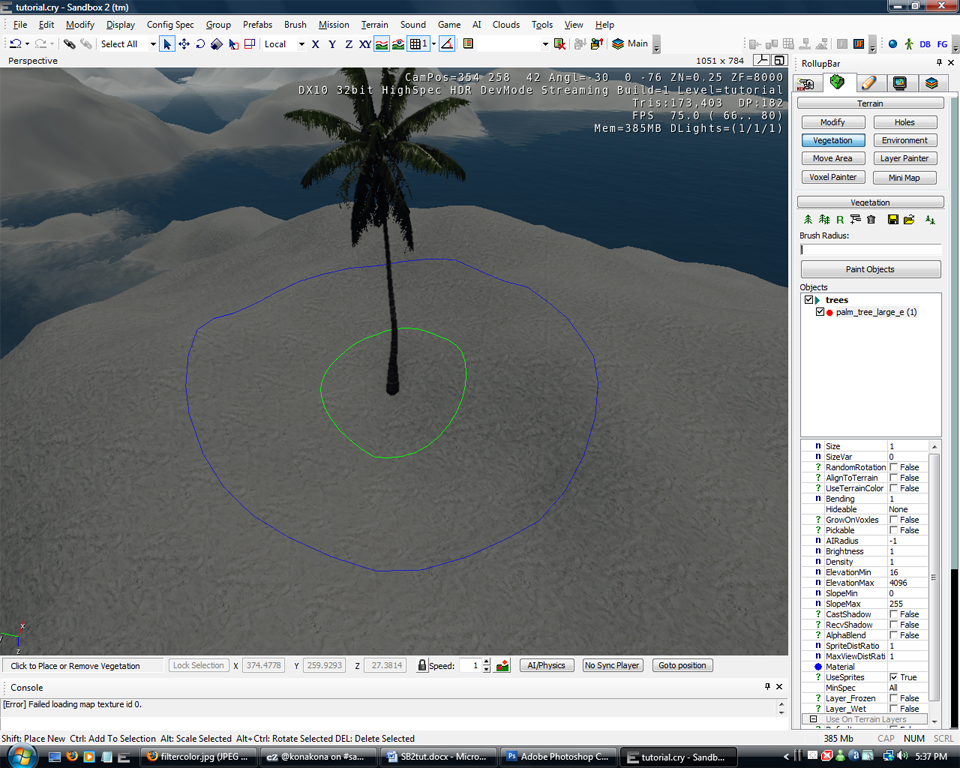
This map is quite boring, because it has no features. Let's add some trees. So press Escape to exit ingame mode and click on the terrain tab on the RollupBar, and then click on the Vegetation button. Now click on the 'add vegetation category button' (It's on the same row as the icons with trees on them), and call it 'trees'. Now select your new category and click the 'add vegetation object' icon (the one with a single tree on it). Now click on the 'natural' icon on the side of the open dialogue, then navigate to trees > palm_tree. Select palm_tree_large_e.cgf, and open it.

Now click on the palm_tree_large_e in the objects view, and Shift+Click in the perspective view to place a single tree.
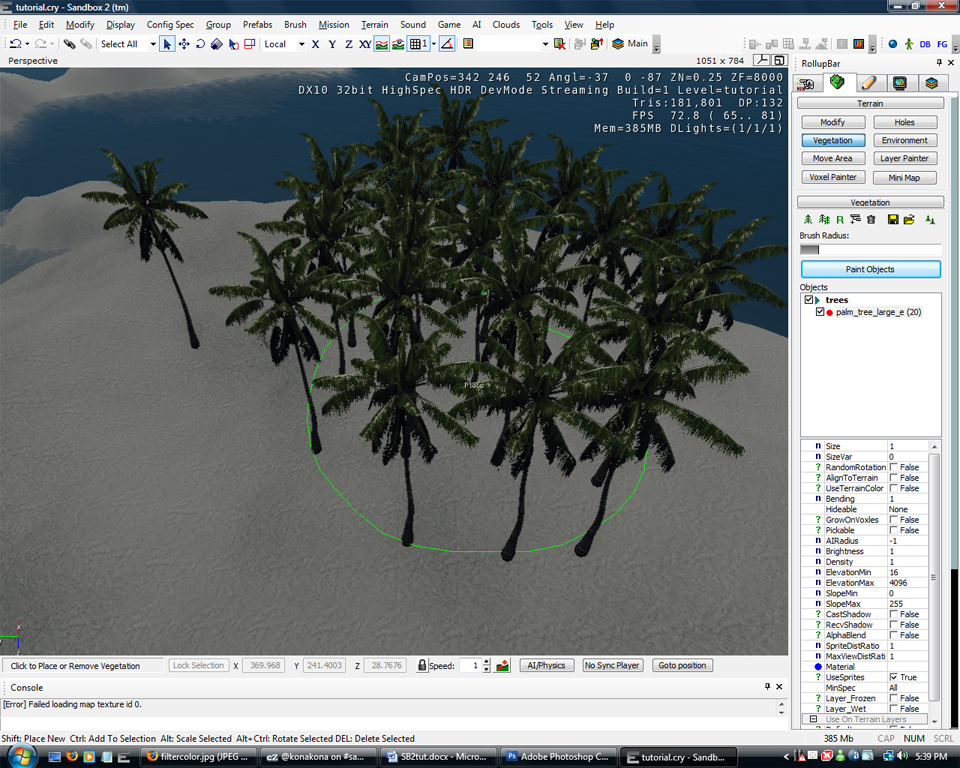
Placing trees one by one is very time consuming though, so move the brush radius slider to the right, click on the 'paint objects' button and start painting some trees.
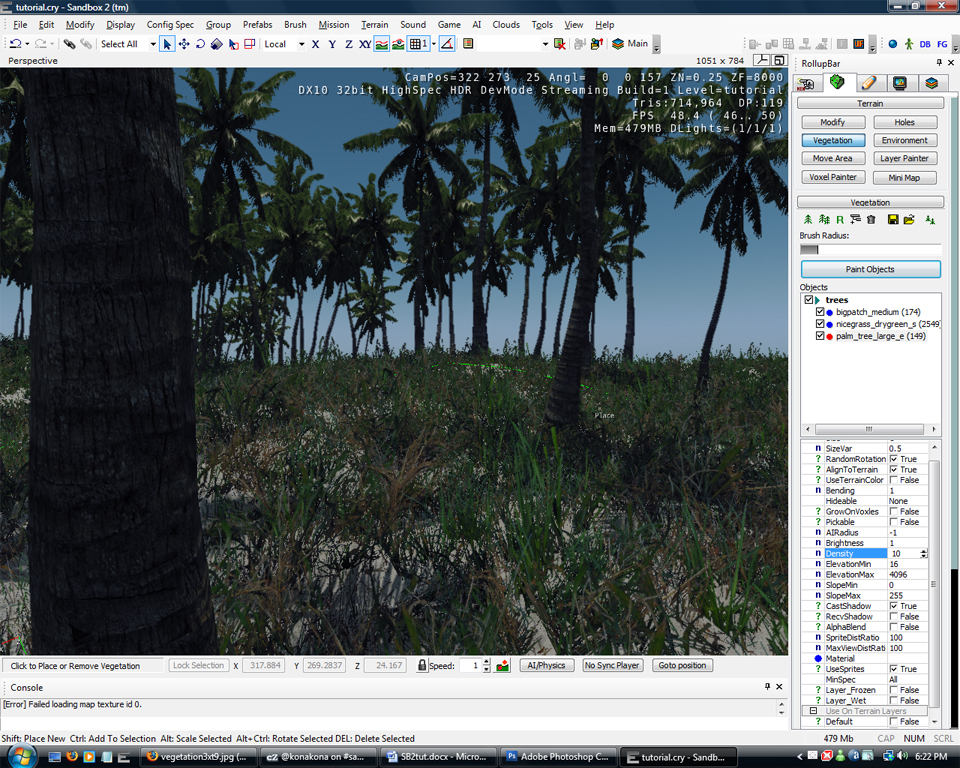
But this style of tree placement is very uniform, isn't it? We want more natural looking trees. So let's take a look at the RollupBar, under the objects view. You should see a list of variables for your selected vegetation object. Size is the size of the tree - 1 is normal. SizeVar is the size variation. The random rotation checkbox does just that - has the trees face a random direction. Bending is how the trees sway (bend) - 0 is no swaying and 1 is maximum. Density is how dense the trees are placed - the value represents the distance between each tree. And finally, the Align to Terrain checkbox aligns the trees to the terrain, such as hills to achieve a more natural look. Play with these settings to see what you get. You might want to set CastShadow to true as well, so the trees you place cast shadows. Feel free to explore and see how many other vegetation objects you can add. Here are my final settings:
Modifying Terrain
Now, our map is a bit empty at the moment. Let's add a building or two to liven it up. But first, let's make a working space. Some flat terrain. In the terrain tab on the RollupBar, click on modify. Set type to flatten, the outside radius to 20-something and height to say, 20. Now move your mouse to the perspective view and 'paint' the terrain. Once you've done that, how about adding some mountains? On the RollupBar again, set the type to Rise/Lower. Set the outside radius to something quite large, and the height to 20 again. Now paint on those mountains! Make sure they extend back somewhat: we will need that to make caves.

Now that we have a flat space and some mountains, we can start placing some objects around.
Placing Objects
How about adding something simple to start off with, like a guardhouse? On the RollupBar, click on the objects tab (the pointing hand) and then click on 'geom entity'. A geom entity is something that isn't affected by physics in the game - like a concrete building. Navigate to the Library > Architecture > Multiplayer > Guardhouse directory and double click on guardhouse. Move your mouse to the perspective view and place the object. You may have trouble placing it exactly on the ground, so turn on Snap to terrain.

Now place your camera near the guardhouse and press CTRL+G to go ingame. Walk around, shoot some trees down maybe, go inside the guardhouse. You might want to get acquainted with ingame controls in the editor: F1 is third-person mode, F3 is noclip and F4 is god mode. A guardhouse isn't a guardhouse without protection, so let's add a crude gun to it. This is just placing items, so don't take this as a level design practice, because we won't be attaching the gun to anything. Anyway, go to the Objects tab in the rollupbar and click on 'entity'. Navigate to the Items folder and double click on the ShiTen. Place it near your guardhouse. If it isn't facing the way you want it to, use the 'select and rotate' button.
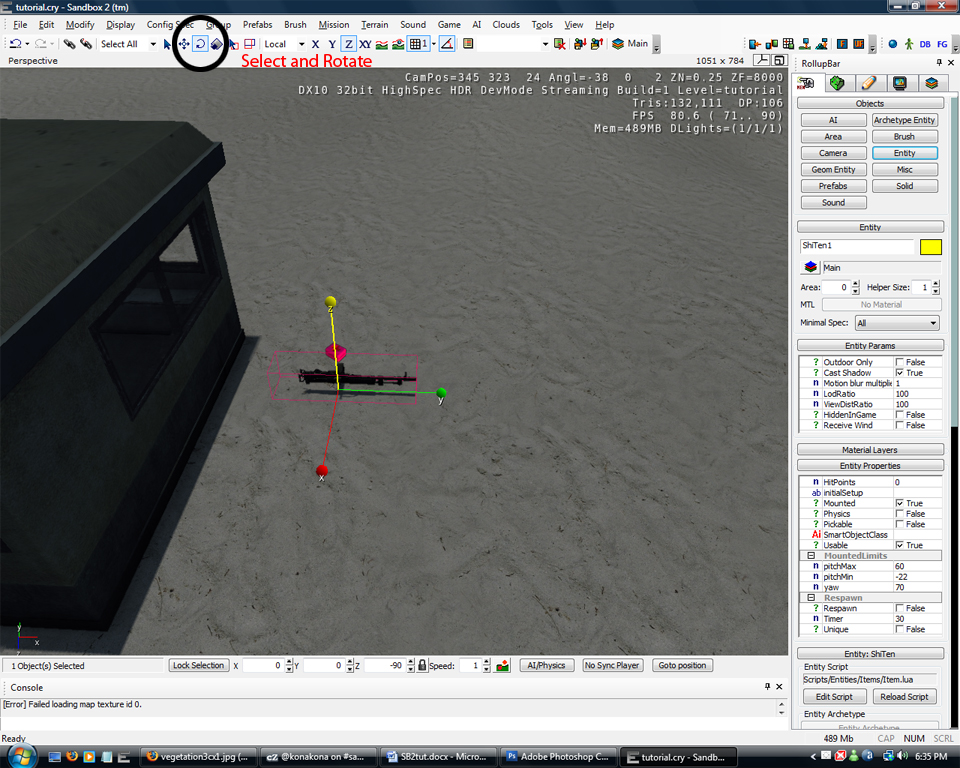
Now move the gun using the Select and Move button (the one to the left of the Select and Rotate button) so it is close to the window of the guardhouse.

Now press CTRL+G to go ingame, punch out the window of the guardhouse and use the mounted gun.
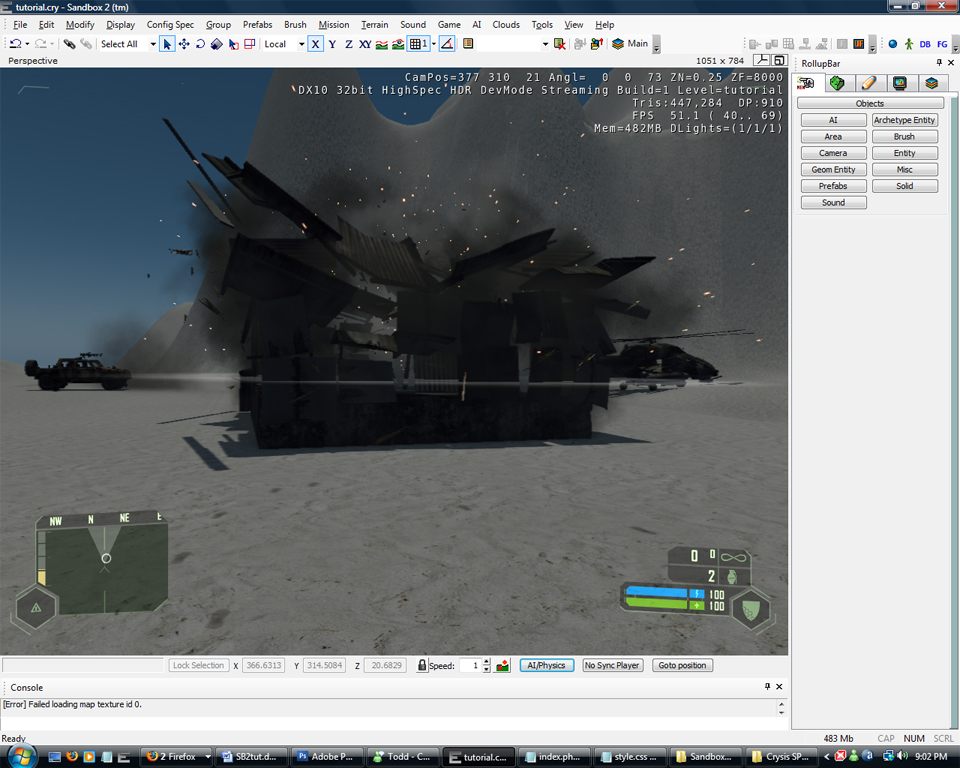
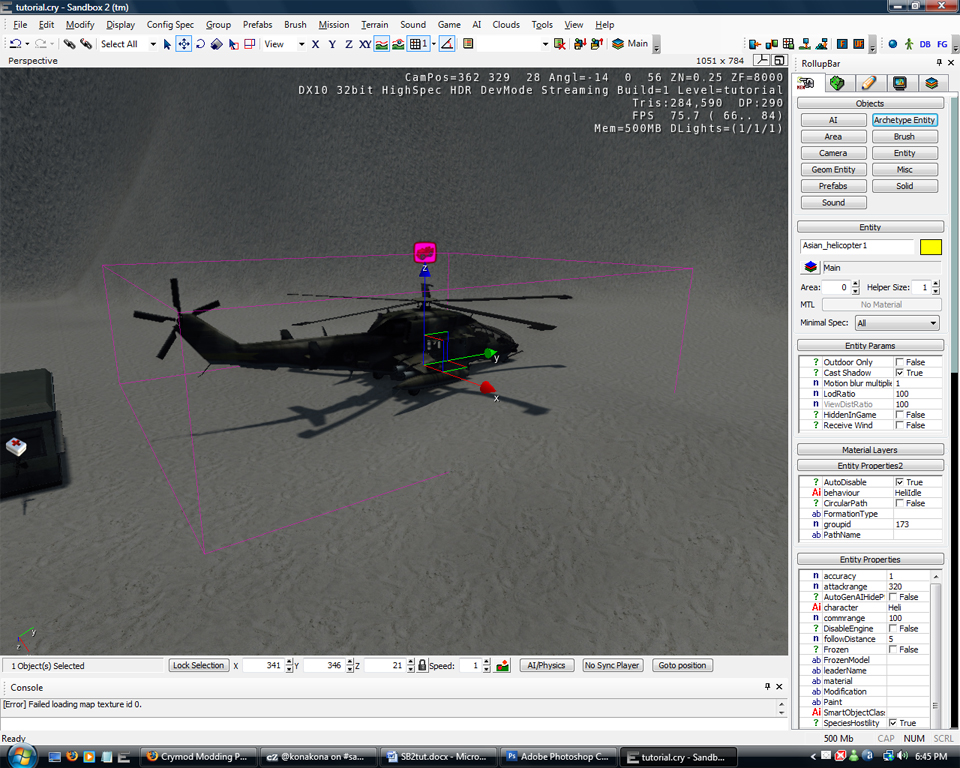
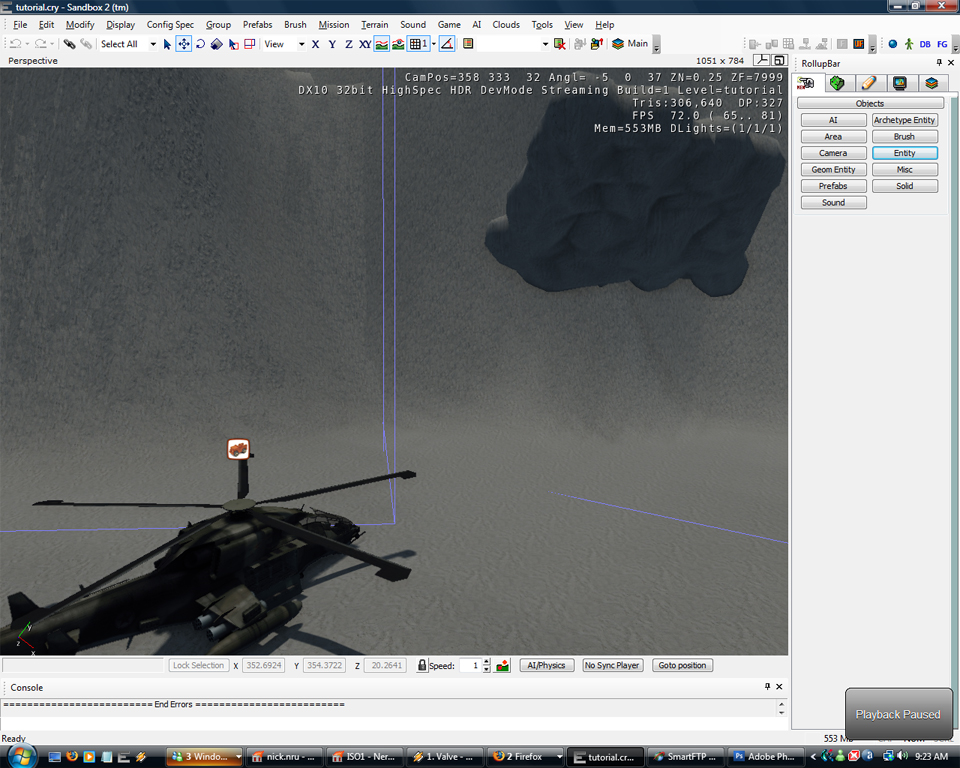
Now to flex out object-adding muscles, let's add a Vehicle. How about a helicopter? Yeah. That sounds good to me. So go to the objects tab on the RollupBar and select Entity, and navigate to the Vehicle directory. Make sure snap to terrain is on and double click the asian_helicopter entity, anad place it in your map. Really, that's all there is to adding objects.
Prefabs
All this object adding is great alright... but you want to smash things up right? You want to add one of those buildings that you can punch around? Well, let's do that. So on the object tab on the RollupBar, click on prefabs and sel- wait. There's nothing in the prefab section! Well, we'll fix that. Go View > Open View Pane > DataBase View to open the DataBase View. Click on the Prefabs Library tab, and then click on the Open button. Load buildings.xml and close the database view.
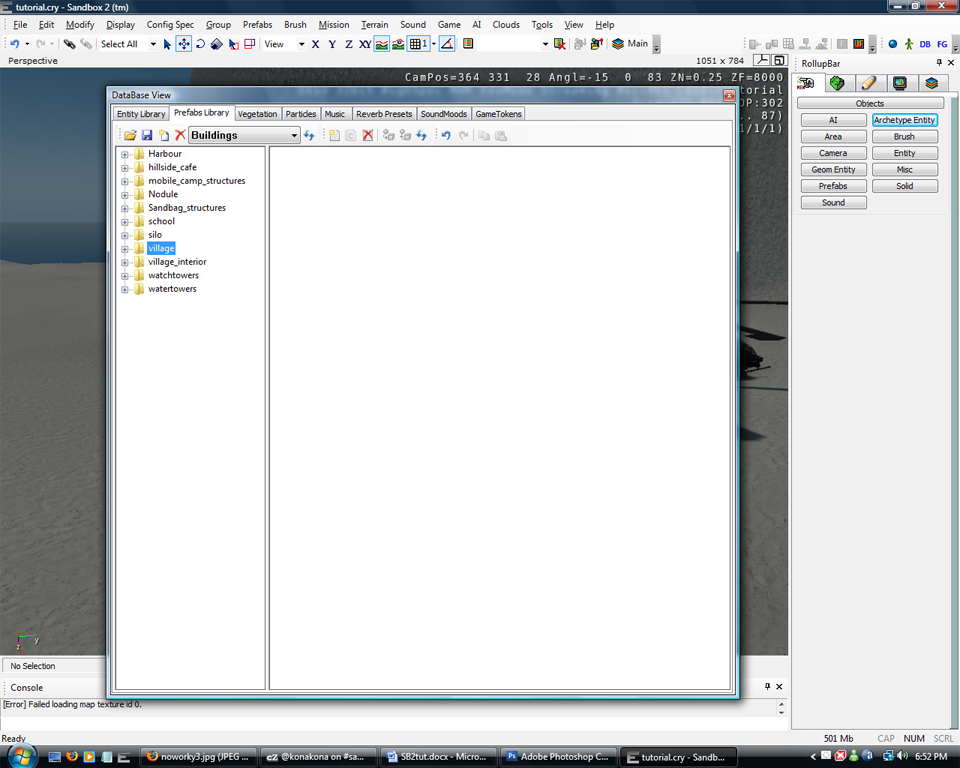
Now we can re-open the prefabs section on the RollupBar, and now there should be a Buildings folder. Navigate to Buildings > Village and then double click on village_house_4. Make sure Snap to Terrain is on and place the prefab in your map.
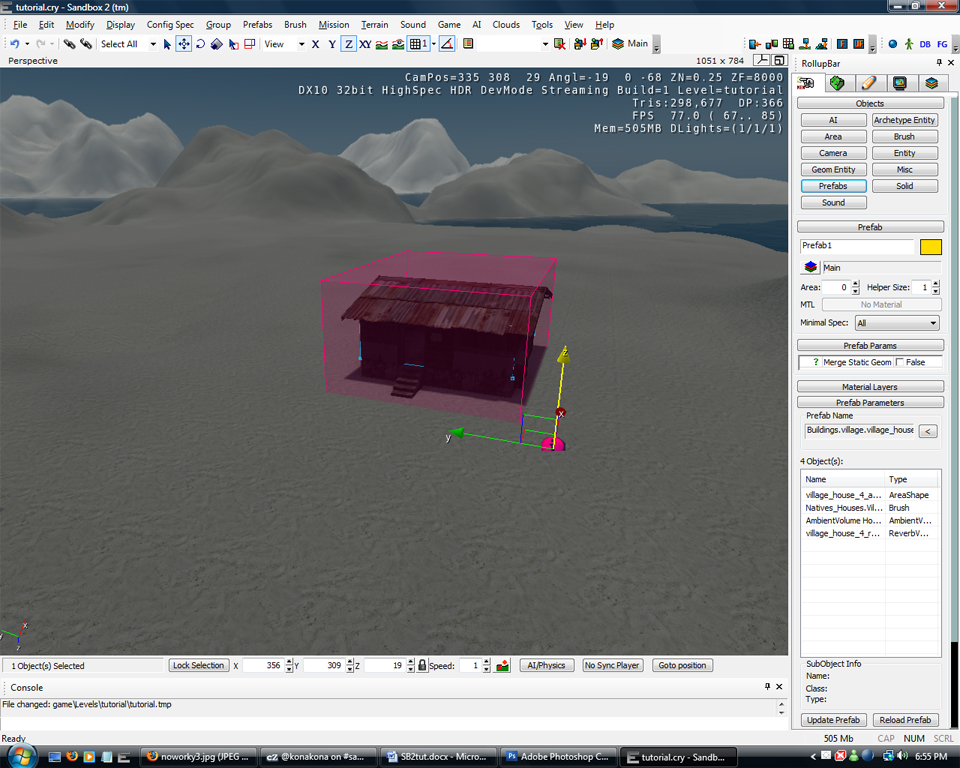
Press CTRL+G to go ingame and throw a couple of grenades in the house, or just punch it around in strength mode.
Voxels!
What's up next? You know how to place vegetation to create a forest, you know how to place objects and prefabs, you know how to texture terrain, and modify it. How about making use of CryEngine2's voxel ability to make cliffs and caves in your terrain? It would certainly liven it up. OK, first of all run this console command -
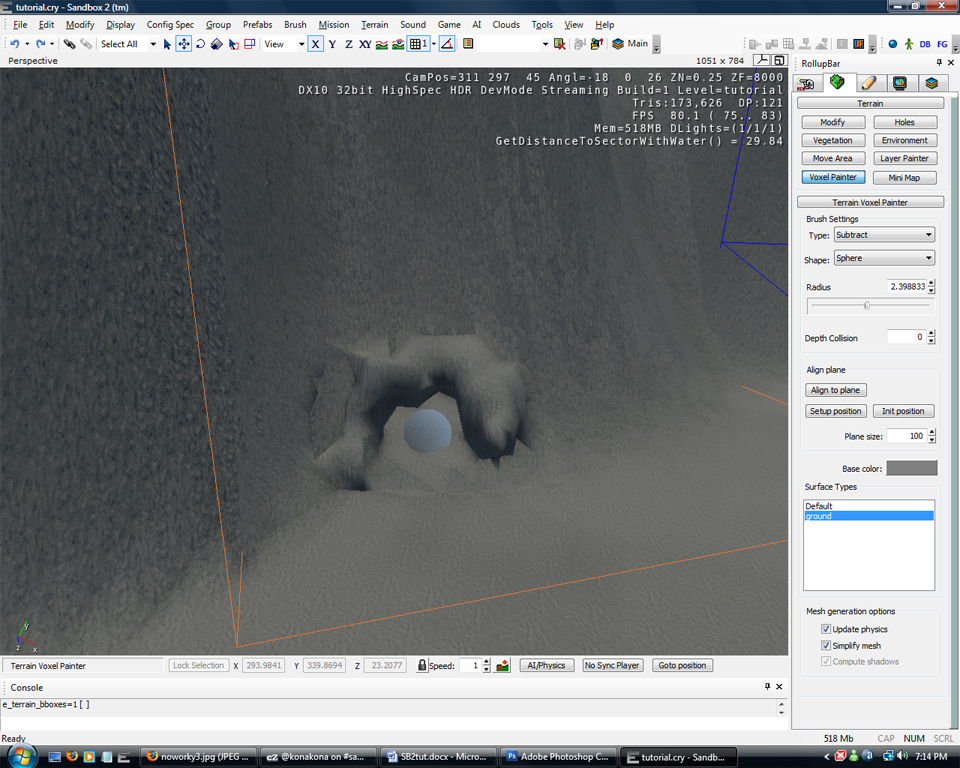
e_terrain_bboxes 1The console is below the perspective view. You should now see a bunch of coloured boxes in your view. These are called terrain sectors. But now we want to make cliffs and caves. So in the objects view, click on Misc and create a VoxelObject. Place it near those mountains you created, use the red box that appears as a guide. If you can't see a red box, press Shift+Space to show it.
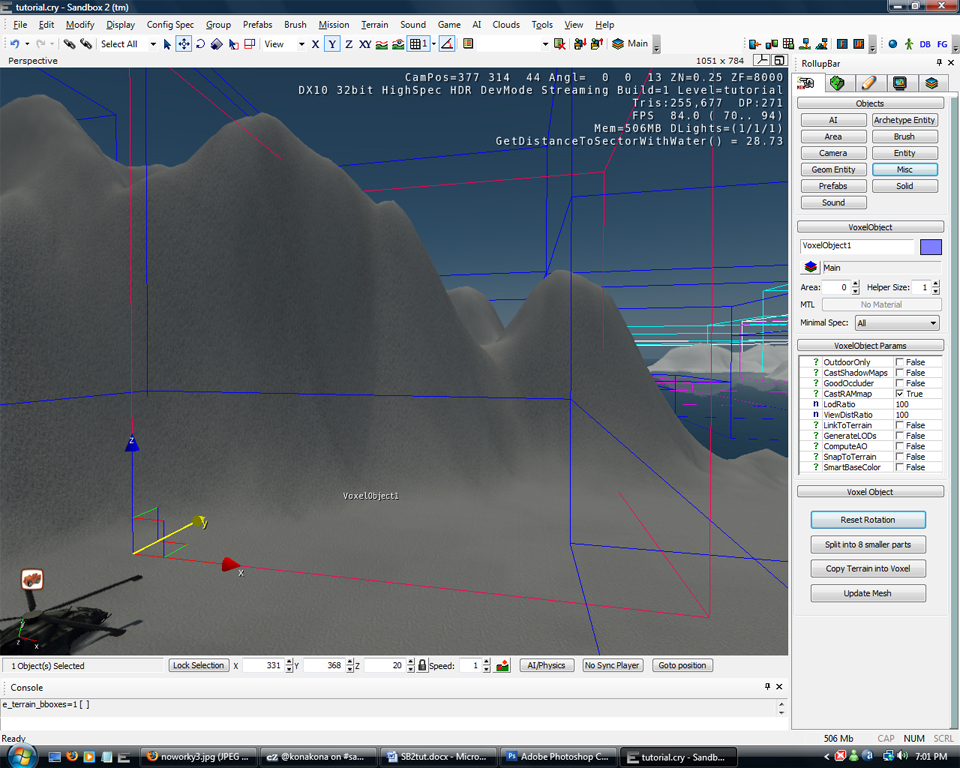
Now we can actually paint voxels inside the red box. So click on the terrain tab on the RollupBar and click on 'Voxel Painter'. Make sure type is set to create, and start painting some voxels. See if you can create a cliff. If your voxels turn out black, make sure that 'ground' is slected as the surface type you want to use.
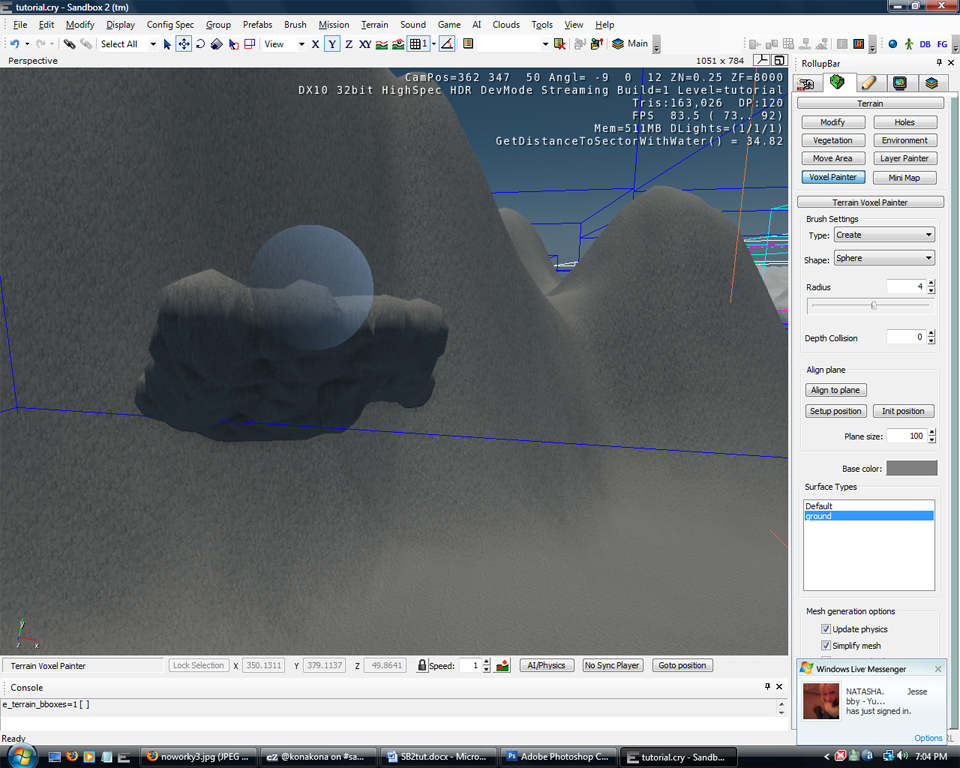
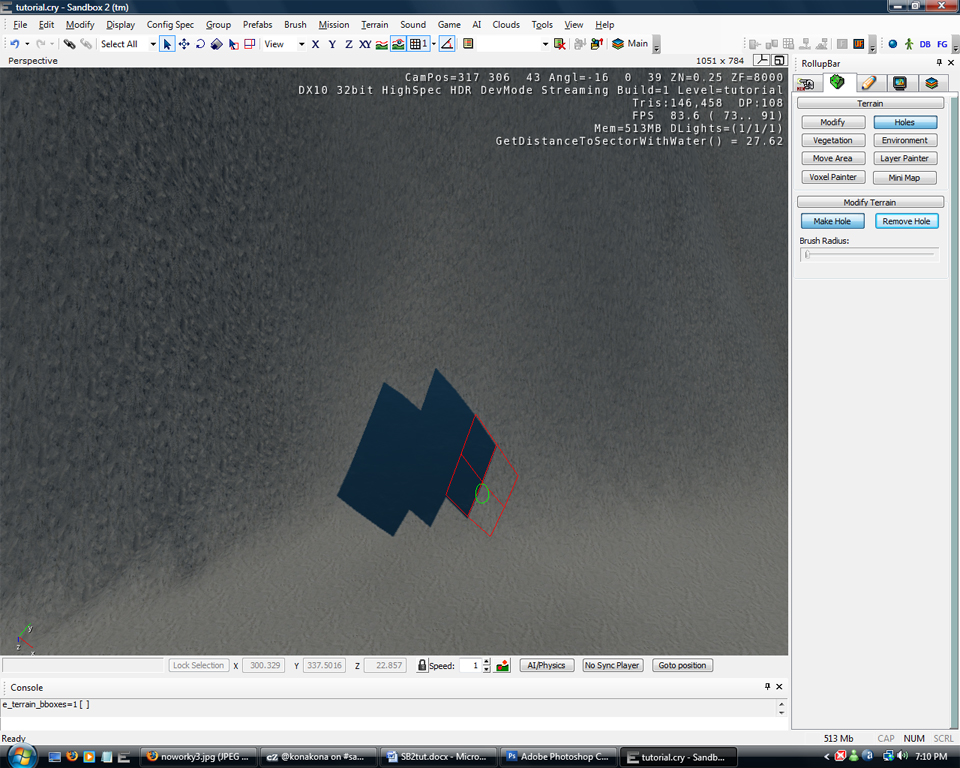
As you can see if you experiment enough with voxels, you could create a whole variety of new shapes, not just cliffs. Let's create some caves now. First we need to create some holes where our cave will open. So go into the terrain tab and click on 'holes'. Set it to 'make hole' and then 'paint' one some holes where your cave opening will be.
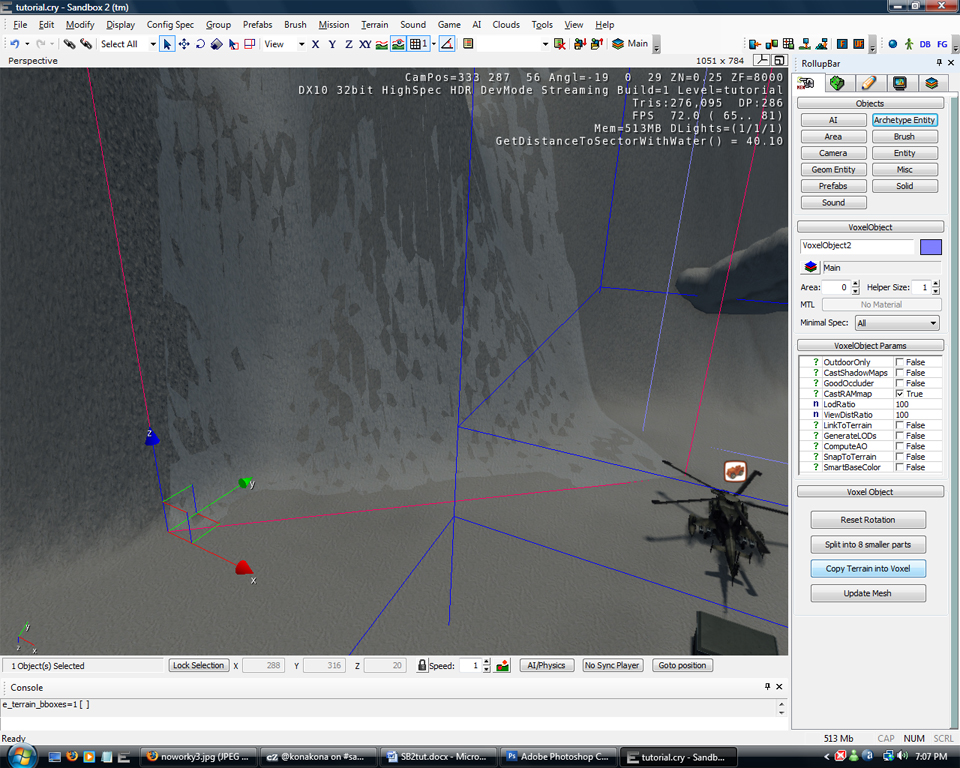
Now create another VoxelObject and place it in the same way you did with the first. You might want to rotate it so that the box encompasses more of the mountain. Once you've got it where you want it, click 'Copy Terrain into Voxel' to copy the heightmap data into the voxel object. As you can see, the hole you made disappeared. This is because the voxels are covering it.
As you can see, the voxels are flashing. Don't worry; this is just because it is selected. Now go back to the voxel painter tool, and change the type from create to subtract. Now you can carve out your cave. Here are my results:
Now, move your camera low over some terrain and go ingame (CTRL+G). Explore the inside of your caves and even to tops of your cliffs.
Time of Day
As you can probably see, all the objects and interesting terrain in the world can't make this map look any happier. Why not? It's because we need lighting - out lighting at the moment is dull and boring. So let's add some lighting! See before the Time of Day adjustments:
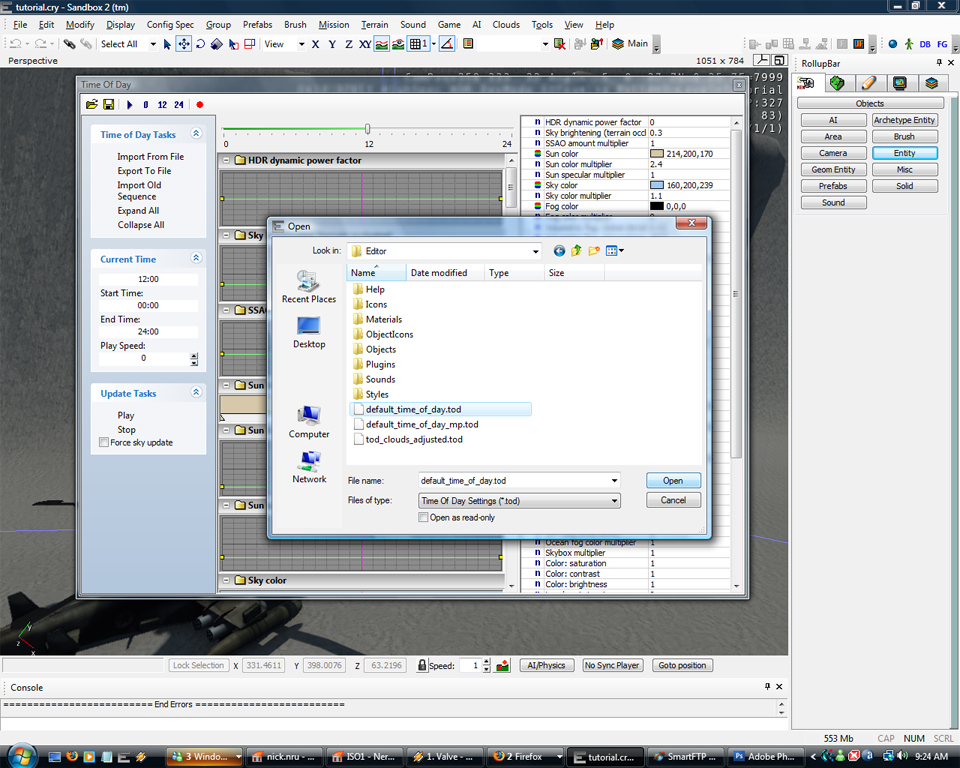
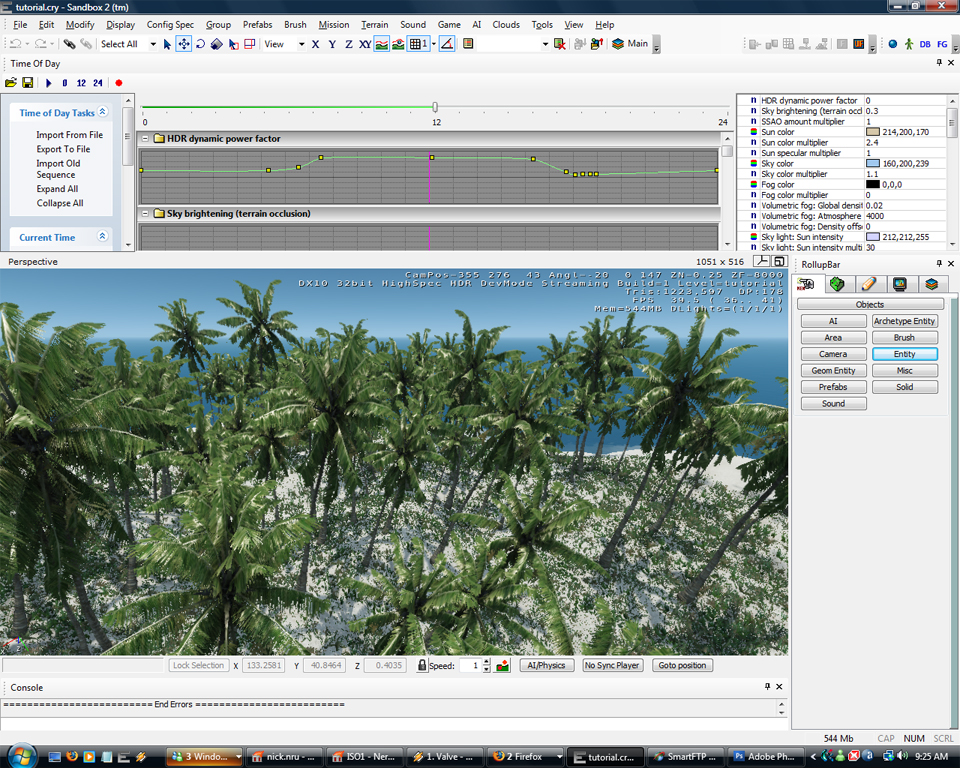
Now we need to adjust the time of day. So pop open Terrain > Time of Day and then in the sidebar there, click on Import from File. Then navigate to your editor directory (Most likely C:\Program Files\Electronic Arts\Crytek\Crysis SP Demo\Editor) and load default_time_of_day.tod.
After that is done, exit out of the Time of Day dialog, and move around your map to see the changes. Our forest looks much better now, doesn't it?
Solids
Ok. You might be the adventurous type and want to explore thick forests. Or you could be the type that wants to have massive vehicle ramps. Well, since the former has already had their feed in the form of vegetation, let's make some vehicle ramps! Well, solids, at any rate.
First, in the objects tab on the RollupBar click on the 'solids' button. Then move your mouse to the perspective view, and click. Don't drag; but move your mouse out to form a square.
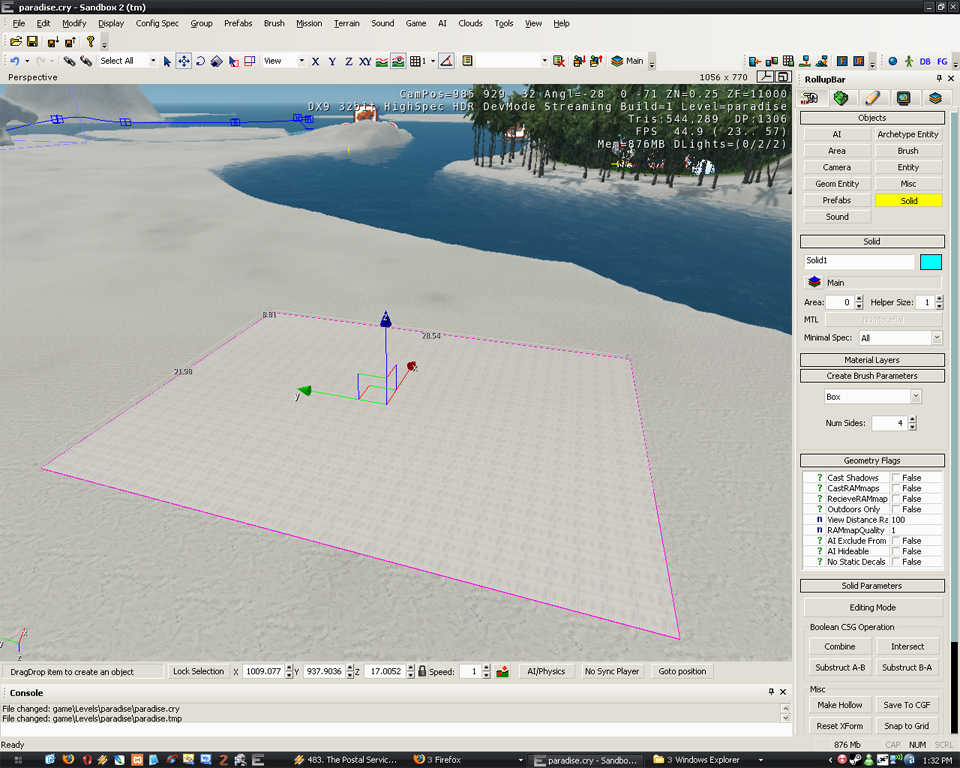
Then move your mouse up, to form a cube, and click to finalize the solid.

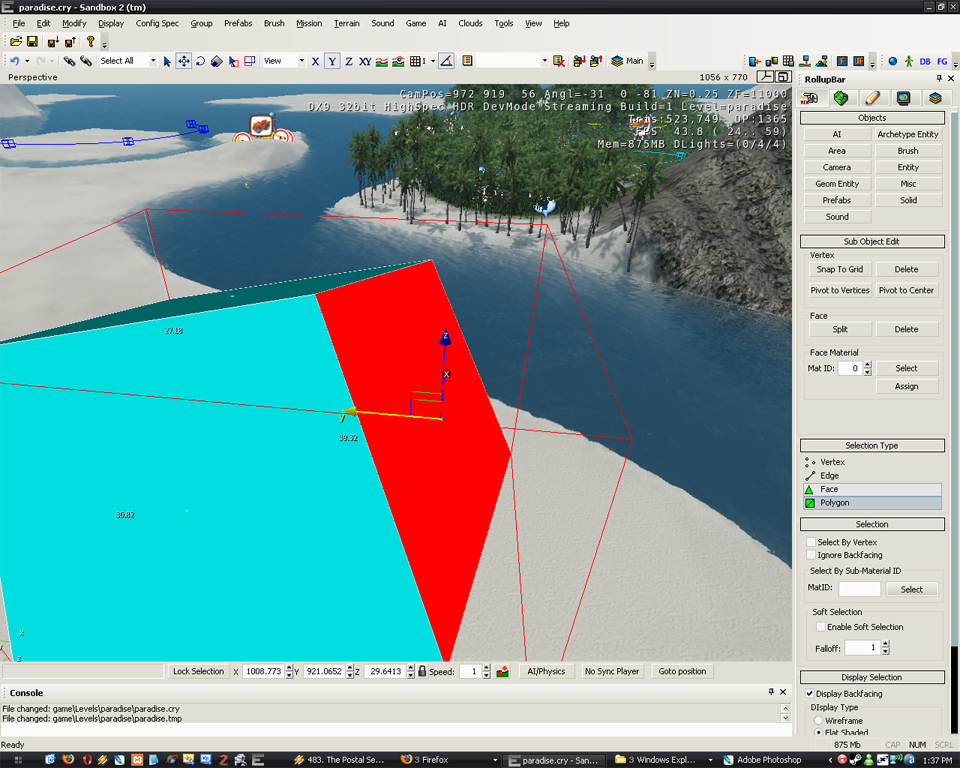
So, you've built your first solid! But as you can see, we won't be flying very far on that. So let's turn it into a more, uhh, ramp-like shape. So in the Solid parameters tab on the RollupBar, click on 'Editing Mode'. Your solid should turn to a solid blue. Now, select Vertex from the Rollupbar and click on a corner on the solid. See? Now you can move it around. See if you can get a ramp like shape, or any other shape if you wish.

You might want to move a face/polygon instead of just a vertex. That's easy! Just select Face or Polygon from the RollupBar and click on a side of the solid.
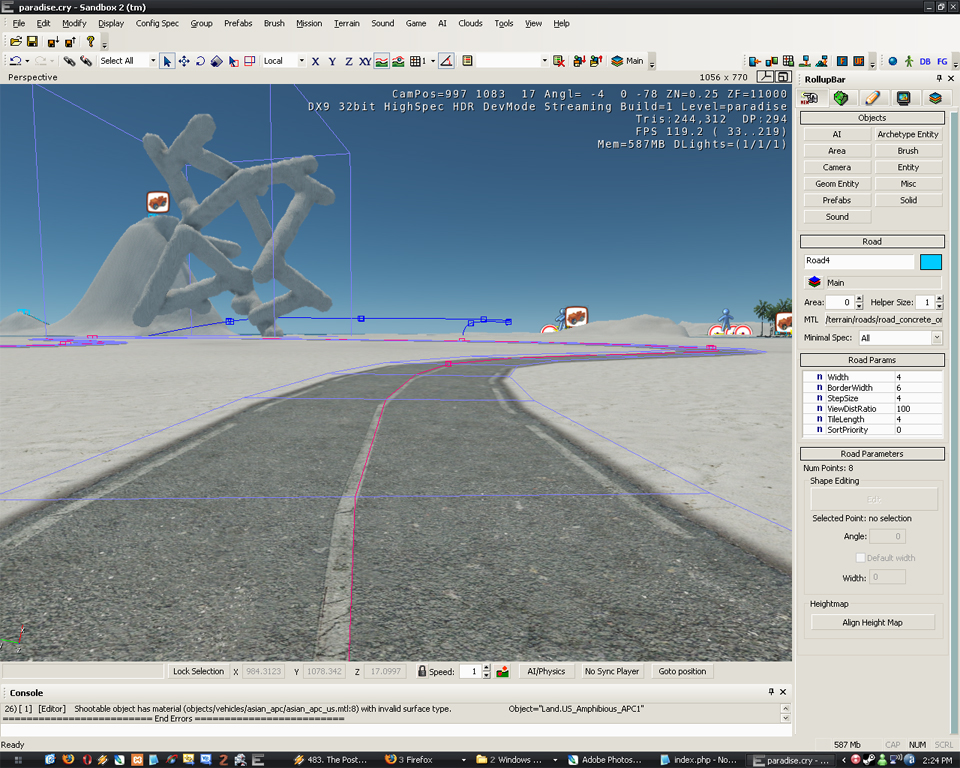
Roads
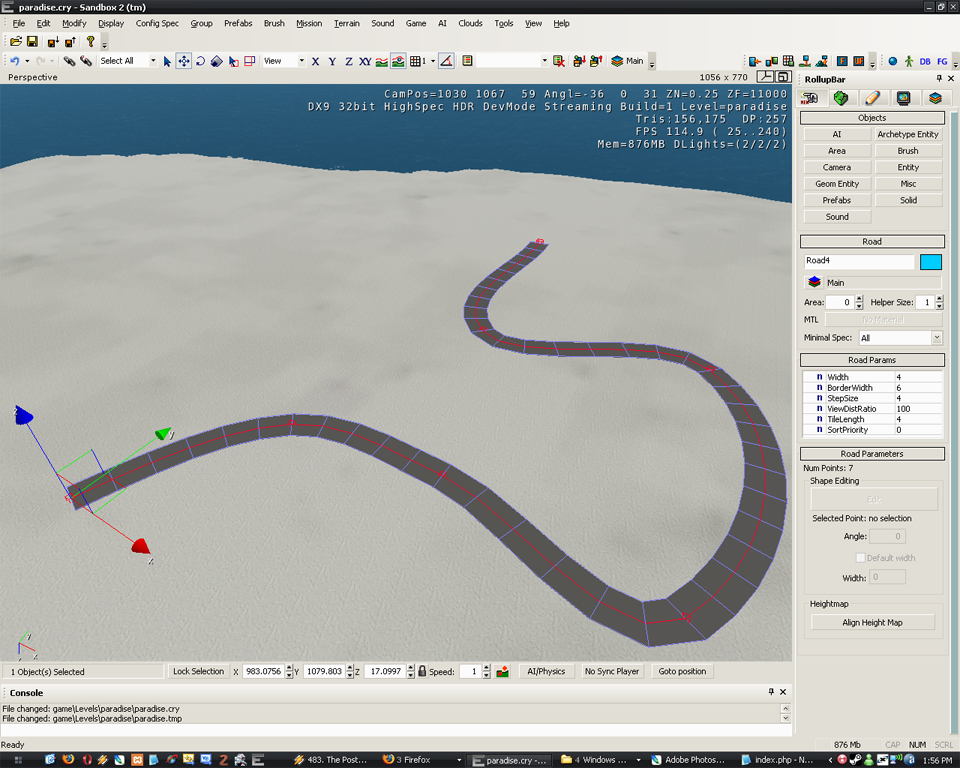
So you have all your little tidbits over here and forests over there, but you have no way to connect them all together. The most obvious decision would be to create a road. And that's what we're going to do. So first, on the RollupBar, click on the Misc button and then select road. Then click where you want your road to begin and then move your mouse to the next point (the road will curve automatically). As you can see the road is being built as you place points. Awesome, huh? Double click on your final point to make the road complete.
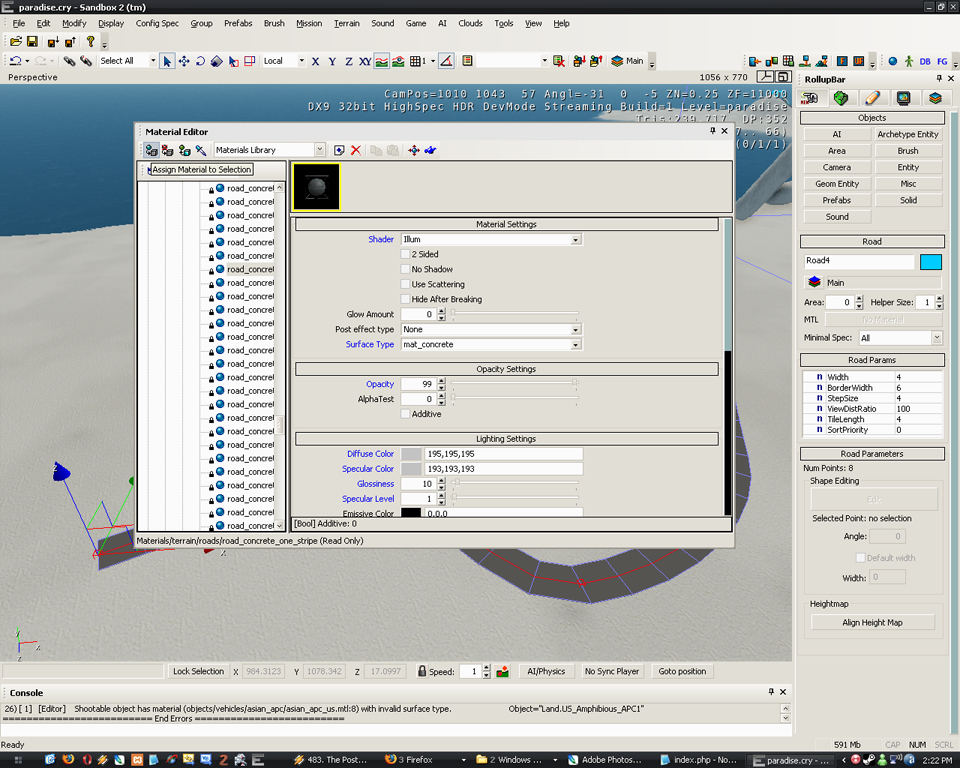
This road is great and all, it's visible and great and curvy... but it doesn't exactly look like a road. So let's put a road texture on it. Make sure your road is selected and go View > Open View Pane > Material Editor. Navigate to Materials > Terrain > Roads in the directories and then select road_concrete_one_stripe - and then click the top left button 'Assign material to selection'.
There, you've done it! You've added a road. Good job! If ou want to edit the width or anything, look in the Road Params on the RollupBar. That will provide you with everything you need.
Adding AI
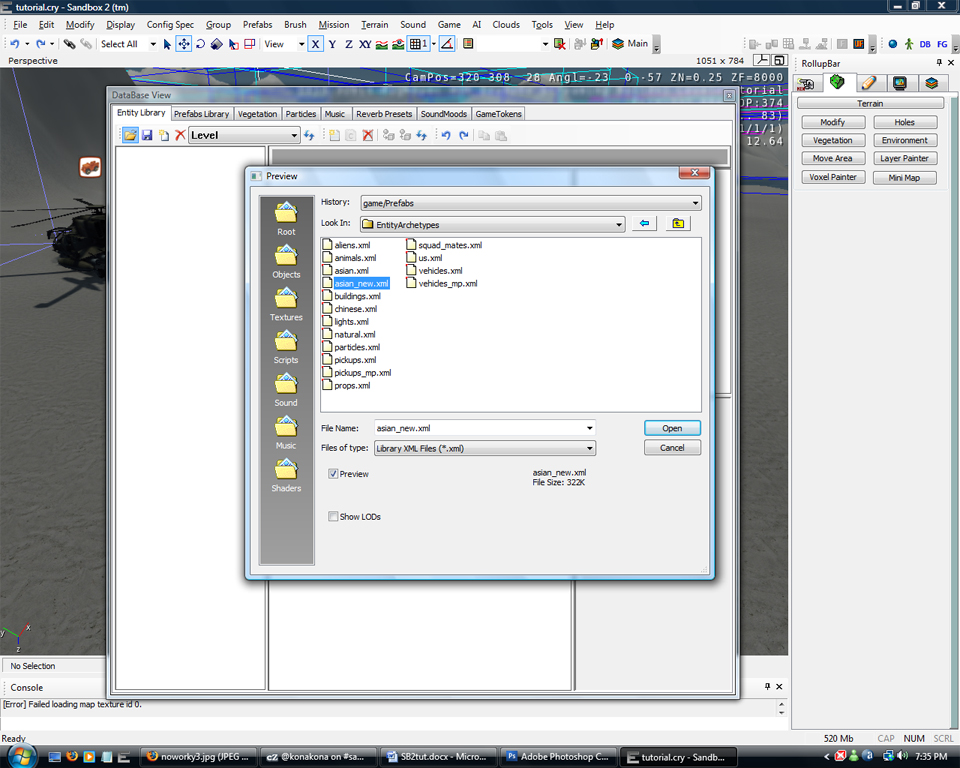
The map is still pretty empty. We have no friends in there :(. How about adding some North Koreans to have fun with? Well, that's easy. All the AI characters are filed under Archetype entity in the objects tab on the RollupBar. But there's nothing there so we'll have to go into the database view to load some AI characters. Go View > Open View Pane > DataBase View and make sure the entity library tab is selected. Click open and load 'asian_new.xml'. Close the database view.
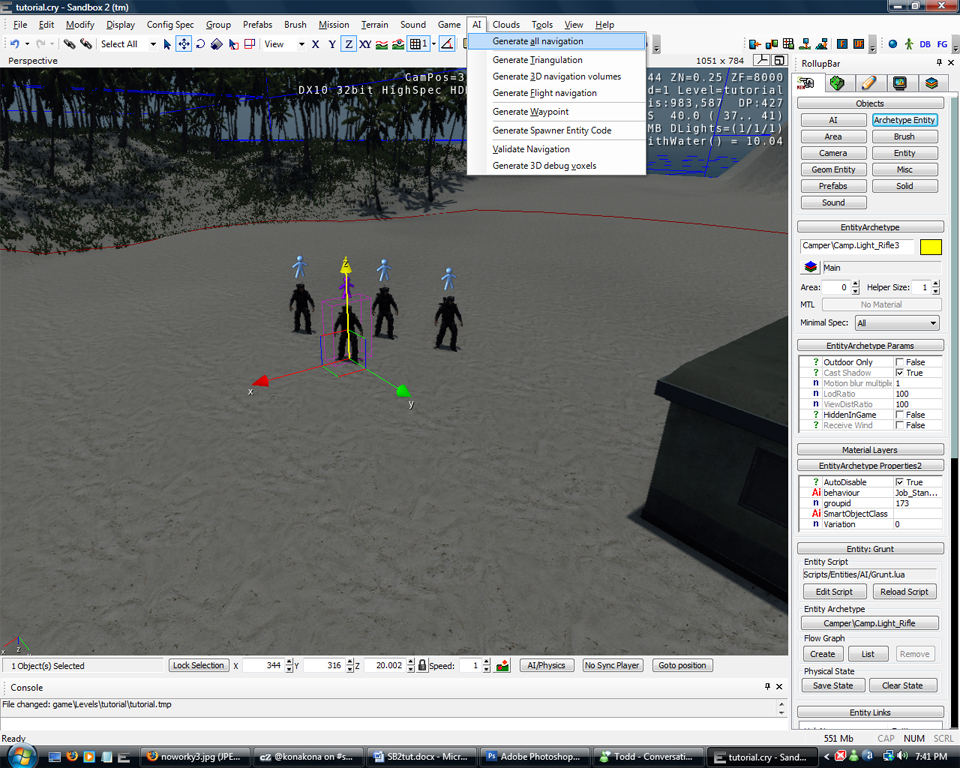
Now go into the objects tab on the RollupBar and select Archetype Entity. Navigate to Asian_new > Camper/camp. All the objects prefixed with light_ should work. So double click on light_rifle and place him in your map (snap to terrain helps with object placement). Now don't get ahead of yourself - if you go ingame he won't attack you. First we have to generate navigation. So go AI > Generate all navigation. That's it! Go ingame and watch the NK attack you. If you wish to place more AI entities - select one and press CTRL+C for Clone. This works for all objects.
Flow Graphs
Ok. How about we add some depth to our AI? Like, making a North Korean walk from one point to another, or get into a vehicle? Easy. First of all, delete all the extra archetype entities you may have lying around - you wouldn't want to be attacked while watching your AI guy walk around. So now you have one archetype entity. Go to the objects tab and select AI. Create a TagPoint and place it in your map - this is where your NK will walk to. Now open the entity section and navigate to the triggers directory. Place an AreaTrigger near your North Korean.
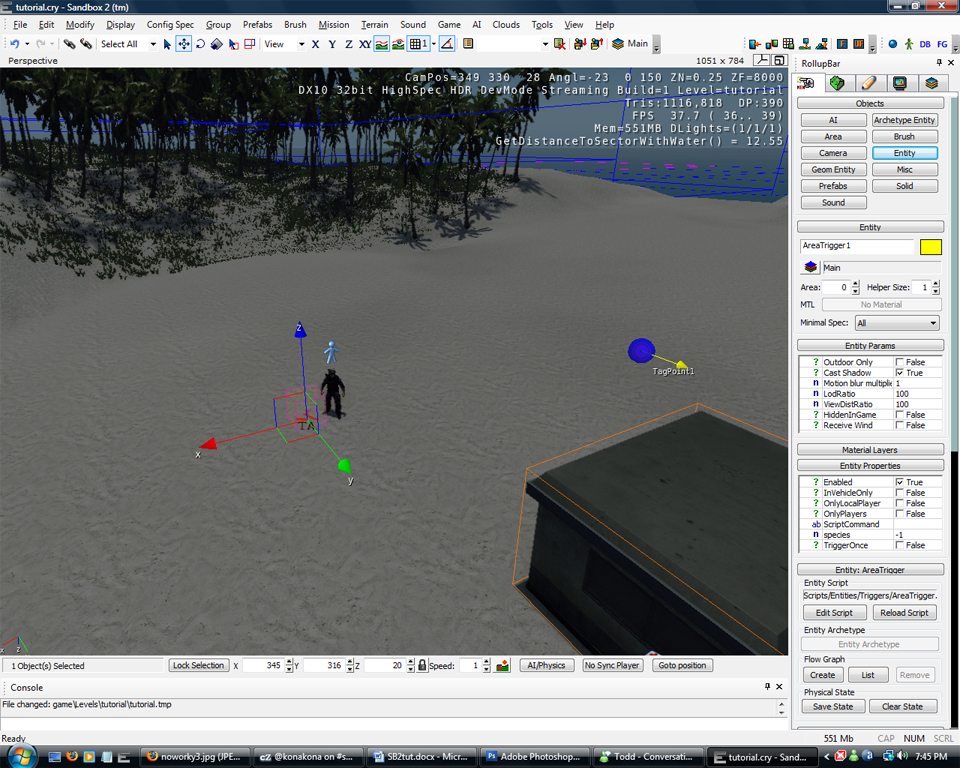
Now, select your AreaTrigger and on the RollupBar, find the Flow Graph section. Click Create and then click OK to dismiss the dialog. Once you have the flowgraph open, right click on the grey space and Go Add Node > Misc > Start. Then Add Node > Entity > EntityPos. And finally, Add Node > AI > AIGotoSpeedStance. If all you see is a dot in the space, use the mouse wheel to zoom in to see the nodes properly. Now, click on the EntityPos node and move the flowchart out of the way (or connect it to the top) so you can see the perspective view. Select the TagPoint object and then right click on the EntityPos node and select 'assign selected entity'. Then select the North Korean in the perspective view and right click on the AIGotoSpeedStance node and select 'assign selected entity'. Now we need to connect the nodes together. Click on the 'output' connector on the Start node and drag your mouse to the 'sync' port on the AIGotoSpeedStance Node. Then connect the Pos port on the EntityPos node to the Pos port on the AIGotoSpeedStance Node. Your flowgraph should look like this:
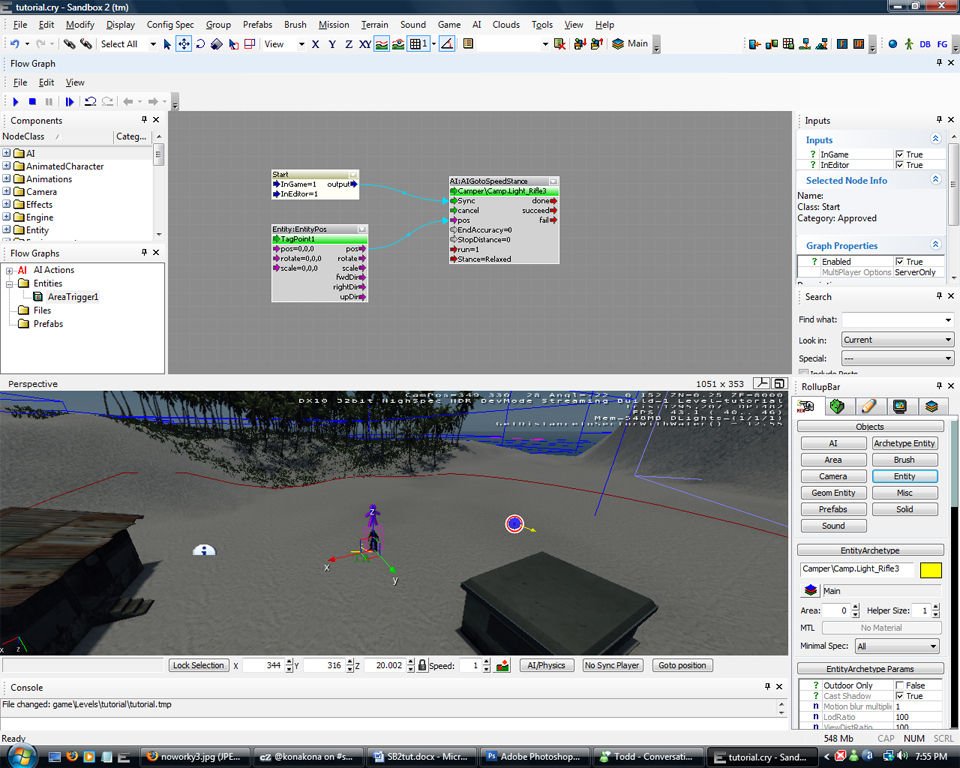
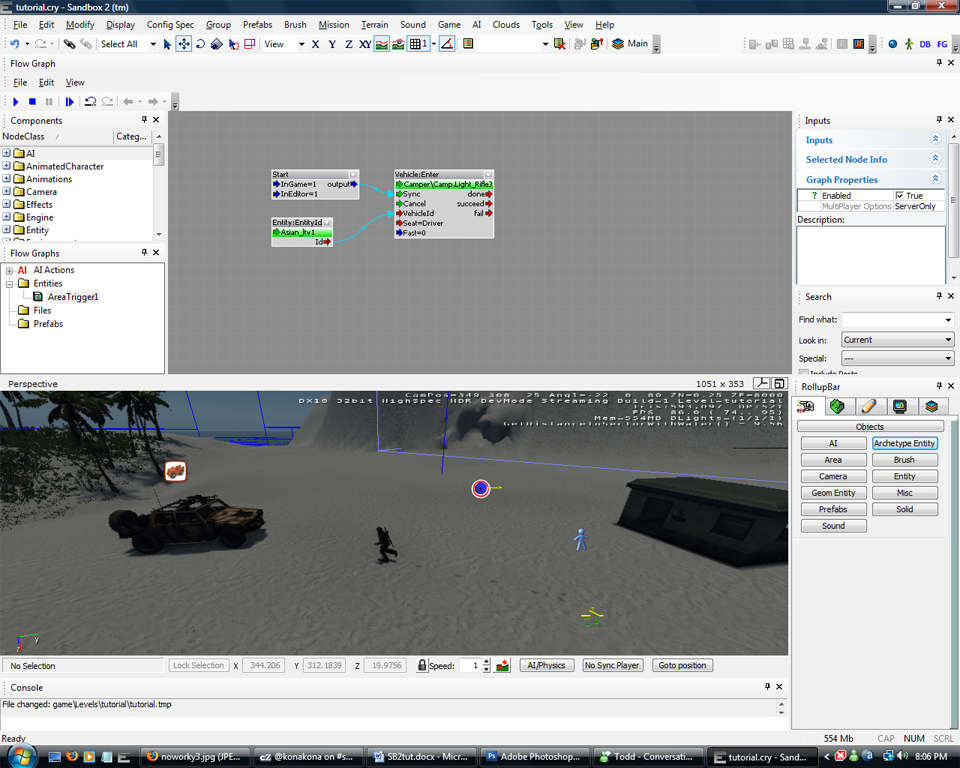
Now click the AI/Physics button (down the bottom) to see him walk. Click it again to disable it or your AI will not work ingame. As you can see all the flowchart is is logic. For instance, you could create another TagPoint object and get the AI to walk to that one after he's walked to the first one. Play around with the flowchart nodes and see what you can get the AI to do. Let's make the AI character get into a vehicle now. First of all, delete your AIGotoSpeedStance and EntityPos nodes, and create an EnityID (Add Node > Entity > EntityID) and a VehicleEnter node (Add Node > Vehicle >Enter). Now create a vehicle in the Perspective view (for an asian_ltv select entity in the objects tab and go to the vehicle directory and double click on asian_ltv). Now select the vehicle and right click on the EntityID node and select 'assign selected entity'. Select the North Korean in the perspective view and do the same thing but for the VehicleEnter node. Now connect the ID port on the entityId node to the VehicleID port on the VehicleEnter node, and the output port on the start node to the sync port on the VehicleEnter node. You can change what seat he gets into by modyfing the Seat variable (use the inputs sidebar) on the VehicleEnter node. Now either go ingame or click the Ai/Physics button to see your AI character enter the vehicle.
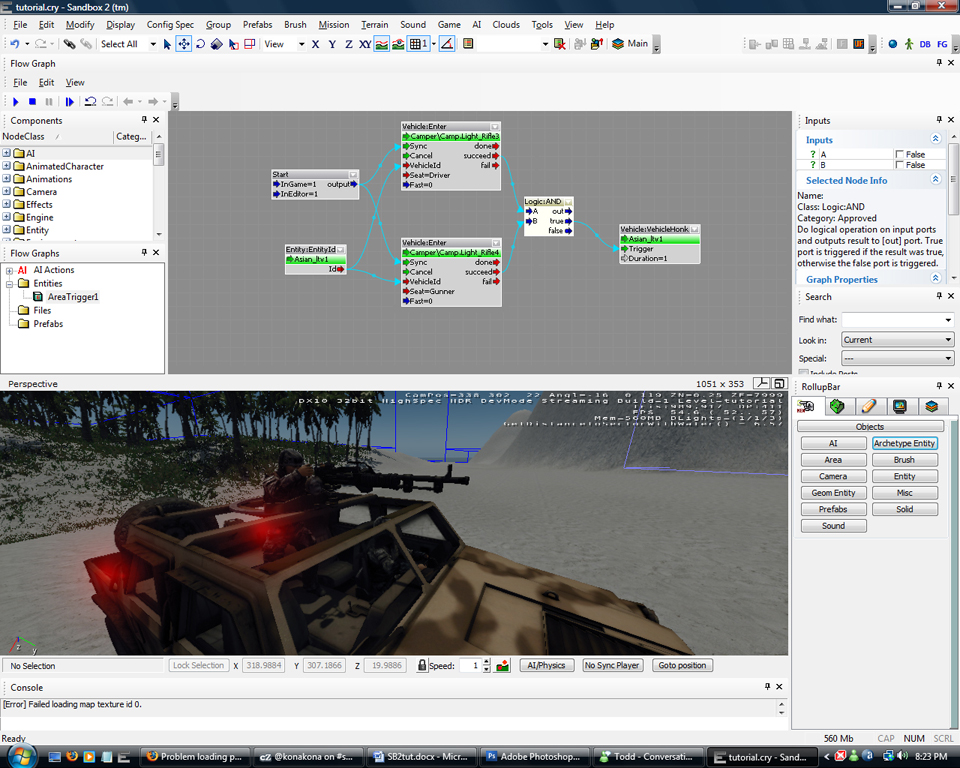
With enough experimentation, you can end up with this:


123
4 5 6?
thank you :)
You're welcome
how can i change the moon direction?