In this article we will delve into Unity’s High Definition Rendering Pipeline (HDRP) and why we decided to utilize this pipeline to develop Elegos. In particular, we will look at HDRP lighting capabilities and discuss the potential advantages and pitfalls when using this high-end rendering package to light our scenes in real-time. We will mainly be looking at this from a game development angle but the topics discussed are relevant no matter the media.
To HDRP, or not to HDRP?
In the famous soliloquy, Hamlet considers existence, complaining about the pain and unfairness of life. Ultimately he acknowledges that the alternative might be worse. Although not quite as existential, the Perpetual Games team came to the same conclusion when considering whether or not to use HDRP.
At the time of choosing, the core of the project had already been prototyped within the HDRP framework, meaning there would be no painful upgrade process whilst the team was being put together to start building the game. Elegos is aimed at providing the modding community with a fully moddable experience. From a technical standpoint, this meant ultimately that the game will require many of its systems, such as lighting, AI navigation, etc to run in real-time. The need for real-time rendering made our decision to utilize HDRP a simple one, allowing us to use the latest state-of-the-art tech to achieve not only beautiful but performant graphics.
The art direction of Elegos matched up nicely with what HDRP offers in its feature set. Using physically based materials and lighting allows us to create a realistic base on which to layer the games stylistic and mythological aesthetic on top of. Built-in tools such as the visual effect graph and look dev help with authoring and iterating on the asset library with the art direction always in mind.
We won’t go into the details of whether or not you should be using HDRP for your specific project (Unity has you covered). The important thing to remember is that HDRP is aimed at achieving high fidelity graphics and so is not aimed at platforms such as mobile, and OpenGL, etc. It is also important to note that HDRP came out of preview with Unity 2019.3 LTS and so you should be using that version or any thereafter to ensure support availability and relevance going forward. At the time of writing HDRP is out of preview and is being heavily supported by Unity now as their flagship rendering solution for high fidelity graphics and power end-users.
The sky’s the limit (HDRI Sky)
One of the main decisions that need to be made around your environment lighting is which sky system you are going to use in your scene. To be technical, the sky is drawn by the Camera before rendering a frame. The sky component resides within HDRP visual environment component which resides in a volume, so really, the volume’s the limit. I digress. The volume framework in HDRP is a powerful system for controlling global and local overrides to the default settings, one of which is the sky setup.
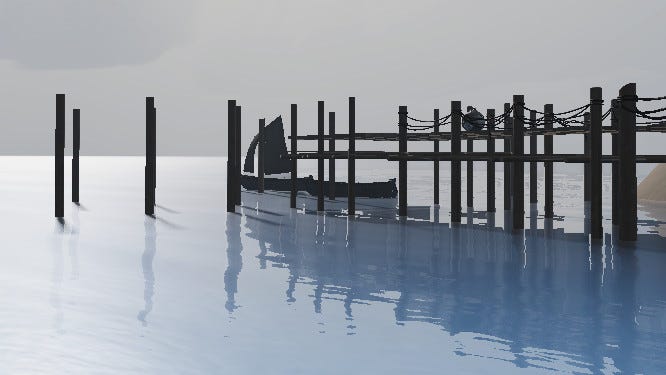
There are three main sky types available in HDRP — Gradient, Physically Based and HDRI. Gradient sky is the most basic of these, simply rendering a three-colour gradient. Physically-based is the most complex, essentially simulating a spherical planet with a two-part atmosphere. This type of sky is obviously very powerful and is best suited to projects looking to create photo-realistic scenes. The third type of sky is the HDRI sky. This method takes an HDR image and computes a cubemap texture which is then used to render the sky. The data can also be used to update the indirect lighting used in the scene to match the sky.
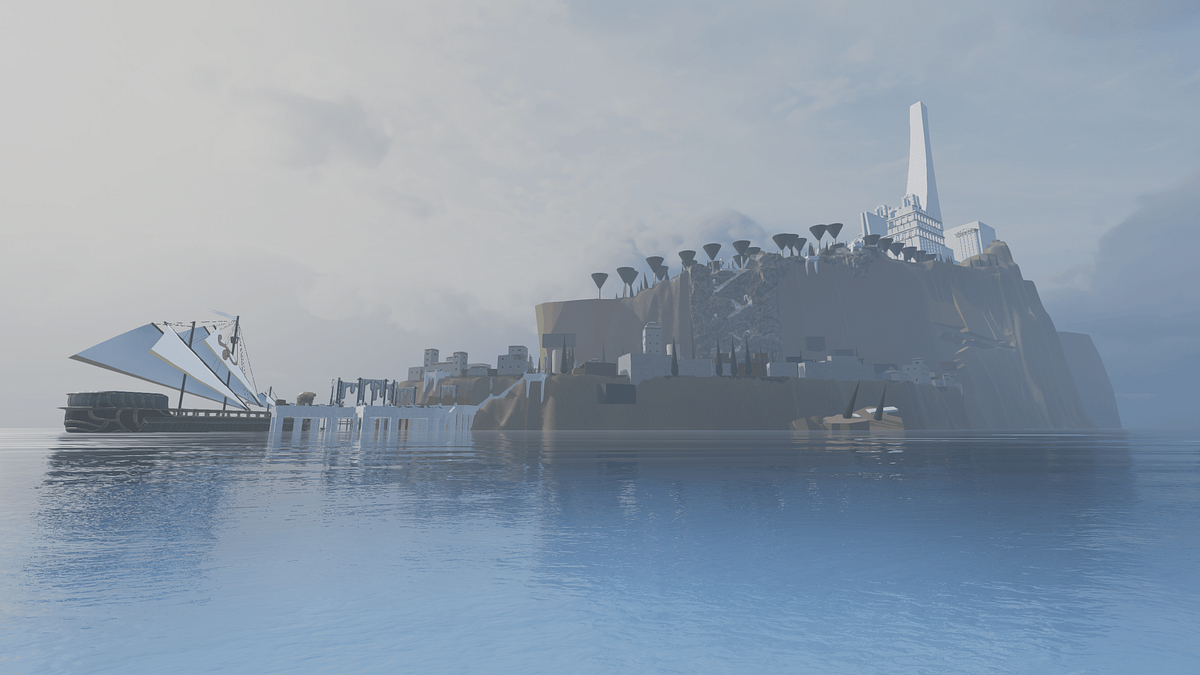
 An example of an HDRI sky used in Elegos development
The HDRI sky was the choice we landed on for Elegos. Due to the real-time restraints of the project, keeping systems as performant as possible is essential for us. After experimenting with a few procedural and precomputed cloud systems we decided the best route was to combine the sky and clouds which is easily done with the HDRI sky by finding a good high-quality HDR sky image with the correct look and feel and work from there.
Life is about the Journey, Not the Destination (Directional Light)
Once the sky is set up we need to add in a directional light. This will act as our main sunlight emitter. Working with HDRP physical based lighting means we need to set our light values to match real-world values. Here is a great cheat sheet you can use when setting up your lights.
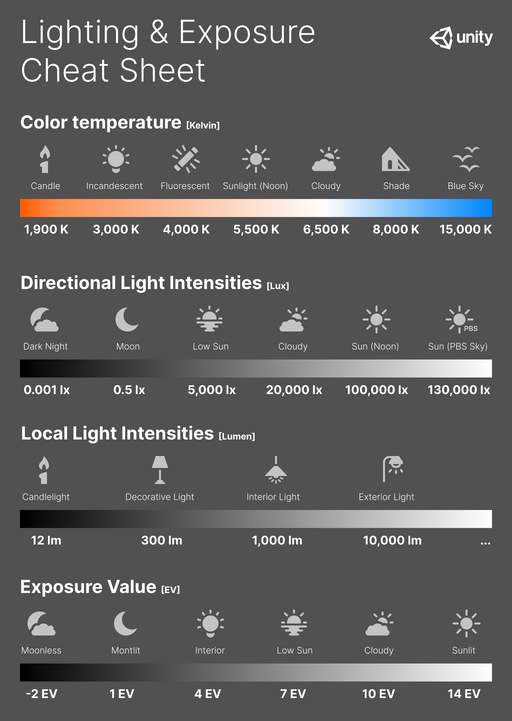
Refer to this lighting value cheat sheet courtesy of Unity.
Creating a custom environment switcher for Elegos
In Elegos, we do not have plans for a day/night cycle (which is the main limitation of an HDRI sky setup). The game is planned to have a number of set lighting and weather conditions that will change at certain narrative or progression points at run-time so we needed a custom system to allow this switch. It was also important for us to keep in mind that users may wish to create their own environment preset which we would need to offer through our modding system.
In order to achieve this, we have created a custom system using Scriptable Objects. Essentially we use a scriptable object to hold all the values we need to override in order to create our presets. These overrides include the HDR Image for the sky, the directional light values, exposure values and the rest of the lighting values related to the sun and sky needed. Using some nifty scripting we then set all the overrides to apply at run-time
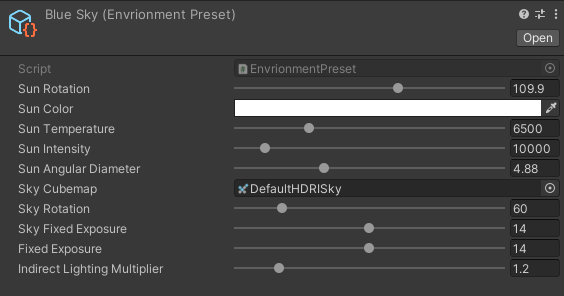
An example of our environment preset scriptable object.
Our plan is eventually to expose these settings into our modding tools to allow our users to create their own environment setups with ease.
If you don’t have any shadows you’re not standing in the light (Shadows)
Lady Gaga said that. Was she talking about shadows in Unity HDRP? Probably not, but if she was then she would have been very wrong indeed. Objects being lit in HDRP will not cast any shadow until a few settings are tweaked. Firstly the light itself (in this case our directional light) must have its ‘Shadow Map’ setting enabled. Secondly, all objects need to have the ‘Case Shadows’ setting checked under their mesh renderer components. Both these settings should be on by default but if you are not seeing any shadows where expected, check here first.
When it comes to performance, we need to be mindful of a number of factors when it comes to shadows. The resolution of the shadow maps make the shadows more defined and can make them look sharper but it takes more processing power to calculate higher resolution maps every frame at run-time. This can be optimized by lowering the resolution or by changing the update mode so the map isn’t being refreshed every frame. Another quick win is to reduce the ‘Max Distance’ setting of your global shadows. This will depend massively on your scene, how far the sightlines are and whether you need to draw shadows in the far distance. If you are able to lower this value without causing issues then it can have a huge impact on your frame times. Other impactful settings for shadows include looking at your cascades, atlases and maximum shadows. See more on shadow settings in the Unity docs.
Beauty is eternity gazing at itself in a mirror (Reflections)
Reflections are another major consideration when it comes to the overall lighting setup. At a base level, HDRP will automatically reflect the sky on reflective materials. Beyond that, the two main implementations of reflections are Screen Space and Reflection Probes. Using a weight system we can control the blending between each of these reflection systems and how much they impact the final reflection rendered.
Screen Space Reflections (SSR) are a resource-intensive solution that use rays intersecting with the depth buffer to essentially reflect everything seen on the camera at any given frame. The main advantage is a good level of accuracy but the major downside being it can only reflect objects seen on the screen so you get issues with larger-scale reflections and issues when the camera gets too close to a reflective material. This can cause issues with larger surfaces where the reflections seem to disappear and reappear as you move your camera around in the scene.
Reflection probes are points in space that take the surrounding scene from their perspective and bake it into texture data which can then be rendered as an accurate reflection. These are the most commonly recommended form of reflections for most use cases since the data can be pre-baked resulting in better accuracy and performance gains. However, reflection probes can also be set to run at real-time in order to capture dynamic objects.
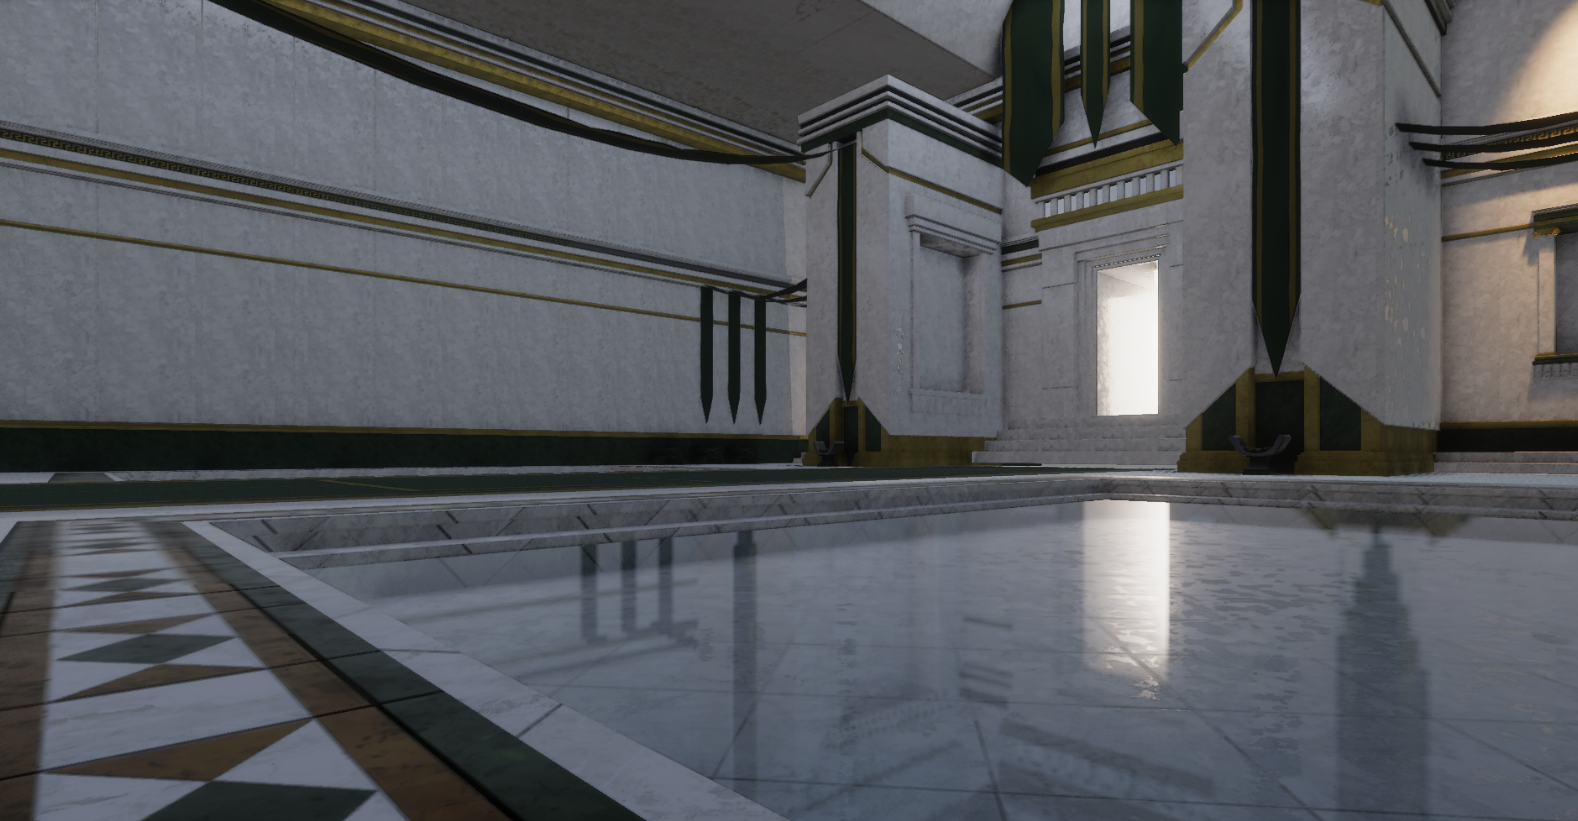
For our systems on Elegos, we required a combination of all the reflection systems. The two main challenges, as with the rest of our environment and lighting setup, was tackling real-time limitations. Since the first section of the game takes place on an island, we needed a solution for our ocean shader which covers a large open plane. For our ocean, we are making use of the ability to blend reflection types by using a large planar reflection probe. A planar version of the standard reflection probe, which utilises layer masks to only affect the water. Due to hardware limitations for something this large, we are using SSR as a fall back for older hardware. We are using spherical reflection probes throughout our scenes wherever there is a need for localized high-quality reflections and again using SSR as a fall back for lower graphic settings.
 Creating quality, performant reflections help to ground your assets in the world.
As with all graphical elements, performance and optimisation is always a challenge when creating high fidelity graphics. This is always a consideration for our project with real-time necessities and it is always good practice to test and simulate graphic settings at all levels of target hardware when developing for the PC platform.
If you want to read more about the reflections in HDRP and how you can combine them for your own needs, see the official documentation.
A quick note on Materials
It is immensely important to pay special attention throughout the setup of your environment to your materials. Since we are utilizing HDRP physically-based lighting, our materials should also adhere to the same rules. PBR (physically based rendering) materials are used to ensure we are working with the same units as our environment.
There is plenty of information and resources out there but in our experience, the important things to look out for are making sure your maps are packed properly (if using masks) and taking time to tweak your smoothness and metallic values to achieve the look you are aiming for.
The future belongs to those who believe in the beauty of their dreams (Post Processing)
This quote from Eleanor Roosevelt, the former first lady of the United States, tells us to keep dreaming and dreaming big as with perseverance your dreams can come true. Again, a lot more existential than game development perhaps but we can apply the same thinking to Post Processing and how it can affect the overall result of our lighting setup.
So we have set up our sky, adjusted our lights with physical real-world values to match our sky and adjusted our materials and reflection settings to ground it in physical space. The final step in setting up our lit environment is post processing. Post Processing is essentially that, processing that happens after the frame is rendered. This stage is when you can really push your artistic vision into your scene and HDRP has its own post processing stack to help you do that. We will not be going into the details of every single post processing effect available (perhaps in another article).
 Some accidental Blade Runner Vibes when experimenting with lighting in the HDRP
As with the rest of the components involved in our HDRP environment setup, post processing is applied via the volume framework meaning you can adjust on a global and local scale. The obvious examples include having a whole different look and feel for when you are underwater, interiors vs exteriors and localized effects such as ground fog and cinematic effects. To read more about the available effects in the HDRP post processing stack see the official documentation.
The whole is greater than the sum of its parts
Creating environments with believable lighting is one of HDRPs greatest strengths. It is important to remember that there are many parts that make up the whole when it comes to environment lighting and each area of technical implementation affects the others. By gaining knowledge in each area and sticking to the same structures around physical units you can create some very believable scenes that feel rooted. There is always room for artistic impression and as long as the systems follow the same principles you can achieve less realistic yet still believable results.
From our experience, the built-in systems of HDRP are very powerful when utilized correctly and the volume framework allows localized control of the look and feel of different areas of the environment. There have been a few roadblocks for us along the way since HDRP is still a WIP pipeline but with a fervent community on the Unity forums and social media, there is always a solution to be found or an update on the horizon.
As always we are always open to discussion with our community around technical aspects of our development and, if able, would love to help those working with the same technology, so let us know your thoughts or suggestions.
Rich