Welcome to our fourth preview for Napoleonic Total War 2, a mod for Rome Total War. We've covered the wide array of French and Russian combat units in the previews, as well as giving some historical background on Napoleonic warfare for all of you who didn't stay awake in school :wink: Now it is time to discuss the mod in terms of gameplay and tactics. We hope the Grognards enjoy, and also that the few doubters out there will come to realise that Napoleonic warfare is as much "lining up and shooting at someone" as Roman warfare is "lining up and stabbing at each other."

We're already devoted 3 previews to our unit types, and how given you a brief description about their uses, strengths and weaknesses. This time we will go into some more detail about their actual performance and abilities on the battlefield.
[size=3]Infantry[/size]
Muskets
Muskets are quite inaccurate weapons. At maximum range, regular infantry will only cause a few casualties each volley. But as the target gets closer, the volleys become more destructive.
Unlike what many people may think, extended long range shooting duels between infantry are rare, because on even ground no one really gets an advantage in doing this. Even though elite units may shoot a bit more accurately then lesser units, they are also more important and you generally don't want to waste them in long shooting duels; after all, no matter how "elite" a soldier is, bullets kill them just as easily. Usually the defender will have better ground so a shooting contest would only result in certain defeat for the attacker. Victories are achieved by routing the enemy units as soon as possible. To achieve this one needs to use the more devastating close range volleys, charge the enemy, or a combination of both.

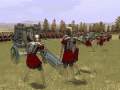
French Chasseurs fires a volley, covered in smoke.
A lot of infantry attacks are executed by grenadiers or other shock units charging the enemy line, while Line infantry follow on their flanks, stopping just a few meters in front of the enemy to deliver close range volleys. The attacker will take a lot of casualties in doing so, but if all goes well the combination of the shock unit's charge and the close range volleys will rout the targeted enemy unit in just a few seconds.

This will create a gap in the enemy line, and cause a morale penalty for the nearby enemy units. The grenadiers can now move in their rear, while the Line units shoot them at close range. The resulting morale penalties will often cause a chain rout, rolling up the entire enemy line.

Of course in reality it's often much more complicated then this. Concentrated artillery fire can weaken a spot in the enemy defence, while close range canister and concentrated musket fire from the defender can rout the attackers before they even reach their target. It all comes down to who is best at creating and exploiting weaknesses or mistakes from the enemy.
The only units who are supposed to be used for long range shooting are the light infantry.
Note: Rifles were much more accurate then muskets, but slower to reload. Neither the French nor the Russians used them to a large extent. They will be introduced to the mod in the Waterloo Pack.
Light Infantry
Light Infantry are the "archers" of the Napoleonic era. They operate independently and in loose formations, making difficult targets for enemy infantry and artillery. They are trained to take accurate shots, have a high range and move quickly.
Light Infantry units are generally smaller then Line and Heavy infantry, but their higher range and quick speed makes them very hard to kill by the latter. If you have no skirmishers of your own, the best way to deal with them is cavalry. Skirmishing Light Infantry are vulnerable to cavalry charges while they are in loose formation.
They are also good at taking out enemy artillery crews, if the enemy has placed these in the front ranks. Their loose formation will result in fewer casualties from roundshot and even canister fire.
Their smaller size makes them weaker then the other infantry units if the latter manage to catch them.
Reload Speeds
Next to range and accuracy, an infantry unit's efficiency also depends on how fast it can reload. Militias will reload slow, while elites can do it quickly. The result is that some units can outshoot others even when they are outnumbered. It also affects how many volleys your men can fire before a charging enemy reaches your lines.
[size=3]Cavalry[/size]
A strong cavalry arm is a requirement for every balanced army. They are generally used for 3 purposes: sweeping up enemy skirmishers, countering enemy cavalry, and exploiting enemy weaknesses. Even though cavalry generally cannot overrun a steady infantry unit, they can quickly run over a weakened unit. Infantry and Artillery can weaken the enemy line enough for a resolute cavalry charge to crush it quickly. If you are on the receiving side, make sure you replace or reinforce weakened units before the enemy exploits it, or keep your own cavalry nearby to counter or disencourage an enemy attack.
Light Cavalry VS Heavy Cavalry
Light cavalry is quite a lot faster then their heavier colleagues, but have a lower shock values. They are especially useful for harassing enemy skirmishers, flanking manoeuvres and any situation were speed is more important then raw power. Heavy cavalry can deliver a harder punch, and can stay in the fight much longer, so they can be used as fast moving infantry. They are best used to lead a frontal charge, proceeding the slower infantry while the lighter cavalry makes flanking manoeuvres.
The Lance VS The Sword
Lancers are equipped with both a lance and a sword. When using alt+right-click to attack, they will charge with their lance, and then switch to swords for close combat. The lance charge can be especially deadly, but switching to swords can take a while, and until then the unit will not be capable of dealing much damage. They also have a slightly worse defence skill then native sword-armed units.
Lancers are especially useful against weakened or wavering units, where their charge alone is enough to break the enemy.

French Lancer and Polish Guard Lancers charging with lances.

Polish Guard Lancers after the charge, using their swords.
[size=3]Artillery[/size]
Line of Fire
12 and 6 Pound artillery pieces fire their projectiles on a virtually flat trajectory. This makes checking their line of sight/fire quite important. It can be useful to lower the camera to ensure that the terrain that looks flat isn't actually a slight hill. The result of this trajectory is that the proper positioning of these artillery pieces is vital to their performance.
Tip: When using round shot, always aim where the enemy formation is the deepest. If you can get an artillery piece on the enemy's flank, don't just aim for the closest unit. Instead, aim for an enemy line that is perpendicular to your artillery. Hitting a Line in the flank has the same effect as hitting a column: the cannonball will cut through several ranks, which can do massive damage when fired down a line.
Howitzers are an exception to the "flat trajectory" thinking; they fire in a very high arc. They have a shorter range and are more inaccurate than the direct fire pieces, but can be deadly against a concentrated enemy who thinks they are safe behind a ridge or inside a village.
Art VS Art
A popular trick in Napoleonic Total War 1 was to destroy the enemy artillery with your own as soon as the battle started. In addition, most games require a "xx art per team" rule to avoid the frame rate drop caused by cannonball explosions. The result was a lot of great NTW1 games started with an artillery duel, with both sides trying to destroy each others' guns.
We wanted to avoid this in NTW2. Artillery "duels" did happen in reality, but there were so many guns on a battlefield that it would be impossible to destroy all enemy artillery in a few volleys. This obviously wasn't possible in NTW1, but is more so in NTW2.
Artillery in NTW2 is more numerous (no artificial limit needed), and they have large crews (60 man per 2 guns). The result is that it takes quite long to disable an entire artillery battery.
Capturing & Abandoning Pieces
If you kill or rout the enemy artillery crews, their guns are left behind. These can be captured by your own artillery crew of the same artillery type. If you can capture them early in battle it can be very useful as additional ammunition for your depleted crews.

Tip: You can detach your artillery crews (press "W" to withdraw the crew, then move the unit). This causes them to leave their guns, but also lets them move a lot faster. This can be very useful to save their lives against a sudden cavalry attack or heavy artillery fire. If you are careful you can retake the guns when things are safe again.

The Napoleonic Total War 2 mod offers a number of predefined group formations, all based on historical formations:

From left to right: Line, Column, Loose Column, Double Line, Loose Double Line, Battalion Square, Left Echelon, Right Echelon
Some are more usefully then others, depending on the circumstances. We'll go into more detail on these and other formations in this section.
[size=3]Line[/size]
The line formation is the standard and most used formation. The default depth of all infantry units is 3 ranks. In reality only the front rank(s) could fire, which was an important feature in Napoleonic tactics, but sadly this feature is not available in the RTW engine. Apparently it will be available in MTW2 so that'll be one of the improvements of NTW3 over NTW2.
The main reason to form lines, and not columns is because the latter is highly vulnerable to artillery fire. Roundshot can easily cut through 5 or more ranks, so in order to minimise casualties you have to deploy in 2 or 3 ranks deep. 2 ranks is ideal when you are facing long range bombardment, but it makes units unwieldy and fragile against cavalry charges.

A thin line minimises casualties from artillery fire.
Another (minor) advantage of a thin line over a deep column is that accuracy decreases over distance (bullets may not reach the target,) and so the men at the rear of a column may be completely out of effective range of the front's target!
[size=3]Column[/size]
A "column" points to a deep formation, but not necessarily one that has more depth then frontage - such deep formations were only used to march, not to attack.
A deep formation (usually 4-6 ranks) is mostly used to attack. It is vulnerable to artillery, so one should only form it right before charging the enemy.

A cannonball cuts through 7 ranks
When multiple units attack in a dense column, they can concentrate a lot of firepower on a single enemy unit. Such a deadly volley can be enough to rout that unit instantly, thus breaking the enemy line. But keep in mind that such a formation can be countered by surrounding it: In such a situation only the flank units are still able to fire, the centre unit(s) will have to manoeuvre in order to get a clear line of sight. If the purpose is to pin down the enemy (preventing them from shooting) then it is better to deploy in a longer formation, charging individual enemy units.
Another minor but possibly life-saving advantage of a deep formation is that when such a unit routs after fighting the enemy in hand-to-hand combat, more soldiers have a chance to escape, while a line can be overrun quickly.
As mentioned before, deep columns can also be useful when marching. Travelling on roads speeds up movement, but roads are narrow and thus require units to move in column to benefit. Line formations often have difficulty manoeuvring around villages, and often find it impossible to move through them. Thus you'll need to switch to a deeper formation in order to move and fight in villages and building complexes and especially to take pesky bridges!
[size=3Squares[/size]
Square formations can be used against multiple cavalry units. A clever cavalry commander will always attempt to attack from multiple directions, hitting units in the front and backside at the same time. The square formations exist to minimise that effect.
Squares are usually formed only in rare and desperate situations, when terrain features or reserves can not provide the protection needed against enemy cavalry.
The are very vulnerable to artillery fire because of the deep ranks and/or exposed flanks.
Single Company

When a single unit faces multiple cavalry units it can choose to form up in a square formation. This is a weak square because it's flanks and backside are not protected, but it minimises the length of the fragile backside. The result is that the initial cavalry charge will not cause as much casualties compared to when the unit would have been in a Line formation. For elite infantry units this can be enough to repel some of the weaker cavalry units.
Double Company

Two infantry units have a good chance of repelling multiple cavalry units as long as they hold steady: one unit covers the front, the other deploys right behind it, facing the other way. The Flanks are not protected, but these squares are quite reliable.
Battalion Square

The biggest square is a selectable formation that ideally exists out of 4 infantry units and an Officer. The infantry will form up in a square, and the Officers deploys in the middle to boost their morale. These large squares are rarely formed because take up a large part of the army, and are very weak against musket and artillery fire. They're only effective against enemy armies existing almost entirely of cavalry without any effective artillery support.

Tip: To counter this formation with artillery: use canister shot against the front rank, or aim roundshot against the flank units. The latter will allow cannonballs to cut through the flank units, killing 5 or more men with each hit.

All our maps are custom (hand)made, none of them are generated from the campaign map. This is necessary because the have a profound effect on the game play. The featureless maps from RTW - that either contain one or two huge hills (more like mountains actually) or hardly any elevation at all - simple don't work with the scale of Napoleonic battle(field)s.
Many of the maps are designed to be well-balanced in multi-player, giving an equal chance to both attacker and defender. Terrain features are small (no huge mountains) so they only ever offer protection to a small number of units, thus forcing defenders to spread their forces or let the unprotected units take a lot of casualties from artillery fire. The attacker then must look for the weakest spot, and try to concentrate his first attack there.
[size=3]Terrain Types[/size]
Hills & Valleys
Obviously, hills offer a slightly improved range, and a small combat bonus, but units on top of them are exposed to artillery fire. It is often best to deploy in the valley behind, and move the unit up on the hill on the right moment - when the enemy is about to attack. But move too late and you might find yourself fighting uphill, or facing close range artillery and musket fire.

A small ridge is enough to protect your men against artillery fire.
Hills also make ideal positions for artillery, increasing their range. Just make sure you can protect them against enemy skirmishers or cavalry charges.
Tip: If your artillery on the hilltop are being targeted by enemy artillery, detach the crews and let them take cover just behind the hill. When the enemy has found another target you can re-attach them to their cannons.
Creeks & Swamps
Some maps have crossable creeks, swamps or mud pools. This terrain type seriously slow down movement. Avoid crossing such terrain when under fire.

Tip: Deploy units behind creeks when defending. The mud will bog down enemy charges, and you can place your units inside the creek for (some) protection against artillery fire.
Forest
Dense forests are also difficult to move through, and cause a combat penalty for cavalry units. On top of that it's very hard to keep an overview when fighting in a forest - annoying but realistic.
Although trees do not block cannonballs (another flaw in the RTW engine) but they can still be useful to obstruct view and to hide units inside (they can't aim at what they can't see.)
Forests on our maps are usually deliberately kept small, and are often away from the defenders deployment zone. Otherwise the defender could just hide his entire army inside, safe from artillery fire, giving him an unfair advantage.
Roads
As mentioned before in the Formations section, roads greatly speed up unit movement. This allows players to quickly move a part of their army to outflank the enemy, or to reinforce a weakened position. Often commanders will consider roads first and foremost when planning and attack or defence!

Pavlov Grenadiers moving over a road.
The speed bonus only counts for the soldiers actually walking on the road, so you'll have to move in marching column or you'll units will get messed up with stragglers trying to keep up. Forming column takes time, and they are fragile to artillery fire so roads aren't always advisable in the heat of action.
Tip: the Russian Cossacks are fast, cheap little buggers. They are very good at sneaking past the enemy lines and hitting fragile units such as officers and artillery. Roads can be a great help to get them there quickly.
[size=3]Buildings[/size]
All our buildings are destructible. Destroying buildings can expose the unit covering behind. Destroy walls to open a new way into a village.
Villages
Most maps are have lots of small villages and compounds. The houses can provide cover against artillery fire or protect your flank. When attacking, you often have to move from village to village to keep your army protected until you are close enough to launch an attack.

A French battalion has deployed in a village.
Enter-able Buildings
Some of the biggest buildings can be garrisoned by units. The current Borodino pack doesn't have a lot of these buildings yet, but there will be more in future release(s), including hopefully a few Belgian chateaux!
Units inside buildings are relatively safe from musket and artillery fire - at least until the entire building collapses, killing everyone inside. The unit inside will probably not cause the same number of enemy casualties as they would in a standard line, because only a limited amount of men can actually fire through windows and the occassional loophole. However, as long as the building stands, there units can be very difficult to destroy, which can endanger the flank of a prospective attack.

French Infantry garrison a big wooden barn.
Enjoy!
The Lordz
^ Lol
Yes! This is my most anticipated RTW mod! Keep up the good work! :D
I love you and i want to have your children