
How to Create Modifications for Cortex Command
In this tutorial i will explain how to create a basic working mod, this includes how to arrange the files and .ini's to get it to load, and basic weapon creation too... I hope to create the kind of guide which i wish that i could have had when i first got started.
this tutorial is aimed at the complete beginners and at getting you creating something as soon as possible.
By the end of this tutorial you will have a working mod, one gun and some idea of what to do next ^^
it covers mod folder and .ini organisation, simple weapon creation, sprite creation and a basic understanding of the Cortex Command code.
Tutorial Beginning:
first you need to create the mod folder in your /Cortex Command/ folder
create a folder and name it .rte (e.g FirstMod.rte)
the ".rte" is important as it is how the game recognises what is a mod in the /Cortex Command/ folder,
this tutorial doesnt have many files that accompany it, but it also serves as a base which you can build a Mod onto, (all the example files with this, will use the mod title "FirstMod.rte" but if you use a different name it will not be much fuss to go around and change them)
within this folder (e.g Cortex Command/FirstMod.rte) Create a folder named "Devices".
this will contain the weapon created in this tutorial and any future devices you add
at this point you have created a basic and easy to organise mod directory,
_../Cortex Command
______ ../FirstMod.rte
___________ ../Devices
it will not load up in the game yet but we will get to that next

These are vital for the mod to correctly load, (or to load at all), they are a set of .ini's,
.ini's play a huge part in modding Cortex Command, and all of the code in Cortex Command (except for .lua code) will be written in one of these,
to view and modify the contents of .ini's you can simply use notepad, but i would recommend "notetab light" (freeware), but to begin notepad is cool,
we will use some .ini's in the mod which we are going to create.
An important note is that adding "//" to anything "comments it out" or stops it from being read
The first and most vital one is the one titled "index"
(a useable example can be found in the tutorial files)
This tells the Game what your mod is titled and which files to load, this is the first file the game will see.
if you load up the example in notepad you should see
DataModule
ModuleName = MyFirstMod
IconFile = ContentFile
Path = FirstMod.rte/ModuleIcon.bmp
IncludeFile = FirstMod.rte/Devices/Devices.ini
The "ModuleName" is the name which Cortex Command (CC) will display above content from your mod,
The "IconFile" is the picture used in the buy menu alongside your mods name.
this should be a bitmap picture.
(an example is in the Tutorial Files)
The "IncludeFile" is the .ini which the mod should load. in this case it refers to another index in the Devices Folder, (this .ini is included with the Tutorial Files we will deal with it next)
FirstMod.rte/Devices/Devices.ini
Place into the directory above the Devices.ini Found in the Tutorial Files, if you look in it you will see that it is empty this is because we have not created any Devices (weapons/tools)
This .ini is loaded up in the "index" and its job is to load all of the various Devices contained with a mod, (you can load up weapons seperately from the "index", but by using this other index we can unclutter our mod files, making them easier to understand, and it is generally good practice as it helps you to pinpoint errors faster by using more indexes and it keeps your mod easy to add to.
Indexes are generally just a good idea, its pretty simple and easy to keep track of things, and thats the good thing about them.
we will leave this empty for now and add lines to it as we add our first weapon
for your first weapon we will keep it simple and the simplest weapon to create in Cortex Command is a Pistol,
in Cortex Command Weapons are built out of a few basic parts and then called into the weapon at the end of the file, (we can then call this in the Devices.ini.)
(there is a useable example in the Tutorial Files of a weapon, use this)
create a folder in FirstMod.rte/Devices/
named "Deagle" and place in it the following files from the
tutorial stuff:
Deagle.ini
DE.bmp
DEMag.bmp
MuterFire.wav
now
open the Devices.ini and add the line
IncludeFile = FirstMod.rte/Devices/Deagle/Deagle.ini
if you now run Cortex Command (if you use a modloader make sure your new
mod is set to load) and your mod with the example gun should load up and
appear in the buy menu. if it crashes, check you have done the last
step right
then you can open up the Deagle.ini and modify
the code if you like to make a weapon you are happy with, to see any
changes you have made just reload Cortex Command, and purchase your gun
from the buy menu, on the next page there is some info on how it all works!
you can modify this until you are happy :D
~
the Ammo
this includes both the Round, and the Tracer
these are what comes out of the barrel of your gun when you shoot it, it can be an AEmitter, MOPixel or a MOSParticle, for the example i have used an MOPixel because it is most suitable for pistol ammo and it is the simplest and easiest to understand
Mass will affect damage, kickback and terrain rape
sharpness is the penetration of that ammo (terrain rape and damage),
particle count is the number of particles fired, this can be used to make a shotgun (with particle spread in the HDFireArm) or to make your weapon more powerful
Velocity is the speed at which bullets move (will effect damadge, and terrain rape)
the shell is the discarded casing
~
The Magazine
the above ammo is called in, this also dictates what the magazine looks like and the number of bullets in a clip
the number of bullets in a clip and the round to tracer ratio (how many tracers for every round) can be changed here
RoundCount = number of bullets in the clip
~
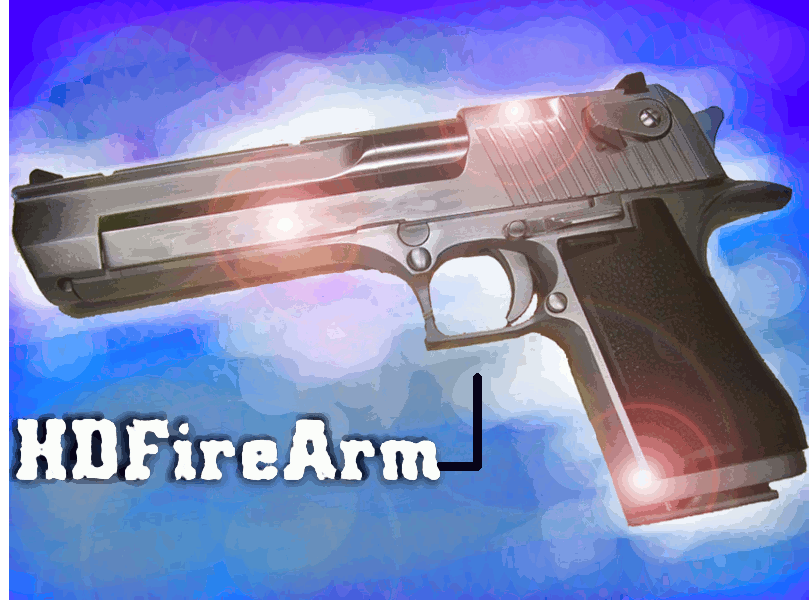
The HDFireArm
this is where the Magazine is called in, it also dictates many important details about the gun, see the example "Desert Eagle.ini" for info, or the wiki. The basic important bits you can change are ,
the firerate, RateOfFire, more bullets = more damage faster
the reload rate,
whether it is two handed, OneHanded, 1 = yes, 0 = no (onehanded weapons can be held with shields)
the particle spread
the gibwound limit (strength),
the joint strength dictates how easily it is knocked out of an actors hands.
Shakerange = the accuracy,
SharpShakeRange = accuracy when zooming (aiming).
Sharplength = aimrange
There are many problems which can occur, often caused by spelling or your early understanding of the code. Here i put some pointers to do with this.
P.S. you needn't even read this section if it all loads up fine ingame.
Important Information, when CC crashes during loadup it should display an error message with some information about the origin of the error. the error itself, the file the error occured within and the line in that file where the problem lies. (if your using notetab light, you can use the go to - line tool to get to this line quickly).
Layout Explained.
RTE wrote: Abortion in file .\System\Reader.cpp, line 531, because
Failed to open included data file in FirstMod.rte/Index.ini at line 5!
The Last Frame has been dumped to 'Abortscreen.bmp
The first line just refers to what line in the loader that it crashed, this will never tell you anything particularly exciting.
The second line is the most important, this will contain (in order) the error, the file that contains the problem and finally the line where that error exists/begins.
the final line simply refers to a screenshot of the loader as it crashed, this wont show you much, but it can be found within the Cortex Command file among the other files and folders.
(FYI on closer inspection this error was caused by a misspelling of FirstMod.rte on line 5 of Index.ini as "FirstMo.rte)
Errors!
it would take forever to list all of the errors, so i will explain what to check for when fixing them
- Spelling, always check spelling, especially with paths, using a capital where one isnt or vice versa will crash the loadup
- Referances, e.g. is the name you used to call in your bullet into your magazine the same name that that is called (presetname = )
- using things which don't exist, have you called something from the base files that doesnt exist, for example flashes, unless you make your own, the only ones you can use are "Muzzle Flash Pistol", "Muzzle Flash Shotgun" and "Muzzle Flash SMG"
- bad coding, look at the way weapons are usually laid out, with "tabs" as they go up (not spacebars) if your code doesn't look like this should be worth fixing, (it might not be causing the error but it makes it a lot easier to read and understand)
- Silly mistakes, we all make them ^^
well thats it for now, any other errors either contact me or someone else (after giving it a damn good fix yourself and checking the forums and the Wiki )
Additional Notes
This Basic Tutorial is now Over and you should now understand the raw basics of cortex command modding, but there is still a little you should know,
Creating your own sprites
Download the Gimp,(freeware)(windows and Mac)
get the CC colour palette
(this is the Duh102s Gimp palette download, my gimp stores palettes in)
(C:/Documents and Settings/User/.gimp-2.6/palettes )

now first create your image, and set it right by going into "image" and setting the mode to indexed, then set the palette (you might have to draw something before doing this im not sure) by going into "colours", "map", and setting the "colourmap" to the cortex command one (should be at the top)
now your good to go, draw your weapon and set the palette again before your finished and it should load up in CC,
you can also sprite in mspaint, GraphicsGale (freeware) and photoshop (commercial), for photoshop more information can be found here ,
( i would wholeheartedly suggest you use the gimp though its kinda like mspaint but pimped!)
If you use Mac you can get Pixen! (freeware)
File Types
Cortex Command can read these filetypes, in brackets is the name displayed in "properties"
Code:
.ini (configuration settings)
.lua (LUA file)
Images
.bmp's (bitmap images)
Sound
.wav (Wave sound)
that is it, and those are all the file types you will need EVER for making a cortex command modification. A little information on the filetypes follows (where neccesary), with their application in cortex command
.ini
most of the code you ever create for cortex command will go in one of these, they are used for the indexes, the actors, the weapons, the dropships, basically everytime you need to do some code it will go in one of these files.
.lua
for more advanced weapons and code (stuff which you can do in the .ini's "now everything is possible") it will be a while before you exhuast the possibilities of .ini's so i dont really need to say much here. if your desparate for more info on how to use them in cortex command you can go here
.bmp
created by most pc art applications, the images inside this file type are indexed, making them real easy for computor programs to read. these are used for all the sprites in cortex command, module icon, bodyparts, effects (glows), any art that you see in game and isn't generated by code will be one of these images (making cortex command moddable)
.wav
uncompressed audio file, used for sounds funny that !
Release Etiquette
a very important topic to understand as a cortex command modder.
Nobody is going to flame you unnecessarily, infact the cortex command
community is uncanilly friendly and supportive, provided you understand a little release etiquette.
when you create your first mod it will most likely fall into one of a few finite categories,
A Reskin
just changing the appearance of the games vanilla (defualt) content, or also the action of one of the weapons slightly and then repackadging into a new mod.
These can range from reskinning the whole dummies factions actors, to just one coahilition and a gun. Unless youve made major changes such as a whole character with a custom weapon, and some awesome, pretty explosions and eyecandy (making it into a mod in its own right) these should generally go into the minor mod dump, where all of the smaller mods go (which was created to unclutter the forums)
This is not a bad thing though as the minor mod dump is a good place to get yourself noticed and if your work is really good maybe even make a few fans.
A Few Guns
a couple of weapons you made around the same theme, unless the number of weapons is substantial like 10-15 or you have a bunch (6?) that do something which you haven't seen done before, these should also be posted into the minor mod dump.
An Actor
and actor you created youself, probably once more the minor mod dump, unless your characters are well sprited and you have, 3 or more AHumans or 1-2 particularly exciting ACrabs, these would be a minor mod.
If you feel its substantial or good enough to make it into the main mods section (mod releases) go for it! Youll probably get supported!
so now your asking what isn't a minor mod its simple, anything with Quality, Quantity, Fun, Uniqueness or Pure awesomeness,
Once your mod has its own thread in the Mod releases section, remeber when updating the mod DONT create a new thread, update the old one, also any mod without images breaks forum rules and could get taken down.
Got any questions? First think over it yourself, look at other peoples releases THEN finally ask in the mod making section.
something else worth mentioning for noobs is the
Mod Requests Forum
Forums.datarealms.com
here you can "help make someones cortex command wet dream come true"
it also is a good way to practice and get noticed,
also if youve started created something that feels really awesome but you can't finish it
(not enough understanding) you could request someone else to help you here!
More Information
i learnt alot by looking at the code of others and how they did similar things to what i wanted, but other information can be found at the wiki or the forums
if you expand on this mod in the future, for other things such as
actors i suggest you create another file in your main mod file
(FirstMod.rte) named after what it contains (e.g "Actors"), then just
create another .ini named "Actors" within this file and use that as
another directory like the one we used (Devices.ini)
i would also like to mention that my mod "the CrowGuard" is open for reskinning, ect. if you want any examples of more complicated weapons or dropships you can find lots in my mod, also you can modify or copy the code from my mod to use in your own without my permission.
(but a friendly message telling me you have yould be nice)
see here for more info on this
if you have anytrouble with this tutorial message me on the forum or here on mod db
By StoneCrowUK, any alterations or additions you would like comment below!
This Tutorial uses Example files, to make it easier and quicker they
can be found here

I started to feel the need to learn coding, so i thought cortex command was a good place to start.. i spent a couple of hours tweaking files, countless errors XD but the small succesful mods i made always drove me on and made it worthwhile. Then when on the vast internet i stumbled on this tutorial,im now working through this... its great! the one thing that sucks with it is, not enough feedback to you on how awesome it is! im truly sorry your not getting the praise you deserve from this, but i can assure you... it has been used by MANY users... SO on the behalf of the communtity.. i guess a thanks is in order :)
My CC crashed but I checked everything, It says:
Abortion in file .\system\ContentFile.cpp, Line 557, because:
Failed to load datafile object with following path and name:
FirstMod.rte?ModuleIcon
The last frame has been dumped to 'abortscreen.bmp'
I couldn't copy and paste it so I hope it was word for word.
Thanks for the tutorial though
you need to use another module icon i used the ronin 1 for the tutorial it solved my crash
i get a crash when i am at the step creating a weapen
---------------------------
RTE Aborted! (x_x)
---------------------------
Failed to load datafile object with following path and name:
FirstMod.rte/ModuleIcon
The last frame has been dumped to 'abortscreen.bmp'
You can copy this message with Ctrl+C
---------------------------
OK
---------------------------
i checked it 10 times
there is a module icon in the tutorial files folder, just simly copy that and past into your Firstmod.rte
i did but that one dont work for some reason
i used the ronin one for this
I want to add Actor files to Cortex command (EX: Crow guard) but im horrible at modding and programming. Is it possible to download an actor then put it into the Cortex Command file to use from there?
I'm guessing you just want to plug in actors,
sadly cortex command requires alot of fiddling with indexes that tell the game what to load from the mod files so you would have to learn how to do that. Also CC_MW2 and CrowGuard use a slightly independent materials and bullets system from the usual CC stuff that has custom materials so would take a bit of tracking down to find what had to go with them to make them work and how to load that.
When I use the gun in the game, there is a bunch of black pixels surrounding it, how do I fix this?
Haven't personally worked on CC mods since an update ago, would suggest trying the datarealms forums for help
This comment is currently awaiting admin approval, join now to view.
This comment is currently awaiting admin approval, join now to view.
This comment is currently awaiting admin approval, join now to view.
This comment is currently awaiting admin approval, join now to view.
This comment is currently awaiting admin approval, join now to view.
This comment is currently awaiting admin approval, join now to view.
This comment is currently awaiting admin approval, join now to view.
Great Tutorial.
Can i make a big Sprite then scale it to small to make a HD Weapons???
If i can, How to do that?
Thanks
Is it possible to create a super dragon ball mod with abilities?