I've been doing loads of polishing on my level for Off Limits over the past few months and as I crawl closer to the finish line I wanted to record the steps I take when polishing certain areas, assets and also improve performance while doing so. With this I hope to share some of my experiences I've encountered over the years.
For this tutorial I used Half-Life²'s Source editor HAMMER, 3DSmax 2011 and Photoshop CS4.
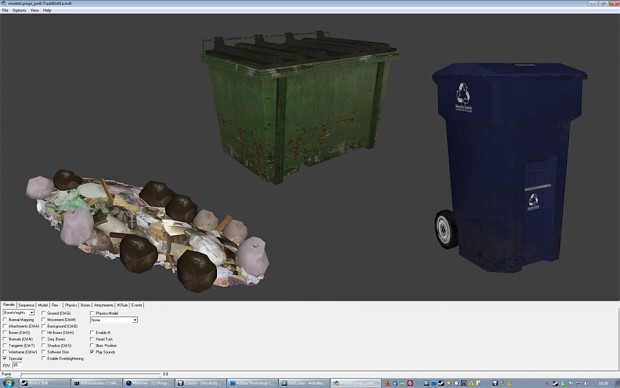
I want to convert prop_physics_respawnable objects I used from the Half-Life² database into prop_statics. This because physical objects take more ent_data than regular prop_static objects. Most of my physical objects in my level were garbage bins. While converting them I also wanted to add garbage bags for some extra detail and cluster them into large groups to save on draw calls.
Here you see the original Half-Life² models I used as garbage bins and the extra model I plan to use for the additional trash.
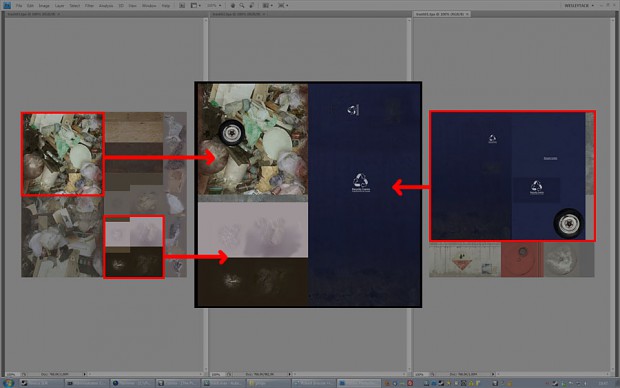
A lot of the Half-Life² assets have UV layouts that could be optimized. I checked if I could combine two materials into one, this to save up on texture memory. In this case I saw the option to combine the blue garbage bin together with the garbage bags I wanted to add for extra detail. So in affect, this extra detail wouldn't cost me a thing except for a few extra polygons (but I removed some from the original models that didn't add anything and wont be missed). The first thing I did was combine the materials in Photoshop in a new UV layout scheme where I plan to overlap more of the blue garbage bin on the right side and have the extra detail on the left side.
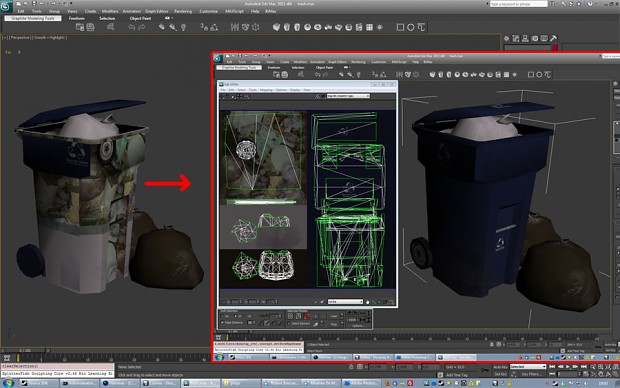
After importing and cleaning the original objects I attached the new material on it and as shown below the new texture coordinates are incorrect. This is because I need to reassign the correct polygon ID to those objects in 3DSmax and re-UV map them to fit the new material. As you can see the new detail is something you didn't have with the original Half-Life² assets.
Here you can see all the variations I made with the objects I was using in my level plus added details.
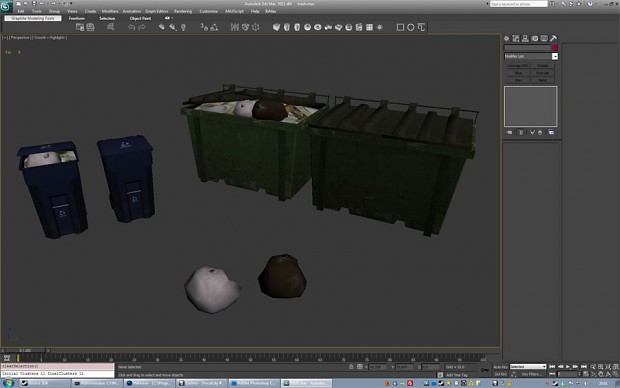
The next step is to combine these objects into a cluster. Because all objects now use the same material I can multiply them and save on draw calls in-game. To do this I select the BSP where the objects are placed against, in this case the walls are all I need. I then copy/paste them into a new file, where I can export the files contents into a .DXF file.
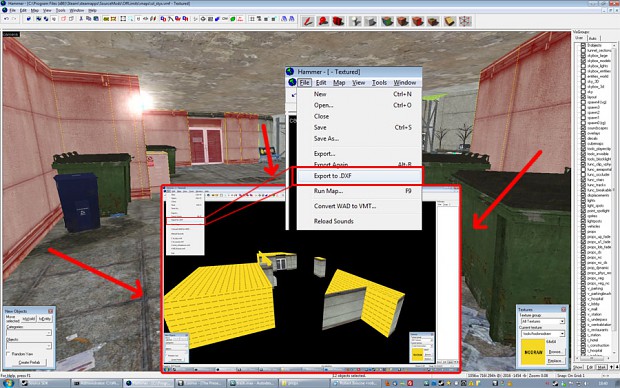
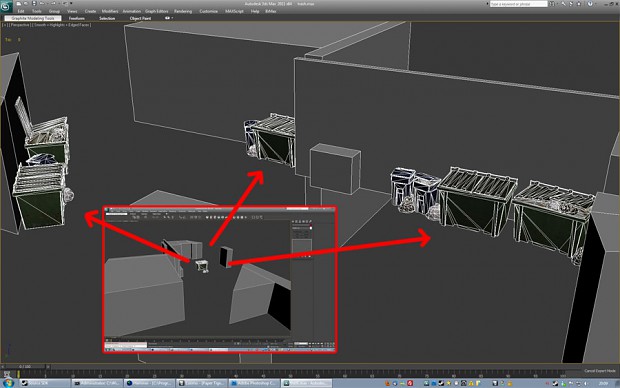
Now in 3DSmax you import the .DXF file, align it with the objects in your scene and make sure the center pivot is somewhere in the middle of the finished cluster. Now with the variations I made I can place the objects where I had the prop_physics_respawnable objects in-game before. So in this case I replace 11 objects to 1. This small update alone will reduce 10 objects and save 2% entdata. This may not seem much, but in a huge level as the one I'm working on it can reduce the entity number by 100+ and shave 30% off of your entdata.
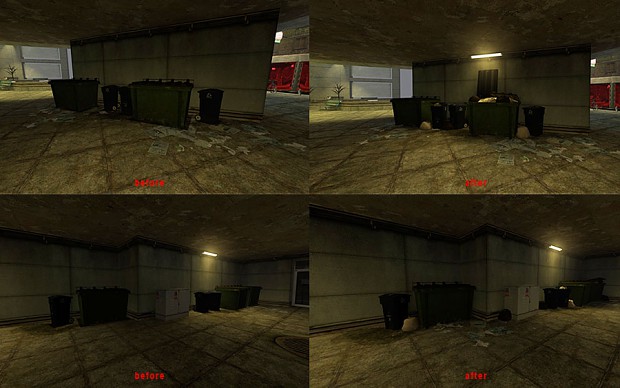
So in the end I reduced the polygons on the original objects (as some Half-Life² objects have too many details in all the wrong places), by doing this it enabled me to add more visual details such as the extra garbage bags and trash. I use more detail on the same material (saving texture memory). I clustered multiple objects into one (saving on draw calls). This all adds up to some important improvements that make a level run and look better in the end. Also by using a cluster system as this you are capable of having the same object reappear in-game multiple times but it will never look exactly the same as you can move, rotate, adapt objects inside each cluster to your liking.
A little warning though, clustering isn't always a good thing. When your level is inside with dense corridors and lots of twists and turns single objects will be occluded out and not rendered. If you were to cluster objects in this case looking in a corridor would also render the cluster behind each turn and not occlude it out. So clustering is only good for large open areas where you have the same objects multiple times in view.
If you have any questions about a certain part of this tutorial please let me know in comments and I'll address them when I can or update this tutorial if needed.
You can find more on my website: www.wesleytack.com


Clustering also takes up more memory, right? Since you're creating a unique model.
Source has no form of Mesh instancing, so it would take up exactly the same mesh memory as if they were all individually placed
Mesh memory would be the same yes, cluster does take less draw calls, so it is still good to do it in Source. I had to do this for performance issues as the large areas had too much entities. As I said, this is one of many ways I had to optimize my level and I thought I'd record it now before I finish the level, otherwise it would be too late.
Also as these props need to be placed as "prop_physics" to get them to work they do take up more memory as well, so I converted them (while clustering and updating the mesh/details) to prop_statics as they also take up less memory in Source than prop_physics. You need to slice and dice anything you can to get a map to run and look decent on Source, ask Robert :)
Turning prop_physics to prop_static might confuse some fans of the HL universe:
Developer.valvesoftware.com
"be aware of that players will rely on the behavior of props to be more or less consistent with other maps, and even other Source games.
"
Oh, one more thing: you combined metallic and plastic objects into one static prop. Are you also using one collision model for it?
I guess in this case you must have at least 3 different collision models (metal, plastic, organic trash) because you need different surface properties for metal and plastic.
Right?
What happens when you shoot the different parts now?
The big green bin also has plastic on it (as they do exist as well). So basically the green and blue bins are plastic and have collision. The smaller objects (garbage bags) don't have collision as I placed them mostly in between the larger objects so the clipping inside players would be a minimum to none. The small low to the ground objects can be very annoying for movement during combat, so I don't add collision to them for smooth game play. Also as there isn't a plastic impact decal/sound it uses the "default" impact sounds/decal anyway. There are however footstep sounds for plastic which sound perfectly fine on these objects.
But you are correct, some larger props I did have to make two versions because of this reason, most notable are glass/metal wood/metal etc etc, that are placed in areas where a lot of shooting is tend to occur or where the player might notice it (which is in some few areas needed).
Really interesting tutorial, thanks for taking the time to put it together. Alot of this is abit over my head currently, but im going to learn it at some point.
Yes, very nice tutorial. I like optimization tutorials to help us maximize performance in an engine while retaining high visual quality
That is a clever idea to combine textures for props that will be near each other.
Wow, that is a very unique idea, and I can see in the long run it will add loads of optimization. And it looks rather simple.
I think there are some very good ideas there but they may not have been used to their best.
UV stuff great, combining props good, making large heavy objects static good.
However Combining props into one model so their bounds check would always be true if any part of the group was visible even though from different approaches into the room you wouldn't see all parts of the group - would increase drawn geometry. Although draw calls are a large bottleneck, if a level is designed well and you guide vis with hint brushes etc then many of those draw calls wouldn't take place. PVS! - we're not in some fully destructible, dynamic environment, deferred rendered engine :)
Making those blue bins static is confusing for the player.
Try pulling the blue bins so the are up against the green or make some lying down - anything to stop it looking like you should be able to knock them over.
The bins hidden round the corner should probably be a separate group, for better vis and for re-usability; there will doubtless be more corners and flat wall spaces where you want bins but few that have that exact layout you have there.
Sorry if for the negativity, just trying to help, and inform other users who may not have your insight and then apply your advice too liberally :)
Well the level is designed for large open urban combat with drivable vehicles (not easy to get right in Source). Designing a level like this with a lot of detail takes its tolls. I know most levels are build in a corridor way where each corner is meant to cull out everything behind it and so forth. And the fully destructible dynamic comment, thanks for bringing that up, I had no idea.
Also, about the blue bins being able to knock over - it's not because Valve has physics and they made them fall over in their design everyone else has to use what they did in their designs. I choose not to have many physical objects because A) they take up too much memory in my already over limits level and B) they hinder game play too much in our fast paced game play. I want people to get killed because they didn't use the environment to their advantage, not by getting stuck or caught by some annoying physical object. This is of course a debate that many people will think different about.
About the re-usability, correct you are that they are made for specific areas and won't be able to be re-used again. As I am the sole level designer/artist on this and I have full control to customize every detail and corner in my level to make it work best for what it was designed for I do it this way. The pros outnumber the cons in this case. But I agree if you are using this tutorial for re-usability it's better to make generic props that can be used in multiple occasions.