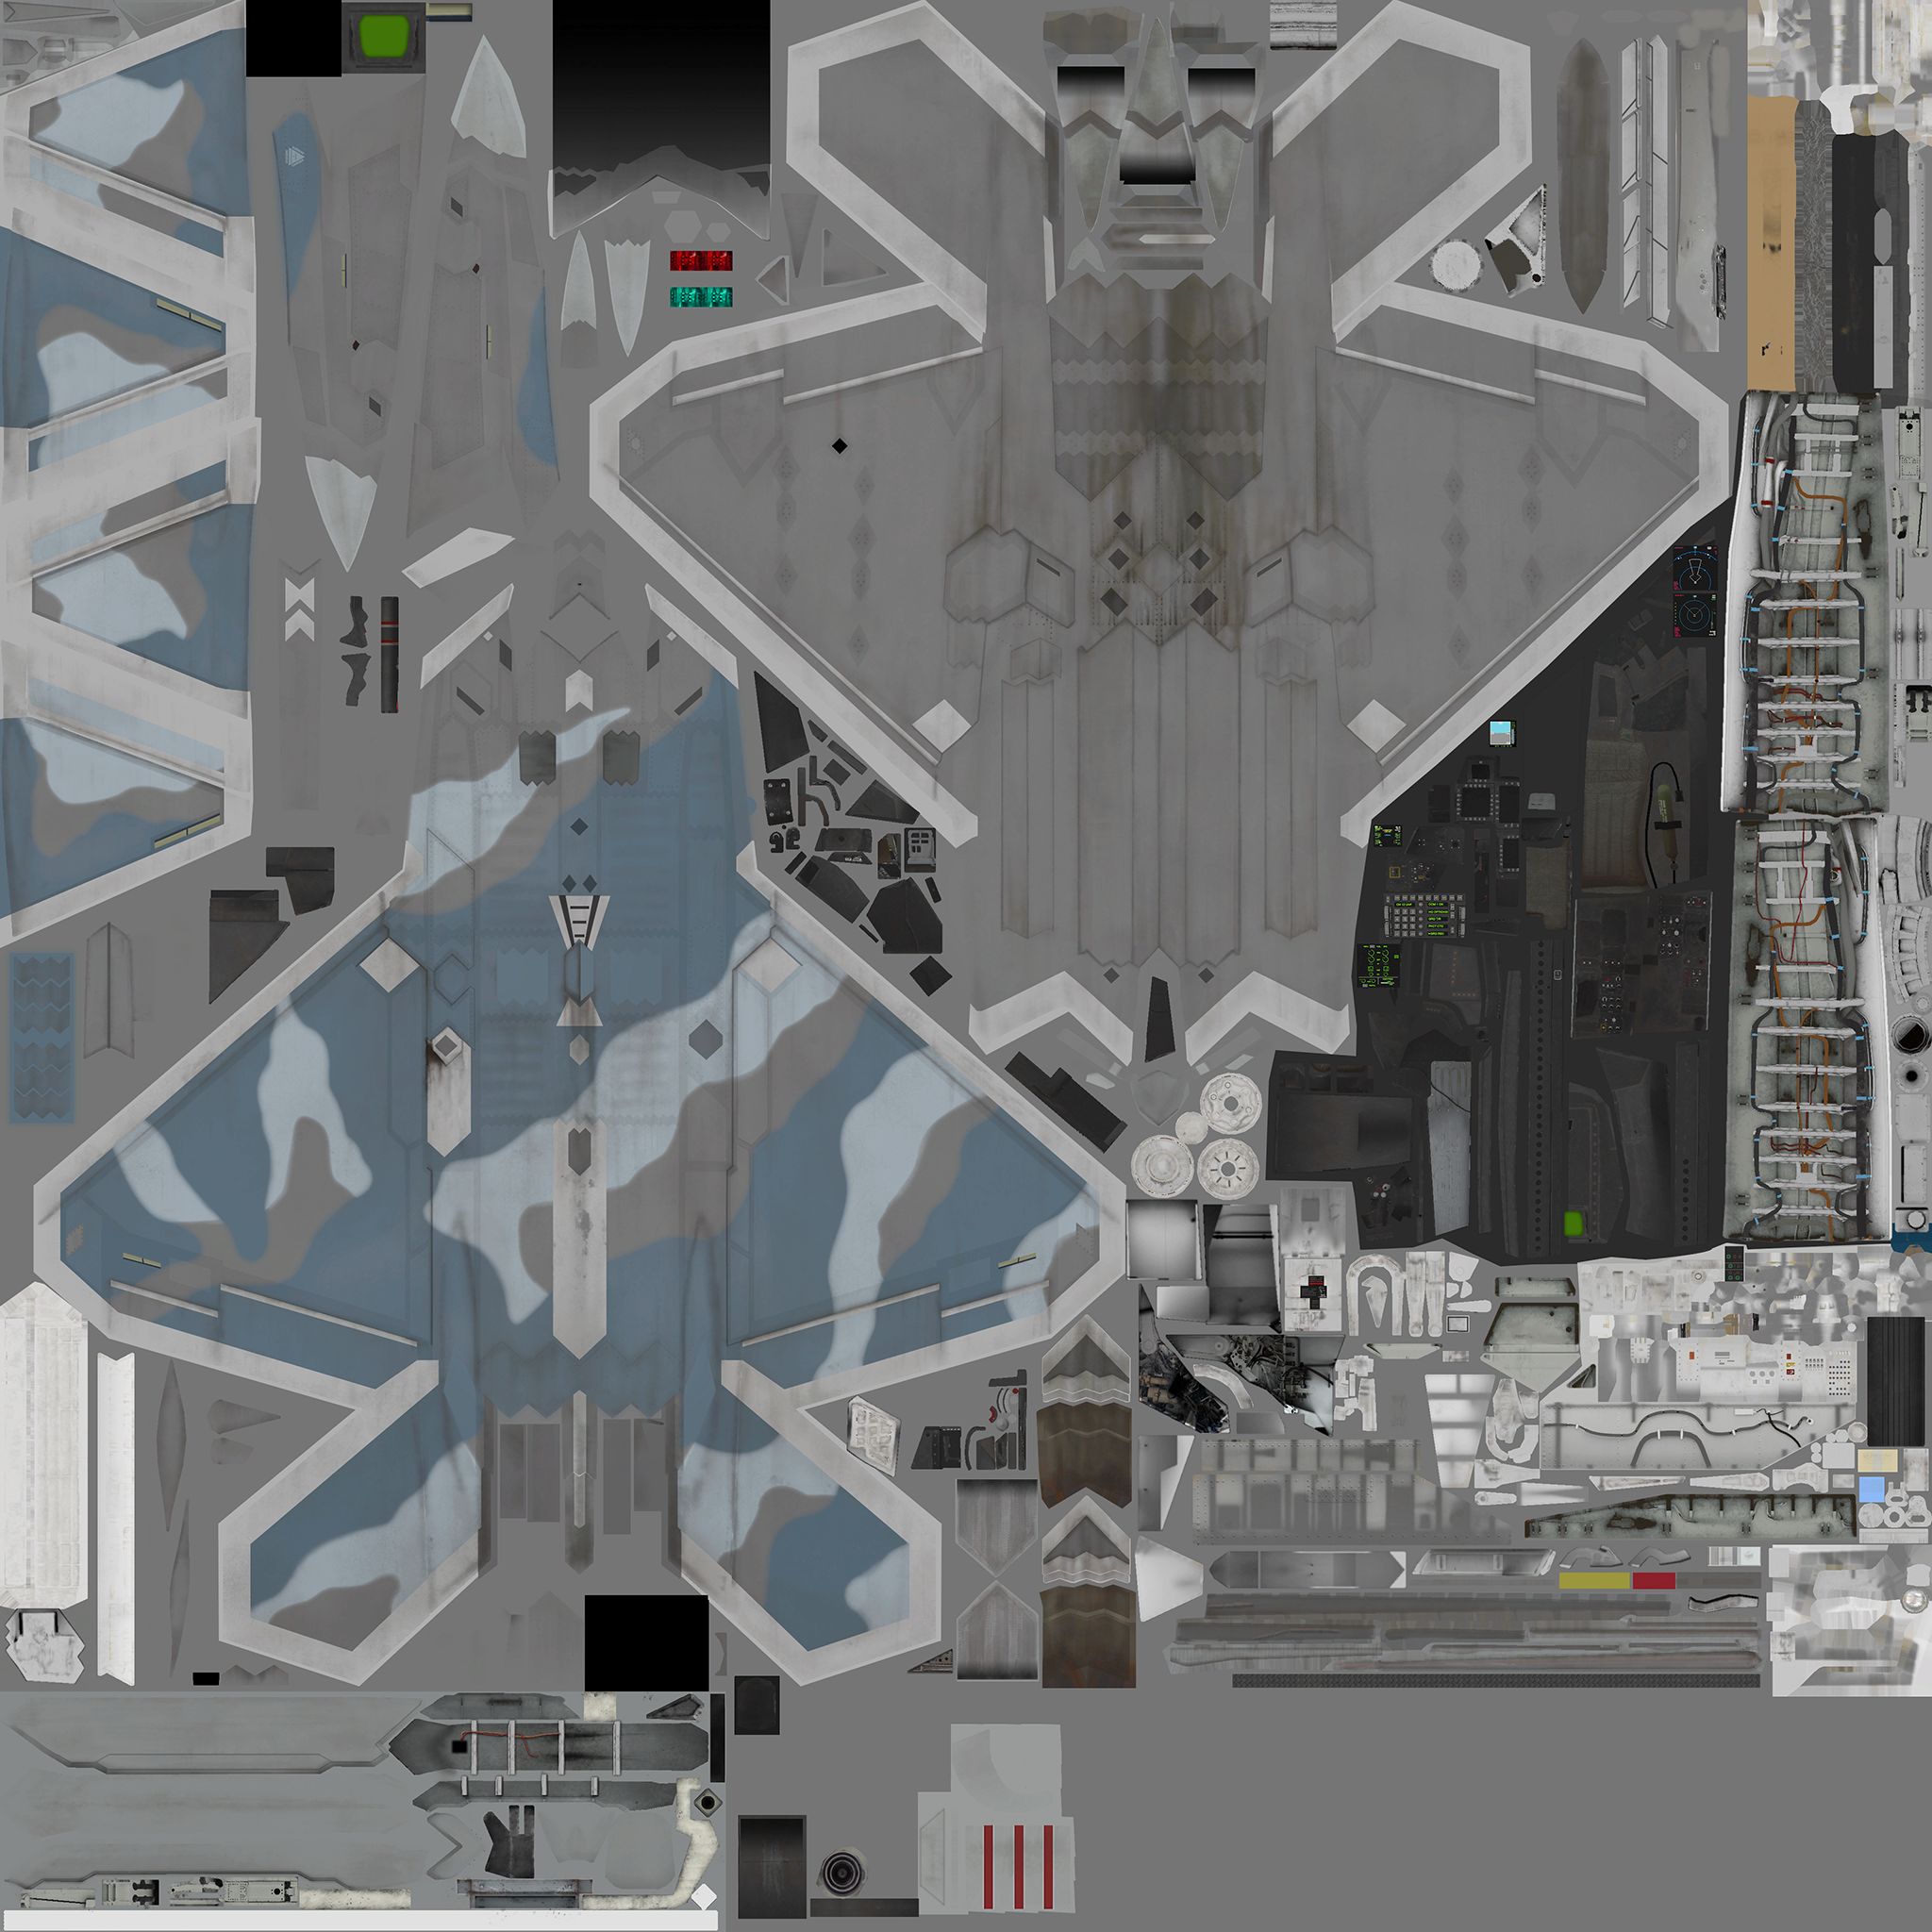
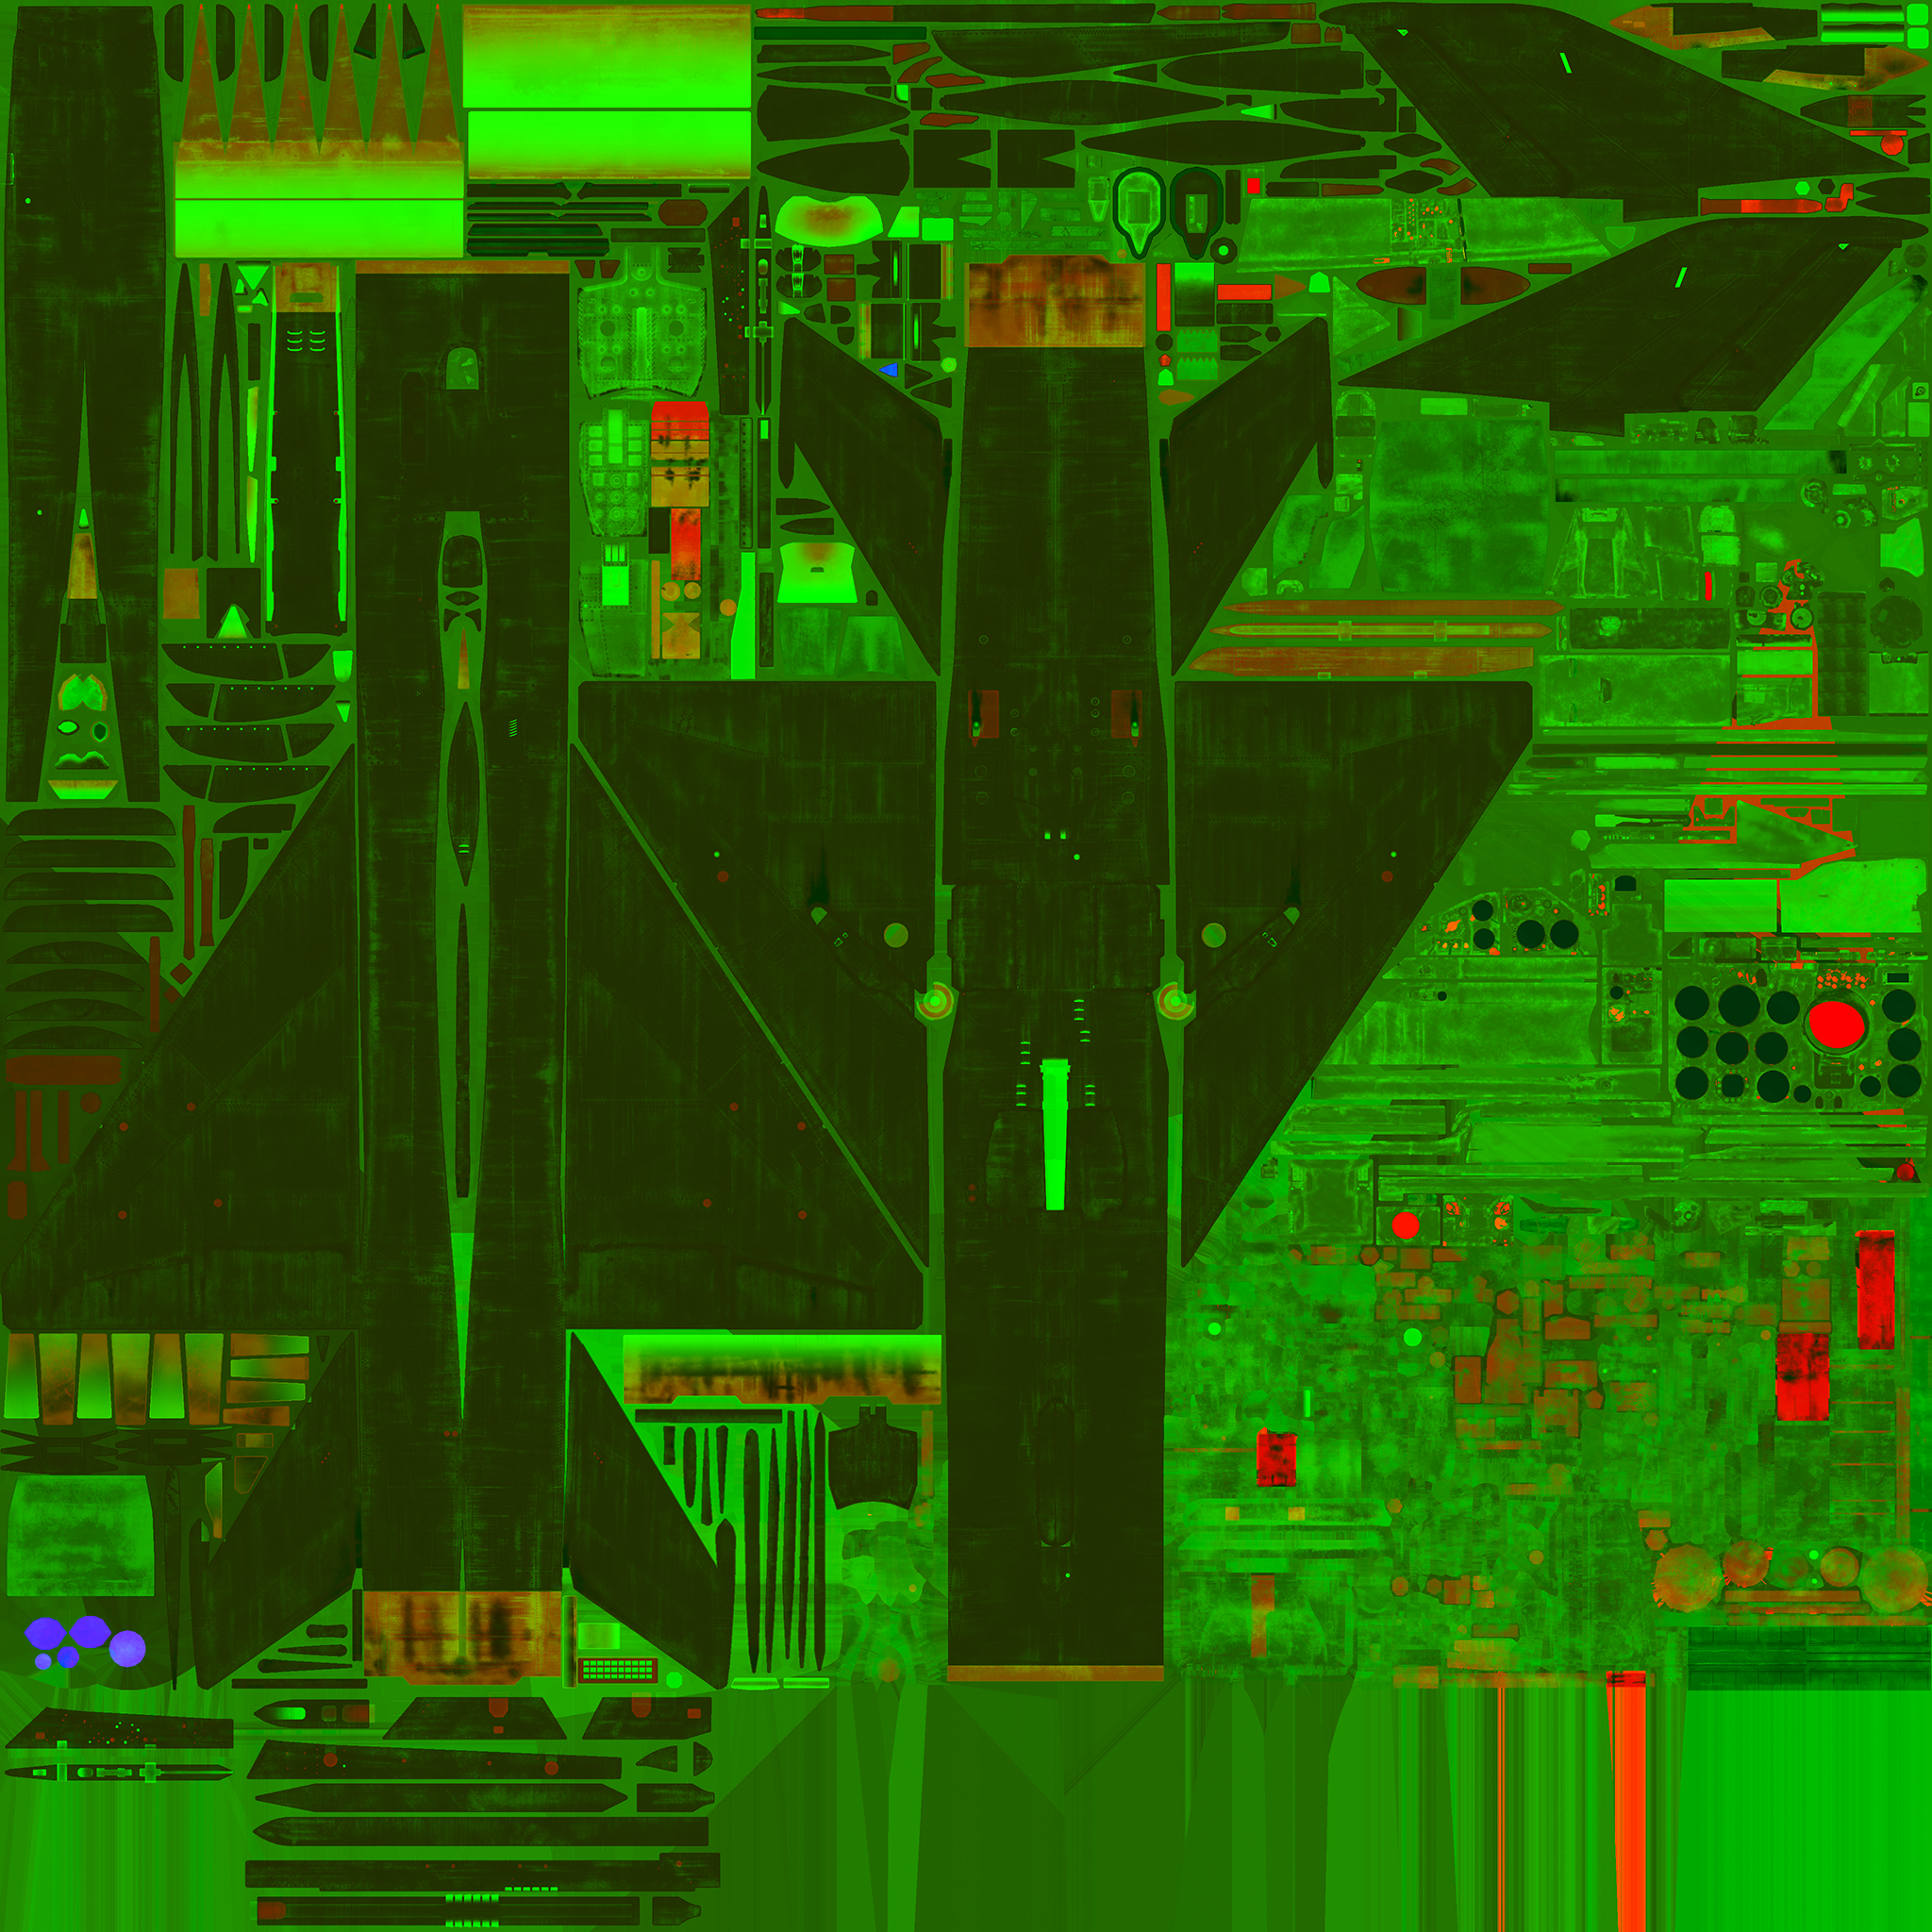
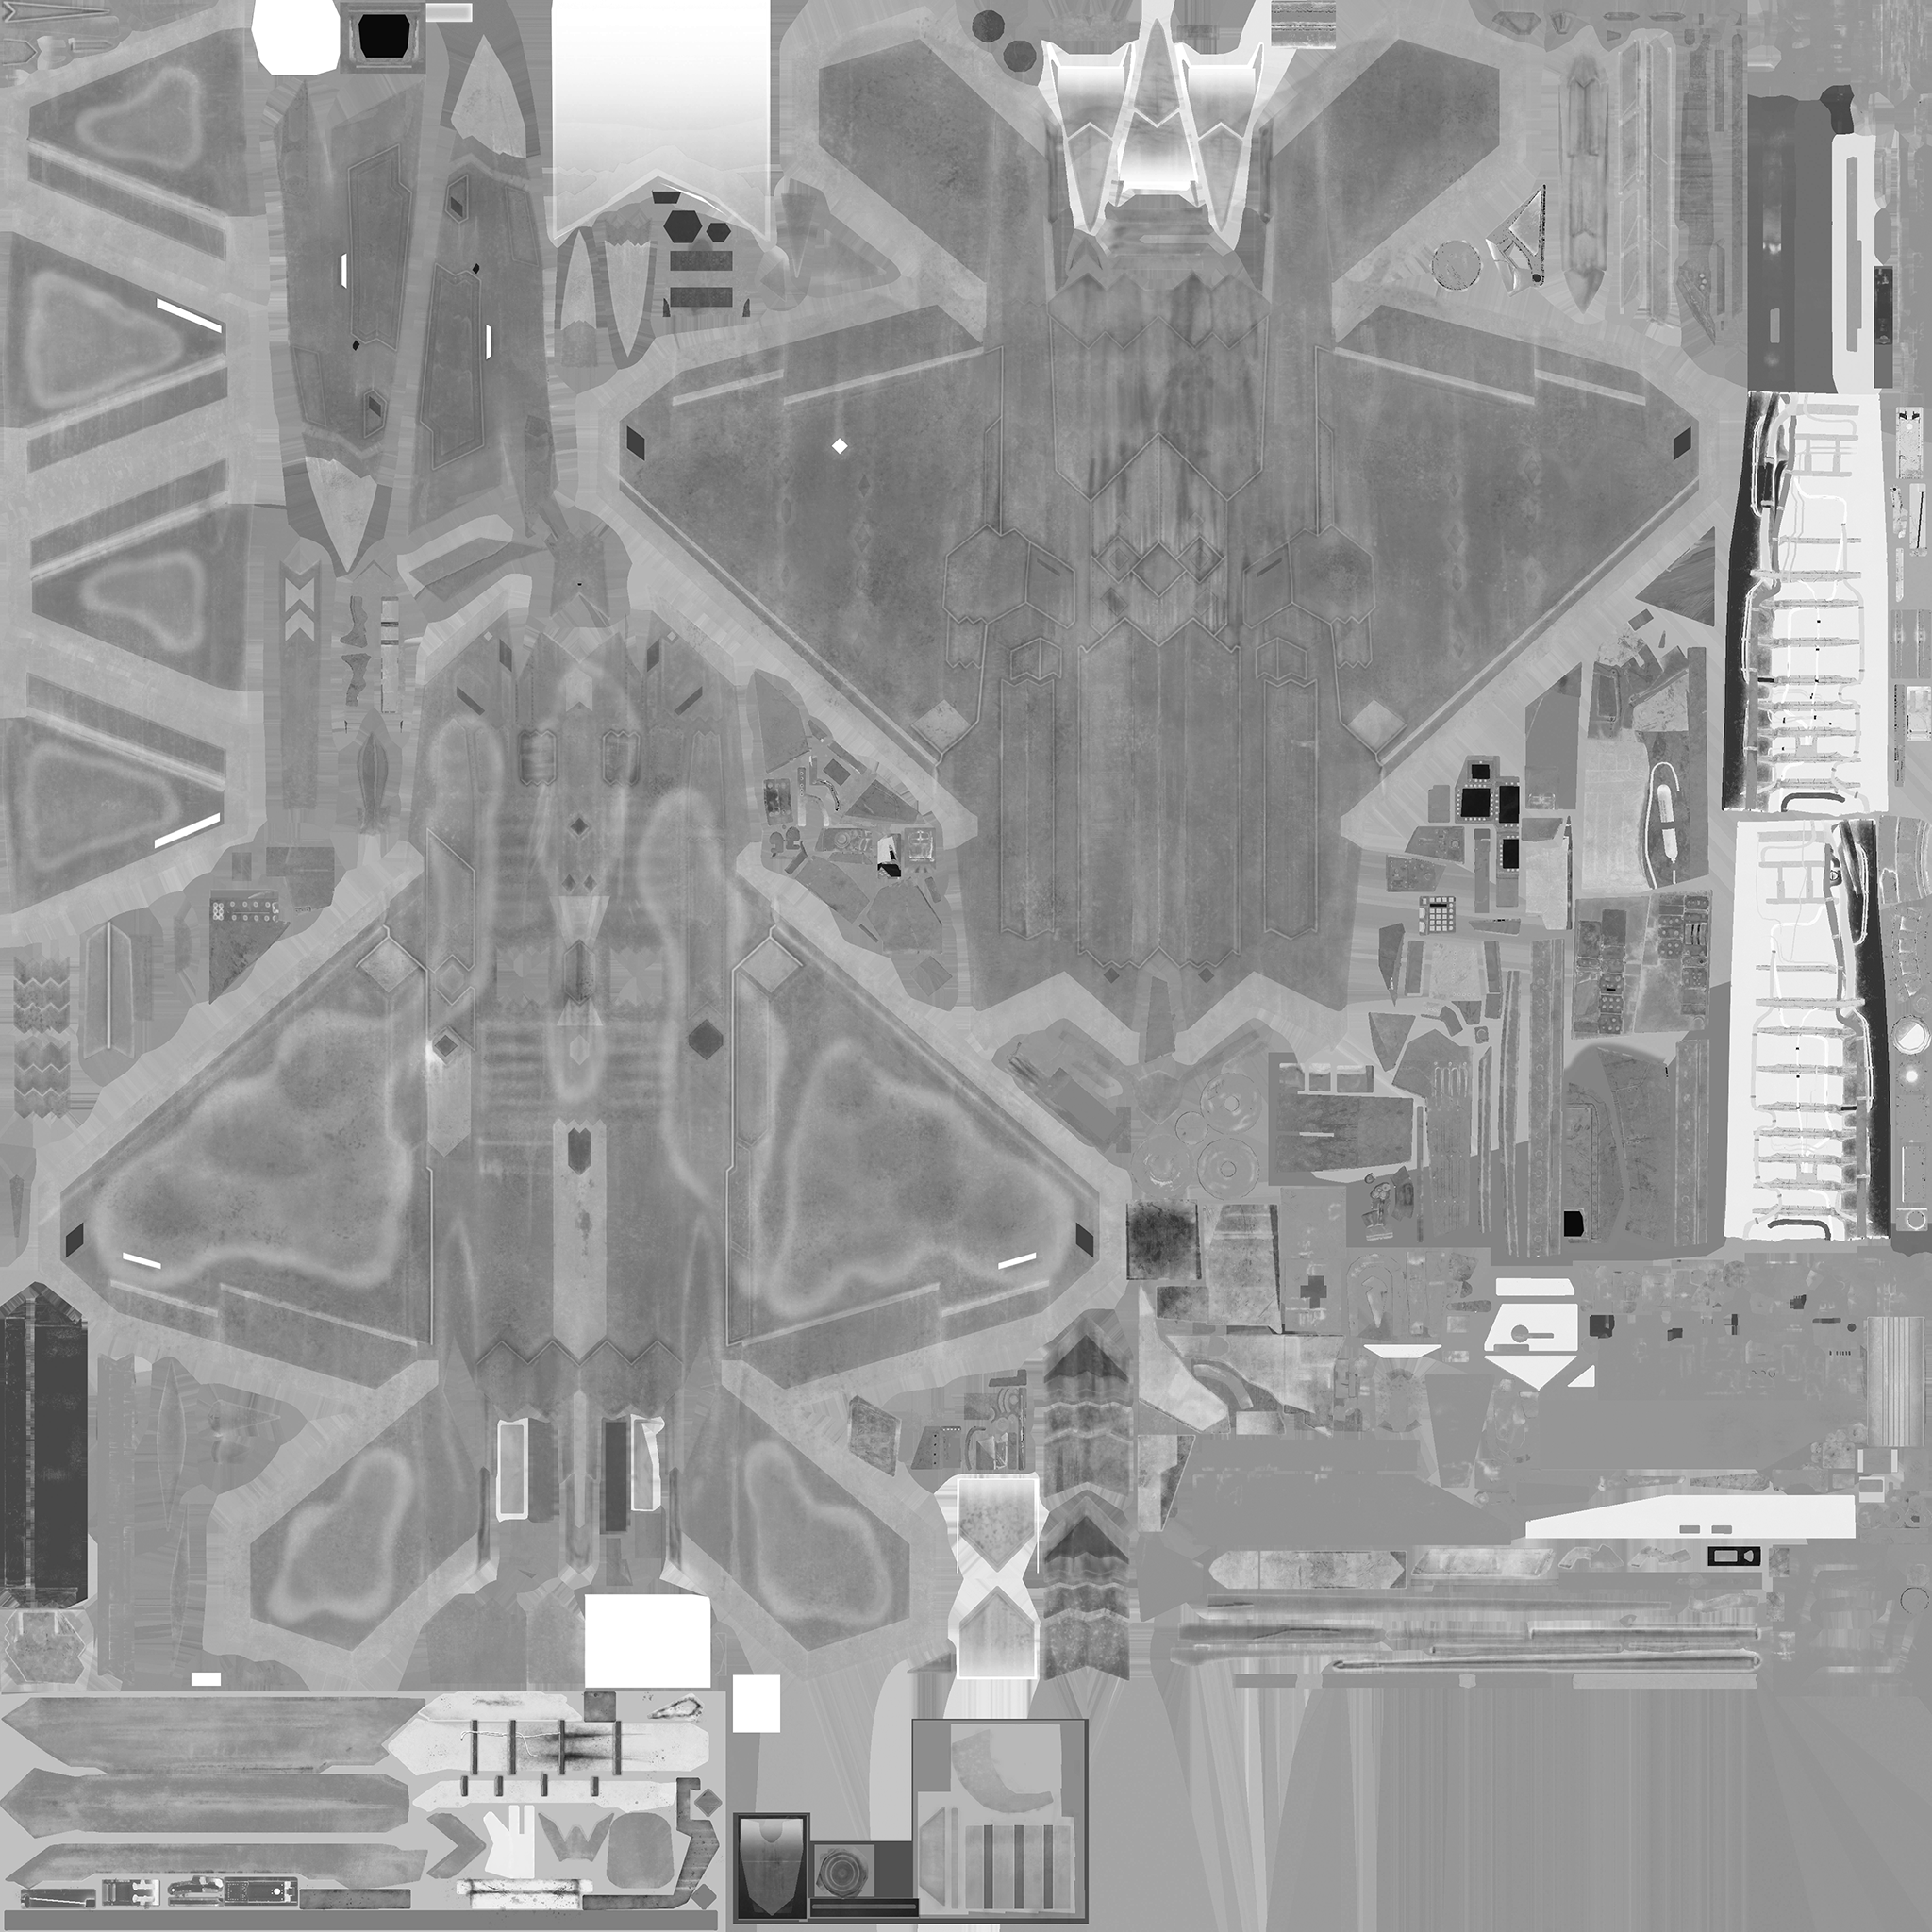
Diffuse Texture Map
The main type of texture used at the gaming industry since the beginning of the 3D era, the map is also refered as 'Albedo Map' on the PBR system(d̶o̶ ̶n̶o̶t̶ ̶b̶e̶ ̶c̶o̶n̶f̶u̶s̶e̶d̶ ̶w̶i̶t̶h̶ ̶a̶ ̶c̶r̶a̶z̶y̶ ̶w̶o̶m̶a̶n̶ ̶w̶h̶o̶ ̶s̶t̶a̶l̶k̶s̶ ̶a̶ ̶s̶k̶e̶l̶e̶t̶o̶n̶ ̶w̶h̶i̶c̶h̶ ̶i̶s̶ ̶a̶ ̶d̶e̶m̶o̶n̶ ̶l̶o̶r̶d̶ ̶m̶a̶g̶i̶c̶i̶e̶n̶), getting a different purpose for highlighting the colors of the model better without any sort of wheatering, the later managed by the other groups. But the main principle of the Diffuse map will be always begin the texture with all the details baked.
-Pros
- Will be always easier to store complex skin designs compared to PBR color customization systems.
-Cons
- Not exclusively for the Diffuse map, however even at 4K resolution, the quality of the texture can be severly affected by the way UE4 encodes them, the so called DXT/BC Compression(Direct X Texture/Block Compression), for people interresed, you could check Dantofu's guide which explains it better¹
- UE4 supports a better compression setting called BC7, which greatly solve most issues of the DXT1 compression format used by default in AC7, however, aside of an increase of the file size, the map won't be supported for the other types of textures, resulting in severe issues, this is also explained at Dan's guide¹
- Some aircraft textures(i.e F-35C Lightning) can lead into serious difficulty at isolating for a Vanilla Template, mostly by the available skins having baked camouflages blended at the wheatering of the same, despite PBR also got their issues, isolating a texture of that system turns to be easier by the wheatering and patterns begin separated by default.
- Using very dark colors on diffuse textures can lead into lightning issues by the way TrueSKY works on AC7 with dynamic lightning. At best, make sure at testing on bright day missions, and calibrate until you find the good balance, due this process at the moment isn't automated.
- When cooking this type of texture in UE4, sRGB needs to be activated, otherwise, the aircraft will get a white fog above it.
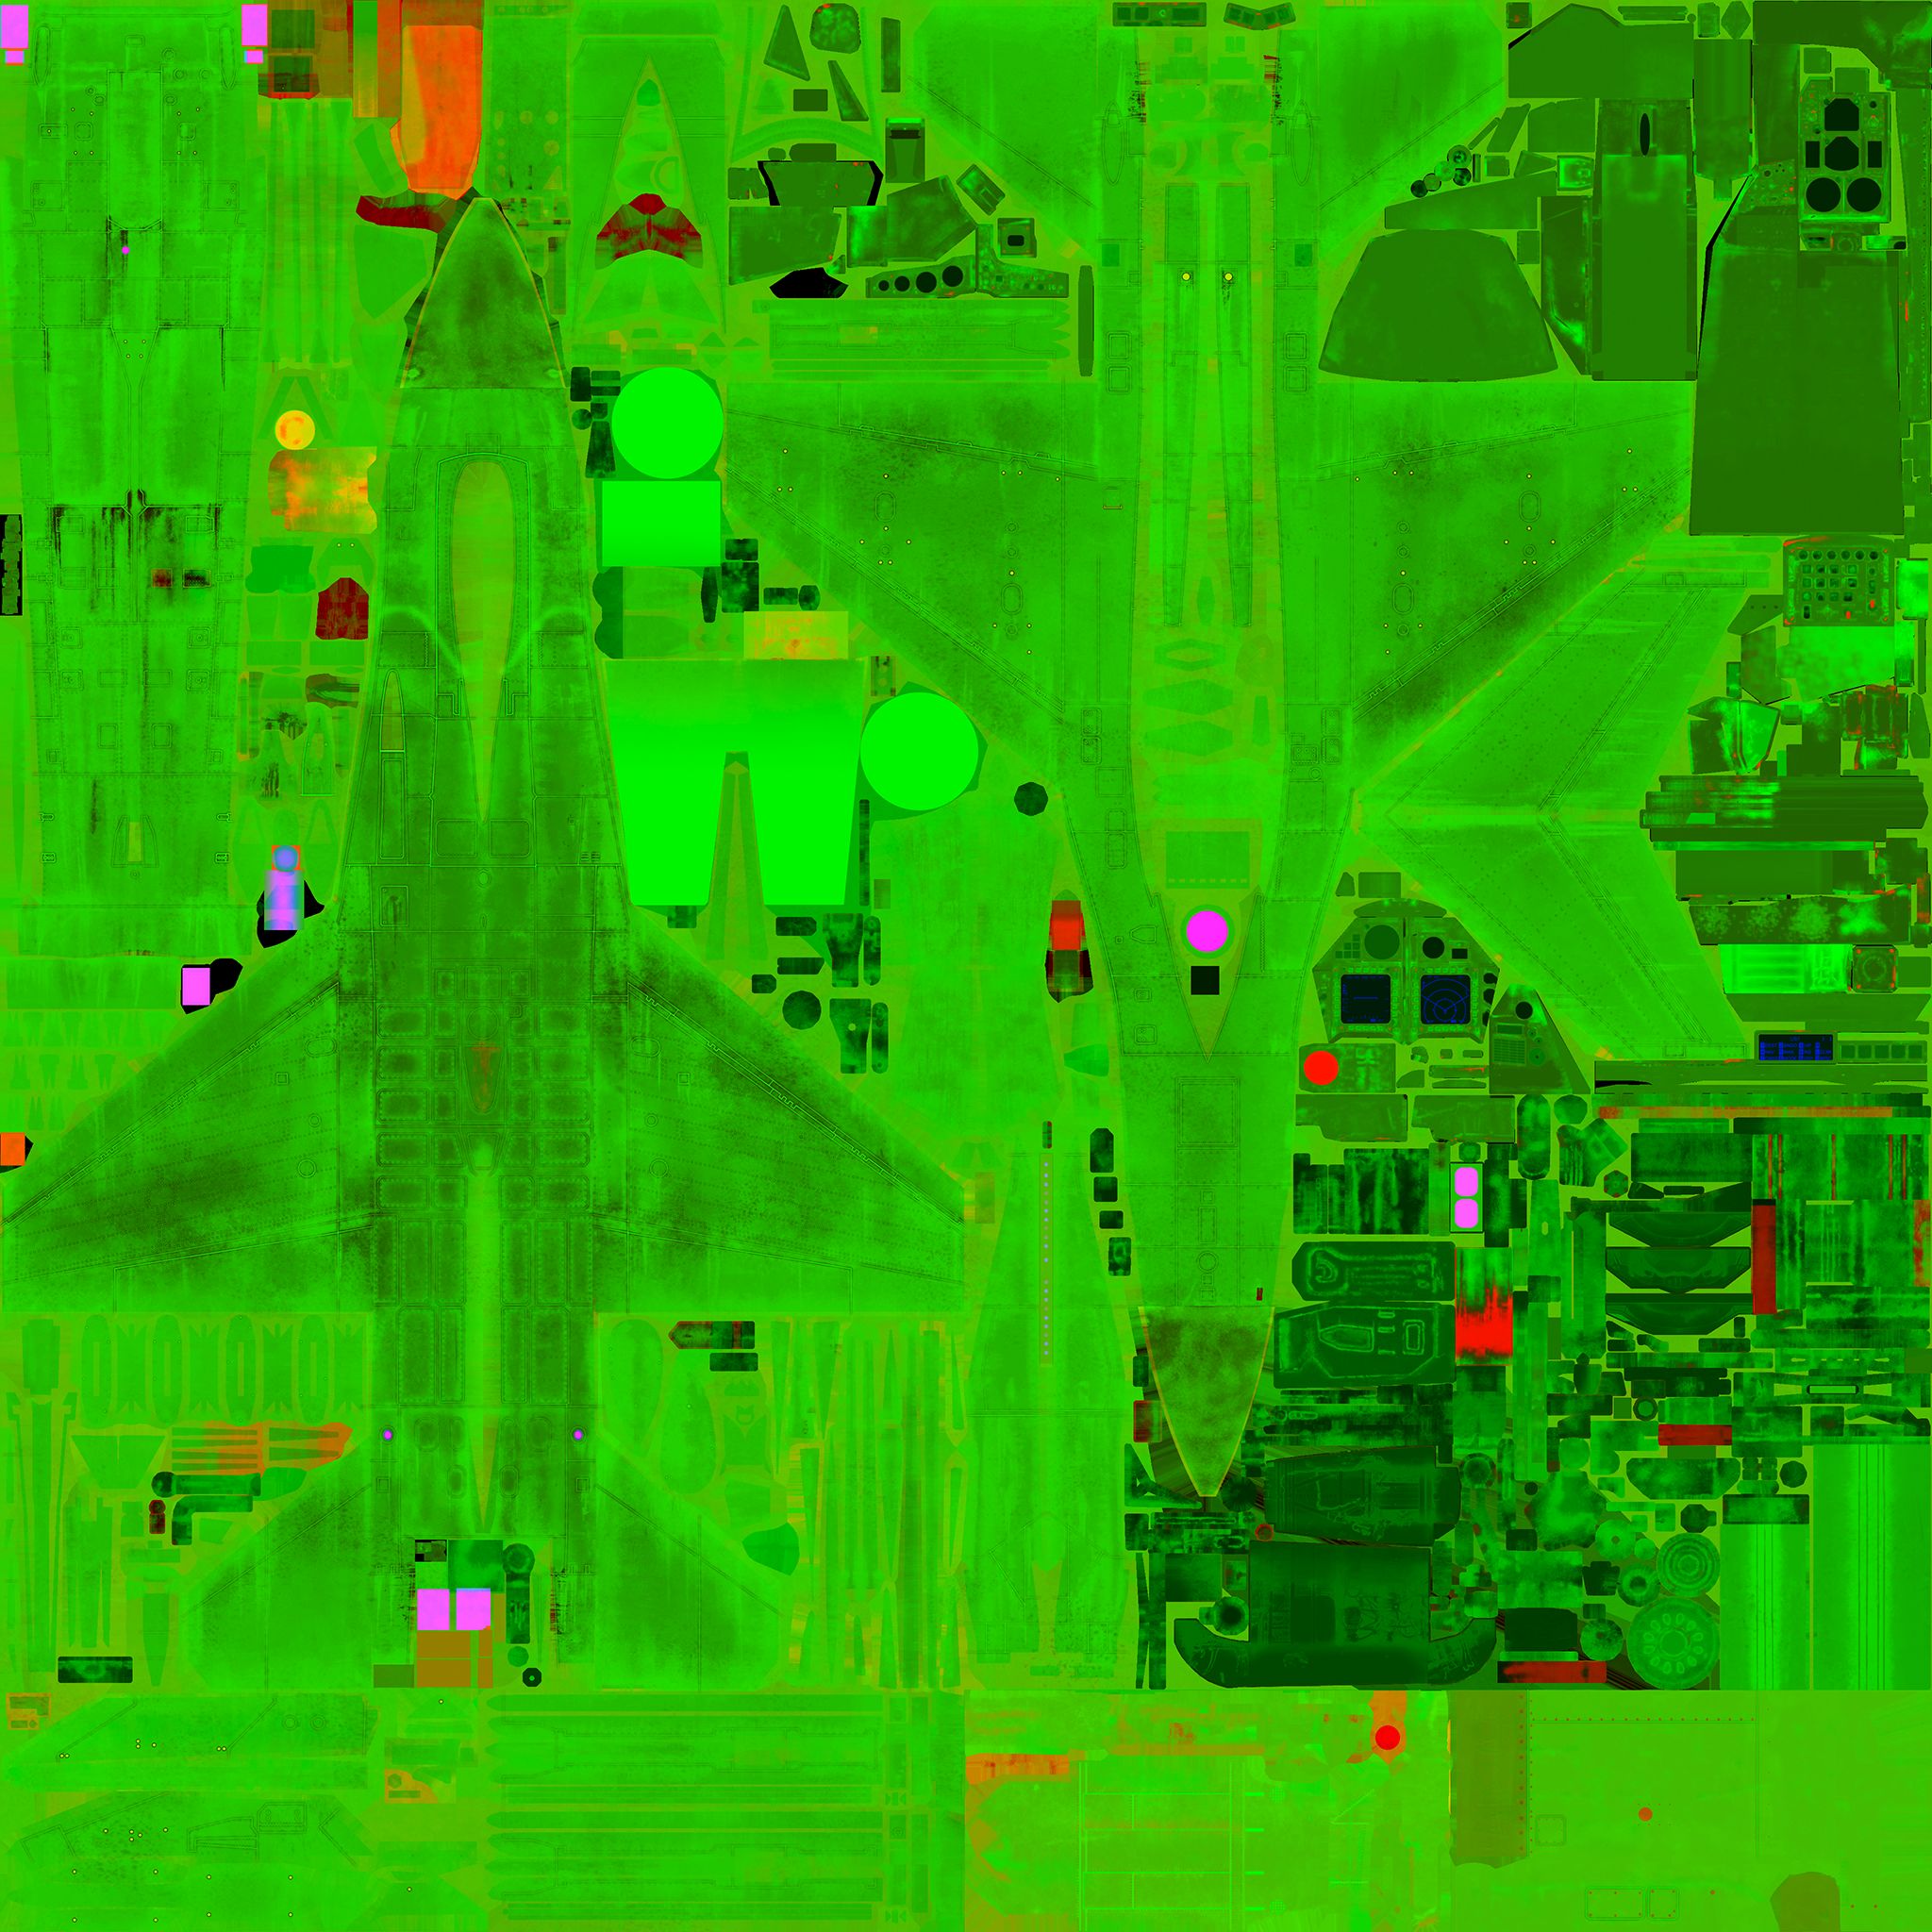
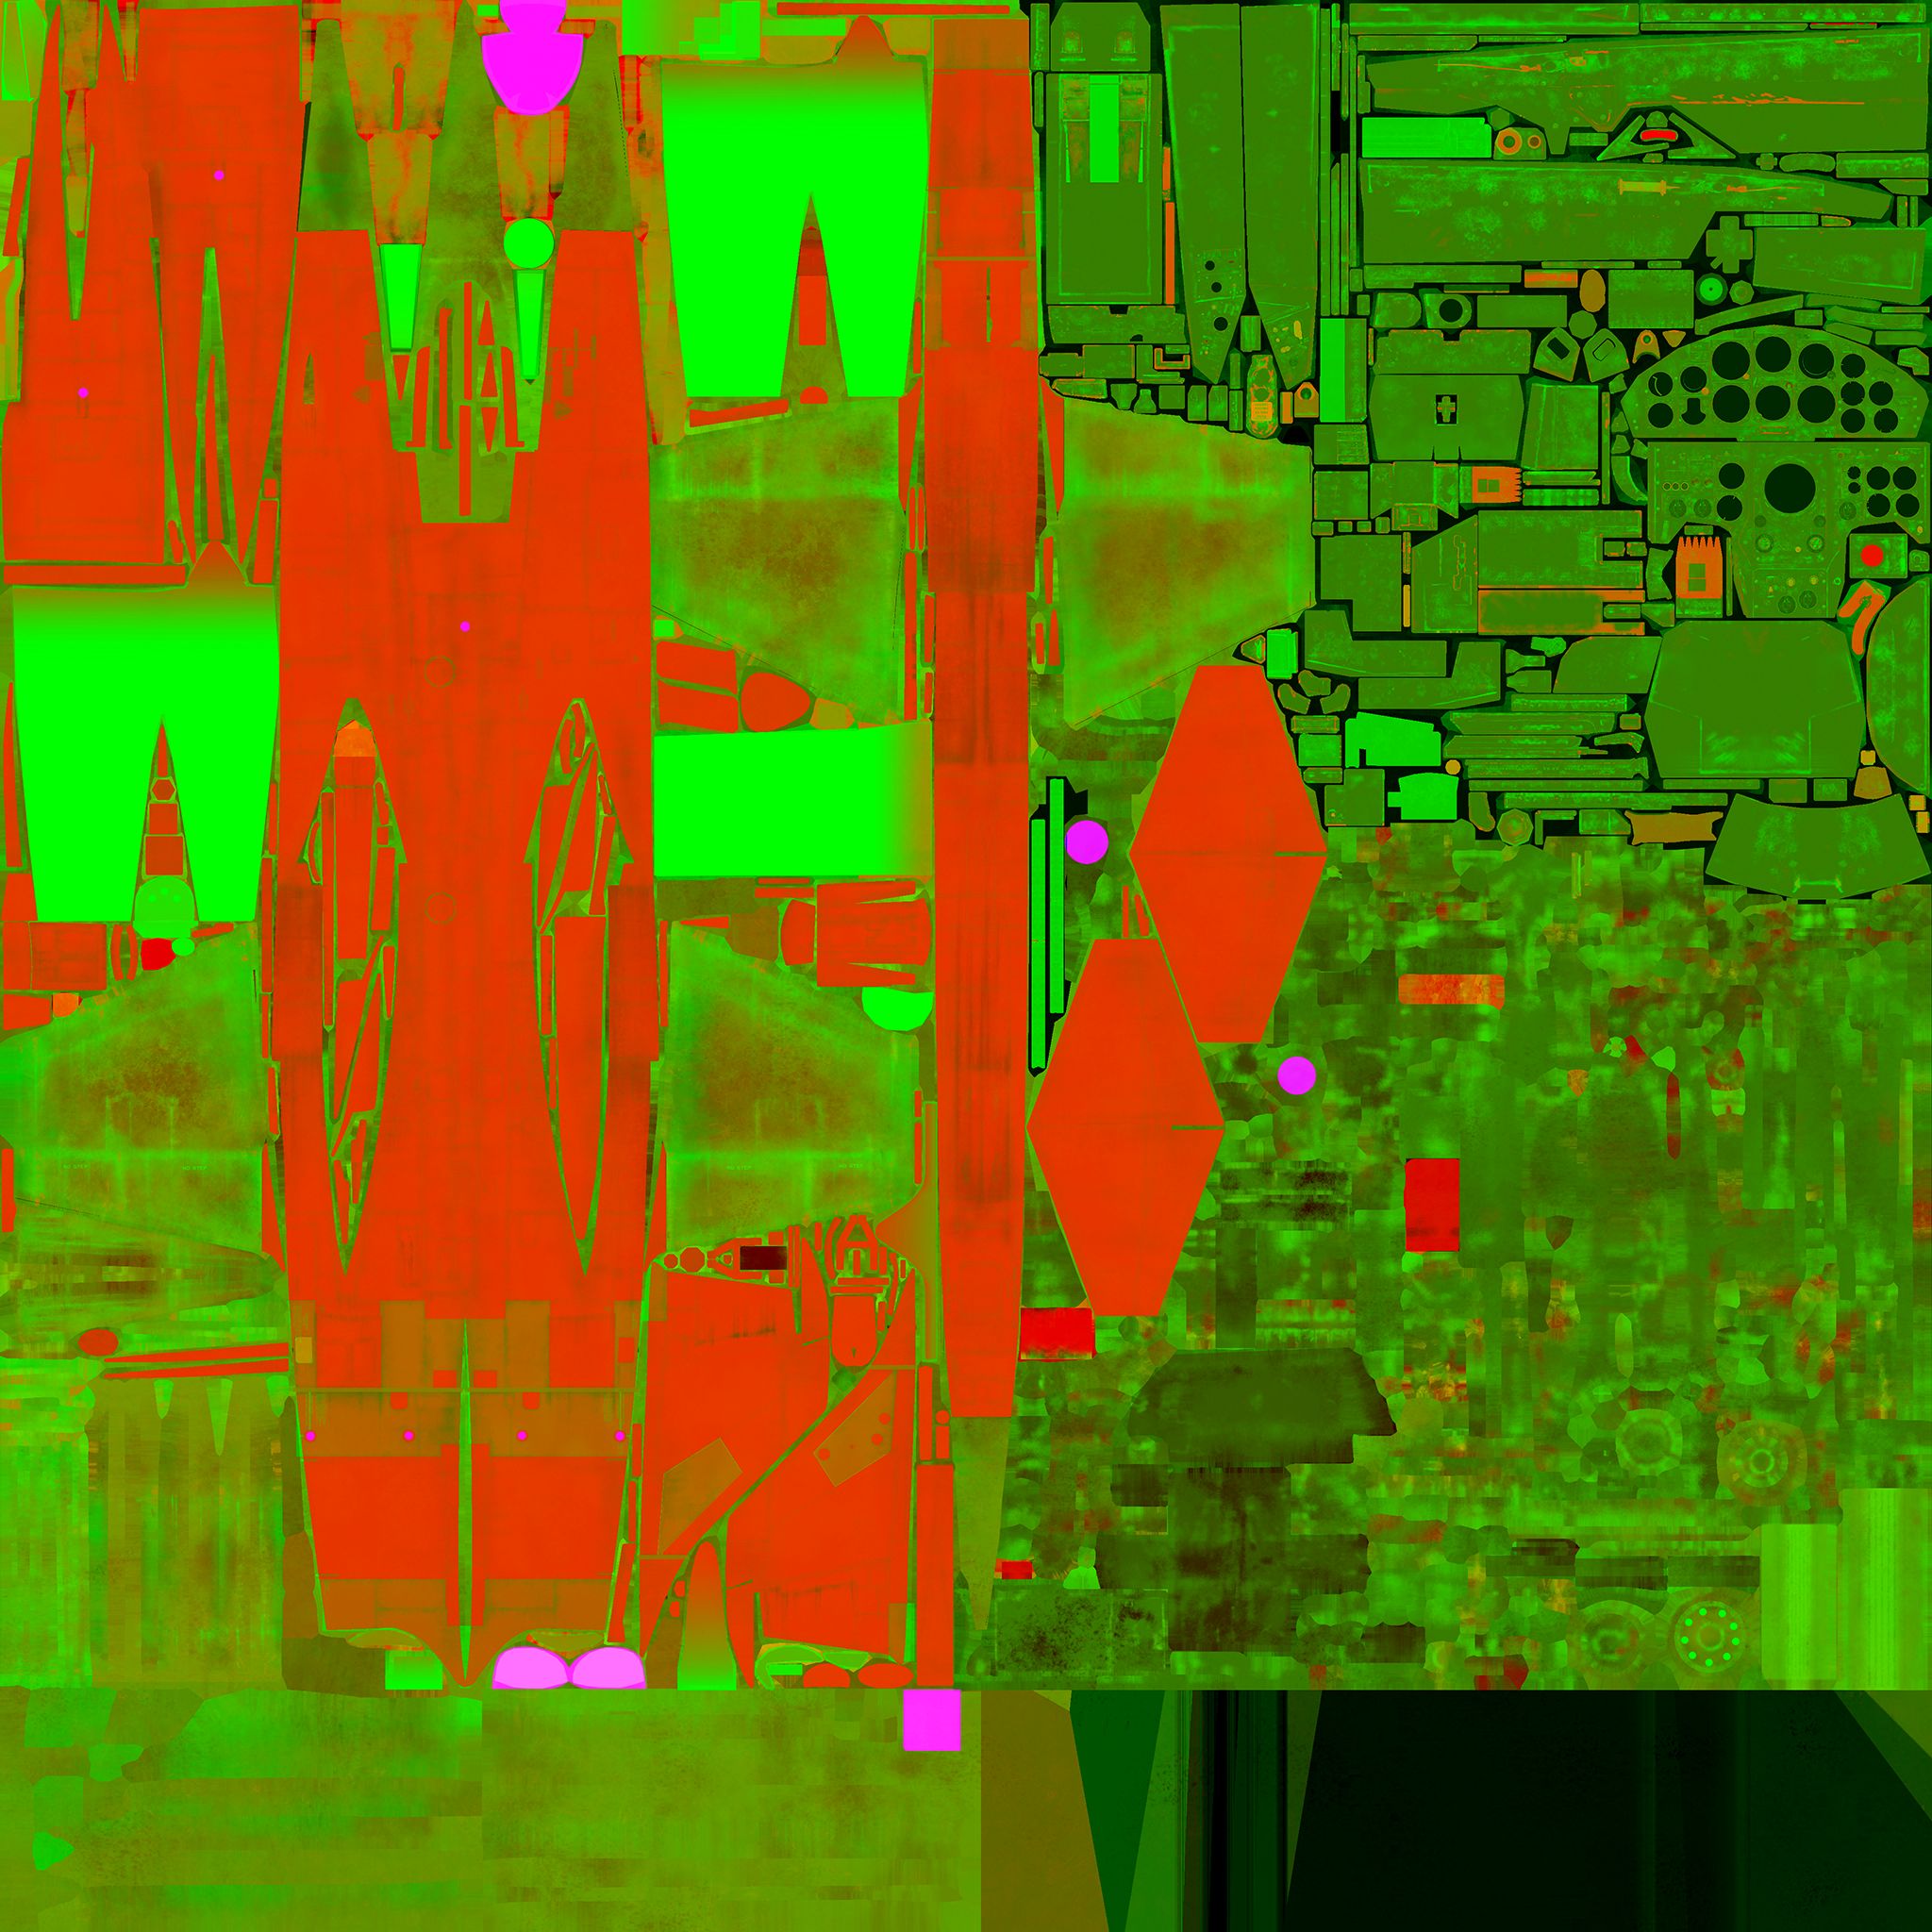
MREC Texture Map
(Metallic, Roughness, Emissive, Custom Data)
MREC is a texture map exclusively used by Ace Combat 7, at first sight, it may look really scary by the vivid colors and lack of explanation of the same, but analyzing it deeper with experience, you'll be getting used to it, MREC is a example of what we call PBR system, at earlier games and 3D modeling from the time, the way at applying metallic and glossiness on a model would be handled by separate materials with textures, or by a map called "Specular", Specular handled most of those propreties at the same texture by monochromatic, or colored adjustments. With the time, this system improved at allowing to manage each state separately into each texture file, by UE4 and Blender supporting this system, one of the main bulletpoints of MREC composition turns at merging the essential maps into a single texture using the RGBA channels, which is the magic behind of his unique appearance.
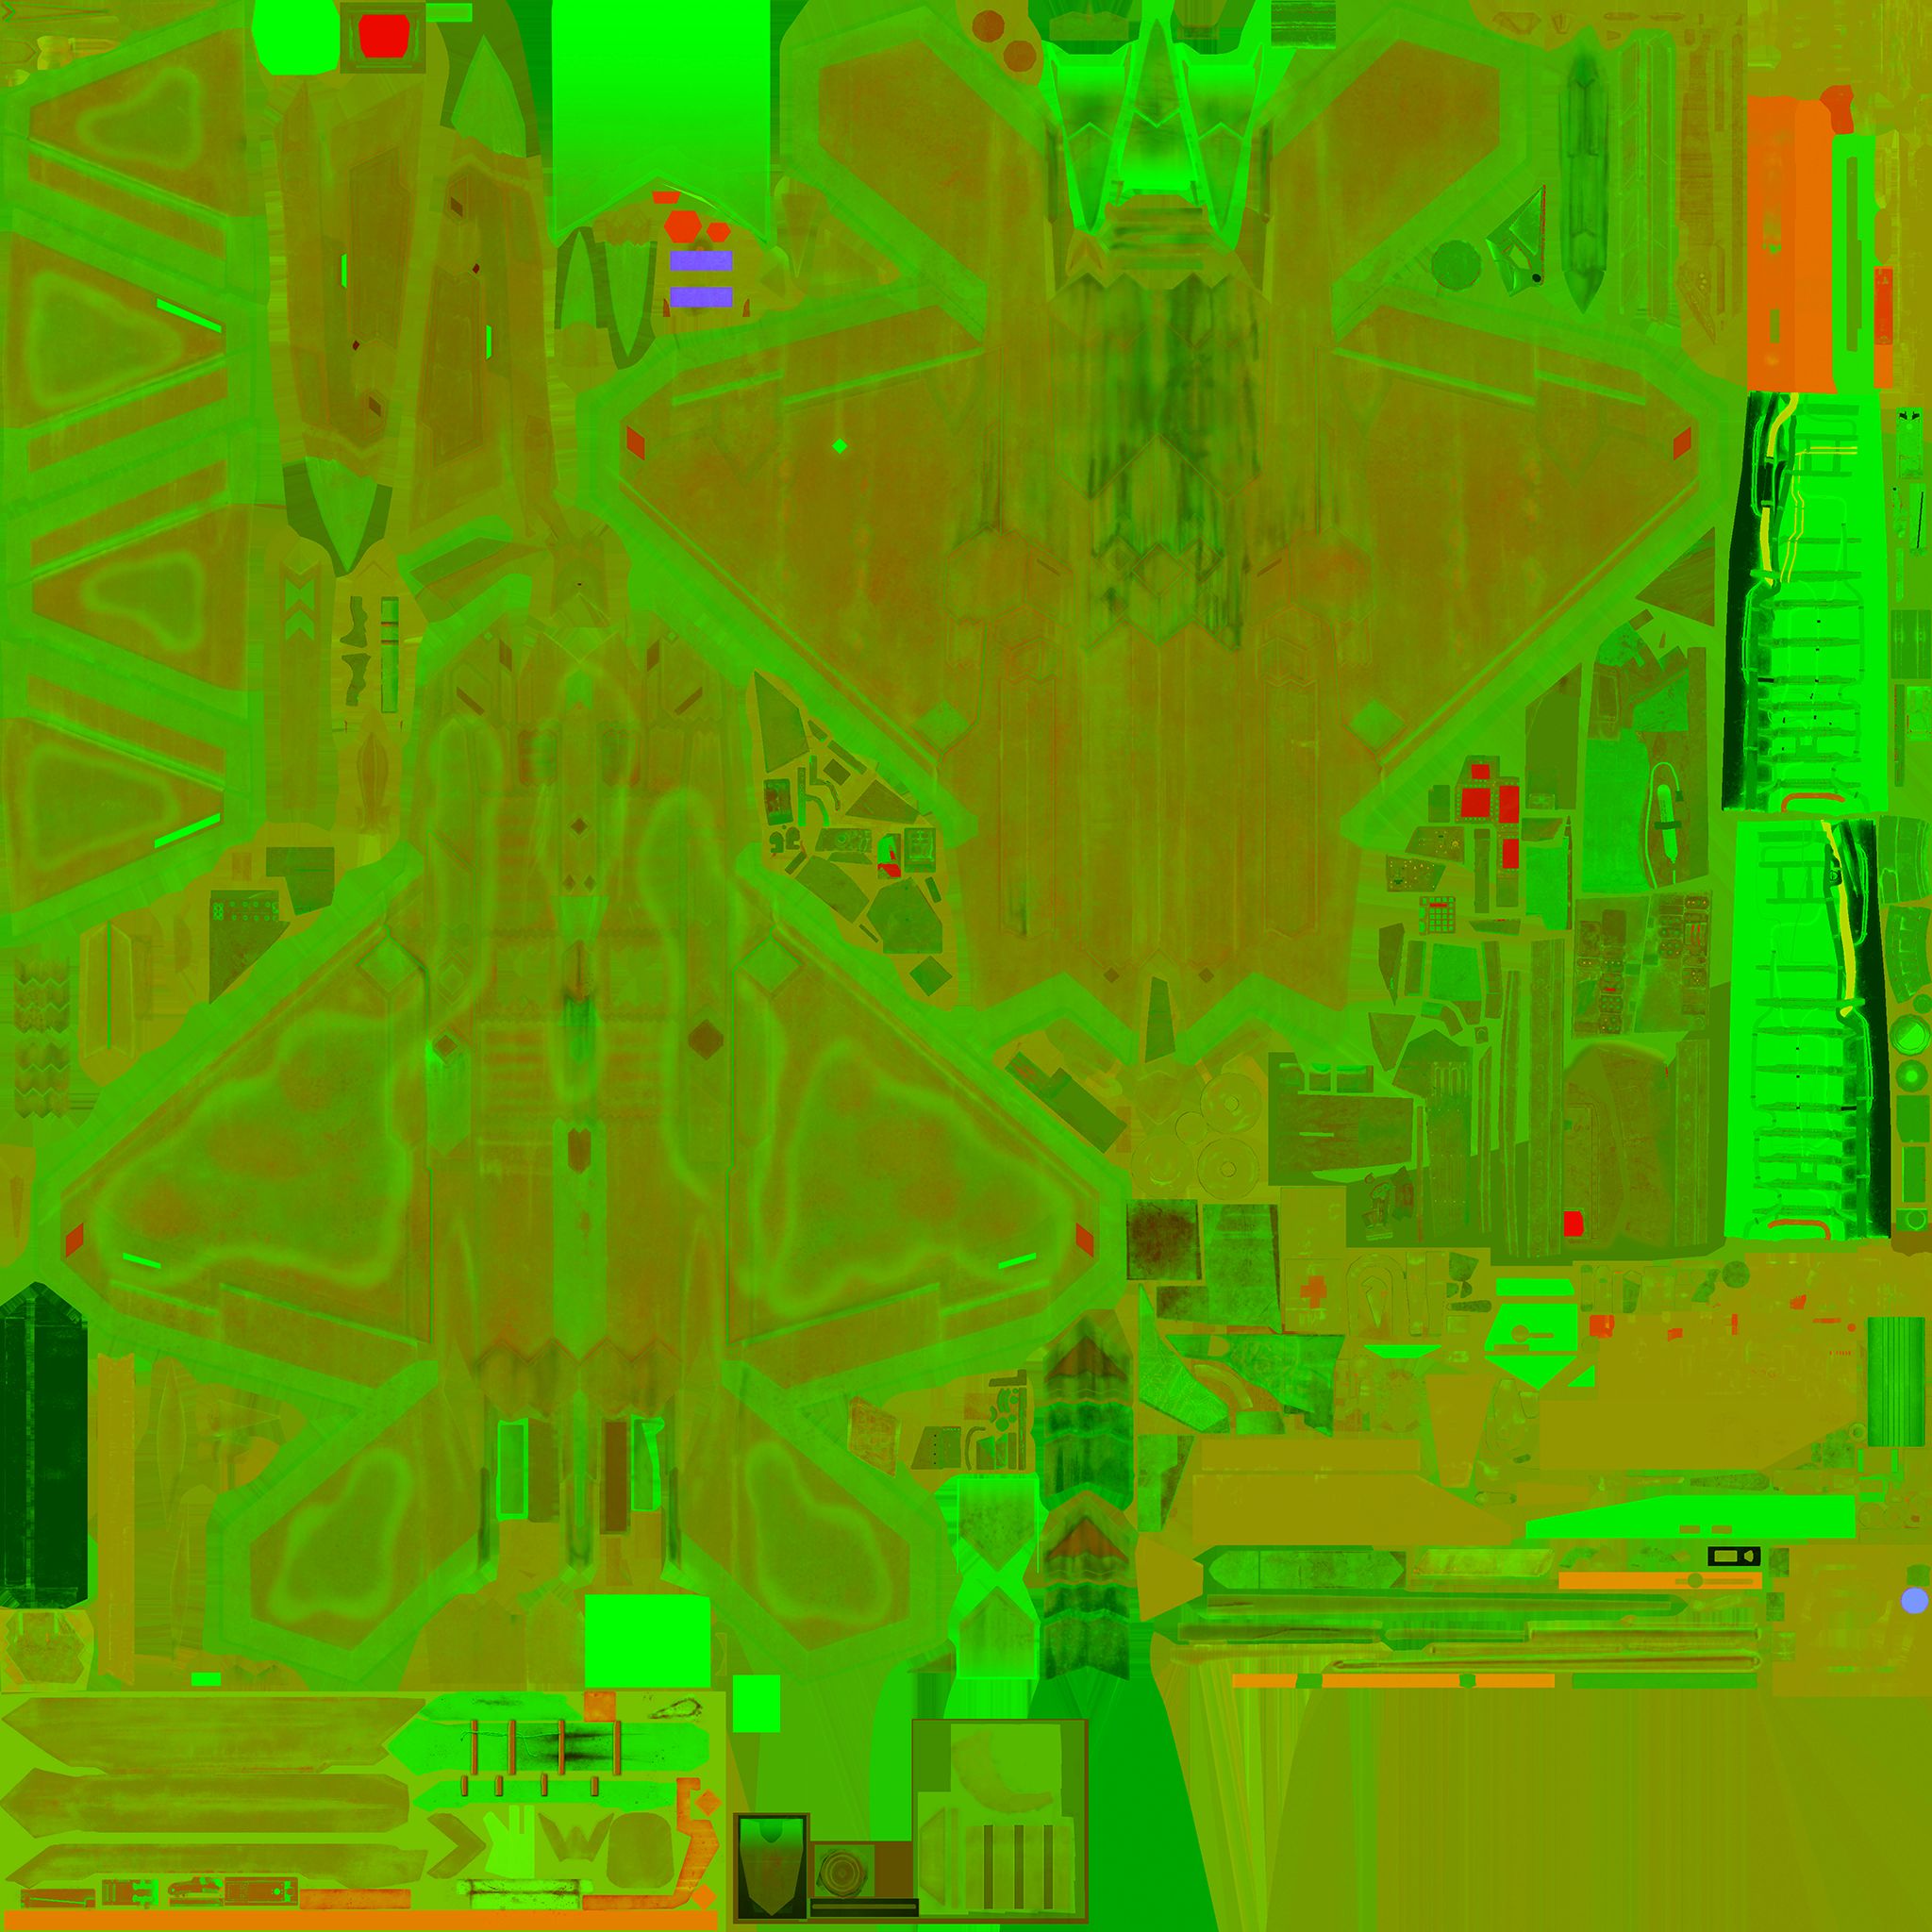
MREC map with Metallic propreties assigned on the aircraft.
MREC map with Glossy propreties assigned on the aircraft.
MREC map with Metallic and Gloss propreties assigned on the aircraft, making it chromed.
The MREC texture, which also makes the composition of his name, is composed by the following monochrome textures :
- Metallic(Red Channel) : the map used for incorporating moderated metal effects to your texture, using darker tones will make the material matte, removing any influence of metallic, and using lighter tones will give the effect of metal to the desired parts.
- *Roughness(Green Channel) : in theory, despite the term is self explanatory, this map works as a hybrid of two PBR material groups, using lighter tones, will make the texture look matte and rough, which englobes the Roughness part, but using darker tones, will englobe a glossy finish to your texture, making it very smooth and shiny with light contact. Originally called the Glossiness map, separated from Roughness on some 3D modeling softwares with PBR. By using the Metallic map with lighter tones, and Roughness with darker tones, it will result of your texture getting the propreties of a chrome metallic effect, which is seen on FB-22 -Flash- and F-104C -Avril-
- Emissive(Blue Channel) : one of the simplest PBR groups to make, Emission maps works in conjuction with alpha masks, which the main object is highlighting parts of your texture in white on a black background, the parts highlighted assigned to the Emission will result of them begin their own light sources into the game, instead of the default light sources. Emissive on Ace Combat 7 is used for landing gears, navigation lights, HUD panels, and any sort of lens and illumination source the aircraft would have, indepedent of the color, which is managed by the Diffuse map.
- Custom Data(Alpha Channel) : Custom Datas are exclusive PBR groups made on UE4, the main purpose of them is developing a whole combination of PBR propreties into a single one, the use of Custom Data in AC7, is used as the same purpose of Emissive, but with a baked fluorescent green colour used for the aircraft that got Formation Lights, same ruels applies, mask the areas the lights would be located in white, into a black background.

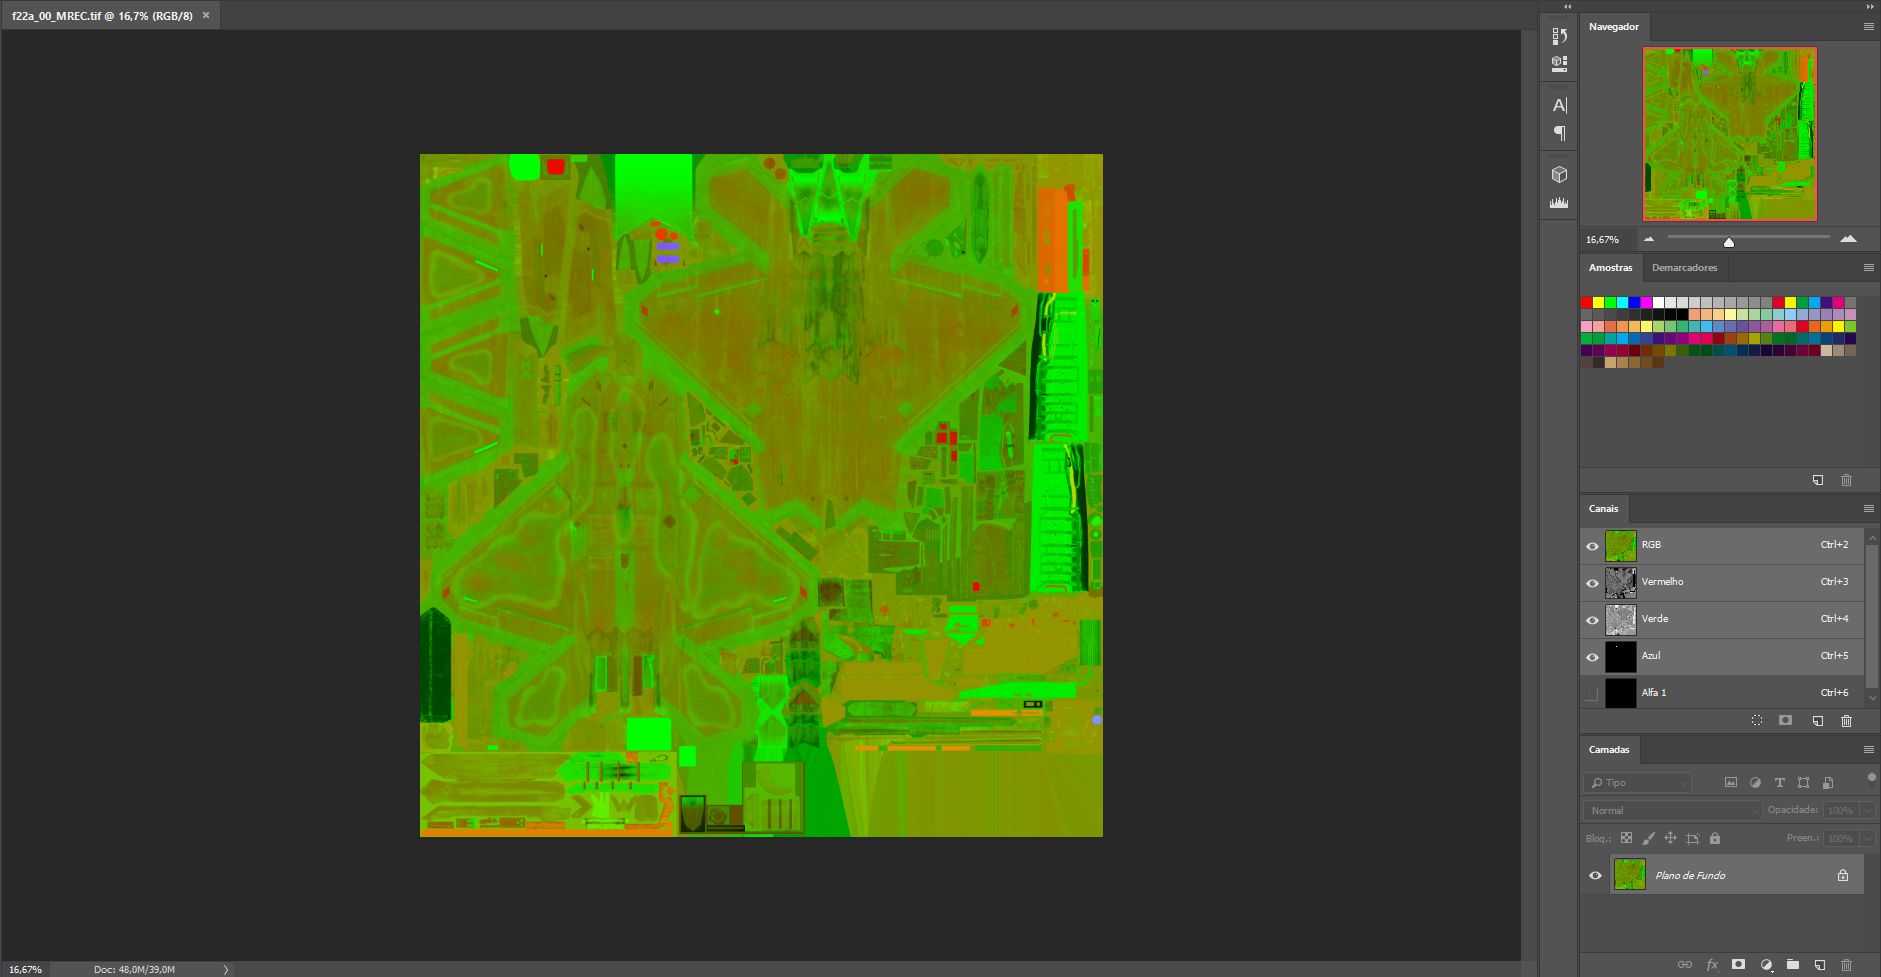
The MREC maps separately in groups, from Left to Right, in Up and Down order(Red[Left], Green[Left], Blue[Right], Alpha Channel[Right])
-Pros
- A conventional way into merging multiple maps into a single one, handling different propreties.
- Can assign every type of material composition to your aircraft, be it Metallic, Rough, Glossy, or Chromed.
-Cons
- For GIMP users, which the way at handling the RGBA channels is different, they are times the MREC maps won't be saved with Alpha Channel, and using external tools like AC7 Mod Tools, there's a sorely chance at turning your aircraft into a fluorescent green blob in the skies, this common glitch caused by the lack of the channel, turned to be a common oversight made by Project Aces during the U.S. Skin Series, where F/A-18F -Red Devils- got baked without the alpha channel. Seeing the charm and infamy this side effect generated towards the fans, PA made a homage for the modders on the 2nd Anniversary Skin Series, in the format of X-02S -Glowing-, however, Glowing uses complex coding not encoded into the Instances for the Formation Lights to work outside of the resupply mini-games, which at the current time, the members of FREEDOM SKIES didn't discovered how to replicate, datamine it, or create an exploit based.
- For users interresed at how to export MREC maps correctly in GIMP, make sure to check out Ostrich tutorial about it²
- MREC also makes uses of the DXT compression, but on this case, of the DXT5/BC5, which allows Alpha Channels to be baked by interpolation(DXT3 forces the alpha, and DXT1 can be assigned with alpha channels made by bytes at 1px, or even without it), however for alpha channels, UE4 got an infamous glitch that will worse the quality of the alpha mask, however, a solution is explained also on Dan's guide¹
- MREC textures needs to be cooked with sRGB toggled to off, otherwise, the aircraft in-game won't translate correctly the propreties of your texture, and will give a permanent wet effect, which occurs when flying around the clouds.
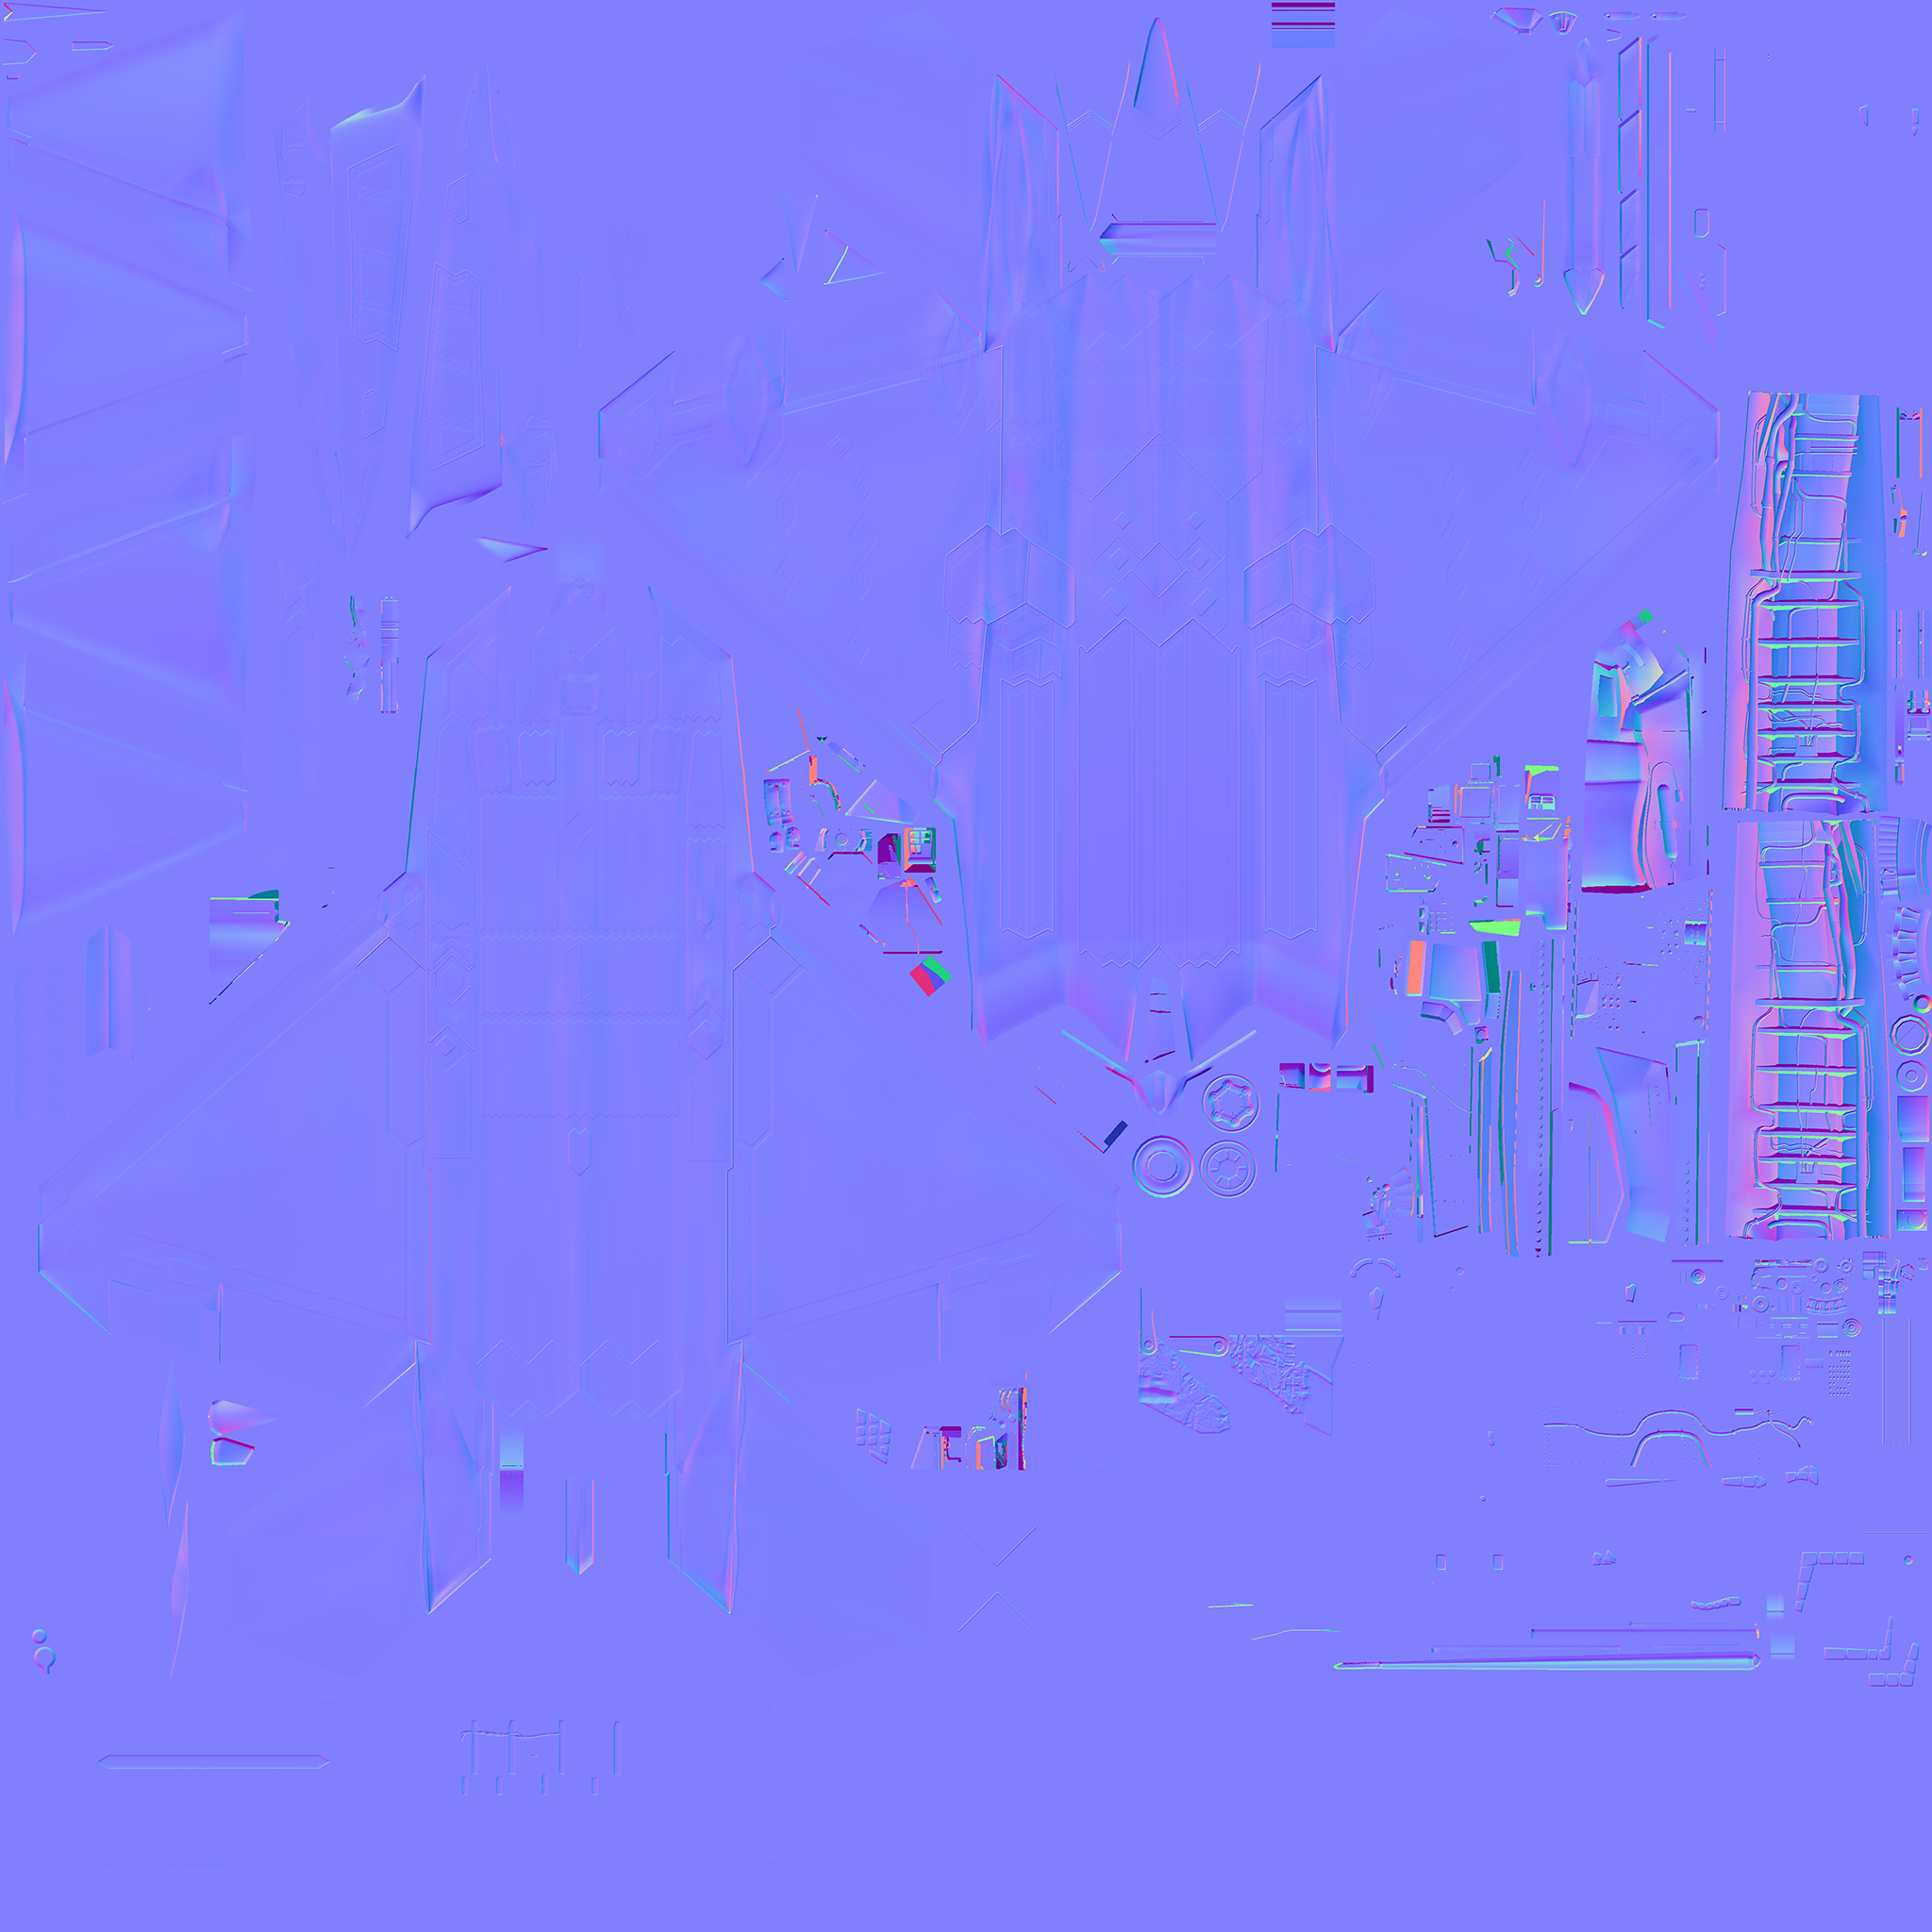
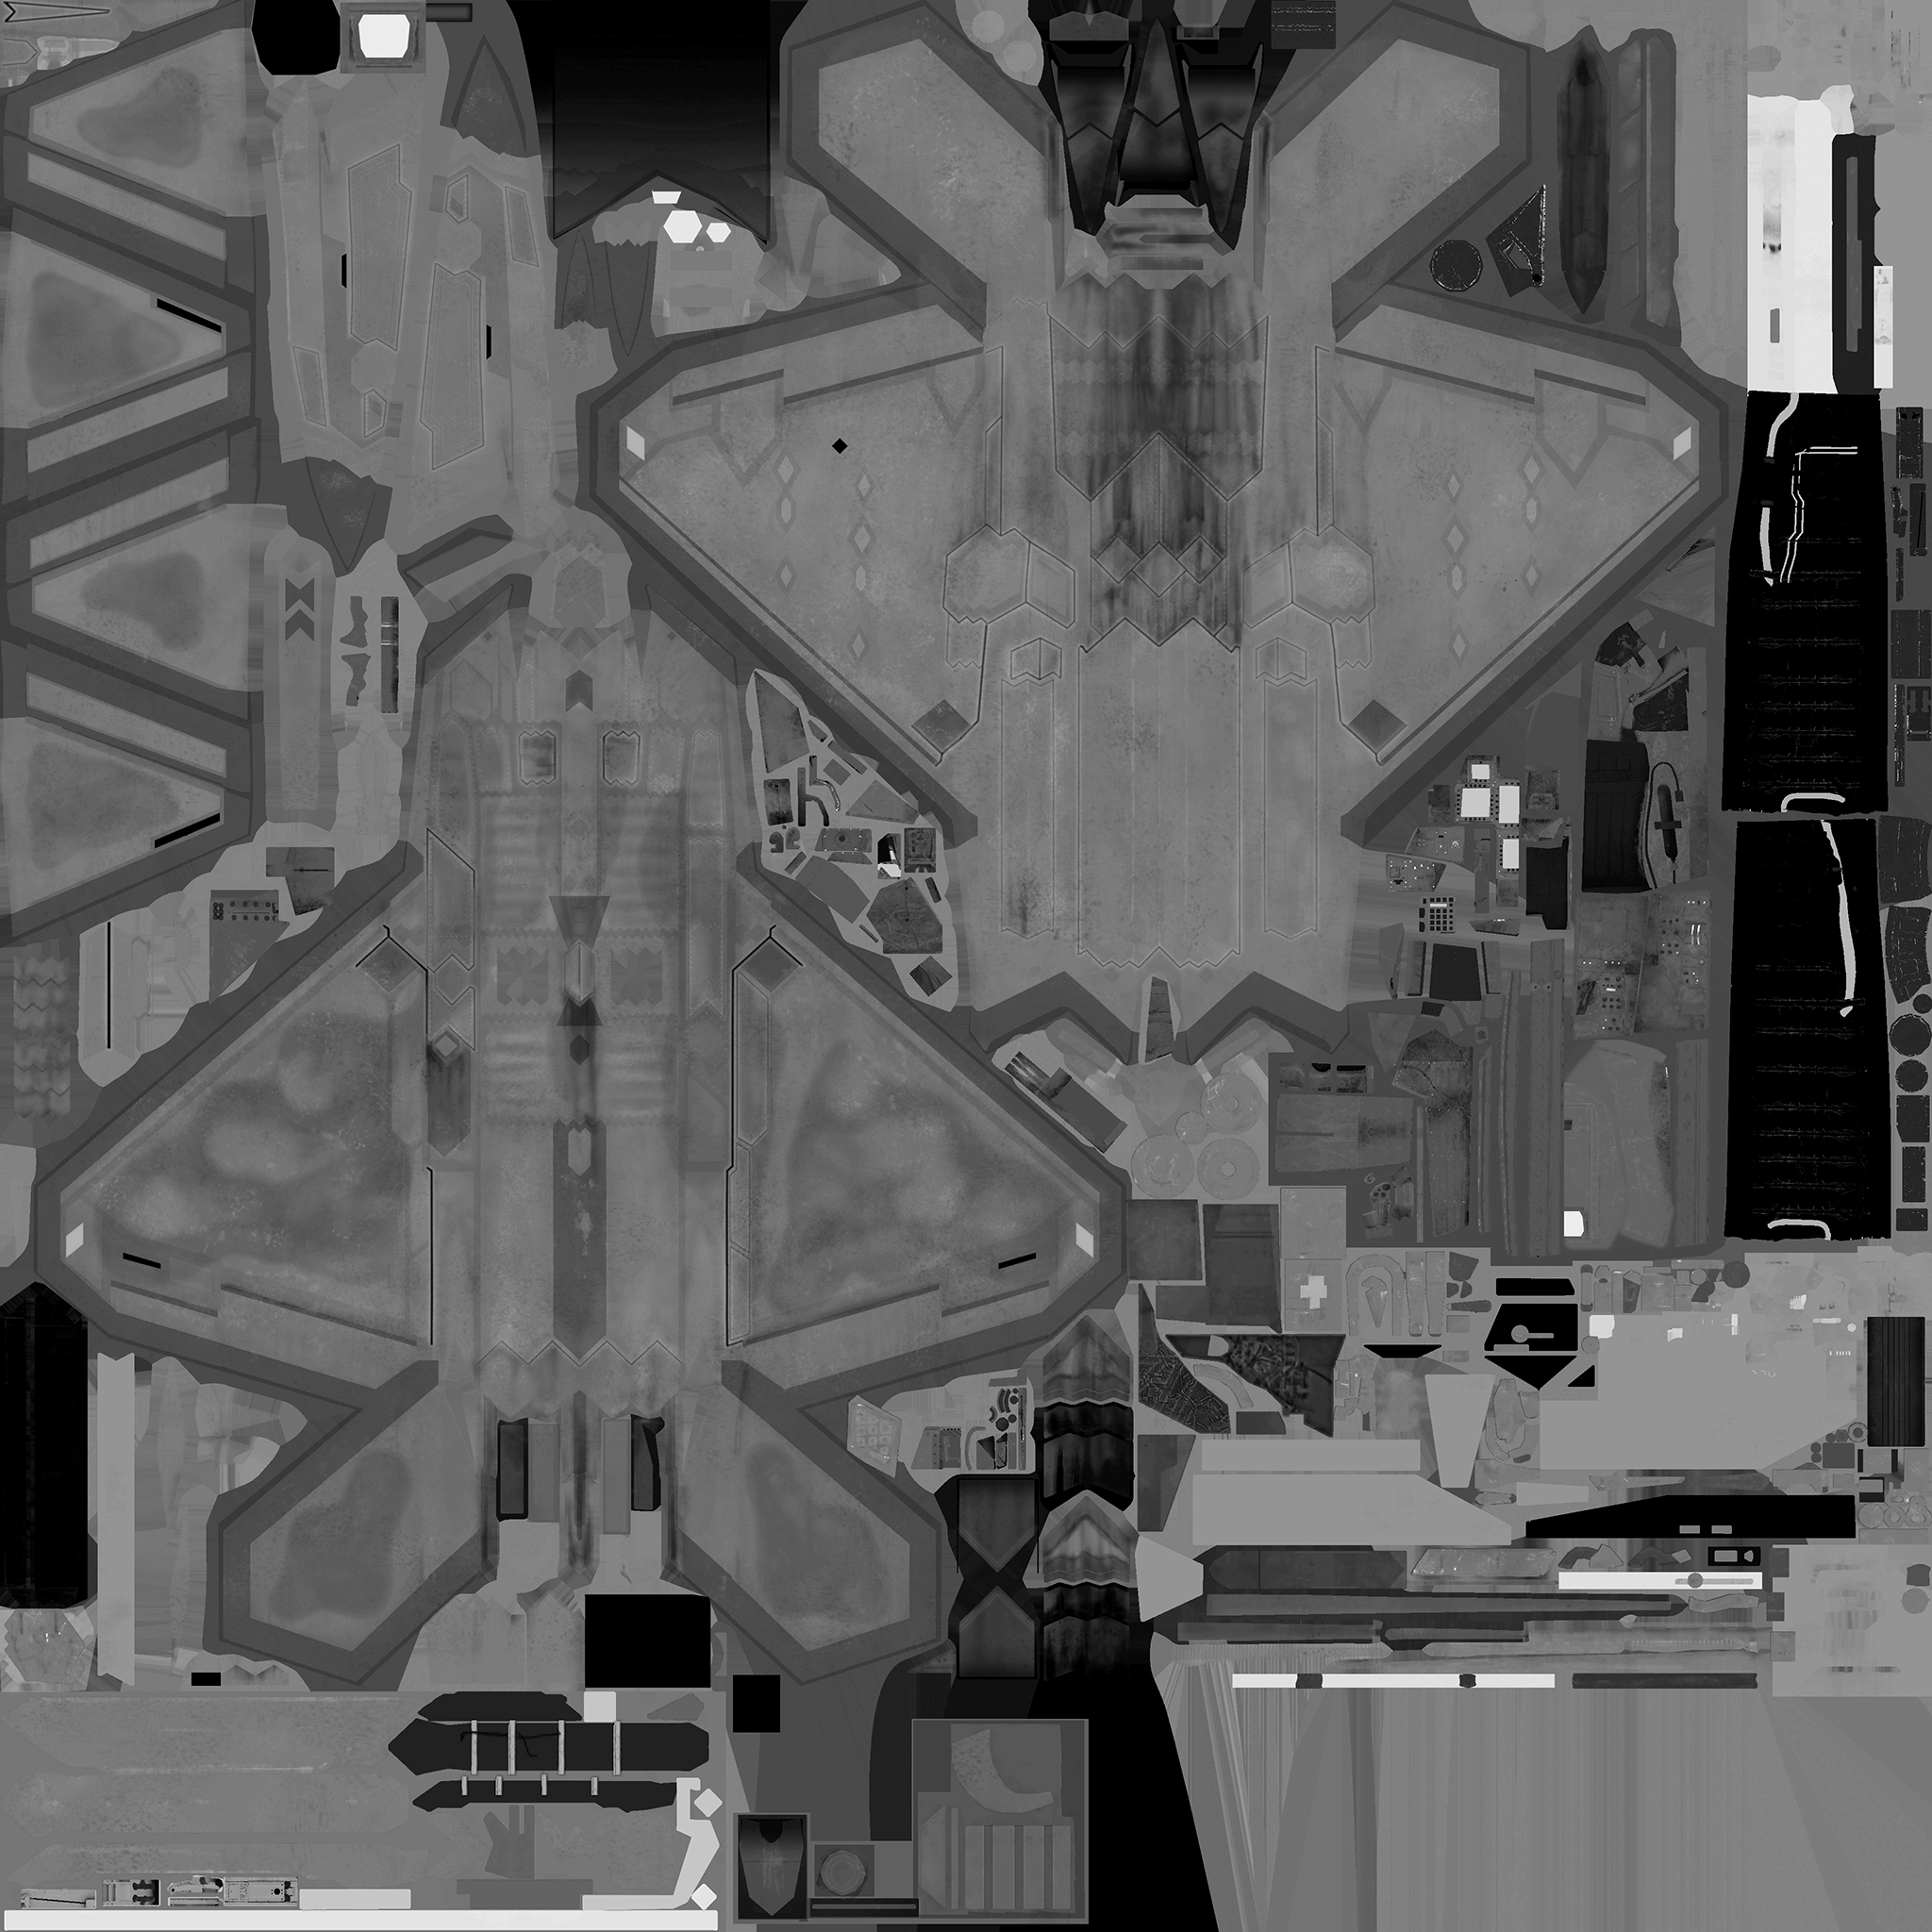
Normal Texture Map
Normals are the evolution of the Bump texture maps used years ago, the role of both is mostly the same, but Bumps handled that in monochromatic tones, when Normals handles by using RGB, similar to the MREC map. Normals originally are made by modeling a high-poly 3D model with each detail sculpted on it, then the artist would model a less detailed 3D model without the attention to the details he developed before, but mostly it needs that the UV map and the topology of the model works the same. Then, the user would be rendering the texture map into the UVs of the low-poly model, which is what we call "Bake Textures". The major point of Normal maps turns that it can emulate 3D model volume, without those parts begin modeled on the newer model, which can turns to be very convinient as an illustion trick, however depending of the degree of the volume, it may turn the model uglier.
-Pros
- Allows to increase the fidelity of details of your 3D model.
-Cons
- Unless you're making a 3D model from scratch, in very rare cases you'll be editing the normal maps of the game, some of the reasons may turn if you want to make the model even more flat on the wheatering, or only removing the parts that the skin in question would need to remove them.
- It may turn into a serious problem if you don't know 3D modeling at first sight, however Photoshop, Substance Painter and some tools developed by NVIDIA, allows you to create normal maps by using image principles, however the two earlier you would need to afford some money to pay their membership for using the program.
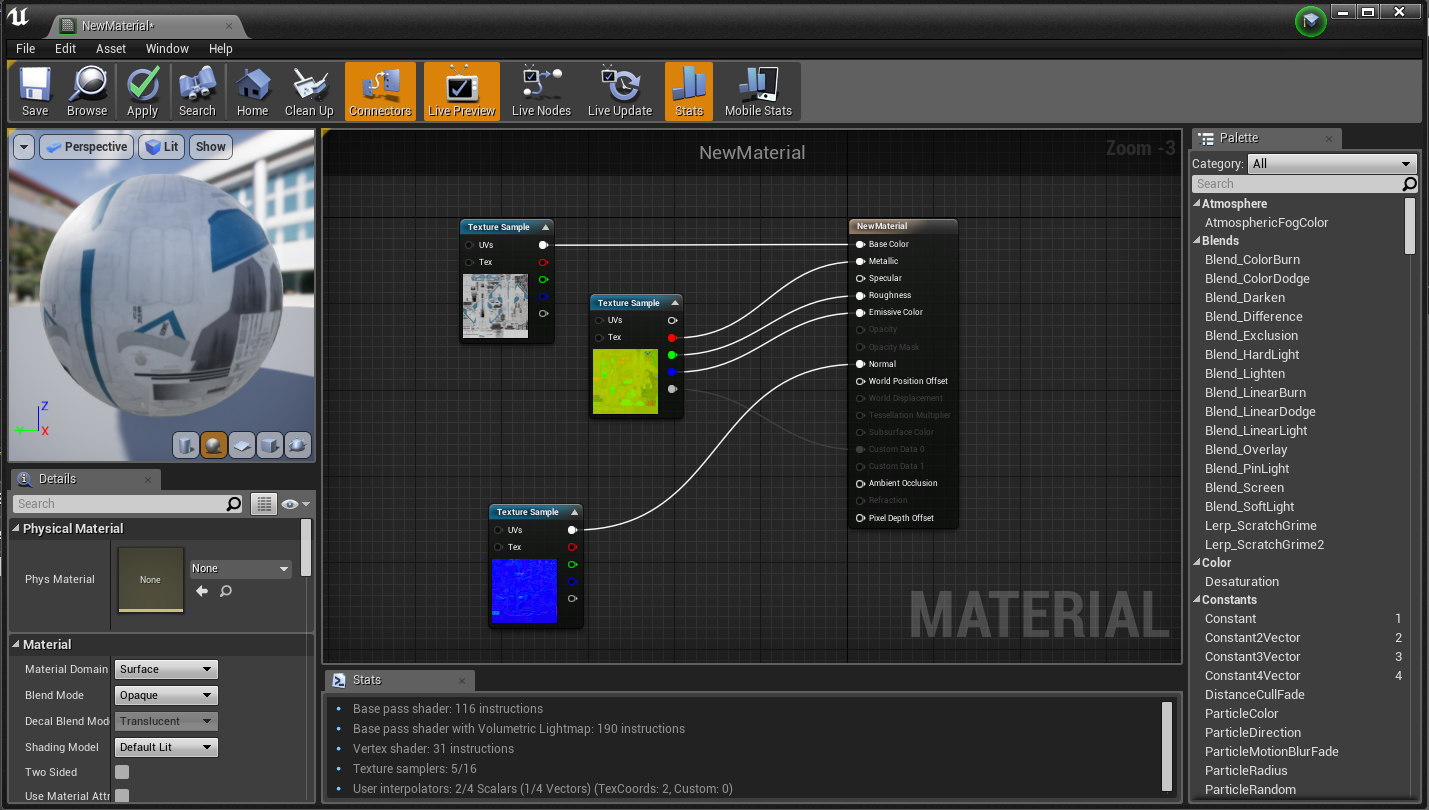
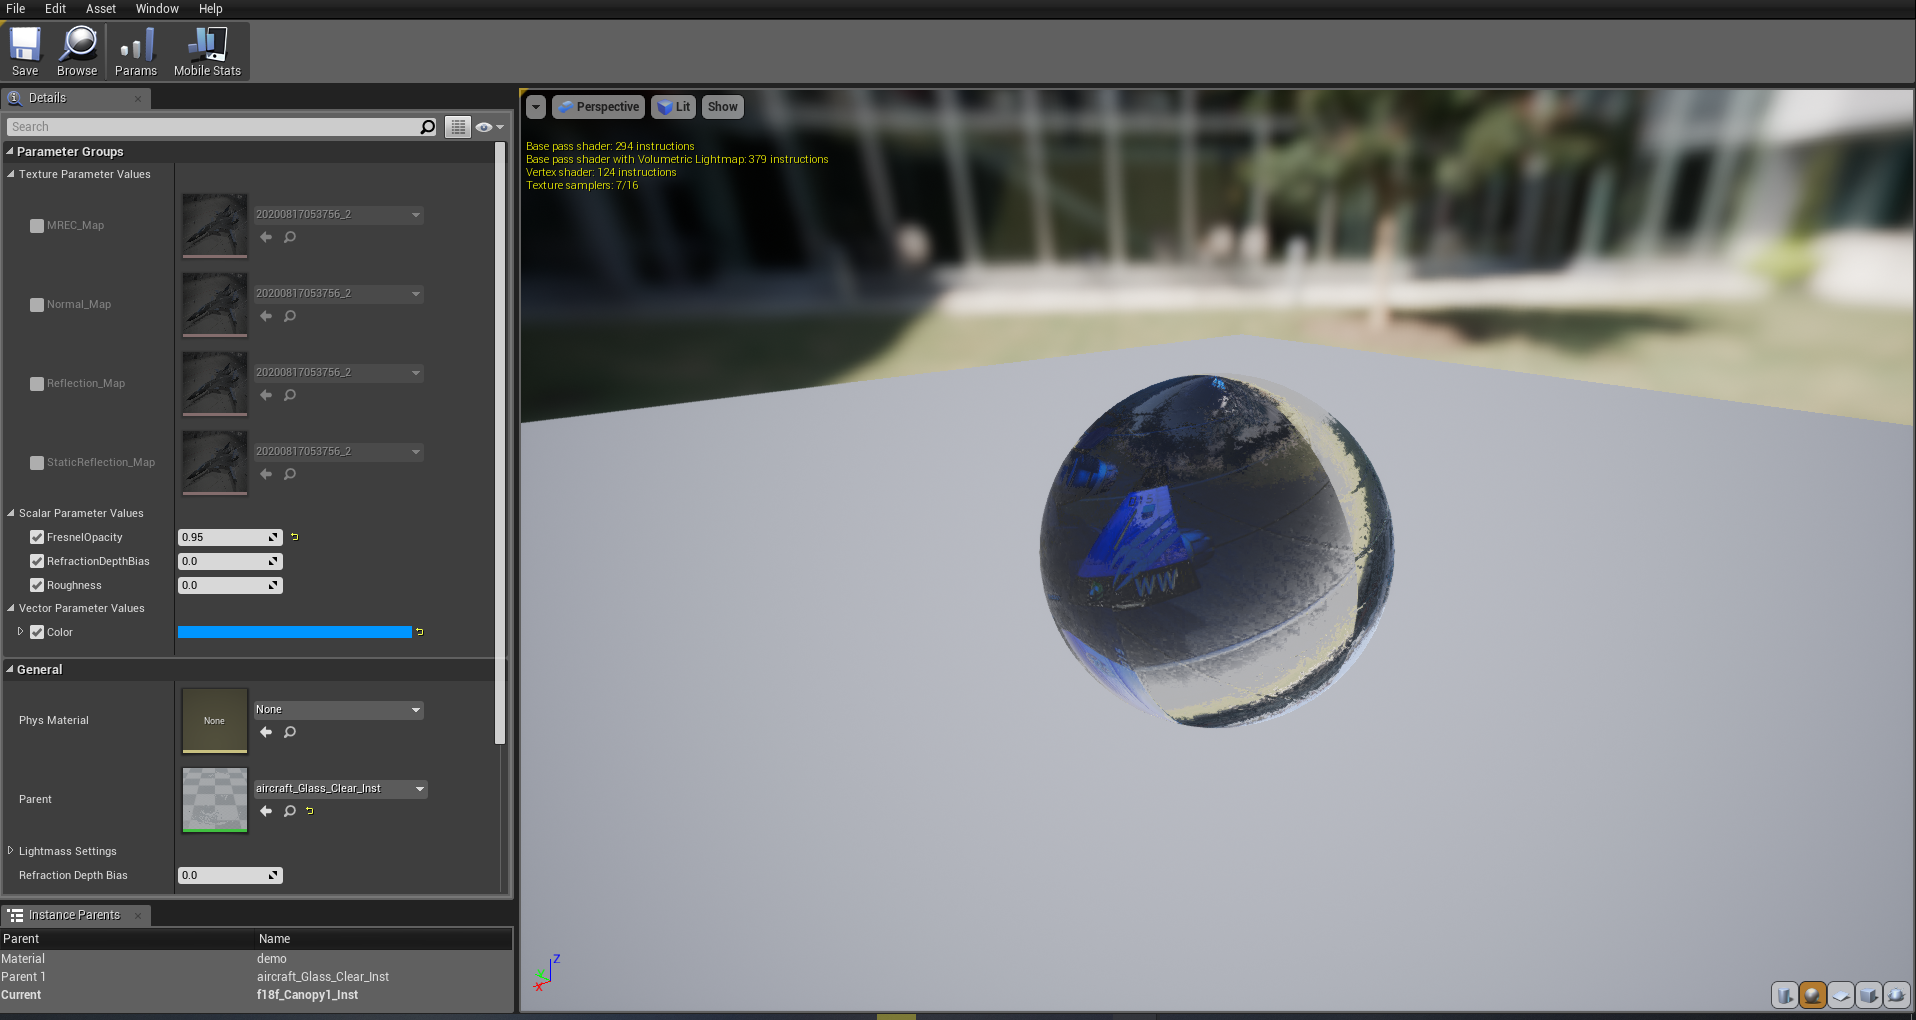
Material Instances
A material is what we call solid color blocks on the 3D modeling area, aside of colors, materials are mostly the gateway for assigning Diffuse, MREC's and Normals at the same time on your 3D model. UE4 makes use of a secondary function called "Material Instance", which is a parent-child group from the original material, and mostly is something AC7 needs to be constantly made for work correctly. Instances allow you to bake propreties at the textures used, like adding bloom, which is the glow that makes the emission of the Formation Lights really charming. Or layering with other materials by the use of alpha channels, like masks isolating decals. The possibilities of develpoing functions with the Instances got their potential, but mostly, the reasons of their use is listed at the Pros and Cons.
-Pros
- By each aircraft of the game having their own Instance, the skins related to Trigger can be easily isolated into separate slots for adding uniques skins with MREC propreties despite it originally wasn't meant to work like that, the same could be also applied for tweaking normal maps separately to that skin slot only, as most of the AC7 skins will use the default 00_N, feel free at checking out the Material Instances included at Codename VANILLA, made by Dantofu :
Moddb.com
-Cons
- Working on VISMODs, or any type of model modding, you'll need to ALWAYS, make a dummy of the Instance file you want to assign at the correct path structure of the game, using materials sorely will result at the game crashing with a fatal error message.
- Some Material Instances of the game got servere errors, a clear example of that is MiG-31's Strider skin, which for an oversight of the developers of PA, it got the strings duplicated at the Decal_Inst, which by isolating the m31b_06_Inst only, won't be giving the desired effects.
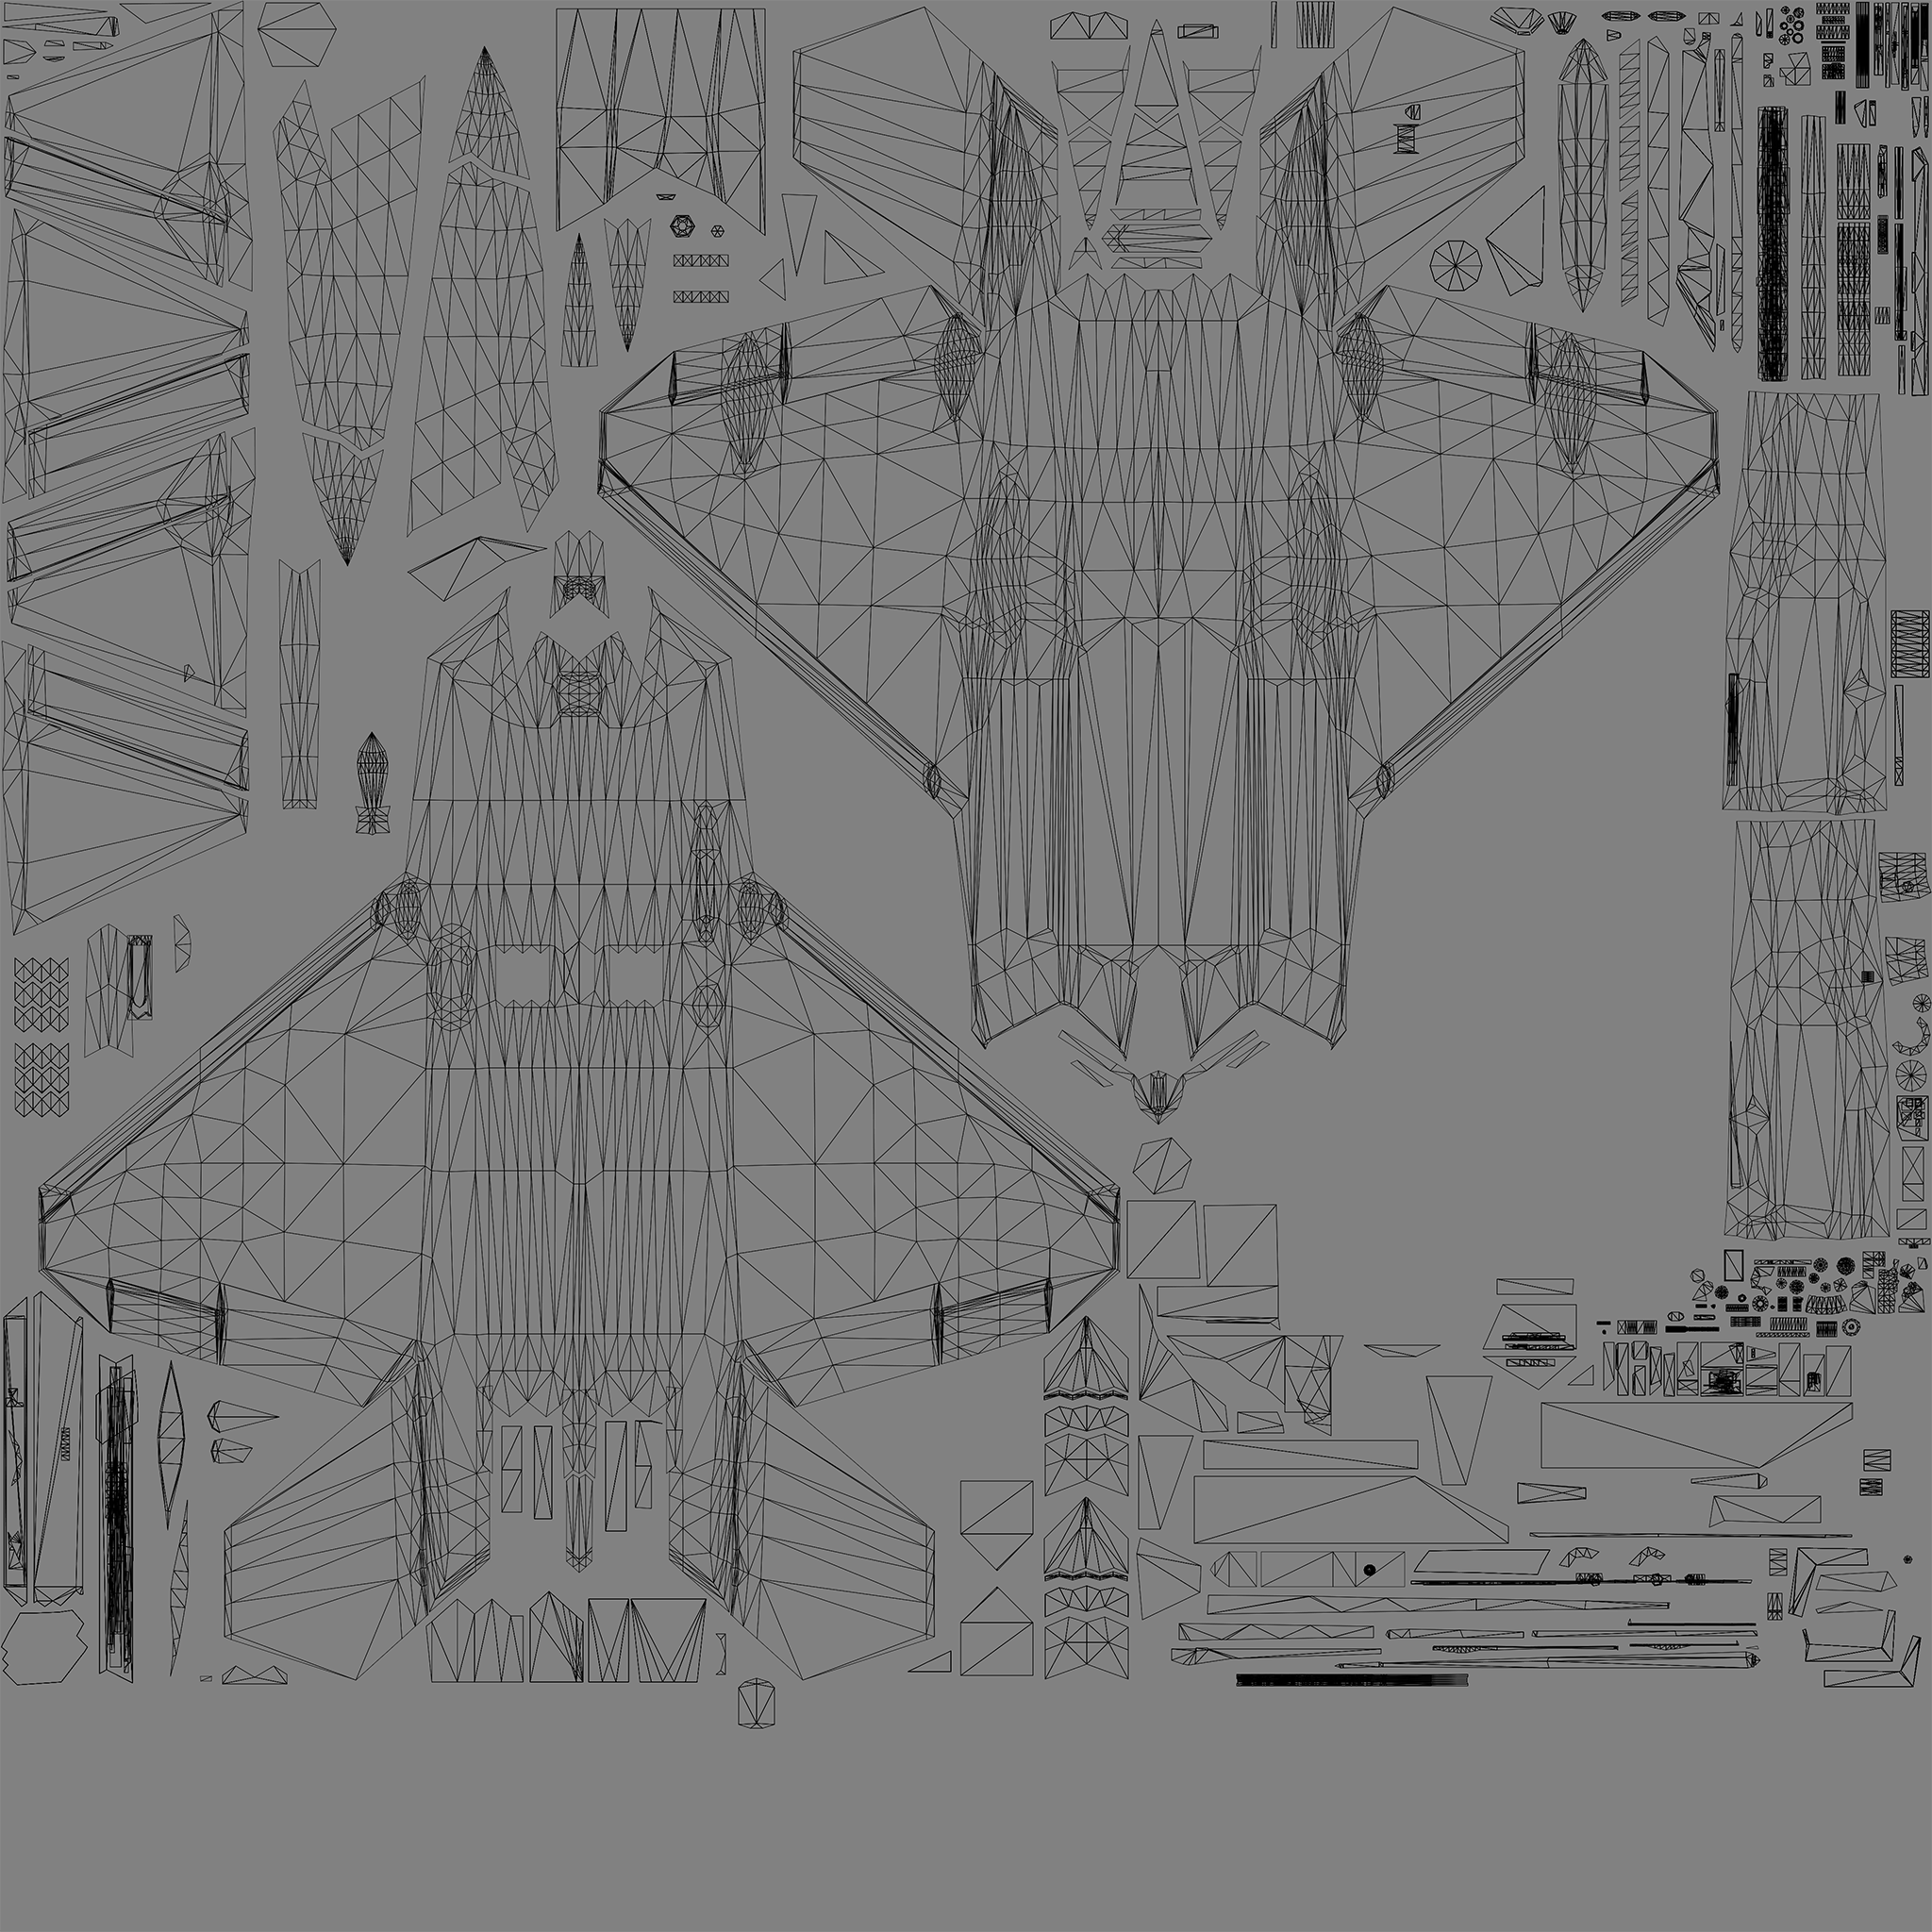
UV Coordinate Map
UV maps aren't exclusively texture maps, but something which is developed by the user on their 3D models, the UV stands for the axis points used on the 2D map range, compared to the euler system of the 3D modeling, which is composed by X, Y and Z axis. Unwraping a 3D model into a good topology for the textures look smooth, is the same as folding an origami papercraft, you would need to assemble it by denomiating seams on parts(called as Islands) that you want to be separated, instead of merged. Some templates of Codename VANILLA includes extracted UV maps using the official game models, mostly as sort of a reference guide at making skins.
-Pros
- Can help briefly to know which areas of the aircraft are used, avoiding to painting over unused borders.
-Cons
- AC7 turns to be very infamous relating to UV maps, the major example of this is taken by the F/A-18F Super Hornet, considering it was the first model made for the game, it got an abyssmal work at UV mapping, mostly assigning them into a non-sense pattern, the closer ones that can be annoying turns to be the A-10C.
- At the same topic, despite the other UVs may look less catastrophic and cleaner, some parts of the topology will get servere stretch distortion of the islands, needing to make weird patterns at the texture for make it look right at the 3D model, however, isn't mostly an issue that started on AC7, due even Holy Trinity and ACAH got almost the same issues, including some that are peak laziness of the artists, like assigning the UV on the fuselage. At least you can thank that AC7 supports you to assign decals to both wings and stabilizers separately.
- Despite it can be useful for a moment, trying to base yourself at the UV map won't help you at trying to solve issues it would need to be fixed at the texture, like for example, you turn to be confused by not understanding a certain part of the UV map, and if you turns to be prehistoric at launching the game each time for noticing something wrong, can turn the process of the creation of a skin mod into frustation.
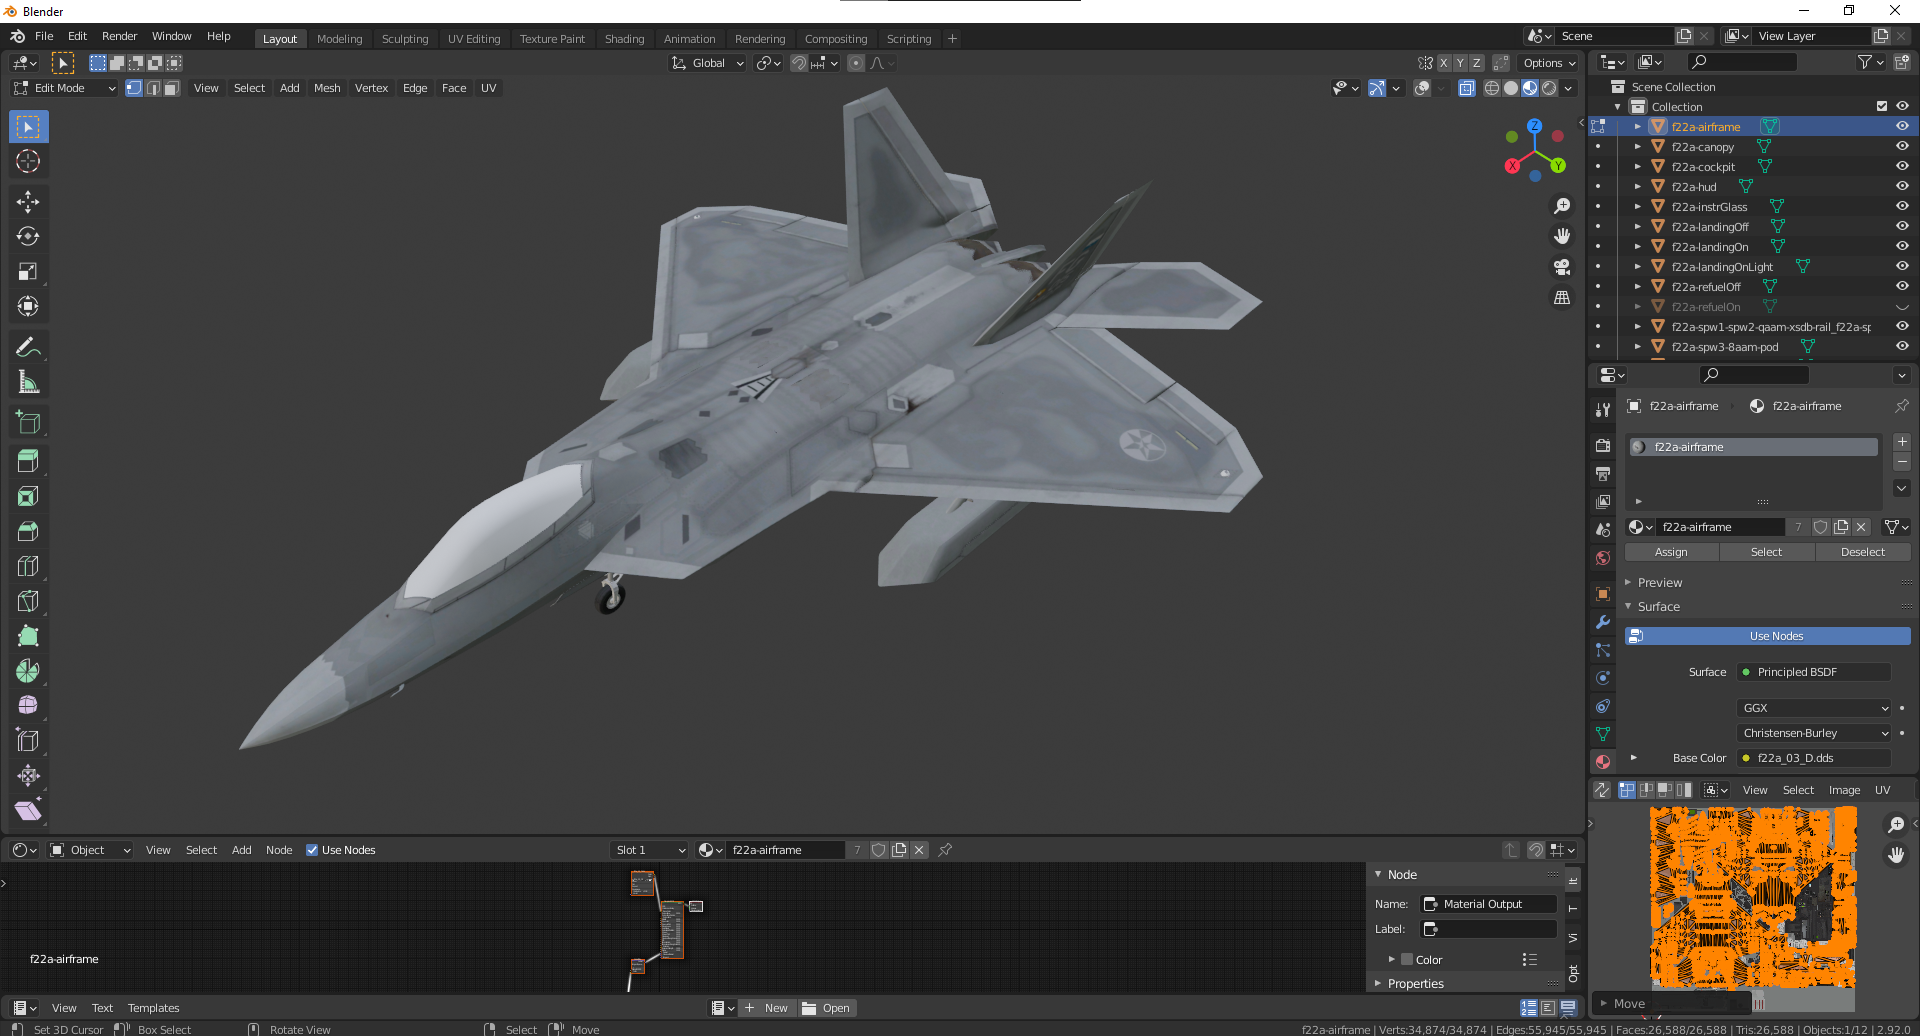
3D Model
As the name says, is mostly the main asset that what makes the 3D games to work, mostly despite is possible to modify those, clearly isn't the topic were talking about, but using 3D Models at skin modding tends to be really useful due you got the clear control of the UV map, and you could analyze the errors of it without needing to start the game just for that, for finding out the models from AC7, they are listed at -Useful Links- article, and Blender turns to be a good open-source and free alternative for vieweing those models if you turn out to be hipster by the price tags of Autodesk.
-Pros
- Gives a better understandment of how the skin will work on the model compared to UVs.
- Can save your time to avoid at starting the game, even begin possible at viewing in angles that wouldn't be possible aside of a free camera.
-Cons
- Learning how to use 3D modeling softwares can be a behemoth at first sight, even more people considered Blender to be infamous by the confusing layout, the lack of buttons and the program begin sorely hotkey based. However if you can, i would suggest you at least going through learning how to use it, mostly suggesting at learn about how to control the viewport, how to assign materials, along as how to highlight vertex and faces.
Protips
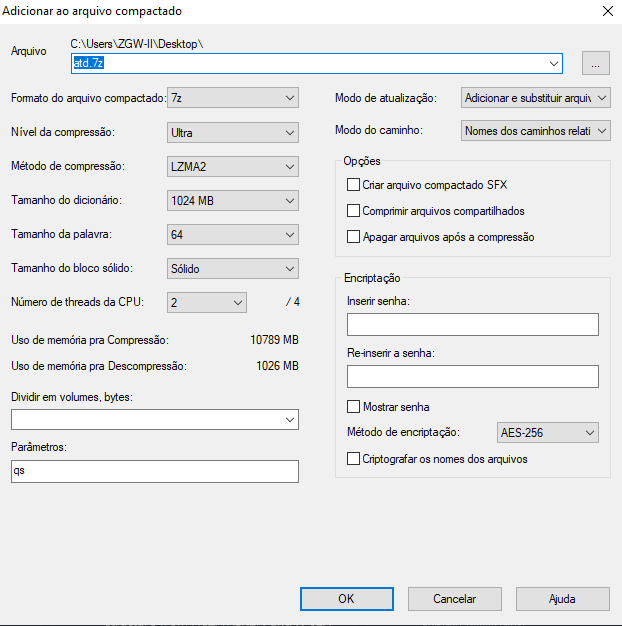
-Compression Issues
With BC7 in mind, or mostly by making available slots for each skin, packaging and uploading a mod package in both Moddb and Nexus can turn into a tedious task, even more when the ISP bandwith isn't at their good times, from the times you almost wasted hours of your life for uploading a mere package of textures, you would want to know if some sort of sorcery could exist, giving some good news, it exists! 7-zip aside of begin open-source and not warning you to buy the license of it but you could use it fine. It allows you to compress textures with similar sizes by using the correct settings, mostly i would thank Krishty from ZFX Developia forums for sharing this knowledge for me.
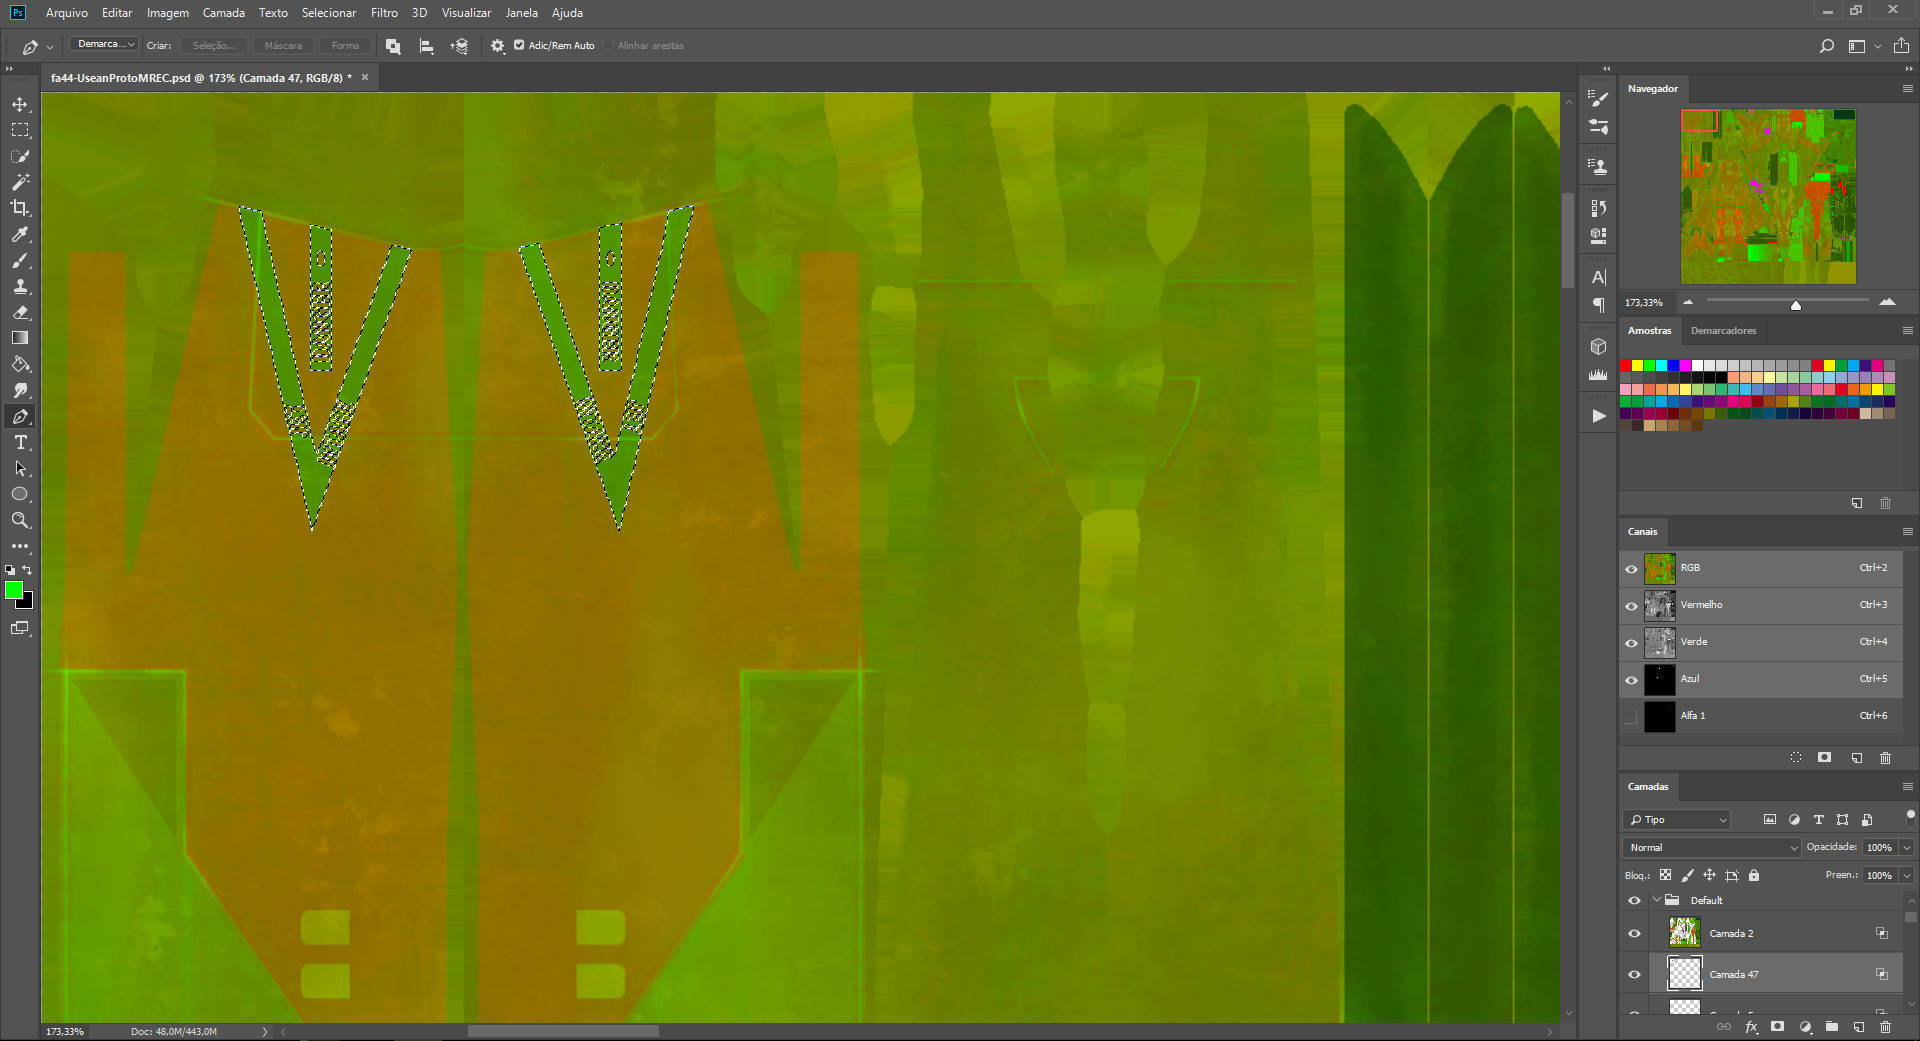
-Correct way to edit MREC Textures
At first place, editing MREC textures isn't like editing a vanilla template, so you won't simply getting your patterns and painting in green, red or orange and regulate with transparency settings to "preserve details". My current workflow for editing them is getting the patterns, duplicate into the MREC layer, and instead of painting it, i click them to active their selection, and i do Ctrl + J on Photoshop for a part of the MREC begin duplicated, but with the selection of my pattern(you can also duplicate a layer with the details isolated to avoid overlaps too). This is the main key for making perfect MREC edits, as the only thing you'll be needing to do, is to regulate their luminosity on each channel separated, maybe apply a inner fade for camouflages, but you will notice the quality increase by doing on this way instead of the older methods you did. Also, isn't the case of Alpha Channels, but MRECs can be also very infamous for giving artifact errors if you edit the blue channel accidentaly by editing with all channels instead, to always begin certain those errors won't occure again, Photoshop allows you to disable each of the RGB channels by double clicking on the layer name, so disabling the Blue Channel will be the saviour of that white pixels runing out your precious skin(BTW, don't disable the blue channel if you isolate the details, otherwise the illumination won't be preserved)
-Artistic Protip
At times, making skin mods can be compared as making digital art, and during some point, there will be times you will start missing some details that you didn't noticed before, this is part of an effect called "addicted vision", which is the result by starting the computer screen for hours doing a task frequently, to the point your eyes will start lying that there are no errors on the current project. As sort to fight over this, start working during one hour at best, considering you're feeling a bit neurotic towards the screen, force yourself at getting out from the PC, and run towards your house for a hour or 30 minutes, it may sound a bit "autistic" at first sight, but when coming back to your computer, you will be able to notice that sole mistake of the pattern you'll be missing for most of the time by an instant.
Must Read :
¹Texture Replacement Guide - by Dantofu
Docs.google.com
Material Instance Guide - by Dantofu
Docs.google.com
²Editing MREC DXT5 Textures - by Ostrich
Docs.google.com
Blender Quick Start - by Ostrich
Docs.google.com