QUICK DISCLAIMER: THESE ARE NOT MY LINKS, ALL RIGHTS GO TO THE RESPECTIVE OWNERS
Anyways, here's a "How to get started" guide:
------------------------------------------------------------------------------------------------------------------------------------
Download these tools (all you'll ever need):
Valve Hammer Editor 3.4 is a map design tool ---> Gamebanana.com
Wally is a Quake2 & GoldSrc texture creation tool ---> The303.org
Half Life Model Viewer (HLMV) helps you to recognize models from your game and also reskin textures, view animations & open package files. ---> Chumba.ch
------------------------------------------------------------------------------------------------------------------------------------
Setting up Valve Hammer Editor, you will be greeted with "No Game Configurations are available" dialog box, SIMPLY PRESS NO WHEN IT APPEARS! If you messed something up, go to Tools --> Options (it's in the upper left corner, you'll find this config box again).
1. Hit the "Build Programs" tab, Analyse the picture below carefully.
Browse to the corresponding directories (it will obviously be different for you depending on where Half-Life and Valve Hammer Editor is installed).
CSG, BSP, VIS & RAD comes together with your installation of Valve Hammer Editor!
WHEN YOU'RE DONE, HIT APPLY!

2. Hit the "Game Configurations" tab.
Again, analyse the picture below. Read my directories and figure out how it should look like on your end.
FGD files comes together with your installation of Valve Hammer Editor!
WHEN YOU'RE DONE, HIT APPLY!

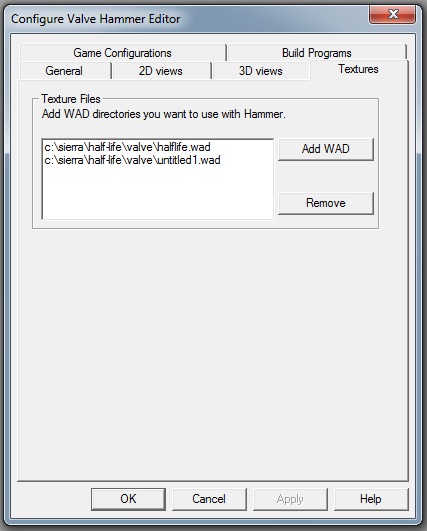
3. Hit the "Textures" tab.
NOTE: "untitled1.wad" will not exist for you! It is my custom texture file and it only exists on my end! Not having it IS NOT vital to this guide. Just point to your halflife.wad file and YOU'RE FINE!
WHEN YOU'RE DONE, HIT APPLY! And you can now close this config box.

------------------------------------------------------------------------------------------------------------------------------------
Now, read from these helpful webpages:
And finally, search on YouTube for specific tutorials.
Best of luck on your first map. This is all actually really easy and fast. PEACE.

