So first begin by getting everything you need:
- Valve Hammer Editor 3.5: Link Mirror 1 Mirror 2
- ZHLT Tools: Link
- Valve Model Viewer: Link
- Wad Merger Tool: Link
Now installing them:
- Valve Hammer Editor 3.5: Is pretty easy, just mash on "Next" and you're done.
- ZHLT: You need to extract the files inside the directory you installed Valve Hammer Tool.
- Valve Model Viewer: Just like Hammer. Run the setup, mash "Next" and finish.
- Wad Merger Tool: You need to extract whats in the RAR file. You
can extract those wherever you like just as long as you remember where
you put them :).
Configuring the programs:
Open Hammer. Go on Tools menu at the very bottom you have Options.
You are first presented with the General tab but skip directly to
Game Configurations tab. Starting from up:
- Configuration: Here you put the name of the game you're going to map for.
- Game Data Files: Here press Add to browse for the
FGD files with are located where the Hammer install folder is, inside
the FGD folder you choose the FGD of the game you are going to map
for. - Texture Format: Automatically set to WAD3 (Half-Life/ TFC)
- Map Type: Automatically set to Half-Life/ TFC
- Default PointEntity Class: This is going to be
your default value your Entity tool is going to have every time you
use it. I suggest you put it for starters at: info_player_start. This
will create a spawn location. - Default SolidEntity Class: Just like with the previous one put a value which will be easy for you to set while you're mapping. I suggest: func_wall
The following setting are going to depend on what game you are
configuring about. I'll show for Conter-Strike since is a good way to
start making map while you can test them online.
- Game Executable Directory: Should be:
C :\Program Files\valve\Steam\steamapps\user name here\counter-strike
- Mod Directory:
C:\Program Files\valve\Steam\steamapps\user name here\counter-strike\cstrike
- Game Directory:
C:\Program Files\valve\Steam\steamapps\user name here\counter-strike
- RMF Directory: Basically this is where you maps are saved but I suggest:
C:\Program Files\Steam\steamapps\user name here\counter-strike\cstrike\maps

Note that configured this for steam. For the CD version is the same basic thing. You just need to find the same folders.
Now go on the Build Programs tab. Starting from up:
- Configuration: The game you are mapping for.
- Game Executable: C:\Program Files\Steam\Steam.exe. (for CD version you need to select hl.exe in your CD install directory)
- CSG Executable: C:\Program Files\Valve Hammer Editor\hlcsg.exe
- BSP Executable: C:\Program Files\Valve Hammer Editor\hlbsp.exe
- VIS Executable: C:\Program Files\Valve Hammer Editor\hlvis.exe
- RAD Executable: C:\Program Files\Valve Hammer Editor\hlrad.exe
- Place compiled maps...: C:\Program Files\Steam\steamapps\user name here\counter-strike\cstrike\maps

Now go to Textures tab:
Basically here you add the texture packages (WAD file) found on you
game directory. If you want other WAD files i suggest you for the
easy way to look on your CD install folders or the internet. For
adventurers you need GCFscape which allows you to see inside the GCF
packages installed with your steam game. You can find more information
and download GCFscape Here.
NOTE: If you manage to find more than 8 WAD files than
you might crash Hammer, so in order to prevent this use less than 8
WAD files, OR if you really need more textures you need to use the
Wally Wad Merger Tool. Here is again the link to explain how to
merge .wad files: Link.
When you finish selecting your WAD files press OK and you are done.

Now the TRICKY part.
If you put on textures only the original games .wad files then you
are OK to go and make maps. Unfortunately if you included CUSTOM WAD
files or other than the original one Hammer WON'T compile the map
with your custom textures and when you compile the map Hammer will
give you an error and maybe crash. So here is how we prevent this:
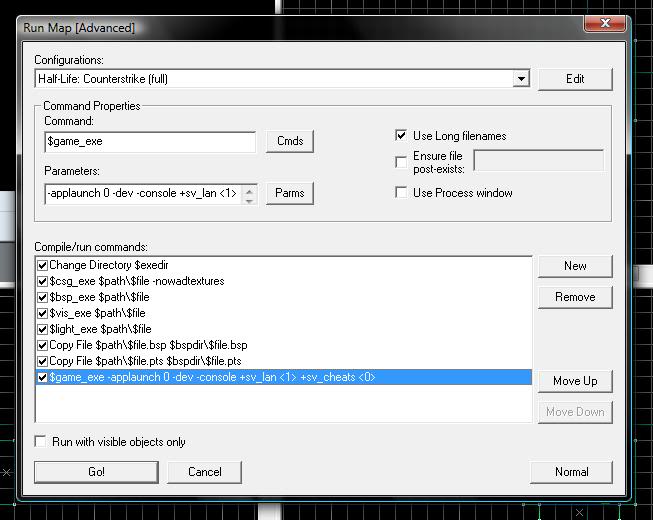
When you Run the compiler on Hammer the Run Map dialog box
appears. Down on the left is a Expert button you need to press to go
on expert mode. Now you are presented with the Advanced Run Map
dialog box. You need to do 2 things here:
- Configurations: choose the game you are mapping for, in our case: Half-Life: Counterstrike (full)
- After you choose the configurations go on compile/run commands:
a. Select: $csg_exe $path\$file. After you select it above is a Parameters field in which you write: -nowadtextures.
b. Select the last command on the list: $game_exe -game..., there are 2 scenarios here:
If you have steam you need to open regedit and go to this address: HKEY_LOCAL_MACHINE\SOFTWARE\Valve\Steam\Apps
The numbers there are your APPID which depending on the game you
are mapping for you need to choose and enter on the parameter this
way: -applaunch APPID -dev -console +sv_lan <1> +sv_cheats <0>
If you installed from a CD you need to write on the Parameter field: hl2.exe -game cstrike -dev -console +sv_lan <1> +sv_cheats <0>
For more info about this last one go here: Link. It will look like this:
This comment is currently awaiting admin approval, join now to view.