This is my first tutorial so quality is not assured and I do recommend that you complete the '3D:Noob to Pro/UV map basics' tutorial before attempting this one. (links down bottom of the page)
Layout of this tutorial is in the paragraphs I will tell you everything to do and generally explain what it does and why we're doing it, then I will provide a bolded paragraph for the more adept people at blender to use which just shows all the shortcuts and what to do with nothing else. There are also pictures to illustrate new shortcuts and generally information that is hard to convey with text alone.
Now lets get started making our Rubix Cube. <!-- hr-->
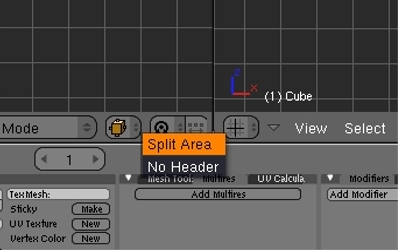
<!--[if gte mso 9]><xml> Normal 0 </xml> Mark Seam after this select the whole cube and press the U key-> unwrap. Nothing much will happen except the edges will go a slightly different colour but if we truly want to see what has happened we need to split our screen. To do this we are going to move our mouse to the bottom of our 3D view window (or slightly under where you choose edge select mode with the mouse) there should be 2 arrows pointing vertically, now right click when you see these 2 arrows click split area, now click where you feel comfortable halving your 3D view.
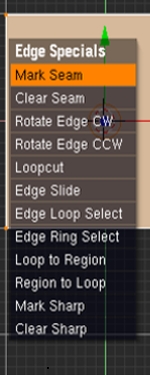
Edit mode, select all (A key), Ctrl E -> Mark Seam, U key -> unwrap, Split the Screen
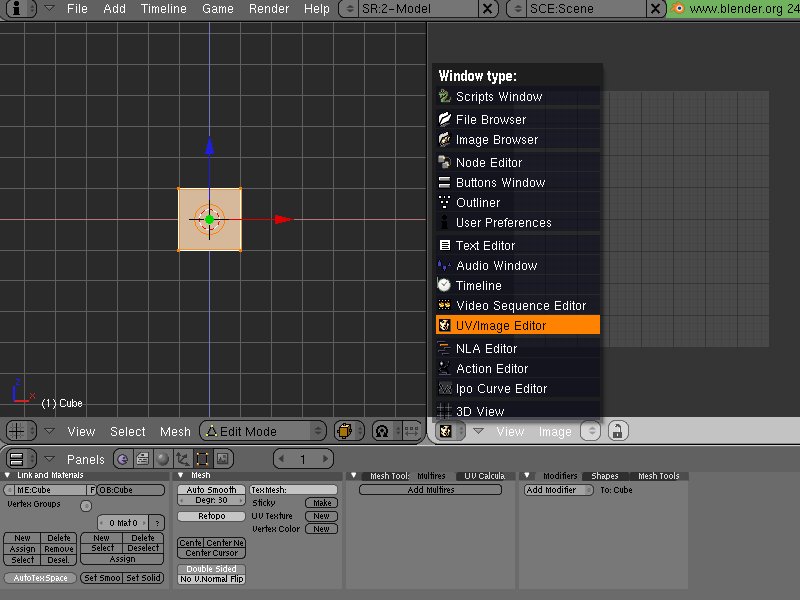
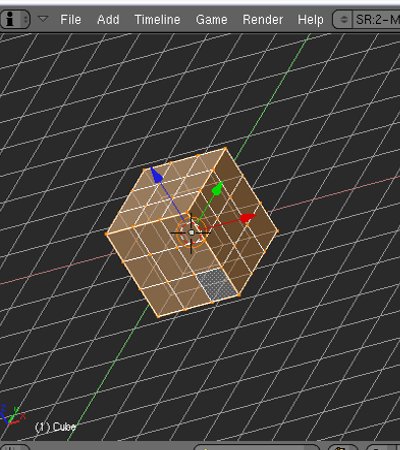
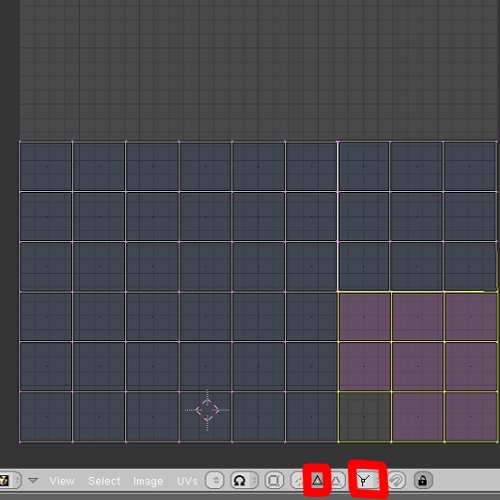
We now have 2 windows, one of the windows needs to be our UV mapping window to do this we need to go click the bottom left corner where there will be a small picture that resembles a grid now click where it says UV/Image editor. Click bottom left grid of window -> UV/Image Editor. Now we are going add some loopcuts to our cube. With your window that is in 3D view go to front view (Numpad 1) Press Ctrl+R and then press the 2 key make the lines go in a horizontal direction, then click. Repeat the loop cutting except this time make the lines go in a vertical direction. Go into top view and then Ctrl+R, Key 2, make sure lines are going horizontal now left click to apply the lines. On each of the 6 sides of the cube there should now be 9 faces.
3D view symbol (bottom left) -> UV/Image editor, then loop cut cube so that each face of the cube now has 9 faces. (it should look like the cube below)
We've now finished the most part of our modelling, now to start UV wrapping.
Now we are going to Select all of the cube (A key) and then unwrap (U -> Unwrap) now look at the UV/Image Editor window, it will turn out different for every time you mark a seam on the model. If you plan on Making your own UV image to wrap onto the cube then skip the rest of this paragraph. What we are going to do now is change the UV unwrap layout so it matches with the image. Go to face select mode, hold shift and right click the squares that are not in the bottom two thirds of the unwrapped cube and then move them so they are in the bottom two thirds of the unwrapped cube (see picture for good layout, Circled in orange are the settings that should be applied to your UV/image editor window)
Move the UV unwrap layout so that all the squares are neatly inside the 2 bottom thirds of the square.
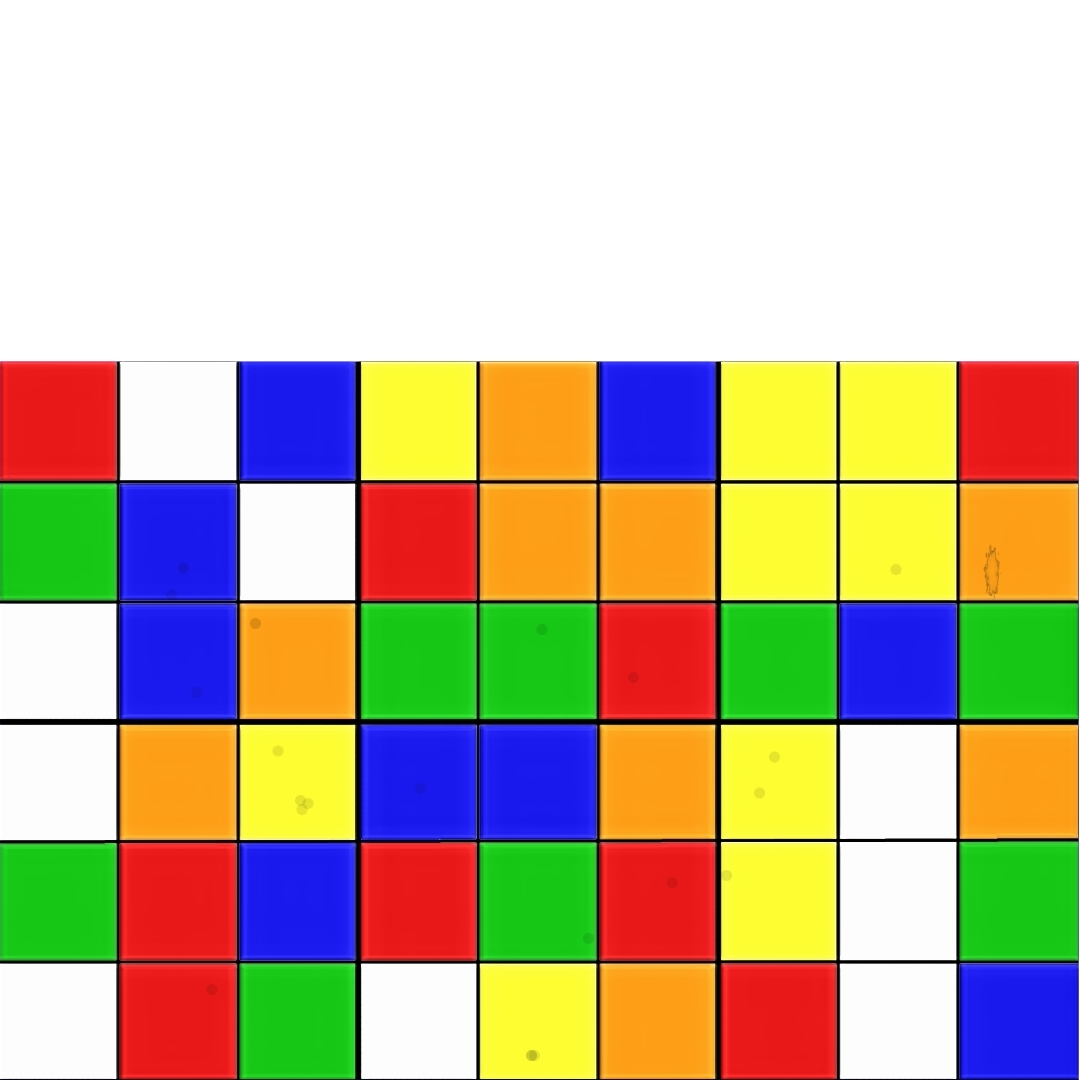
All UV wrapping is, is putting an image on the surface of a mesh, so what we need now is an image to wrap it to. I have made an image, which you guys can use or feel free to make your own Image, if you are using mine then Right Click the image and save it to where you can easily finds it later as either a JPEG or PNG format.
Here is the image:
Now in blender on the UV/Image editor we are going to finally apply our image to the cube by clicking Image -> Open, find where you saved the image to and then click open image.

Save the image that we are going to Map our Rubix Cube to. Image -> Open apply that image to the UV unwrap. (it should look like the above image)
Now that we've done the UV mapping we need to make it that it appears when we render it, but first we're just going to check on our progress by Just pressing Alt+Z you should see the Image applied to the Cube in the 3D view window, if not check over the previous paragraphs to make sure you didn't skip anything.
Now If you try and render it (F12) you'll see that it still looks like a grey cube, not to worry the tutorials nearly over and our UV wrapping will appear on our finished render within the next Paragraph.
go into the shading menu (F5) then make a new material click Add New in the Links and Pipelines mini-window, then Go into the materials mini window and click Tex Face.
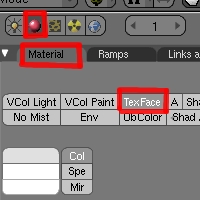
F5, Links and Pipelines -> Add New, Materials -> Texface.
Now what's left is to adjust the camera and lamps to get a quality finished render.
Moral of Tutorial: a little good UV wrapping or Texturing can do amazing things for a low poly model.
I hope you have enjoyed the first of many to come CupCake Tutorials
Other Useful tutorials on UV mapping:
3D: Noob to Pro/UV Map Basics'
Advanced UV mapping: Modeling a Steam punk Telescope
Advanced UV mapping: Creating a wooden barrel

Not bad!
easy to follow, however, it is much more efficient to mark seams so that the unwrap forms a lower case t. Although not necessary in less detailed models like this, breaking up every face will create ugly seams in more detailed models