This tutorial will teach you how to make a simple winter scene, including some fir trees and a snowman. It is supposed to show you how to use the most common Blender functionalities (i.e. modelling, adding materials and textures) and shortcuts.
When a shortcut is used for the first time, I'll say something like "press the x key". When I use it again, I'll just put something like "(x)".
The Snowman

Step 1 - Press the X key to delete the square that is in the middle of the scene. Press the space bar. Select Add > Mesh > UVSphere to add a sphere in the scene (click on the OK button for the number of segments and rings, 32 is perfect). Zoom in ("+" key or the mouse scroll button) and press the S key (size) to make the sphere 4 squares wide. (if you want it to be exactly 4 square wide, hold the Ctrl key while you move the mouse ). This is going to be the body of the snowman.

Step 2 - Press the Tab key to switch to the object mode (the sphere is now displayed in pink). On the bottom of the 3D view, there's a little menu with icons, click on the one circled in red opposite (or press F9), and change the values of the 2 fields with a name that fits (i.e. SnowmanBody). It is not necessary to name the object, but it's a good habit to develop :).
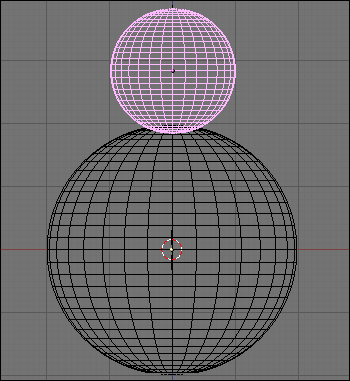
Step 3 - Now switch to the front view (numpad 1), and add a 2nd UVsphere in the scene. Resize it (S) to 2 squares wide. Switch again to the object mode (Tab) (when you create an object, blender automatically switches to the Edit Mode). Name it SnowmanHead (as done in the previous stage). Now press the G key (G=Grab) and move the head on top of the body. This is the beginning of the snowman. (You can add some "arms" later if you want, or a 2nd snowball for the body). If you're satisfied with the shape of your snowman, you can "link/join" all the elements together. Select them by pressing the B key and drawing a square all around them. Then press Ctrl+J and click on "join selected meshes".
Step 4 - Now, let's create his face. Stay in the front view, press the space bar and choose Add > Mesh > Cone. Switch to the side view (3 on numpad). The cone is going to be the nose and, as you can see, it's much too big. Deselect all the points by pressing the A key. Then select only the points on the right (the base of the cone). Press the S key and decrease the size of the base of the cone. Switch to the object mode (Tab), and press the S key to decrease the size of the "nose" of the snowman. Then place the nose (G) onto the face of the snowman.
Note : The other sphere you can see is an arm I added to the snowman.

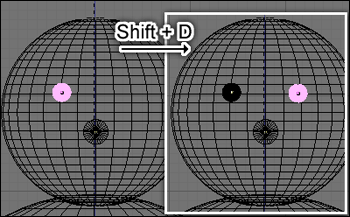
Step 5 - Switch to the front view (1 on numpad), add a sphere, and make it small enough (S) to be one of the eyes of the snowman. Press Tab to get into object mode, and put (G) your sphere in the place of one eye. Then, with this sphere still selected, duplicate it by pressing Shift+D, and put it (G) at the place of the second eye. Zoom in (+) and select the 2 eyes (right-click on the first one if it's not already selected, and Shift+right-click to select the other one. They should now appear in 2 different tints of pink. Be sure to be close enough not to select the snowman instead of the eyes. If it happens, press the A key to deselect all and try again). Now, join the 2 eyes (Ctrl+J).
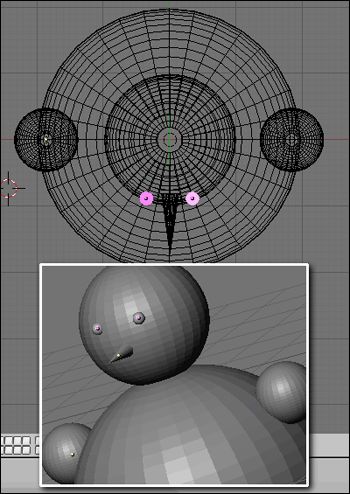
Step 6 - Keep the eyes selected, move to the top view (7 on numpad), and move the eyes as shown in the picture. To make sure they're visible, press Z to switch to "Solid" mode (instead of "wireframe" mode). and move around the snowman (hold the middle mouse button down, and move the mouse). As you can see, the snowman is all grey, but we're going to make it look better. Press Z once again to switch back to the wire frame mode.
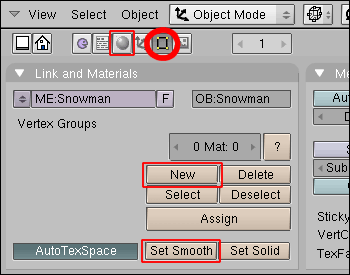
Step 7 - In the object mode (tab) select the snowman body. Now go to the editing menu (F9 or the button that is circled) and click "Set Smooth". If you press Z now, the snowman should look smoother. Then, click on "New" to create a new material for the snowman, and click "Shading" (or F5) to go onto the shading menu.
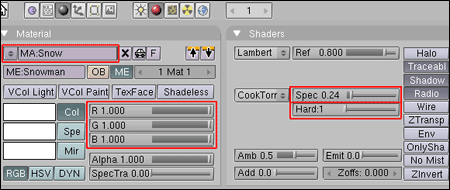
Step 8 - Name the material "Snow", and change its RGB values to 1 to get a white color. Also set the "Hard" value to 1 (If it's bigger than 1, you'll get a grey snowman looking more like metal than snow) and the specularity value to approximately 0.24.
If you go to the solid mode (Z) once again, you'll see almost no changes. They'll be noticeable only when you make a render of the scene. (This is the F12 key. If you see nothing, don't panic, that happens if your camera is not "watching" your snowman. Select the camera (the triangular object that should be hidden somewhere in the scene - If you deleted it before, press the bar and choose Add > Camera) and use the rotation (R) & move (G) to point it at the snowman. Press the 0 key (zero on the numpad, not "o") to go into the "camera view" and check that you can see the snowman, then try to render the scene again).
The Fir Trees
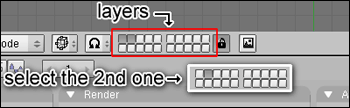
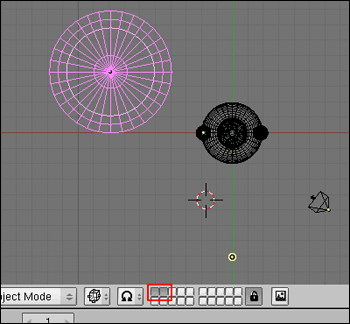
Step 10 - We're going to make the fir trees on a different layer than the layer of the snowman. Layers? Yes, the 20 little squares are the layer buttons. As far as I know, you can't have more layers, and you can't name them. The first (and maybe the second) layers are selected, which means the snowman was created on the first layer (when several layers are selected, the objects are added on the *first* selected one, the most on the top-left - to select several layers, hold the Shift key when you click). Select (only) the second layer. Switch to the top view (7), and add a Cone (Add > Mesh > Cone).

Step 11 - Switch to the front view (1), and make the cone a little flatter. To do this, select the top of the cone (right-click on it) and move (G) it. To move it only in one direction (e.g. along the z axis only) start your move in the direction you want and do a click with the middle-button. The move should now be restricted to only one axis. Click a 2nd time with the middle button to cancel. Then switch to the object mode (Tab) and increase the size (S) of the cone. Make it 8 squares wide.
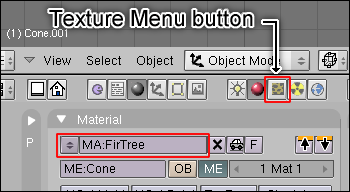
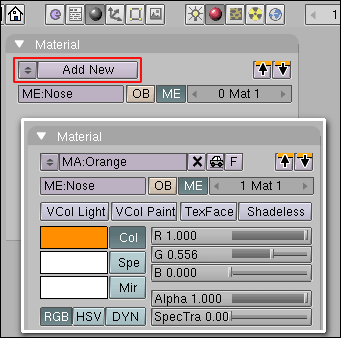
Step 12 - Keep the cone selected, and go to the shading menu (F5). Click on Add New (as in step 9), and name the new material "FirTree". Then, click on the Texture Menu button.
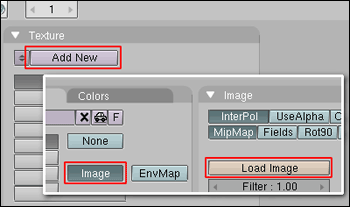
Step 13 - Click on "Add New" to add a texture to the FirTree material, then select "Image", because the texture will be based on an image. Click on "load image" and choose the image you'll find here.
Set the "Xrepeat" value to 2 (the Xrepeat button is underneath the "Load image" one).
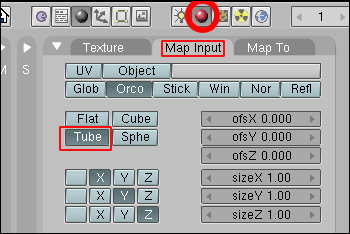
Step 14 - Go to the material menu, and select the "Map Input" tab. Choose "Tube". Make sure the cone is still selected, go back to the editing menu (F9) and select "Set Smooth" (as in step 7).
By the way, the textures can't be seen in the solid mode (Z), they're visible only in renders.
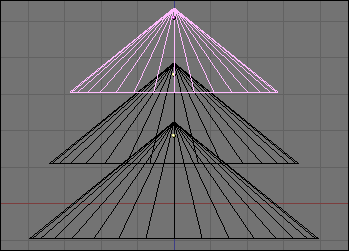
Step 15 - In the front view (1), duplicate (Shift+D) the cone, and put the duplicated cone on top of the other. Repeat this once to have 3 cones. Decrease slightly the size of the cone on the top and in the middle. You should have something looking like the picture opposite.
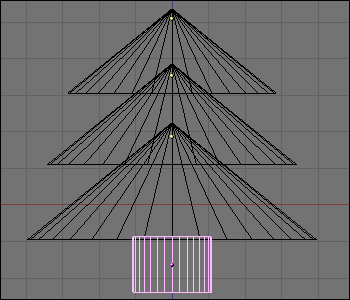
Step 16 - Switch to the top view (7) and add a cylinder (Add > Mesh > Cylinder). Make it small enough (S) to be the trunk of the tree, and put it at the right place in the front (1) view.
Repeat the same things as in steps 7 and 8, (or step 9) to make them smooth and add appropriate materials. Make the material brown (R:0.500, G:0.250, B:0.000).
Step 17 - Switch to the top view and select the whole fir tree (A or B and draw a square around it). Select the first layer (press Shift when you click on it to keep the layer with the fir tree selected). There's a big probability that the fir tree will be over the snowman, so move it (G) away.
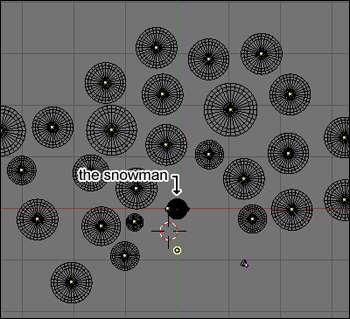
Step 18 - Use Shift+D to copy the fir tree and create a little forest around the snowman. (Don't put fir trees in front of him, or he'll be totally hidden from the camera). You can make some trees bigger or smaller, so it won't look too artificial (yes, I know, trees made out of 3 cones and a cylinder *do* look artificial, but let me dream it's not the case ;). Verify your scene in the front/side views (1/3) that the bigger tr
The Ground

Step 19 - Select another layer and add a plane (Add > Mesh > Plane). Now select the 3 layers you used, and (with the plane still selected) grow the plane to be bigger than the forest. This is going to be the ground.
Switch to the object mode (Tab) and make sure in the front or side view (1 or 3) that the ground is not floating above the trees, but directly under them.

Step 20 - Now go to the shading menu (F5), and instead of choosing "Add New", click on the small arrows on the left of the Add New button and choose "Snow".
The Camera & Lights

Step 21 - Let's start with the camera. Select it, and try to point it at the snowman (with G and R), so that you can see the snowman and also the forest. You can go in the camera view (0) to help you (you can move the camera while you're in this view). Here I show you the place I chose to put the camera.
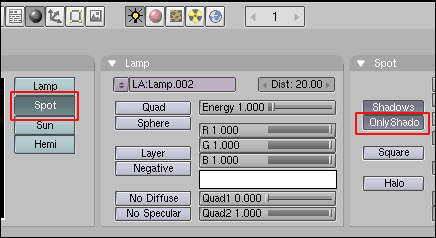
Step 22 - This part is a little more difficult, because the quality of the image could change a lot depending upon the lights, and there's no "magical tip" that will make them always look right. In general you'll have to try many times before creating something good. Select the light/lamp (the small yellow circle with a yellow dot inside that you can see on images 18 and 19), then go to the shading menu (F5) and click on "Lamp Buttons" (the square button with a light bulb). Select "Sun" (one of the green buttons on the left). Then try to place it (G and R) somewhere where it will light the scene properly (as in image 19 for example... Don't forget to try rendering (F12) to see what it looks like).
You'll notice that the "sun" doesn't cast shadows. Only "spots" can do that: Add another lamp (Add > Lamp) and, in the same menu as before, click on "Spot", and then on "OnlyShadow", so the spot will not light the scene but add shadows to it.
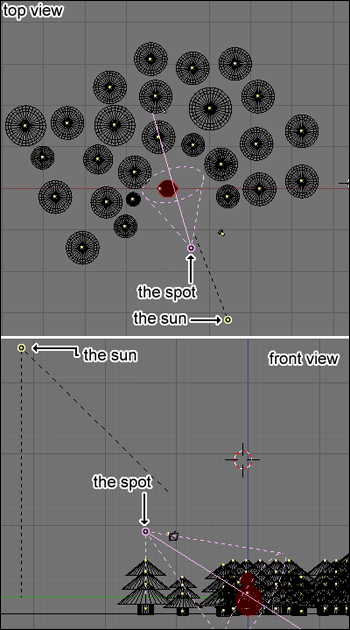
Step 23 - Try to place the spot approximately at this place with the grab (G) and rotate (R) tools. (I colored the snowman in red to show you where it is).

Step 24 - Select the camera, and on the shading menu (F5) try to make the "world" color sky-blue.
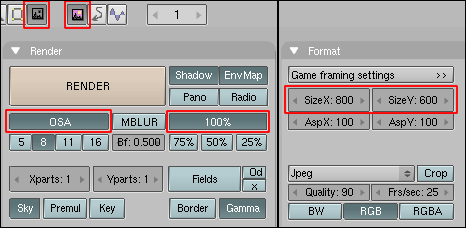
Step 25 - On the Scene menu (F10), select "OSA" (this will enable anti-aliasing). The 5,8,11,16 buttons below set the quality of the anti-aliasing (the higher, the best). Also select the "100%" button to render the image at 100%, and then change the values of the SizeX and SizeY (this is the size of the final image). Then you'll only have to click on the big "render" button (or F12) to start the rendering. To save your image, press F3 after the render.

Step 26 - Here is what it should look like :)
You'll find the Blender source of this scene below. I added some fancy stuff on the last layer (the one on the bottom right) so you can try some renderings with the 3 layers + this one.