Tutorials originally written by Kiramin and Dark Lord for PlanetVampire.com. Mirrored here for archival purposes. Note that there are also video tutorials available on Javokis's youtube page here.
If you wish to talk about VtmR modding I suggest joining the Planet Vampire discord server here.
Setting Up and Getting to Know Embrace
by Kiramin
Before you can get started making your maps for Vampire, you have to download the Nod SDK (Software Developement Kit). It contains all the tools you should need to edit Vampire: The Masquerade. You can find the latest version here. Once it has finished downloading, run it. The setup process will begin. Follow the instructions to install it (Note: Make sure the installation path is your Vampire directory, otherwise the SDK may not work). When the installation is complete, open up the NodSDK directory in your Vampire directory.
Ideally, you should read through the documentation by opening the index.html file you see there. But lets be sensible... The last thing I wanted to do in your situation was read through pages and pages of technical explantaions. So lets just start up Embrace.exe (the Vampire map editor) and get to the good stuff.
It should recognize that this is the first time you are running Embrace, and the preferences screen should come up. It looks like this:
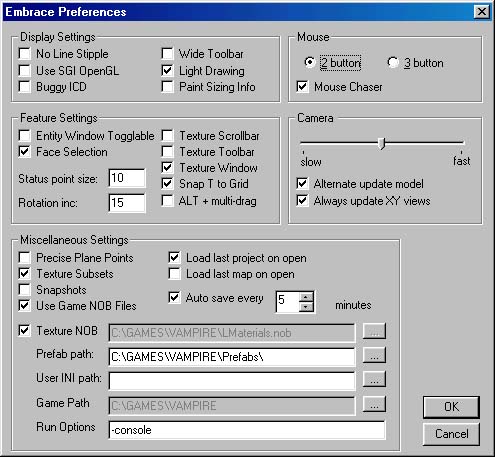
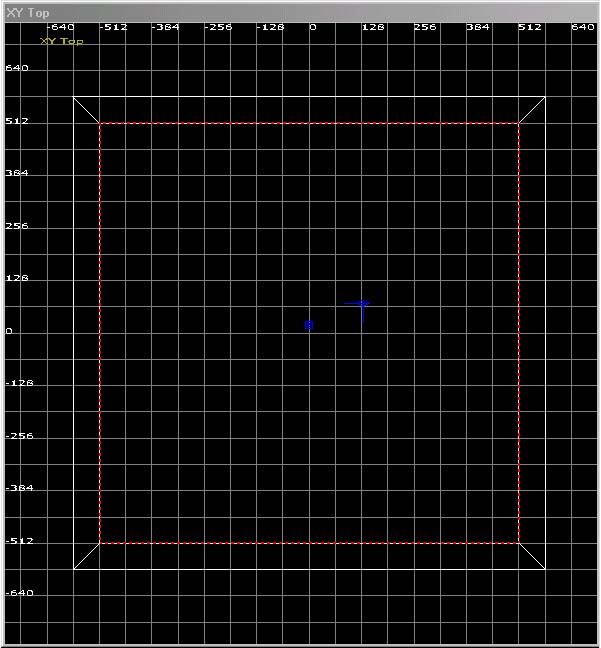
Make sure to set what type of mouse you have, but everything else can (and probably should) be left unchanged. Hit OK. When Embrace is finished loading, you will be presented with an almost empty window. At the far right of the toolbar, you will see the ![]() button. Click it. (That was the Default Windows Setting button... anytime your windows get messed up and you want to return them to the default size and position, just click that button). Your screen should now look like this, minus the blue text:
button. Click it. (That was the Default Windows Setting button... anytime your windows get messed up and you want to return them to the default size and position, just click that button). Your screen should now look like this, minus the blue text:
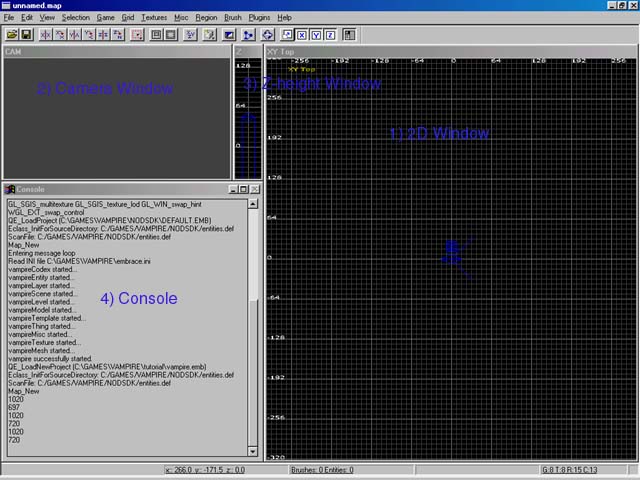
You will see that I have added blue labels in the above image. Read through them so you know the names of the different windows. I will describe each as I familiarize you with Embrace. However, first I want you to place your cursor over the large area on the right side, labeled "1) 2D Window". Hold down the left mouse button, drag the cursor a very short distance, and release. This should have made a red-dotted square. This is a brush. Think of brushes as the building blocks you will use to build your level. I had you create this brush so I can better explain the functions of the different windows:
1) 2D Window - This window is where you will do most of your level building. Any brushes you have selected will show up as red, while unselected brushes will appear white. You can zoom in and out on the 2D window by using INSERT and DELETE respectively. Also, you can shift the view up, down, and side-to-side by placing the mouse cursor in the 2D window, holding down the right mouse button, and moving the mouse. Currently, the 2D window is displaying an XY (top down) view of your level. You can also switch to YZ and XZ (front and side) views, by pressing CTRL-TAB or clicking thebutton on the toolbar. Other than your brush, you should currently see a bunch of grey lines (the grid) and a strange blue mark. That mark is actually two, overlapping. The square is the Z-checker and the diamond is the Camera position. Those will be explained below.
2) Camera Window - This window offers you a 3D view of your level. You should see your brush floating in a world of gray. The camera's position is marked in the 2D window by the blue diamond. You can move the camera around by using the following controls:
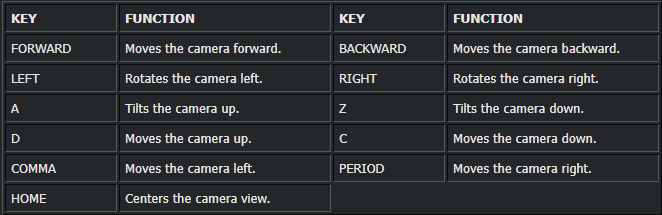
Experiment with moving the camera around. If you get lost (which is very possible), you can open up the View menu and select Find coordinates.... Then type in a zero in all three fields. This will teleport your camera to the position (0,0,0) which should be close to the brush you made.
3) Z-height Window - This window gives you a means to keep track of and manipulate the height of your brushes without having to constantly switch back and forth between the top and side views. You can move up and down in the Z-height Window as you would in the 2D window, by holding down the right mouse button. Any currently selected brush shows up as a red box, while any brush the Z-Checker intersects shows up as a solid-blue box. The Z-Checker is the blue "Z" square in the 2D Window. You can move it by holding down SHIFT and right-clicking somewhere in the 2D window. Try moving it in and out of your brush. You will notice that your brush always appears as a red box (because it is currently selected), but only becomes solid blue while the Z-checker is inside.
4) Console Window - Currently, this gives you info on what is going on in the editor. This is also where the Texture Window and Templates Window will appear when they are activated. You will learn more about these in the next tutorial.
There are the basic explanations of the major windows in Embrace. For more detailed information and controls, check out the HTML manual that is included with the SDK. If you are ready to start editing, check out the the tutorial Building your First Vampire Map.
Building your First Vampire Map
by Kiramin
Your first map should be simple. Let's say, a large square room. Yes, it's boring but you need to get familiar with creating and manipulating brushes before you try to make something harder. Open the File menu and select New Map. If you still had Embrace open from the last tutorial, it may ask you things like "Do you wish to save?" or "Copy current selection?". Hit NO for both of them. First thing, save the map as something like "tutorial" (Note: Do not put spaces in your map name! If you do, it will not run properly). This way Embrace has a name to autosave it under. You should also remember to save regularly.
1. Creating and Manipulating Brushes
Now to create a brush. You may remember how to do this from Part 1. If not, all you need to do is place the mouse cursor over the 2D Window, hold down the left mouse button, and drag a box. That box becomes your brush. It is drawn as a red-dotted line because you currently have it selected. Deselected it by SHIFT + Left-Clicking on it, or by hitting ESCAPE to deselect all brushes. Now reselected it by SHIFT + Left-Clicking on it again. Now, hit BACKSPACE. Hey! Why did you just delete your brush? Because I wanted to show you how, just in case you want to sometime in the near future. Go ahead and make a new brush.
We need to make this brush into a room. To begin this process, you must move and resize the brush in order to make it the size you would like your room. You can move a selected brush by placing the mouse cursor inside of the brush and holding down the left mouse button. Now you can move the brush by moving your mouse. To resize a brush, you place the mouse cursor outside of the brush and hold down the left mouse button. If the cursor is to the left of the brush, you will move the left side. If it is above the brush, you will move the top side. If it is to the top and to the left of the brush, you will move the top-left corner. Experiment with resizing your brush by placing the mouse cursor at different points around the outside.
Here is a table of the controls we just covered:

So you know, many of the above actions can be performed on multiple brushes at once (if there are multiple brushes selected). BACKSPACE deletes all selected brushes, and moving/resizing applies to all selected brushes. Resizing multiple brushes can get a bit tricky, so I recommend only resizing brushes one at a time for now.
Use what you have learned to make the brush at least 512 x 512 units (use the numbers along the edge of the grid to measure distance) or 8 x 8 large grid-squares. The players are usually about 128 tall, so 512 x 512 room could fit 4 people laying in a line on the floor. Now you need to give the brush height so your players have room to stand! You can do this either by switching to one of the side views (CTRL-TAB or ![]() ), OR you can do it in the Z-height window. You can move and resize brushes in the Z-height window the same was you do in the 2D window. Make your brush at least 256 units (4 large grid-squares) high. (Note: Be sure that brush contains the point (0,0,0). This is the point where the two grid lines labeled zero meet, and the elevation marked zero in the Z-height window. This is important because your character will spawn at that point, and you want him to be inside the room!
), OR you can do it in the Z-height window. You can move and resize brushes in the Z-height window the same was you do in the 2D window. Make your brush at least 256 units (4 large grid-squares) high. (Note: Be sure that brush contains the point (0,0,0). This is the point where the two grid lines labeled zero meet, and the elevation marked zero in the Z-height window. This is important because your character will spawn at that point, and you want him to be inside the room!
2. Using the "Make Hollow" Function to Build a Room
Don't look so smug. You haven't even made a room yet. Currently, you only have a single brush, which is a giant solid block floating in the middle of nothingness. To make it a room, you must simply click the "Make Hollow" ![]() button. This breaks a single brush up into multiple brushes to form the floor, walls, and ceiling. Each of these new brushes are the thickness of a small grid-square.
button. This breaks a single brush up into multiple brushes to form the floor, walls, and ceiling. Each of these new brushes are the thickness of a small grid-square.
3. Loading and Applying Textures
Go ahead and move your camera around inside of your new room to get a good look. You should notice that the entire place is covered in a really ugly purple and pink checkers pattern. Don't worry, that isn't permanent. You see, every surface on a brush is assigned a texture (an image file) that is "painted" on it in the game. Textures are how you make your brushes look like brick, dirt, grass, etc. Before you can assign any textures to your brushes, you must load them. To load a set of textures, open the Textures menu and selected one of the texture sets at the bottom of the menu. Go ahead and pick the textures from your favorite area in the game.
After you have loaded the textures, hit T. This will bring up the Textures Window. You can move through the textures by (once again) holding down the right mouse button and moving the mouse up and down. Find a texture you like, and click on it. That textures should then be applied to all your selected brushes. If you like, you can select the brushes one at a time (or in smaller groups) to assign them different textures.
4. Adding a Light
Your level will be pitch back unless you add a light. You do this by right clicking anywhere in the 2D window. It will bring up a long list. Select light. Position the light somewhere within your room. You can make multiple lights using the same method. At another time, I will go in to how to change the properties of your lights.
5. Adding a Sector
Sectors are used to tell the game what can be seen from where. Everything you want the character to be able to see MUST be contained in a sector. You could just place a giant sector around your entire level, but it is better to break it up in to smaller sections. The section covering sectors in the Embrace manual does an excellent job at explaining them. Also, I will talk more about sectors in Part 3.
For now, you just need to create a sector around your room. Do this by right-clicking in the 2D window and selecting sector. Resize the sector as you would a brush so that it contains all of your room. Be sure to resize it in the Z-height window so it extends both above and below your room as well.
6. Making the Floor Walkable
You might have noticed that there are some places in Vampire you can not walk. That is because they have not been made walkable. The floor of your room is currently not walkable. To change this, select ONLY the floor brush, and hit S. This brings up the Surface Inspector. This allows you to set the properties of the surfaces of your brush. You should see a box labeled "walk." Check it and hit OK. Be warned, if you change the texture on a brush it will reset all of the flags! This means that you will have to recheck the walk box.
6. Exporting and Running Your Map
You have just made the simplest map you could possibly make in Vampire. It currently isn't in a form that is playable however. First you need to export it to an NIL file that Vampire can read. To do this, open the File menu and select Vampire Export. This will bring up a huge list of export options. Leave them all alone. All you need to do is hit Export at the bottom of the window.
When the text in the right window says it is finished exporting, then hit Run at the very top. This will start Vampire. When you select a new singleplayer game, it will load up your map (Besure to have a permanent save for your current singleplayer game so it doesnt autosave over it). Go ahead and test out your map!
I have receieved many emails saying that the above method isn't working for testing. Since I haven't been able to figure out why, here is an alternate testing method: Open up the Chronciles directory, make a copy of mp_new_york_null.nsc and rename it to embracetest.nsc. Then, open that with a text editor. Find the line that begins "location NewYorkDocks". In that line, change the the text "n1_dock.nil" to "yourmap.nil" where yourmap is the name of your map. Now, when you start up Vampire, select multiplayer, then lan, then create game. When you are presented with a list of hubs, you should see "embracetest" as one of the options. Select it to test your map.
Pretty cramped, huh? Not much to look at either. Don't worry. As soon as you are ready to learn how to build a REAL vampire map, check out my Complete Beginners Guide to Embrace.
Complete Beginners' Guide to Embrace

by Kiramin
This is a guide designed for a beginning editor (though it contains much useful information for experienced editors unfamiliar with Vampire editing). It walks you through the process of building a map for vampire, and in the process, covers almost every tool and function you will need to make good maps. It was written as a continuation to the Setting Up and Getting to Know Embrace and Building your First Vampire Map tutorials, so it is expected that you have the knowledge of the things they covered:
- Installing and Setting Up Embrace
- Familiarizing yourself with Embrace
- Creating, Deleteing, Moving, and Resizing Brushes
- Loading and Applying Textures
- Using the Make Hollow Function
- Adding Lights
- Adding Sectors
- Exporting and Running your Map
If you don't know how to do all of those things, take a look at those tutorials. If you do know these things, then you can continue with this tutorial.
You already know the most basic steps for making a map in vampire, but you still lack the knowledge of many tools you will need if you want to make a good map. I will cover those tools in this tutorial. To begin, let us start a new map. Remember to save it right away.
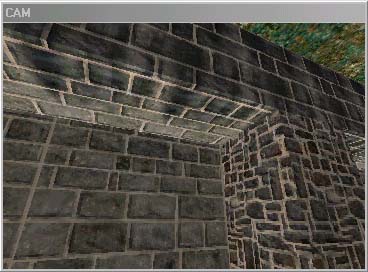
Lets make this map a fair sized courtyard, open to the night sky. Instead of using the make hollow tool, I am going to walk you through the process of building it brush by brush. I prefer to do it this way even though it may be a bit slower, because it is usually cleaner and more efficient. Lets make the courtyard 1024 x 1024. So create a brush that is 64 thick just to the left of the -512 y (vertical) grid-line. Make this brush extend an extra 64 units above x (horizontal) 512 and below the x -512 grid-lines.
1. Using Clipping Mode
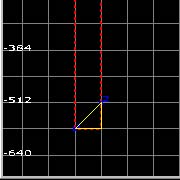
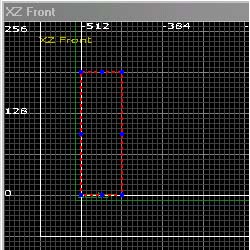
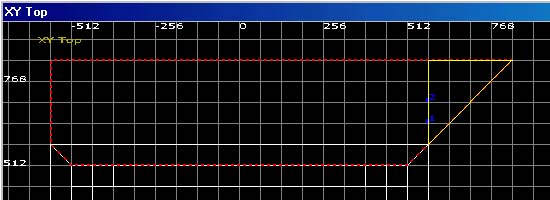
With the brush selected hit X or press the ![]() button. You just turned on clipping mode. You use clipping mode to cut brushes. Click once at the top left corner of your brush, and click again down and to the right 64 units. This should have created a little blue dot labled "1" at your first click and a another blue dot labled "2" at your second. These two points form the line along which your brush will be cut. If you didn't place them correctly, you can move the dots by clicking on them, holding, and dragging. If you miss and click somewhere else, it will create a third dot. This is used for clipping in all three dimensions (three dots for a plane, not a line). I will not be covering 3-point clipping in this tutorial due to its advanced and more complex nature. If you accidently created that third dot, click once more to erase all your dots and create a new "1" dot. Move your two dots around so that your brush looks like the BEFORE image below. When it does, press Q. It should now look like the after image.
button. You just turned on clipping mode. You use clipping mode to cut brushes. Click once at the top left corner of your brush, and click again down and to the right 64 units. This should have created a little blue dot labled "1" at your first click and a another blue dot labled "2" at your second. These two points form the line along which your brush will be cut. If you didn't place them correctly, you can move the dots by clicking on them, holding, and dragging. If you miss and click somewhere else, it will create a third dot. This is used for clipping in all three dimensions (three dots for a plane, not a line). I will not be covering 3-point clipping in this tutorial due to its advanced and more complex nature. If you accidently created that third dot, click once more to erase all your dots and create a new "1" dot. Move your two dots around so that your brush looks like the BEFORE image below. When it does, press Q. It should now look like the after image.
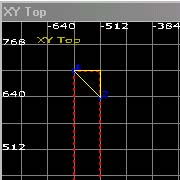
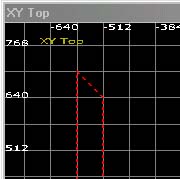
Before After
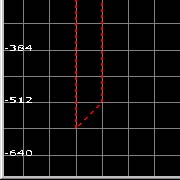
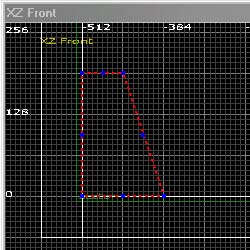
The yellow outlined piece of the brush is the piece which will be deleted after the brush is clipped. Now we need to clip a similar cut down at the bottom of the brush. Make your first dot at the lower left corner and make your second up and to the right 64 units. Here are those before and after pictures again (but don't hit Q yet):
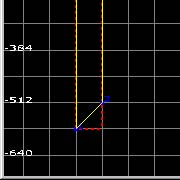
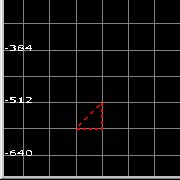
Before After
Hmmm... Something isn't quite right here. If you hit Q like I warned you not to, you are probably feeling as stupid as me right now. I deleted the wrong side of my clip. Now I have to go back and create a new brush and clip the top over again. You, on the other hand, have an easier solution. With your clipping points still in place, hold down CTRL while pressing Q. This should switch the side you want to delete, so now the little corner is outlined in yellow. Go ahead and hit Q now.
Before After
2. Copying and Rotating Brushes
Much better. You should now have a brush with a right side that is exactly 1024 units long, with a top and bottom that slope outwards at 45 degree angles (Before we go any further, turn off clipping by hitting ESCAPE). This is going to be the west wall of our courtyard. I know what you are thinking: "You mean we have to do this tedious clipping thing 3 more times for the other three walls?!" No we don't! This is where we copy the brush and use the rotation tools to make our life easier. To copy brushes, select the brushes you want to copy and hit SPACEBAR. You now have a second identical brush.
Along the tool bar you should see a set of buttons that look like this: ![]()
These are the rotation and flip buttons. They are "Flip across X", "Rotate around X", "Flip across Y", "Rotate around Y", "Flip across Z", and "Rotate around Z". Since you want to change your brush's orientation as seen from the top down window, you want to rotate it around the Z axis. So hit the "Rotate around Z" button. This will rotate your brush 90 degrees clockwise around the Z axis. Now move the brush so that the two angled edges fit together in the top-left corner. Like this:
Make a copy of this second brush, rotate the third brush around the Z axis again and fit it against the second brush. Then repeat the process with a fourth brush. You should now have placed all four walls of your courtyard:
3. Resizing Multiple Brushes
Exellent. Wait a second... Take a look at the Z-height window. Those brushes are only 8 units tall! Not a very impossing wall. Lets fix that. You need to select all four brushes. When you have them all selected, use the Z-height window to raise them to 512 in height. Also, lower their bases to -64. Why? So they extend a short ways into where the "ground" is going to be (I will be getting to that in a moment).
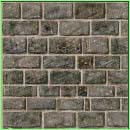
Since you happen to have all the walls selected, now would be a great time to pick a texture for them. So load up a texture set from the Textures menu. I chose prague, because I'm going for that dark age castle look. I chose the texture "ctwall1_side" for my walls:
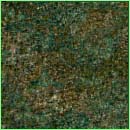
Now, too make the ground. Hit ESCAPE to deselect all the brushes and create a new brush that fills the box formed by the four walls. In the Z-height window, have its base at -64 (lined up with the base of the walls) and its top at 0. Pick a good ground texture for it. I chose "grass1_1_p" for my ground:
We better set the walk flag before we forget. With only the ground brush selected, hit S, check the box labled "walk", and hit ok. Well, whats missing? Oh yeah, the ceiling. You are probably thinking "But wasn't this courtyard going to open to the sky?" Yes, it is. But if you try to run your map like this, you wont see sky when you look up out of the courtyard. You will see what is known in extremely technical game-industry standard terminology as "Hall of Mirrors." Ok, so it isn't that technical. Basically, since there is no brush there, there is nothing for the game to render, so it doesn't render anything. That means that whatever was displayed on that part of the screen wont get drawn over, so as you turn your view, the edges of the walls leave these funky flashing trails that look like a million reflections of one another. Hence... Hall of Mirrors.
4. Making Sky, Fog, and Music
To make the game render the sky, you must create a sky brush and use it to cover the courtyard. So drag a brush that extends over the empty courtyard and all the way to the edges of the walls (make sure to set it right on top of the walls in the Z-height window). You don't have to worry about the texture, because the game wont draw the brush in the conventional way. Hit S as you did with the ground. Instead of setting it to "walk", set it to "sky" and hit OK.
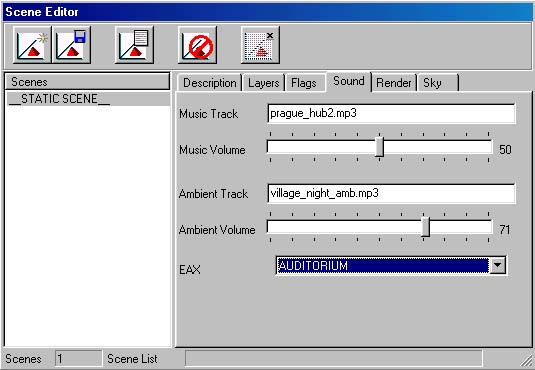
That is only one half of making the sky. The game knows that there is sky above the courtyard, but it doesn't know what that sky looks like. You have to set that in the Scene Editor. Open the Scene Editor by holding down SHIFT and pressing S. The Scene Editor looks like this:
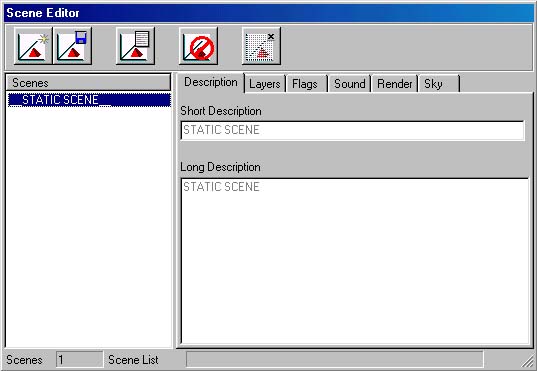
You want to click on the "Sky" tag. At the bottom you will see a little button that says "Set Default Skys". Click it! This will fill in the two fields above with "sky.nod" and "sky.nad". These are the default sky model and animation. There are other skys but I don't know what they are, so if you want something different you will have to figure that one out some other way.
Sky isn't the only thing you set in the Scene Editor. You can also make fog in your map by selecting the "Render" tag. It says in the Embrace documentation that you should only use linear fog. The exponential fog causes problems. So if you want fog, select the linear radio button. A good color for normal fog is gray or white, and you set that by choosing a number between 50 and 255 and filling that in for all three color fields. The higher the number, the whiter the fog. "Distance 1" is the distance at which the fog begins to obscure view and the "Distance 2" is where it completely obscures the view. A light fog would be about 1000 to 10000, a medium fog would be about 800 to 5000, and a dense fog would be about 500 to 2000. The "ZClip Distance" should be set to a bit more than "Distance 2". ZClip tells the game how far away to stop drawing architecture. If the view is completely obscured at 5000 then the game shouldn't have to render anything much further than that, so you should set it to something like 6000.
The one other thing that you could do in the Scene Editor at this time is set the music for your map. The files you specify in the Music Tracks can be found in the Sounds/Music directory and the Ambient Tracks can be found in the Sounds/StereoAmbient directory. I chose "prague_hub2.mp3" for my Music Track and "village_night_amb.mp3" for my Ambient Track (don't forget to set the volume). The EAX setting only works for those machines that support it, but you should always set it because it only takes a couple seconds. You should choose one of the options that best seems to reflect the physical form of the area. For example, the courtyard is surrounded on all sides by walls but open to the air, so I picked AUDITORIUM:
Now would actually be a great time to save, export, and test your map. However, we are going to do the lighting a little differently this time around. When you open up the export options, check the Moon/Sun Light box. This will naturally light your map as if the moon were lighting it (or the sun if you change the color and intesity to make it appear so). You can mess around with the settings, but you don't need to. The default settings create just the right shade of moonlight. Also, check the Ambient Light box. This will make it so the shadows cast by the walls are not pitch black. Set the intensity to about 30 and all three color fields to the same values as the Moon/Sun Light color settings.
When you are done seeing what you have built so far, join me on page 2.
A major improvement over that first map, huh? Its still square and boring, though, so lets spice it up some.
5. Edge and Vertex Manipulation
What can we do to make this courtyard more interesting? Well, lets start by adding some beems/pillars along two of the walls. Create a new brush that is 64 x 64 in one corner of the courtyard. Adjust it's height so it is sitting on the ground and is 192 (3 large grid squares) high. A perfectly straight and narrow pillar would still be pretty boring, so we are going to slope the bottom. To do this, hit CTRL-TAB or click the XYZ button to switch to the front view. Now hit E.
You just turned on edge manipulation. A bunch of blue dots should have appeared around the surfaces of your brush. Each one of those dots is an edge. Look at your brush from a couple different angles in the camera window to get a good idea of which blue dots represent which edge. You want to grab the edge in the lowest right corner of your brush, and drag it 64 units.
Before After
There is also a vertex manipulation mode. That allows you to move the corners of the brush. However, this is often a difficult tool for beginners to work with, because it will automatically move the other vertices of the brush to make sure it maintains a valid shape. It takes a lot of geometrical forsight and practice to use this tool effectively. You can toggle it on and off by hitting V, though I don't recommend trying it until you are more experienced and have a chance to experiement with it a bunch.
Back to the map at hand: Now your pillar's base should be sloped in towards the courtyard. You should probably pick a decent texture for the pillar too. I like the texture "ctwall2_btm" because it resembles the wall texture but is different. Now switch back to XY Top view and make another piece of pillar that is 64 x 64, resting on top of the the sloped pillar. I textured this piece as "ctwall2_mid" because those two textures fit together but it makes the top look different from the base. Make this second peice 256 (4 large grid-squares) high.
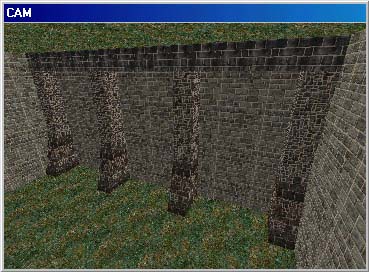
You now have a pillar that is almost as tall as your courtyard with a sloped base. You need to turn this into multiple pillars. Select both pieces, copy them and space them 256 (4 large grid-squares) apart along the west wall. You should end up with four pillars total (two in the corners and two near the center) with all their bases sloping into the courtyard. They look kind of funny as they are now, because they aren't supporting anything. So lets make a long brush that stretches the length of the courtyard and rests atop them. I chose the texture "ctwall1_top" for this, because once again it fits the theme, but adds a bit of variety. Here is a shot of what your pillars should look like in the Camera Window:
6. Multiple Selections
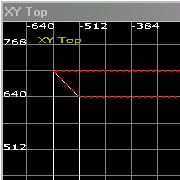
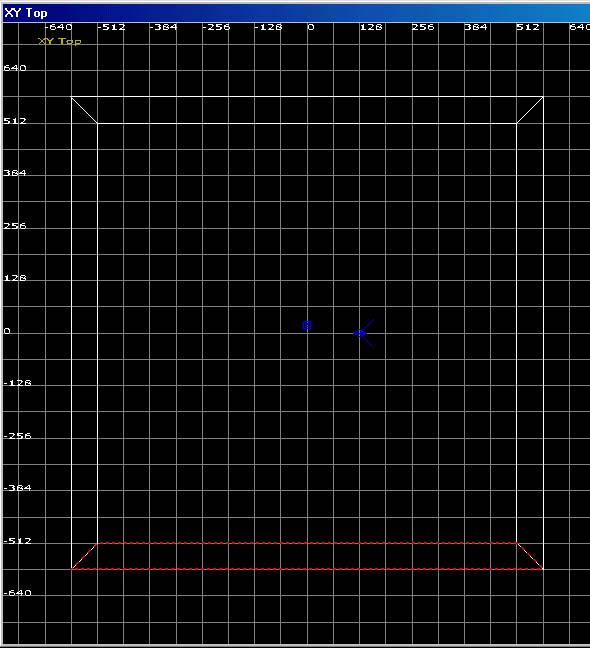
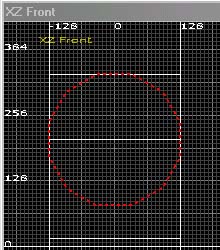
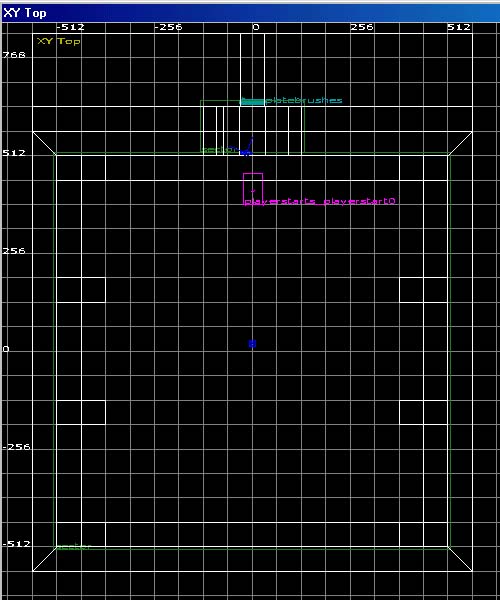
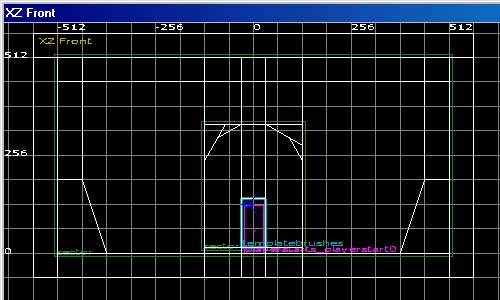
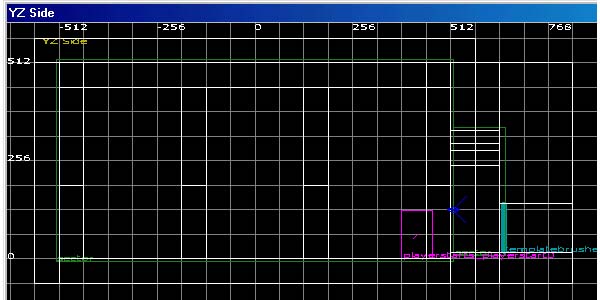
Of course, we need to put a similar set of pillars on the wall across from this one. You need to select all of the pillars to do this. Don't go click on them yet though. When you need to select lots of brushes at once, you can use this little trick I'm about to show you. Create a new brush completely containing all your pillar brushes (and only your pillar brushes. Below are a pictures of what the brush should look like in each of the 3 views:
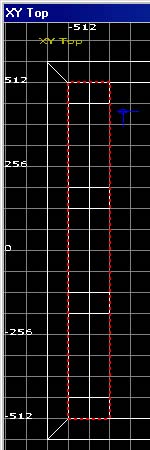
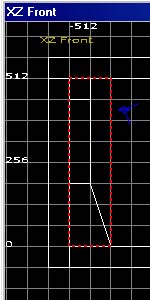
XY Top XZ Front
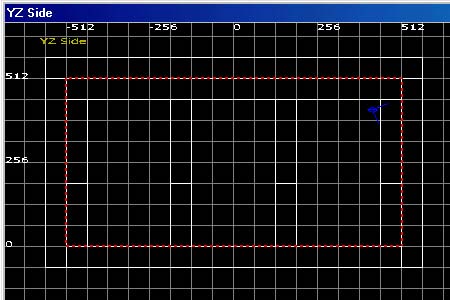
YZ Side
With ONLY your new brush selected, right click in the 2D Window to bring up the menu. Choose "Select" and then "Inside". The brush you had selected will be destroyed and now all the brushes that were contained within (all the pillars) will be selected. You may have noticed some other options listed under the "Select" sub-menu. I will explain them all breifly:
- Complete Tall - This option selects all brushes that are completely contained within the selection brush as seen from the XY Top view. That means that regardless of the heights and elevations of the brushes involved, they will be selected as long as they are completely contained in the XY view.
- Touching - This option selects all brushes that even slightly overlap the selection brush. This DOES consider height. Meaning, that even if a brush appears to be contained within the selection brush in the XY view, it will not be selected if it is not intersecting it in both of the Z views.
- Partial Tall - Like the other "Tall" option, this only pays attention to the XY view. However, this will select all the brushes that are even partially intersecting the selection brush in the XY view.
- Inside - As you saw, this selects all brushes that are completely contained within the selection brush in all three dimensions.
- All Sectors - This selects all the sectors in the map.
Now that you have all your pillars selected, copy them by hitting space bar. Then, clip the "Flip across Y" button and move them up against the east wall. Now, make a copy of one of the long brushes that runs along the top of the pillars. Use it to make a similar brush running along the top of the north and south walls as well. Make sure that they only touch their eastern and western brothers. You should NOT overlap brushes. Though your map will most likely work, overlapping brushes can lead to unexpected complications, expecially in more complicated maps.
7. Selection and Manipulating Individual Surfaces
Take a look around your level in the Camera Window. You might happen to notice one small oddity:
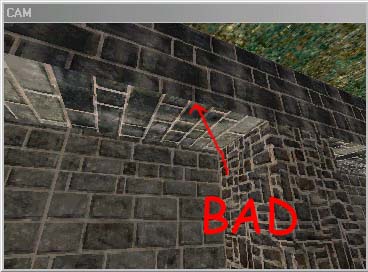
No. Not the word "BAD" in big red letters. You wont see that because I added it in Photoshop. You might have noticed that the bricks on the bottom of the long beam dont match up with the bricks on the side. This is know as a texture misalignment and it is a very, very bad thing. It makes your map look sloppy and unbelievable. How do you fix this? Well, you have to select ONLY the bottom surface of the brush and rotate the texture. To select only a surface, hold down CTRL and SHIFT and left click on the surface in the camera window. That surface (and only that surface) will highlight red.
You can do a lot of stuff with only a single surface selected. You can shift the texture by holding down the SHIFT key and using the arrow keys. You can expand and contract the texture in different directions by holding down the CTRL key and using the arrow keys. And you can edit the surface's properties. You do this in the same way you made brushes sky or walkable: press the S key. In fact, when you use the Surface Inspector while selecting a whole brush, it is just as if you are selecting all of the surfaces of the brush and applying those properties to all of them. So, you can just set a single surface of a brush to sky, or to walkable, etc. In fact, for walkable surfaces I usually set each surface one at a time.
Go ahead and bring up the Surface Inspector while you are selecting just that bottom surface. You will see some fields on the left side. One of them is labled rotate. Type in 90 and hit apply. If it looks better but the bricks still dont line up quite right, then try 270. When you have matched up the bottom and the side, hit OK. Go check the bottom of all of your beams to make sure the textures line up right.
Phew... Much better. Now that we have that out of the way, we can move on to Page 3.
You should now have a couryard with beams running along the side. This is almost a functional Vampire map. However, you wont be able to use it in conjunction with other maps unless you make an exit.
We could just make a door directly in the side of the wall, but instead lets place it in an arched alcove in the wall. Why? Because it will look cooler and it will give me a chance to explain how to use arbitrary sided brushes and the subtract function.
8. Arbitrary Sided Brushes and the Subtract Function
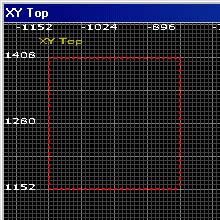
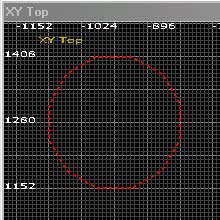
So far, we have only made brushes that are square. What if you want to make a brush that appears rounded? Well, you create an abritrary sided brush. To do this, create a brush that is the same width as you want your cylindrical brush. Then you bring down the Brush menu. You will see a list of different sided brushes. Select one and it will transform your brush into a brush with that many sides. You can also pick the arbitrary option to type in a number of sides greater than nine. (Note: The Primitives option will allow you to turn your brush into a cone or a sphere).
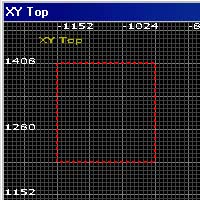
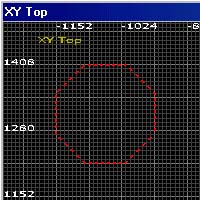
Before After
You can use this to make pillars and arches. The pillars should be pretty straight forward, but you might be wondering how a solid cylinder can be turned into an arch. Well, I will show you. First we need to prepare the north wall of the courtyard for our arch. Do this by stretching the north edge upwards about 256 units. If you like to keep your stuff pretty like me, then you might cleave off the edges that are sticking out.
Now you need to cleave it 128 units north of the walls southern side. However, you don't want to delete either half. So what do you do? Hold down SHIFT when you press Q. This should cut the brush in half, but not delete any of it.
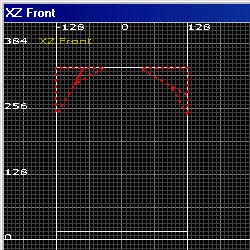
Select only the southern piece of the wall, and switch to the XZ Front view. Use the SHIFT+Q cleaving method to carve that piece of wall up in to the sections shown below:
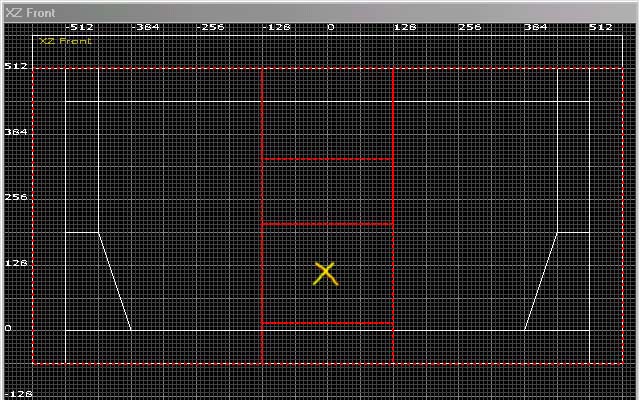
Delete the middle chunk that is the second to the bottom (marked on the diagram above by the yellow X). Now this is where the arbitrary brush comes in to play. Switch back to XY Top view and create a brush that is 256 x 256 units. With only it selected, bring down the brush menu, select arbitrary sided... and type in 12.
Before After
Rotate the brush around the X axis. This will tilt the cylinder so that it is running horizontally up and down. Elongate it in that direction (and only in that direction) and place it so that its top half fills the second to top segment in the middle of the north wall. Make sure it only extends into the southern half of the north wall and not into the back half. Below are some diagrams to better illustrate what the heck I am talking about:
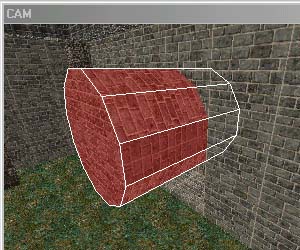
Camera view XZ Front

XY Top
Here is the part that we have all been waiting for! (SAVE FIRST!) Click the ![]() on the toolbar. You did it? ... ... Ok ... You are probably wondering "WHAT THE HECK DID THAT DO?" That was the CSG_Subtract function. It takes every peice of any brush that is overlapped by the selected brush, and deletes it. This usually forces the editor to break up the subtracted brushes into smaller brushes that fit around the chunk that got deleted. This is because brushes must be convex (they can't bend outwards, only inwards). Here is a diagram that demonstrates the difference between a convex and non-convex (concave) shape:
on the toolbar. You did it? ... ... Ok ... You are probably wondering "WHAT THE HECK DID THAT DO?" That was the CSG_Subtract function. It takes every peice of any brush that is overlapped by the selected brush, and deletes it. This usually forces the editor to break up the subtracted brushes into smaller brushes that fit around the chunk that got deleted. This is because brushes must be convex (they can't bend outwards, only inwards). Here is a diagram that demonstrates the difference between a convex and non-convex (concave) shape:
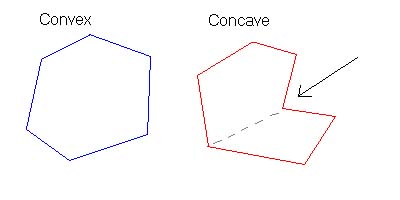
The black arrow is identifying the angle that points into the shape, making it concave. That gray dotted line shows you how you could break up that concave shape into two convex shapes. Ok, enough geometry, I still haven't really explained what you just did. Delete the cylinder brush and take a good look in the camera window.
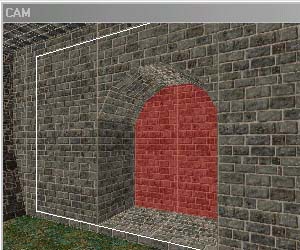
Camera Window XZ Front
Yes, that is an arch. You will see in the diagram on the right, that the cylinder "subtracted" every part of the brush it intersected, breaking up the remaining brush into those smaller (selected) pieces. That is the purpose of the subtract function and it has many more useful applications. However, have caution. The Subtract function isn't very intelligent in the way it breaks up brushes, so when you are using it, I strongly recommend subtracting from the smallest brush possible. Let me show you what things would look like if we had cleaved up the north wall less efficiently before using the subtract function:
Granted, you still would have succeeded at making an arch. But this method broke the northern wall up into tons of oddly shaped and angled brushes that are messy to look at and work with. That is why it is a good idea to limit the area that the subtract function will effect. At this point, be sure to set the floor of the arch and the vertical face of the step up to walkable. If you don't make the front of the step walkable, the characters wont be able to step up into the arch. After that, we are ready to build a door in our archway, so come on over to Page 4.
9. Making an Exit Out of Your Map
To make an exit, you need to have a brush that the players can click on to leave the area. In this map, lets make a door at the back of the arch way. To make the door, you need to cleave a brush that is 64 wide x 128 tall in the back (and still whole) section of the north wall. If it is not whole, then you probably had overlapped it with the cylinder brush when you used the subtract brush. Either reload an old save and redo the subtract function or rebuild the back brush.
Instead of deleting the 64x128 midsection, switch to the XY top view and drag its southern edge one small grid square backwards (8 units). It should now be slightly recessed in the wall. Choose a door texture and apply it to that brush. The door texture probably wont be aligned properly. This is the time you use those surface manipulation tricks I taught you earlier. Select the surface using SHIFT+CTRL clicking. Then hold down shift and use the arrow keys to line up the door.
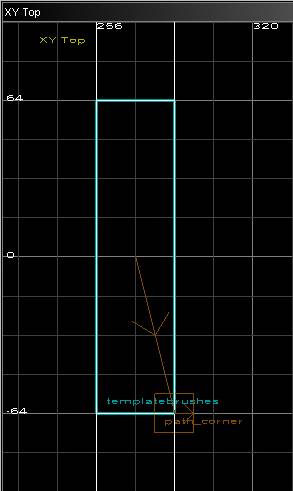
Now you have a perfectly good looking door. Too bad it does do anything yet. To make it into an exit, you need to select the door brush (and only that brush) and right click on the 2D window. This brings up that good old menu. At the bottom you should see a line that says templatebrushes. Select it. You have just turned the brush into a template so you can edit its template properties by pressing N. It will bring up this window:

That is the template window. On the left hand side, there is a list of the different NOT files. You can look through them and find things such as trees, flames, actors, and props. Double-clicking on a template will add it to your world. On the right hand side of the window you will see the different information of your currently selected template (your door). There you can change the orientation of your template as well as properties such as light color, intensity, and falloff.
Before you go any further, take a look in your Vampire directory and open the codex.nob with WinZip. Create a directory under your vampire directory called Codex and extract all of the files from Codex.nob to that directory (make sure you have subdirectories enabled). Now you select the Overrides tab in the Things and Templates window and click on the Pick Script... button. Under the Codex directory you created, find the file named "Clickexit.class". Select it and hit Open. Then click the Apply Script button.
Now you need to set the exit number. The exit number is a value that is passed to the script by the Codex Linker. With your door selected, open the Codex Linker by holding down SHIFT and pressing C. You should see three fields: Value, Type, and Description. You are only allowed to change the value. The Type field tells you what type of data the value field holds, and the description tells you what role the value plays in the script. You should see a value of zero for the Exit Number. Since this is the value this exit SHOULD have, leave it as is and hit apply at the bottom of the window. If this were our second exit, we would have changed the value to 1 by selected the zero and hitting enter. If this were our third exit, we would have changed the value to 2. When you are done with the Codex Linker, click the close-box in the top right.
The last thing you have to do in order to make your exit work, is apply the tracker_thing template to it. So, open up the Template Window again and hit the plus sign next to "Global", then again next to "Miscellaneous" and single click on "tracker_thing". DO NOT DOUBLE CLICK! If you double click, it will create a tracker_thing in your map. If that happens you must select it and delete it or you map wont run right. After you single click "tracker_thing", click the Apply Template button.
There, you did it. You can make other exits using the same method. Before you rush off to do that, you need to create a playerstart. Every exit should have a corresponding playerstart. The playerstart is linked to from other maps and it is where the players appear when they travel from that map. For more information on linking maps together to form a hub, take a look at our Basic Hub Tutorial. You should always make sure that playerstart [X] is linked with exit [X] otherwise travel to and from your map wont make any sense (i.e. players exit through door 1 to map 2, and come back through the door on that end but end up at door 4 half way across your map, because they were sent to playerstart 1 which was next to door 4 while playerstart 4 was next to door 1).
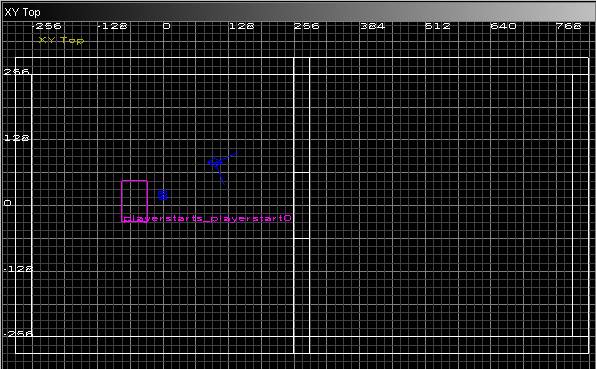
To create a playerstart, unselect everything and right click somewhere in the 2D window. Select playerstart from the menu. Since this was the first exit you created, it is exit number zero, so pick playerstart0. Place it somewhere a shortways outside of your arch. You shouldn't put it right up against the door because the camera would be squished up against the wall and staring right at the back of your chraracter head when they appear there. Also, the playerstart is currently oriented to zero degrees. This means it is facing straight north. That would have your players facing the door when they appeared. Since you want it to seem as if they just came through that door, open up the Things and Templates window with the playerstart selected. Under the main tab, change the orientation to 180. The playerstart is now facing south.
In order to see your exit in action, you have to create a chronicle file that links your map to another. In the Chronicles directory, make a copy of the file "mp_new_york_null.nsc" and rename it to "embracetest.nsc". Copy the first line that begins with "location NewYorkDocks"... and insert a copy on the line before the original. Rename "NewYorkDocks" to "Courtyard" and change the "n1_dock.nil" to "yourmap.nil" where your map is the name of your map. Now scroll down to the line labeled "# NewYorkDocks exits". Right below it, replace the line "exit NewYorkDocks,1 GunHaven,0" with the line "exit Courtyard,0 GunHaven,0"
You just connected Courtyard Exit Zero with GunHaven Playerstart Zero, and GunHaven Exit Zero with Courtyard Playerstart Zero. That one line works both ways. That is why you need to make sure your Playerstart numbers and Exit numbers match up. Go ahead and export your map, and hit run. Instead of playing a single player game, start a multiplayer LAN game using the "embracetest" Chronicle. You should now start in your courtyard and be able to walk back and forth between it and the gun shop.
Now its time break the map up into sectors. This is the last step that you need to preform before you release your level, and you will learn what you need to know on Page 5.
10. Placing Sectors
I would recommend reading through the part on sectors in the Embrace manual. They do a very good job at explaining how to use sectors, and I feel that I would just be repeating them if I were to explain it here. You can find the Embrace manual by opening the file "index.html" file in your NODSDK directory. Click on the "Embrace Manual" link, then in the the list presented on the right, scroll down to the Editing Catagory. At the bottom of that category, you will see a link labeled "Sectors". Click it. Now read through that section.
Back? Good. Now, some of that might have gone over your head. That's ok. Now that you have read it, let me give you a brief summary of the key concepts.
One: The game uses sectors to figure out which areas are visible from which other areas. If you could NOT draw a line from your player's position to Sector 26 without crossing an unsectored area, then Sector 26 CANNOT be "seen" from your position. Once the game determines which sectors can and cannot be seen then it knows which brushes to consider when determining what to display on the computer screen.
Two: Any area that is NOT in a sector will NOT be rendered. That means that if you have a chunk of hallway that isn't contained in a sector, the point at which the hallway leaves a sector will be a giant sheet of Hall of Mirrors because the game has nothing to draw. So, don't leave areas that SHOULD be visible unsectored.
Three: Visibility can only cross between sectors whos edges are exactly touching. That means, don't over lap connected sectors. Their edges have to fit together like placing two blocks against one another, otherwise it wont think they are connected.
Four: Sectoring works in all 6 directions. So, be sure to check the front and side views to make sure your sectors are the right elevation and height.
Five: Not every non-visible area should be unsectored. Details like pillars, beams, and the like shouldn't be sectored around. Too many sectors will end up slowing down the game instead of speeding it up.
Six: A template will ONLY be rendered if its CENTER is contained within a sector. This is not the case for normal brushes such as walls, but is for template brushes such as a clickable exit brush.
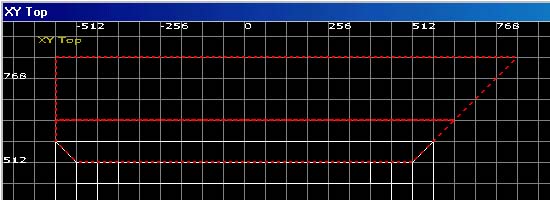
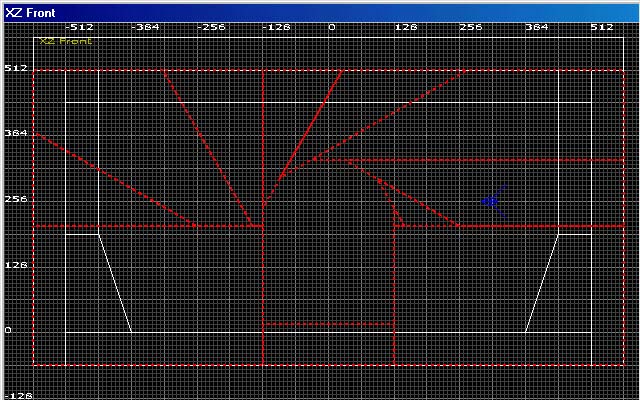
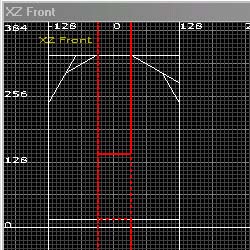
The courtyard could probably be broken up into only two sectors. The courtyard itself, and the archway. Below are images of the map from all three directions. The green boxes are the sectors:
You might have noticed how I resized our door brush. I had to make sure its center was contained within the sector, otherwise it wont be rendered at all.
11. Finishing Up
That does it. Now you have a completely finished and releasable map. Before you release it, you have to export it again! This time, when you export be sure to click the Full Export button first. This will export your map will all the features that should be in a released map. The files you need to destribute are the NIL and SEC files in the Levels directory and the NSD in the Scenes directory. It would be a good idea to make a mirror of the directory structure and zip all the directorys into a zip file. That way, when someone goes to download your level, they can just unzip the files to their vampire directory and they will automatically go to the right places.
One last thing! I want you to read this very very very carefully: DO NOT RELEASE THIS MAP! Why? Because you aren't the only one who followed this tutorial and we don't want tons and tons of the same courtyard floating around the internet. Also, its a rather bland courtyard (no windows and only one door? I mean, come on!) that we built for learning purposes. So I repeat: DO NOT RELEASE THIS MAP! Thank you.
There are a few things that I didn't cover in this tutorial that contribute to creating a good map, such as, placing templates (such as trees, flames, people, and other objects), exporting mutliple layers and scenes, and creating moving doors and brushes. These will be covered in seperate tutorials (if they haven't been already). If you have any editing questions, head on over to our editing forums. If you have feedback on this tutorial, send it to kiramin@planetvampire.com.
Making Doors That Open

by darklord
This document is copyright (c) 2000 Corporation X. All rights reserved because... because they are. Do not reprint this document without explicit written permission from the author, or your shoes will smell. Badly.
Vampire: the Masquerade is a registered trademark and Vampire: Redemption is a trademark of White Wolf Publishing, Inc..
The Big Idea
This tutorial is written to give you an idea of how to put openable doors into your Vampire: Redemption levels. That's it! That's all! If you want more than that, you'll have to go somewhere else!
The Basics
In the NOD engine, a door is just a brush that you give certain attributes to and assign one of several possible door Java scripts to. The concept of a "door" is really better said as "moving brush", because you can do a lot more with these types of brushes than just make doors. Anywhere you want a brush that moves between two locations when it's clicked on (sliding doors, hatches, movable altars, whatever) you can use these scripts to serve your needs.
Carve Yourself A Door-Like Brush
So, to get started, draw yourself a doorpractice.map level; two little 512x512x256 rooms that share a wall (the wall that the door will be in). Carve a door-shaped brush out of the shared wall. (For a great tutorial on how to do this, check out Kiramin's Embrace tutorial.)
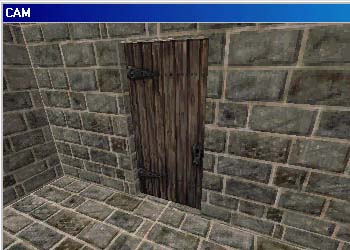
You should end up with something that looks about like this:
I picked the Prague texture set, and pulled out some textures that look good together. Mmmmm, Prague texture set.
(In order to get the door texture lined up right, I selected the visible surface of the door brush (not the door itself, just the front face), and pressed (Ctrl-F)it To Surface. FYI.)
Turn It Into A Door
Nihilistic was kind enough to provide a very simple method of turning this brush into an openable door. Select the door, right click, and pick the QuickDoor menu item.
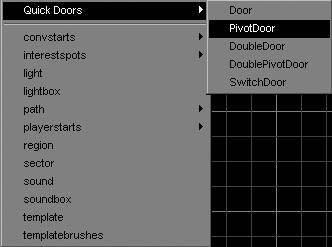
You will see five options: Door, PivotDoor, DoubleDoor, DoublePivotDoor, and SwitchDoor. Select PivotDoor (because that's the one we want for this case). You should see something that looks like this:
What has happened? The Embrace has:
- Turned your door brush into a templatebrush. It has done this so that you can associate scripts and other attributes to it. Your door now is highlighted in blue (or another color, if you have changed your color scheme).
- Associated the tracker_thing template with the door. This is so that you can roll your mouse over the door in the game and make it highlight, and to allow you to click it.
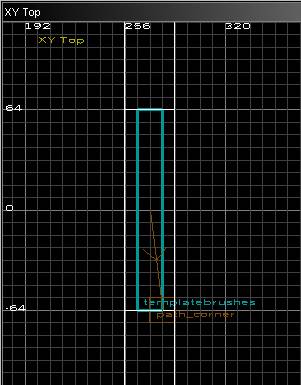
- Created a path_corner object, and associated it (through arcane magic that I do not yet grok) with your door. This is the little brown box that is highlighted in the center of the door, and it is the key to the door movement. This path_corner has a TARGETNAME key (probably set to "t1"), and your door has a TARGET key (also probably set to "t1"). There is some other step in this process that actually connects the two; if anyone knows what it is, please email me.
- Associated the PivotDoor script with your door templatebrush, which the NOD engine will send messages to when you interface with the door in the game.
So, *poof* you have a door. However, if you export and build your level right now, you will be able to click on the door, and you will hear a satisfying click-clack, but the darn thing just won't open. Why?
Let me introduce the magic of the path_corner.
path_corner
The settings of the path_corner tell the engine what to do with the door when you click it. Each door script is a little different, so we'll handle each one in turn. There is, however, a concept that applies to each case: orientation. This is the center of the mystery, so here goes:
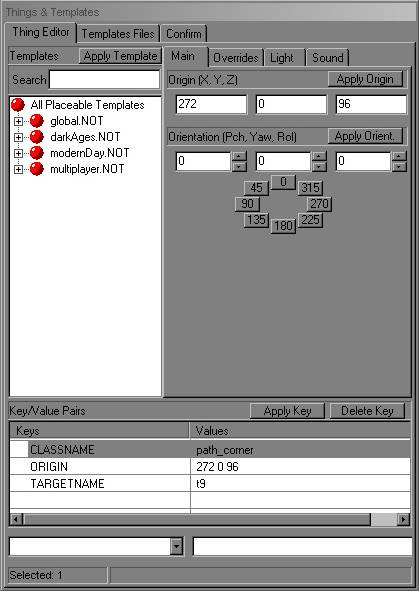
Select your path_corner (you may have to temporarily move your door brush out of the way). Press 'N' to switch the texture pane (or the console, depending on what you have selected) to the Entity Info pane. Select the "Main" tab on the upper right, which should give you something about like this (you may need to resize frames within the window to get it to look right):
Templates & Orientation
Most template object have an "orientation" which tells the engine which direction to face them. When you are placing objects like a couch or a lamp, you might think that if you wanted the object to face a different direction that you should simply turn the templatebrush by hand. This is not so; it will cause the engine to simply not draw your object in the level. Orienting templatebrushes is done here, in the Entity Info pane. You're given the choice of selecting one of the "standard" orientations (0, 45, 90, 135, etc), or entering your own (which may be any value, positive or negative) in the fields given. Pitch will tilt the templatebrush around the X-axis, Yaw will tilt it around the Z-axis, and Roll will tilt it around the Y-axis. Yaw is most commonly used, because normally objects are oriented straight up and down in a map, and pitch and roll will tilt the object one way or the other.
Back to path_corner
So, your path_corner object has an orientation, which is the key to determining how your door will open. The orientation you give to this path_corner object tells the engine how far to turn the door, using the number of degrees to assign to the orientation, and in what direction, based on whether that number is positive or negative (positive=counter-clockwise, negative=clockwise).
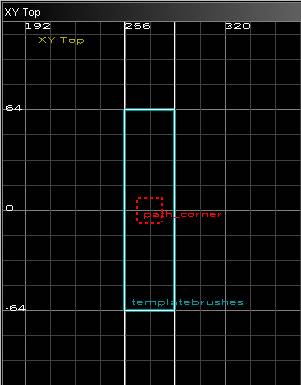
Make sense? We'll try an example to help illustrate this. With your path_corner selected, click the button on the Main tab in the Entity Info pane marked "90". You should see a little arrow appear inside your path_corner:

You've told the engine "turn my door 90 degrees counter-clockwise as it opens", which means... uh, hmmm. Nope, that's not right. With the door texture the way I've got it, to open the door outward we would want the door to turn clockwise. Okay, so click in the edit box where the "90" appeared in the Entity Info pane, and type "-90". Hit enter. Now the arrow should be pointing the other way:
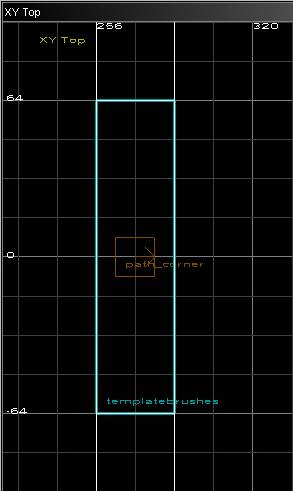
That should do it. Now, the PivotDoor will pivot around the center of your path_corner (clockwise, if you followed the instructions above), which means that the centerpoint of the path_corner is effectively our "hinge" for the door. So, move the path_corner to where the hinge would be, here:
Duration
Finally, we'll change how long it takes for the door to open.
Every new door (built using the QuickDoor menu) starts out taking three seconds to open. To change this behavior, you must modify the duration variable using the Codex Linker.
The Codex Linker
Select your door brush and press Shift+C to bring up the Codex Linker. A window will pop up that looks like this:
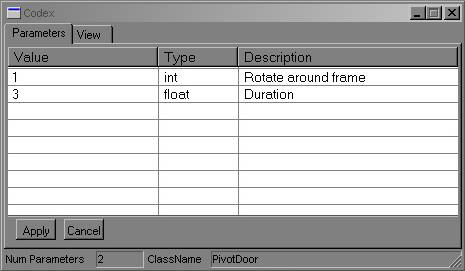
The one we're interested in here is Duration. Initially, your duration is set to 3, which means that your door will take 3 seconds to open. Change this by clicking on the number in the linker once, and then again (not a double click, two clicks with a pause between them). You should be granted an edit box to change the value. Enter "1", press enter, and then click the Apply button.
What we have done is changed the data that is given to the PivotDoor class object when the user does something to the door. This Codex Linker is the way that you pass all data from The Embrace Land (where everything's a brush) to Java Land (where everything's a class). Codex Linker good!
Opening The Door
Make sure you've got a playerstart (and some lights if you're feeling spunky) in your map, export it, and run it.
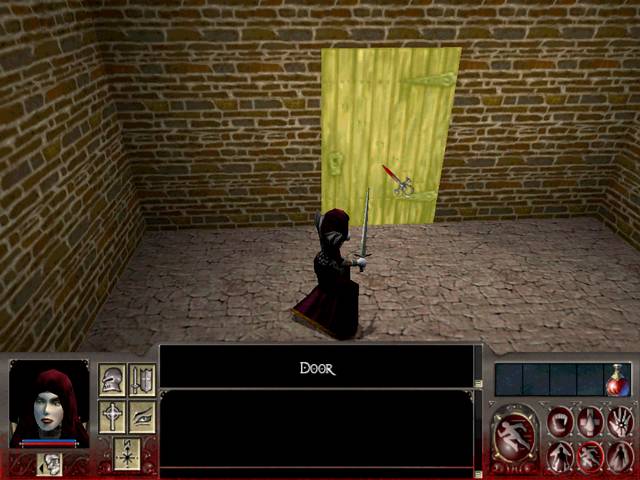
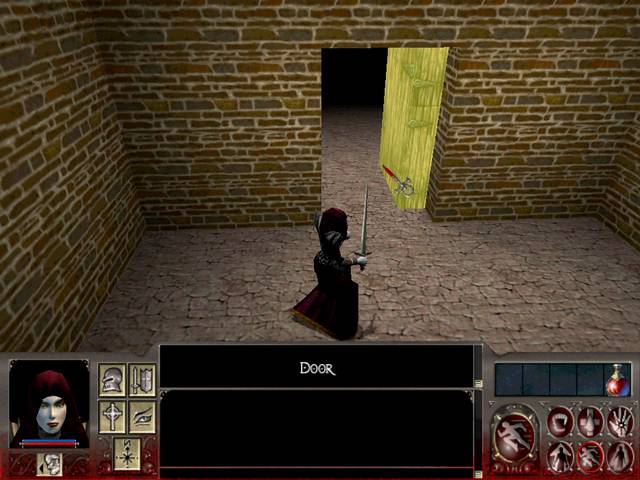
Holy freakin' molasses! If you followed the steps in this tutorial correctly, your door should open away from you, pivoting on the right, like you see above. Victory!
Boy, that's one thick door. Let's fix that real quick, like this:
So, you have a working PivotDoor! But wait, you say, there are four other kinds of doors! True. I can help with one of those for now: Doors.
In the case of a Door class object, the path_corner indicates where you want the centerpoint of the door templatebrush (as indicated by where the little brown arrow that points to the path_corner originates inside the templatebrush) to end up when it opens. You may apply an orientation to the path_corner if you wish the door to turn as it moves, but remember that this is centerpoint-to-centerpoint movement. This is useful, for example, for making sliding doors that open sideways.
DoubleDoor, DoublePivotDoor, and SwitchDoors will have to wait until later. I have a question in to NSI about how these work, because I don't freakin' know! I'll update this tutorial when I have it figured it out.
Publishing Expansions
by darklord
Vampire: the Masquerade is a registered trademark and Vampire: Redemption is a trademark of White Wolf Publishing, Inc..
The Big Idea
This article is written primarily to give you an idea of how to go about publishing your chronicles for Vampire: Redemption in a way that will make it simple for other gamers to download your files and plug them in painlessly. The effort involved in setting up a new chronicle can be intimidating, and many players just want to get in there and play. Any extra effort you put into releasing files that are as plug-and-prey as possible will pay off in the long run, both in terms of a player's experience of your map, and (thusly) in it's popularity.
There are a few simple shenanigans involved in getting a complete release together, but if you follow the steps outlined below, you should have no problem.
Development & Expansion
If you've been developing a level for Redemption, you've likely either got your map, level, and scene files all spread into the root Vampire install directory, or all localized into a "project" directory. Either way, releasing your files in that state can result in the end-user's Vampire directory getting messy (best case) or corrupted (worse case).
(Note: this is not the case if you just release the .NIL & .NSD files, and let others figure out the installation details for themselves. That's a fine way to go about it, but not the subject of this tutorial.)
Fortunately for the Vampire community, Nihilistic provided a very simple method to expand Vampire: Redemption: .NOB files. A .NOB file is simply a .ZIP file renamed; it's an archive of files all crammed together into a single file. .NOB files can store directory information, so it is straightforward to replicate the Vampire install structure within a .NOB file without messing up the actual game installation itself.
As a historical note, I believe it is likely that Nihilistic chose this format because Java does the same thing with .JAR files, and I believe this was one of the many good things the NOD engine inherited when Nihilistic chose Java for its scripting language. All around, a good thing. If you haven't read Robert Huebner's article, "Using Java as an embedded game scripting language", in the NOD SDK, I recommend it.
The Objective
In order to release your files in a nice, neat package that the end-user can easily install and use, your development files (maps, scenes, chronicle files, etc) should all go into a single .NOB file. There are two tricks to this process:
- First, when adding the files to the .NOB file, turn off compression. In WinZip, you will see a combo-box in the Add/Replace Files dialog that lets you select the level of compression; select "none". De-compressing files from an archive would slow down the engine performance considerably, and the NOD engine doesn't support it.
- Insure that your directory structure is retained within the .NOB file. Because of the way WinZip does its thing, this can be tricky, so here's a simple method to pull it off:
- Create a "DROP" directory in your Vampire root.
- Create a duplicate of the Vampire directory structure in this DROP directory (\Chronicles, \Levels, \Scenes, etc). Make copies of the files you want to release in the appropriate directories.
- Create a new archive, and open it. Drag your completed "DROP" directory over to the archive, and drop it. This will bring up the Add/Replace Files dialog. Insure that "Include Subfolders" is checked, and that "Save Extra Folder Info" is NOT checked. Click "OK".
That should do it. The files will be added to your archive with the directory structure intact. (Note that if you had checked "Save Extra Folder Info", the *entire* path to the files would have been stored, which is not what you want.)
Now you have a .NOB file that Vampire will be able to open and use, either from the Vampire root directory, or from a directory you specify with the "-user" command-line argument.
What Should Go In The .NOB?
So you know how to create a release file that will be simple for the end-user to install. What files should you include in such a release? That depends on what your map is for.
If you are making a blank multiplayer map, then in order for your map to be immediately usable, you will need to include the following files:
\Vampire
	\Chronicles\MP_YourMap.NSC	Chronicle File - Essential
	\Chronicles\MP_YourMap.NMF	Metafile - Optional, unless you need the other files that it references (.NST, .NLS, etc)
	\Chronicles\MP_YourMap.NST	StoryTeller Object Short List - Optional, but handy if you have the time to pick out what objects you think will be appropriate to your map.
	\Levels\YourMap.NIL	The engine map file
	\Maps\YourMap.MAP	Optional, but it's often helpful for other people who are making maps to look at what others have done
	\Scenes\YourMap.NSD	Scene Description; needed if you have *any* template objects in your map
	\Strings\YourMap.NLS	Strings File, only if you have added strings or if you want to change the names for any of the default objects (If you have scenes in your map)
	\Chronicles\MP_YourMap.NSS	StoryTeller Scene List - Essential for the Scene Pane in the ST in-game interface
	\Scenes\YourScenes.NSD	Include all .NSD files that originated with your scenes
(It's also considered good form to include a README file, so that people know what to expect from your expansion. Take a few minutes and write up something informative; it will boost your presentation a great deal.)
What these various data files should contain is discussed in another tutorial.
Blank Chronicle File
Here is a blank chronicle file for you to get started:
YourLevel.NSC:
###################################################################################################
# Locations
#
#	Area Name  .nil file to use  Initial Scene file  Area map backplate  Area map tag  Flags
# location [AREA_ID]	[yourlevel].nil		[yourscene].nsd		[yourmap].nui		[yourtag].nui		0x0
###################################################################################################

location YourLocation	[yourlevel].nil		null	mapNYCdocks.nui	map00	0x0

###################################################################################################
# Exits
#
# exit [AREA_ID_1],[EXITNUM]  [AREA_ID_1],[EXITNUM]
###################################################################################################


###################################################################################################
# Chronicle Settings
###################################################################################################

metafile	testing.nmf
portal	YourLocation 15
reviveloc	YourLocation 0
flags	0x7

###################################################################################################