
You can download this tutorial HERE (PDF)
Basic about the Unreal Editor and Maps...
Here how we'll do this. We are going to make a very simple box map for Unreal Tournament 2004 (should be similar in UT'99, UT2003 and UT3*). As we go along using different tools I will make side note explaining the tools themselves and what they do so you can get familiar with Unreal editor's interface.
*Only when the editor is in subtractive mode.
In your UT2004 folder there should be a folder named "system". In there you will find the game exe(UT2004.exe) and the map editor, "UnrealEd.exe". 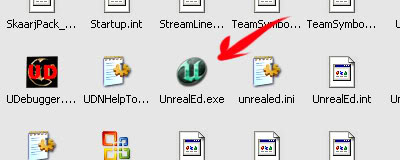 (If you want make a shortcut to this on your desktop or what where ever.)
Here we have the editor.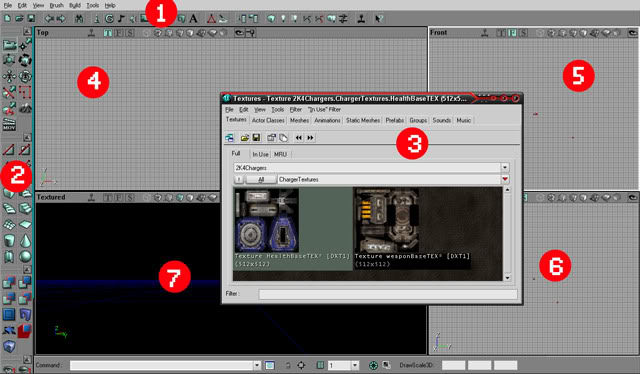
1.] The standard menu bar seen in most apps. "new" "open" and "save" along with other buttons that open up the different resources browser.
eg.  opens the browser to the "Texture" tab. (aslo see #3)
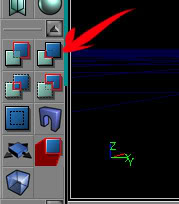
2.] The Toolbox. by default, the one at the top controls camera mode, scaling, rotating, matinee mode, etc. Second one from the top controls the creating of brushes (clicking on one makes what UnrealED calls a "builder brush" aka Red Builder Brush or RBB) which is used to build world geometry. Right clicking on one of these buttons pops up a box that can be used to alter the builder brush's dimensions.
**Note on brushes. -The Unreal Engine differs from most other 3D engines in that its brushes combine with CSG: they can be additive or subtractive, removing or adding matter to the world. (After making your first Box Map you will understand  )
)
3.] The Resource browser is a separate window where you have access to the different resource type available for the game. Here you can browser through textures, static meshes, actor classes, sound, animation etc. that can be used in the editor for your map/mod in different ways.
To open the browser, go to the "View" menu and select one. all are contained in the same window separated by tabs.
4, 5, 6, 7] The default "Viewports". These are the camera views that you will be editing your maps from. At the top of each "viewport" there are buttons to customize its view.

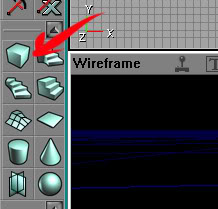
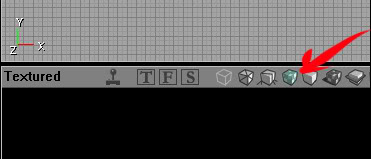
The Joystick activates the real-time preview. "T", "F" and "S" are Top, Front and Side. The cubes give a "perspective view" each in a different mode. The first (from the left) being "wire frame" mode. The forth being "texture (no lighting aka all bright*)" mode. 5th is "lighting only" and 6th "texture and lighting".
Lighting can only be seen after map lighting and be applied and complied (geometry and light have been added and built).
* Left-Clicking within the map selects an object.
* Left-clicking and holding pans the map along the X/Y axis.
* Right-clicking and holding rotates the camera.
* Holding both left and right mouse buttons pans the camera vertically and to the side.
1. Open the UnrealEd. If your viewports are missing or need to reset, go to the window menu, View > Viewports > Configure. You can chose the first one and hit Ok.(You can close or move the browser window if it gets in your way) Now you have your work space and can start mapping.
2. On the Toolbox to the left and the second toolbar from the top are the brush tools. Right click on the Cube brush. the cube builder options should pop up. Lets change the Height to 512 and Width and Breadth to 1024. Hit Build.
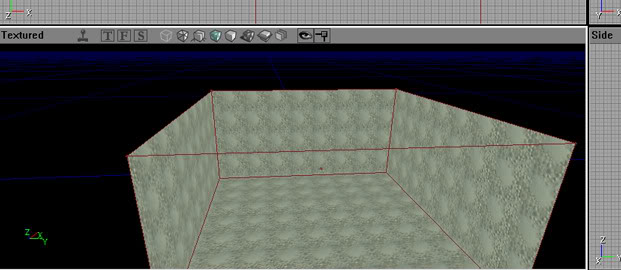
You should see a large red wire frame cube (Red Builder Brush or RBB). (If not seen in all views just click on that view to update it)
3.Now...we are basically working in solid space. We need to "cut" or "carve" out of that solid space. We can now use the Red Builder Brush (RBB) to subtract from that space.
Click on one of the lines that make up the RBB (in any viewport)to select it. It will turn a brighter red. Now to the left, in the ToolBox 3rd set of tools. (Build tools?..can't remember what they are called) click the subtract button.
You have just made a playable area in your map. If you can't see any changes, that because you need to change the view mode in the perspective viewport. Change it to the "Textured view" from the menu and the top of the viewport.
You should now see your subtracted space. (Don't worry...almost there  )
)
4. Actors classes.
They are weapons, particles and effects, player starting points, flags (in CTF mode), vehicles, lights etc. They are the other entities that will make up your world. For this map we just need one. You must have one in your map before you can run it in the game. That is the Player Start actor. for any actor, go to View > Show Actor Class Browser. Here you can browse through all the actor classes.
But this actor is important and always used in all maps, (the game will NOT run the map without it) so they made it easy to access. No need to open the Actor browser, it is always available when right clicking in the viewports. (Lights and a few others are also always on the right click menu. Also the selected Actor in the in the Actor browser will show up on the right click menu.)
In your perspective viewport move to in side the subtracted space and right click on the floor where you would like the player to spawn. Then select from the right click menu "Add Player Start Here". You should now see your Player start actor.

NOW QUICK SAVE YOUR MAP. I can't believe you haven't be saving all this time. You can save at any point. All maps are to be saved in the "Maps" folder in your UT2004 folder.
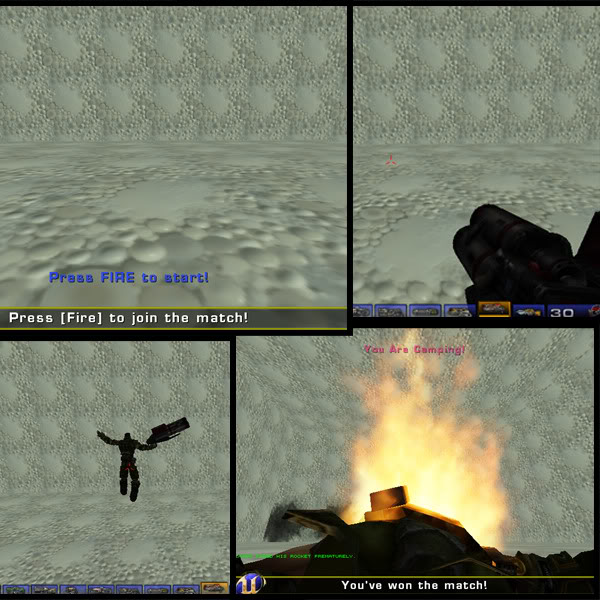
5.Time to build your arena! At the menu bar at the top. the last set of icons are the build map tools. the first one builds geometry only. Since we have no lighting at all we will want to use this one. Click it and it will build your map. Since our map is very small, simply and has no lighting it will only take a few seconds to complete to build process.

When its finished, click (in the same menu bar) the joystick button. This will run your map. YAY!...After hours of box map fun quit the game to return to the editor.(it may be minimized)
Useful Links...
Unreal Developer Network Official unreal dev website...
Unreal Wiki - really really helpful ...
Welcome to the Unreal Wiki. The Unreal Wiki is dedicated to gathering documentation on the Unreal Engine. Not only can you browse the large quantity of material already here, but anyone can add or edit information instantly – no registration required. A large community of mappers, coders and modelers helps in this effort.
That's it for now :)

Congrats on first tutorial, I'll be trying this out with your tutorial.
I hope Unreal Anthology does work well with this.
Keep it up :)
Thank a lot. If you have any problems don't hesitate to ask :D
Thank you, this is useful.
Are you planning to post part 2 of the tutorial ?
Iam still a begginner in UED and i would like to see some more simple well written tutorials like yours.
Thanks you!
I didn't think anyone would be interested. But you are so I'll try to do it as soon as I can :)
well i have created level on under water when i started the game..
well the AI can be unlmited time on under water and not lose health *(only if he spawn under water) and when you spawn under water and you long time under water you starting lose health wtf... THE AI CAN DO ANY THING AND ITS ISNT FAIR!!!!!