Tutorial originally posted on JediKnight.net. Mirrored here for archival purposes
Learning the ways of Jed
Written by Jeff Walters
The Art of Cleaving
One of the most important skills to learn in JK level editing, is how to cleave walls, sectors in thr right ways. If you design a large, complex area without carefully planning your cleaves you could end up with a area with bad lighting (yes, cleaving affects lighting) or you the area could cause substantial lag as their are too many adjoins. Once again, the ugly 'God of the Framerate' rears it's head.
The handiest tool I've found when testing any multiplayer maps I make is the 'framerate' console command. To access it, press the 'talk'key - t. Then press TAB and type in 'framerate'. A number will appear at the top of the screen which changes as you look in different directions. This is, you guessed it, the framerate. The higher the framerate, the better. Areas that have at least more than 12+ are most desirable. Be sure when checking an area's framerate to test every angle. Very important.
Ok, back to cleaving. Here's an example a friend of mine put to me whilst explaining the art of cleaving to me. Say you want to create a set of stairs. There are numerous ways to do this, and doing it the wrong way will wreck the area. The best way to cleave a staircase is to cleave diagonaly along the tops of the steps so the stairs area has one big sector. Then cleave the steps in. By doing it this way your vision and all the collision code won't traverse all the adjoins. If you were to just cleave vertically from floor to ceiling for each step, your staircase would look terrible in gameplay. It would have a bad framerate and the lighting would look very much off.
Briefing Text
While working on Jedi Knight Revisted with Mike Rajotte, I discovered how to add briefing text to any multiplayer and single player mission. To do this for your level you'll need to add a file called cogstrings.uni to your project's JED directory. Below is the cogstrings.uni from my level Cardia: Midnight Showdown -
____________________
MSGS 15     # <--- DON'T FORGET TO UPDATE THIS COUNT

#   "<key>"     <unused number>     "<string>"

#***************************
#   Names of Levels
#***************************
     "JEFF"       0    "Midnight Showdown"

# ***************************
# Objective descriptions
# ***************************

#    Cardia: Midnight Showdown - messages.

     "JEFF_TEXT_00" 0 "^----------------------"
     "JEFF_TEXT_01" 0 "^Darkness descends..."
     "JEFF_TEXT_02" 0 "You have been summoned to Cardia to participate in the Midnight Showdown. Information on your opponents is very sketchy, so watch your back young Jedi....."
     "JEFF_TEXT_03" 0 "^----------------------"

END
____________________
Ok, let's go through this file part by part to illustrate how it works.
MSGS 15 # <--- DON'T FORGET TO UPDATE THIS COUNT
This line simply states the number of lines of code (not including lines starting with #) in the file. Make sure this number is ABOVE the number of lines of code in the file.
"JEFF" 0 "Midnight Showdown"
What the hell is the "JEFF" part you wonder? JEFF is simply the name of the JKL file of Cardia. So to make a cogstrings.uni for your level work - delete JEFF and replace it with your JKL's name (in capitals). The "Midnight Showdown" part is what will be shown at the top of the screen whilst the level is loading.
     "JEFF_TEXT_00" 0 "^----------------------"
     "JEFF_TEXT_01" 0 "^Darkness descends..."
     "JEFF_TEXT_02" 0 "You have been summoned to Cardia to participate in the Midnight Showdown. Information on your opponents is very sketchy, so watch your back young Jedi....."
     "JEFF_TEXT_03" 0 "^----------------------"
Now here's the interesting part - this is the briefing text. The explanation for this is ver easy. The "JEFF_TEXT_xx" parts just specify paragraphs really, each one starts on a new line. Remember to change the JEFF part to the name of your JKL. Finally - you may be wondering what the ^ is doing in front of some of the lines? The ^ is kind of like the JK equivalent of BOLD. It makes the text larger and also - yellow.
That's it for the cogstrings.uni file! You now know enough to add a briefing to your level. Remember all you have to do is put your cogstrings.uni file in your project's directory. When JED creates your level's GOB it will automattically put the file where it needs to be within the GOB. Good luck!
Making Water
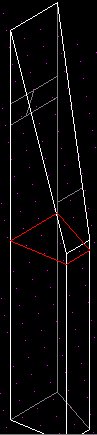
Making water sectors is a very easy process that requires on COG at all. Consider the picture to the left. In this example we'll want to make the bottom one of those two sectors into a underwater sector. First, let's get the adjoins between the two sectors setup so that - a) it draws a water texture, and b) the water texture is translucent.
Now, get into Face mode and select either one of the surfaces in the adjoin. Now you'll need to choose a water texture to use. Just browse the resource picker till you find the one your after.....in this case I chose 13fwater.mat. Next, click on the GEO box in the Face editor and change the 0 to a 4. What this does is tells the engine to texture the adjoin, not have it clear.
Once that is done, move down to the Face Flag box, double-click on it and check the box next to 'Translucent'. Terrific, now that adjoin is perfect! Now just do the same things to the other wall in the adjoin.
Ok, next you need to set up the underwater sector itself. So get JED into Sector mode and select the sector you want to make underwater. Now, first off - double click on Flags in the Sector Editor and check the box next to 'Underwater'. The engine will now recognise that area as an underwater section. But....you're not done yet. You also have to set up the 'tint' of the water and also add underwater sounds. So next, double click on Tint and you'll get a choice of many different color tints to use. Here, I chose the the blue in the top row, third from the right. When you click 'ok' after selecting a tint you'll notice a bunch of numbers appear in the tint box to represent the color - 0.00 0.50 1.00 (for the blue I chose).
Next - sounds. Double click on the 'Sound' box and you'll access a whole list of sounds that you can use as the ambient sound for this sector. For underwater areas you'll need 00underwater.wav. Final thing to do is set the volume that the sound will be played at. For underwater sectors I've found that something around 0.4 is perfect.
Done! Now you have an underwater area with a translucent surface. Bewarned though when making underwater areas - making the surface of the water translucent can decrease the framerate dramatically in complex areas. So if you are getting lag in the area - don't make the water textures translucent.
Slashable Grates
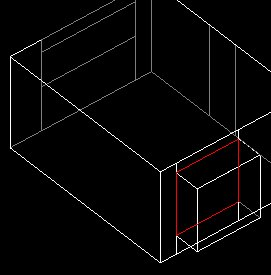
Believe it or not, the slashable grating is dead easy. Consider the picture to your right. In this example we'll be making the adjoin (adjoin is in red) between these two sectors a slashable vent. Ok, first thing you'd need to do is to get JED into Face mode and select either one of the two walls in the adjoin. First let's select a .mat for the grating. I chose the vent grating - 08TMSHD.MAT in this instance. Once the texture has been selected, moved down to the GEO box in the Face editor. Change the value to 4 to make the engine texture the adjoined wall. Next remove the #2 Adjoin Flag so that the adjoin becomes Impassable. Final thing to do in the Face editor is to set two Surface Flags -'Used in Cog' and 'Impassable'. There the wall is done! Then just do exactly the same for the other Face in the adjoin.
Final thing to do is to place the COG for the slashable grate. First thing to do here is to record the sector and surface number for both walls in the adjoin. This will be displayed at the top of the Face editor for each wall. Ok, make sure you've got the right numbers down cause they're about to be used.
Next, select 'Placed Cogs' from the Tools menu. Then click on 'Add Cog' in the bottom left hand corner of the screen. The Resource picker should start you in res2.gob where most of the generic COG files are stored. Scroll through the list till you come across 00_slashgrate.cog - that's your baby. Once it's on the Placed Cogs list - click on it. You'll see in the top right hand corner of the screen that this particular COG file has two values that need to be assigned - 'grate' and 'grateback'. Now all you have to do is enter the two adjoins as the two values! Doesn't matter which you put as 'grate' or 'grateback'. So if one surface of your adjoin is Sector 5 Surface 3...then put '5 3' next to Grate. If the other side is Sector 11 Surface 6, then just put '11 6' next to grateback. That's it! Finito!
Now just load up JK, draw your trusty saber and hack the grate open to make sure it works :)