Tutorial originally posted on JediKnight.net. Mirrored here for archival purposes
Scratched and Brushed Surfaces with Noise and Motion Blur. Also, Radial Shadows.
 ------- >
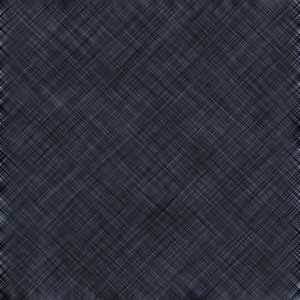
So you want to know how to make realistic brushed metal? Here are a few simple steps for textures that have a brushed look. For this tutorial I’ll use zppoolg4.tga.
Step 1:
Create an image of the size you want. Make a new layer. Use the eyedropper tool to make a close \approximation of the original texture’s average color. Fill the new layer with the color.

Step 2:
Make a new layer, fill with 50% gray.

Step 3:
Add a bit of noise, use your own judgement as to how much is needed. For this particular texture the grain goes both 45 degrees and –45 degrees so we’ll have to repeat this. Duplicate the layer to do the other half. Now, select one of the Layers and so a motion blur 45 degrees. Use your judgement again to find the right amount of blur. Rpeat the step on the other layer but with –45 degrees angle. Make both textures overlays. You may need to increase the contrast on the overlays.
Step 4:
Now its time to add the radial shadow. Make a new layer, select a white-to-black gradient and also select radial. Now, make a gradient from the center to the edge of the picture. Make the layer overlay. Adjust the brightness, contrast, and opacity, and maybe even gaussian blur it until you have the right effect.
That’s it for the first part, zppoolg4 is done. Save the layers to do the next tutorial.
Using Paths and Lighting Effects to Create Embossed Effects.
 ------- >
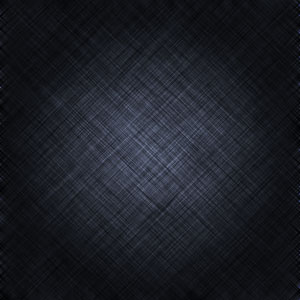
In the last tutorial, we made zppoolg4, a simple brushed metal texture with a shadow. In this one we will take that texture and convert it to zppoolg5, exactly the same thing as zppoolg5 but with some tile grooves in it. You will need the last tutorial’s file with all the layers saved and not flattened. This one teaches how to do use lighting effwects to produce realistic shadow and secularity on materials to simulate grooves.
Step 1:
First make a path along all the grooves you need to make. (If you don’t know what a path is or how to make one, go find a tutorial on paths)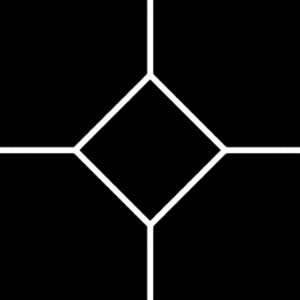
In the above image, I converted the path into a line so you could see it better. Note that guides will help you do exact and accurate lines.
Step 2:
Make a new layer and stroke the path with a soft brush of the width you want to make the groove. Make a new channel and also stroke it with the same brush.

Step 3:
Now its time to add lighting effects. Go to the filter and make a white directional light along the angle you want the light to be. (Note that in complicated textures this is a good way to insure that all your light comes from the same angle.) Now go to the textures section and select the channel that you just made as the texture channel. Adjust the height variable until you get approximately the effect you want. 50 works well for most things. Then apply it to the layer.

Step 4:
Make the layer an overlay and adjust brightness, contrast, levels, blur, opacity etc. till until you like the effect. The layer that has the grooves overlay should be under the shadow layer. And that’s it for that.
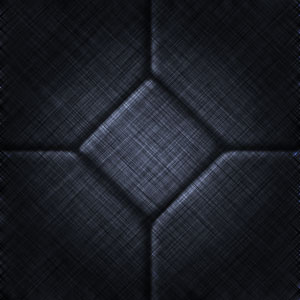
This method is useful for almost any grooves in a texture. Unfortunately, it does not work equally well for all textures. This texture is one of those that it does work well with.