
Most of who use level editor are pleased with the automatic AI map creation, but automatic creation often makes errors at terrain elevations/depressions (duplicated ai nodes), and this results almost always an invalid ai map, which can hurt very badly a mod's alife. You can't build a rock solid mod on top of a bad ai map, bad graph and bad spawn. If the AI map is erratic and not valid, it ruins the a-life completely. When you use maps from SOC, CS or COP (the unmodified vanilla maps), you are secured, all the officially released single player maps have validated AI map. But all other maps - fan made, taken from an old build - must be checked in level editor and with xrAI, because noone can guarantee, that those maps have corrected ai maps and graphs.
Creating AI map is needed for single player levels only. If you make multiplayer level, you can skip this tutorial.
1) Theory
What is the ai map? How is it looks like?
The AI map is an area filled with AI nodes, it controls and restricts the npcs and creatures on-line (and off-line) movement on the level.
In stalker games (x-ray engine) there are two types of entities: either something is on-line or off-line. If an entity is on-line, it means it's somewhere around the actor, not further then alife radius. The alife radius/switch distance is in SOC/CS/COP (alife.ltx) by default 150 meters around actor.
Among entities, the npcs and creatures can exist and move only on the AI map (on-line mode) or move along graph points (off-line mode). An npc/monster comes on-line, if it moves in off-line state inside the switch distance - these are the moments when the game hangs up sometimes for seconds, as the engine switches the entities from off-line to on-line. The AI map must be continuous on a single map, because all ai nodes must be accessible from all other ai nodes to allow AI to calculate paths from any point to any point. Separated ai node islands are not allowed (invalid AI map).
: 595499.")
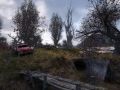
Selected AI map in level editor: all ai nodes are selected on SOC vanilla Escape, the ai nodes count (right below Sel): 595499.
You can see on the above picture a big whiteness, which ends at bushes, trees, buildings - no, this is not a badly designed winter mod, this is the selected AI map itself. AI controlled npcs/monsters move exclusively on the ai map, which consists thousands or even millions of ai nodes. Npcs/monsters don't see static objects and don't collide with them, they collide and see only the AI map.
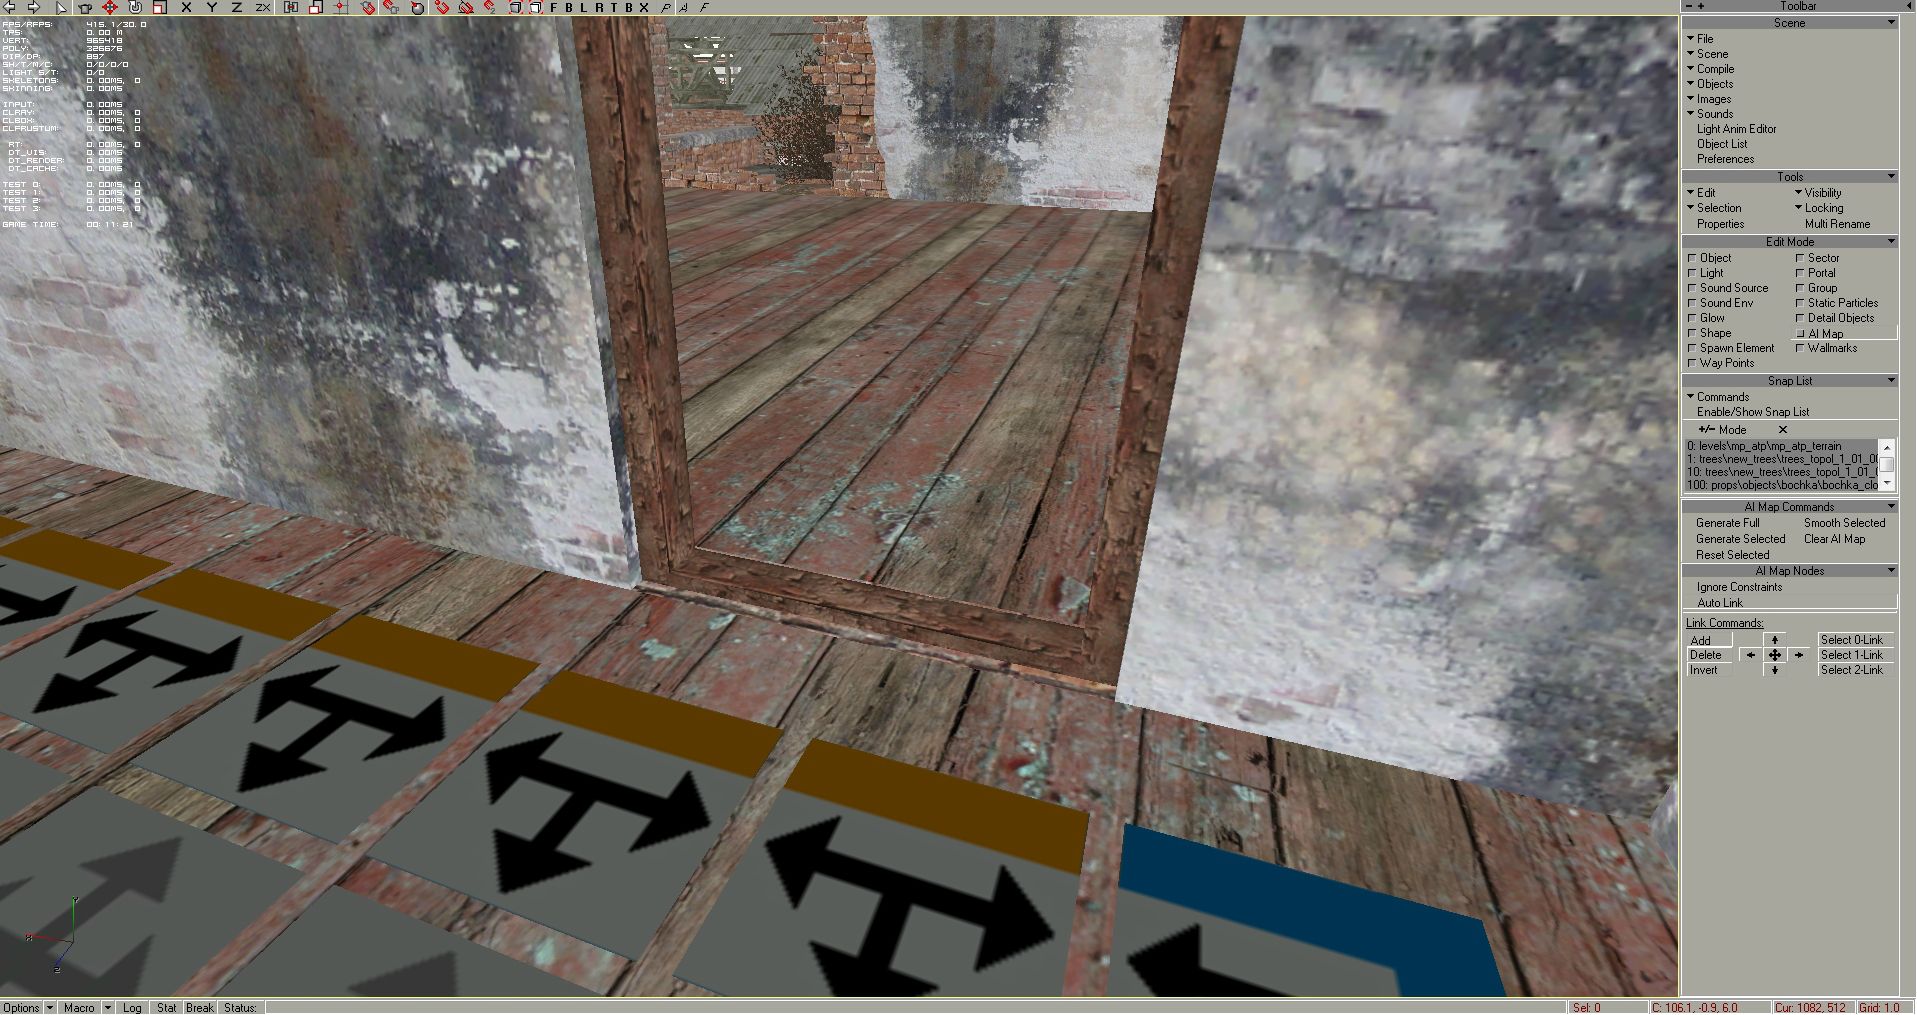
In a level editor scene, you can see grey colored (4 linked), orange bordered (3 linked), blue bordered (2 linked), green bordered (1 linked) and in worst cases red colored (0 linked, invalid) ai nodes:

Selected ai nodes
What is the maximum size of the AI map?
It's somewhere around 3.000.000 - 3.500.000 ai nodes, which is roughly a 1.3 km x 1.3 km sized area filled totally with ai nodes. It depends also from the number of graph points on AI map, for optimised a-life there must be a dense graph point network on the AI map. The memory usage barriers of xrAI won't allow you to make bigger the playable area then around 3 million ai nodes + around ~400 graph points. For best results, compile the level.graph (*ShOC only) or all.spawn (for CS and COP graph) on Windows 7 x64.
Of course it doesn't mean the maximum size of level geometry, it's just the playable area limit.
What are the graph points, and why we need them?
If an entity becomes off-line, so it goes beyond switch distance, and the engine switches it from on-line to off-line, it disappears from the AI map, and starts to move along graph points. Graph points are designated points, which exist only on the AI map. Graph points appear as spawn objects in a level editor scene, but they don't exist as a spawn object in the game or in the game's all.spawn: xrAI compiler translates the graph points on AI map into game/level vertices (into a graph network). If you would unpack a game.graph with GGtool, you could see, that the number of game vertices are equal with the number of graph points on the AI map.
All off-line entities will move along these level/game vertices on AI map, travels to other maps etc. Graph points are also used to designate a point for spawning the actor after level change from an other map, or link two map to allow for npcs/creatures level to level traveling.

Selected all the graph points on Escape: 253 needed for this map.
Which files store AI map and graph in gamedata?
The level (local) ai map is stored in level.ai.
The level.graph (ShOC only*) contains the level part of the global offline graph.
The game.graph (ShOC only*) is a collection of level.graph files, plus some reference information to the corresponding local ai map in level.ai.
The level.gct (ShOC only*) is a level graph cross-reference table, it is used for quick level ai map node to global offline ai node determination. The level.gct.raw (ShOC xrAI generates only) is just the raw/draft version of the level.gct file.
The CS/COP all.spawn have included game.graph (and included level.graph and level.gct too). If we decompile CS/COP all.spawn with ACDC tool, the section*.bin is the game.graph itself.
*Note: game.graph (and level.graph and level.gct too) is stored in CS/COP inside the all.spawn.
2) Practice
I'll start with a multiplayer map, with the mp_atp, and prepare this map for single player game. First I remove all the _$rpoint (actor respawn points) and all the _zone_team_base (profile: network/team_base) from spawn, they needed for multiplayer only.
Removing multiplayer spawn
Switch to „Spawn Element" at Edit Mode panel, and open the „Object List" at the Scene panel, Ctrl + left mouse click on all of the MP-related spawn objects on the list, close Object List and hit „Delete" key on keyboard:

Creating AI map
If you start this tutorial as a creator of a brand new map, which you modeled from scratch with a 3d editor, then you have to finish your map in level editor, encircle the playable area with fence/fake collision texture, and place every object you wanted to, then comes this part:
Step 1:
As you see on the below picture, the map has borders:
-a fence object, which is visible in the game
-weird white objects with CTEHA (wall) label, these are invisible collision objects in the game
- it's always good to encircle the map's playable area with a fence and fake collision object, this helps a lot to generate AI map:
")
The mp_atp map has a fence and a fake collison border already, it will be the border of our AI map too (single player playable area)
Also you can see on the right panel (Edit Mode), the „AI Map" button, so select it (it's highlighted with white color):
, the „AI Map” button, so select it (it's highlighted with white color):")
Step 2:
After you selected AI map Edit Mode, make sure you clicked on the arrow button at the upper toolbar (or press "S" for selection arrow):

Step 3:
Now you can click on the Snap List's „+/- Mode" button, and start to add the terrain and all the objects inside the fenced area to the Snap List one by one. Every static object what you select now, will be taken account into AI map collision model. Press „Enable/Show Snap List" to show with red color what was selected:

Step 4:
When you select an object, it will be added to that Snap List, and it will get red color, so you will know, that you already added it. However, adding objects outside the fenced area, is not needed*, since you will only spawn npcs/creatures inside the level, and of course do not forget to select the fence objects too, so npcs will not try to go through them.
*Note: sometimes you need to add more hundred objects, and if you perfectly encircled the AI area with fence/fake invisible collision object, you can simply add all objects to the snap list, see " Step 3 and 4 for lazy people"
Tip: to remove an object from Snap List, press „Ctrl + select with left mouse button".

All objects and the fence are selected in the playable area/ai map area
Step 3 and 4 for lazy people (including me):
If you don't want to bother adding more hundred objects one by one to the Snap List, here is a simplier method. I used to add all objects of the scene to the Snap List, because if we add the first AI node inside the fenced area, the full AI map generating will create ai nodes only inside the fence (again: the fence or fake invisible wall must encircle perfectly the playable area, or the complete terrain will be filled with ai nodes):
-Switch to „Object" Edit Mode:

-Select all objects by clicking on Tools-˃Selection-˃Select All (or hit Ctrl+A):
:")
-Switch to AI map Edit Mode, and click on Snap List-˃Commands-˃Make List From Selected. This will add all selected objects (which we selected in Object Edit Mode) to the Snap List in the scene, all highlighted in red:
 to the Snap List in the scene, all highlighted in red:")
-Unselect the objects with switching to Object Edit Mode, and choose ->Tools-˃Selection-˃Unselect All:

-Choose AI map Edit Mode again to for the next step (Step 5), so as you can see all objects are added to our Snap List:
, so as you can see all objects are added to our Snap List:")
Step 5:
When you selected all needed (or simply all) objects on the level, you need to place at least one ai node by hand on the map inside the playable/fenced area. So click on the bucket "Add" icon at the upper panel (or press „A" on the keyboard), and left mouse click on the map. You placed an ai map node, which will be red coloured (0-link node):
 objects on the level, you need to place at least one ai node by hand on the map inside the playable/fenced area. So click on the bucket")
Step 6:
Now that you added the needed objects to the Snap List, and you placed an AI node, you can generate AI Map. Click on "Generate Full" at the AI Map Commands panel. This can be a long process, if you made a big map. The automatic creation of AI map can take only 1-2 minutes in case of an mp_atp sized map, but can take up to hours in the case of huge and complex maps with much vegetation and junk, also it depends on your pc's performance.

The AI map is automatically generated, but not ready yet...

All scene objects are on the Snap List, but „Generate Full" expanded the AI map only inside the fenced area
When it is done, you can click on "Enable/Show Snap List" button, so the red colors disappear from the map.
Step 7:
After generating the AI map, select all nodes with „ctrl + A" and press on the AI map Commands panel the „Smooth Selected" at least once, so the ai nodes will be smoothed, the editor fits the ai nodes better (horizontally) to the terrain/ground objects:
 to the terrain/ground objects:")
Step 8:
After this method, while the AI nodes are still selected, click at the „AI Map Nodes" panel under „Link Commands" on the middle cross (+) ai node image, and wait. This will check connection between ai nodes, and force connection for each unconnected ai nodes, so you won't find any red - invalid - ai nodes or unconnected neighbouring ai nodes on your map:
 ai node image, and wait. This will check connection between ai nodes, and force connection for each unconnected ai nodes, so you won't find any red - invalid – ai nodes or unconnected neighbouring ai nodes on your map:")
To make sure, that you don't have 0-nodes, on „AI Map Nodes" panel, under „Link Commands" click on the „Select 0-Link", and watch the number right below near „Sel:", it shows how many red (0) nodes are selected. If it's not 0, so you have some 0-Linked nodes, press „Delete" key on keyboard and you get rid of red (0) nodes.
Step 9 - Visual check of AI map:
First it's fine to check the AI map visually, and search for ai nodes, which allow for npcs to go to weird places and delete these nodes. It can happen the contrary, sometimes ai node creation fails, if it doesn't find a way through narrow places, and we have to place manually some nodes.
Deleting ai nodes
If you forgot to add some object to Snap List (which can't happen if you follow „Step 3 and 4 for lazy people", and add all objects to the Snap List), and you don't want to re-generate the whole aimap, select ai nodes one by one: select more ai nodes with Ctrl+left mouse click on more ai node (or Ctrl + encircle an AI map area with holding and releasing left mouse button), and hit „Delete" button on the keyboard.
For example I checked my new AI map, and I didn't like this, so I deleted both nodes:

These 2 ai nodes are useless, it would be weird to see npcs/creatures walking on top of the trunk
Adding ai nodes
If you deleted too much ai nodes or the full AI map creation missed out some interior place because of narrow door entry, you have to work manually a little.
Adding ai nodes is easy, just press „A" button on keyboard and left click with mouse, so you can place down ai nodes manually to the empty areas. They will be automatically connected with the neighbouring ai node, if „Auto Link" button is pressed in AI Map Nodes panel, which is switched on by default.
An example how to add manually ai nodes. This room in the picture is not covered with AI map, because the editor couldn't make ai nodes through the narrow doorway. The whole room is now forbidden for npcs/monsters, where the actor is in safety, where we can't spawn npcs... But we would like to make AI map in this room too:
Option one:
-Adding manually the nodes with a big brush size: choose in AI Map Edit Mode the Properties, and grow Brush size, so you can add more ai node with one click (10*10 sized brush will cover the complete room):
:")
- Press „A" button on keyboard and left click with mouse in the middle of the room to add more ai nodes:

Option two:
-Generate a partial AI map from a 0-link node, what you place in the middle of the room, so set brush size to 1 and add a node by pressing „A" button on keyboard and left click with mouse:

-Now press „Generate Selected" at AI map Commands panel and see a partial AI map creating:

Linking ai nodes through objects:
This room's AI map is separated from the main part of the AI map, which makes the whole AI map invalid, so we have to link the ai nodes through the narrow door entry (don't forget to set back the Brush size to 1). If at the AI Map Nodes panel the „Ignore Constraints" option is not pressed, the editor won't allow you to place down ai nodes there, it will cry in the log „Can't create node":
. If at the AI Map Nodes panel the „Ignore Constraints” option is not pressed, the editor won’t allow you to place down ai nodes there, it will cry in the log „Can’t create node”:")
So we press „Ignore Constraints" option and voila, we are gracefully allowed to place 2 ai nodes here, through the narrow doorway:

Well, the npc who goes through this door, will intersect a little with the door-post, but the room is connected to the playable area
Linking ai nodes with height difference (for watchtowers, rooftops etc.)
There could be places, like building roofs and watchtowers, where we would like to expand our ai map, to spawn some npc. Automatic ai map creation will never do it properly, so we have to work with hand.
I show an example with the Generators watchtowers. We have two options to link two ai nodes with height difference.
Option one - with a vertical ai node:
Let's push „Ignore Constraints" option at AI Map Nodes panel, and add a 0-node in the middle of the ladder:

Now we have to rotate this ai node to make it vertical. While the red node is still selected, push the white circle-shaped arrow at the top toolbar and X or Y nearby - Rotate along X or Y axis:

I had to rotate the node along X axis, but on different maps you have to experience, X or Y axis do you need:

Now I have to move the ai node into a position, where it can link the ground and the watchtower flooring. While the ai node is still selected, select at the top toolbar the red cross shaped arrow - the Move button, press Y nearby, and start to move the ai node along Y axis up or down*:
*Tip: you can enhance the mouse sensitivity of the editor when you rotate and move, choose at Scene panel the Preferences, and open Tools drop down menu, and at Sense, reduce the values of Move and Rotate between 0.1-0.3

Add ai nodes on the watchtowers floor, and if necessary, add extra ai node to the ground too, to link the vertical ai node. While all new ai nodes are selected, click at the „AI Map Nodes" panel under „Link Commands" on the middle cross (+) ai node image, to force connection between nodes:
 ai node image, to force connection between nodes:")

Now we can spawn an npc in the tower, and if you don't want to see up-and-down levitating NPCs, an IN space restrictor should hold back the guy in the upper area
Option two - without vertical ai node:
It is possible to do this without vertical ai node. I don't know, which one looks better in the game, but NPCs won't climb the ladder.
So I added some nodes to the ground and to the watchtowers floor, and now we should bridge the height difference - I select both ai nodes, what I'd like to link:

While both ai nodes are selected, be sure, that „Ignore Constraints" option is pushed on the AI Map Nodes panel, and click at the „Link Commands" panel on the middle cross (+) ai node image, to force connection between nodes, and done, height difference is surmounted:

Big step for an NPC - small step for the mankind
Step 10 - Check AI map with xrAI:
Now you'll need the xrAI tool to find errors on the AI map, which would be impossible to find visually.
See in my earlier tutorials how to set up xrAI:
First we need to build the map in level editor (xrAI will need build.prj), but before this choose at „Scene" panel the „Scene Options", set among the „Build Options" the scene „Quality" to „Draft", and at „Level path" option name your map as you wish - I gave the mp_atp name:
, but before this choose at „Scene” panel the „Scene Options”, set among the „Build Options” the scene „Quality” to „Draft”, and at „Level path” option name your map as you wish – I gave the mp_atp name:")
-now at „Scene" panel choose in the „Compile" menu the „Build" option.
After you succesfully builded the map, you find a new folder with your map's name (the name you gave as a level path) somewhere in the C:\Program Files\X-Ray SDK\level_editor\gamedata\levels\ folder.
Tip: If the scene is not valid, and you can't build it, keep in mind that you need in the scene at least one spawn (one actor for example), glow and light object, also all MU (multiple usage) objects in the scene should have generated lod textures.

-make a batch file (*.bat) with these commands (instead of mp_atp, insert your map's folder name what you find in C:\Program Files\X-Ray SDK\level_editor\gamedata\levels\ folder) to check AI map and run it:
@start /wait bins\compiler_ai\xrAI.exe -draft -f mp_atp
@start /wait bins\compiler_ai\xrAI.exe -verify mp_atp
The first command makes a draft level.ai, the second command checks the ai nodes connectivity and ai map validity:


To see the message of xrAI after you clicked on OK, see the xrAI log somewhere in the C:\Program Files\X-Ray SDK\level_editor\logs folder, usually an xrai_username.log:
Verifying level gamedata\levels\mp_atp\
*New phase started: Verifying level graph
Vertex 2748[107.800003][-6.956611][10.500000] is single linked!
Vertex 2901[108.500000][-6.956611][10.500000] is single linked!
Vertex 3051[109.199997][-6.956611][10.500000] is single linked!
Vertex 6722[128.100006][-7.156704][-15.399994] is single linked!
Vertex 6723[128.100006][-7.156704][-14.699997] is single linked!
Vertex 7664[133.699997][-7.098376][-7.000000] is single linked!
There are 6 single linked nodes!
AI-map is valid!
Verifying level gamedata\levels\mp_atp\ completed
Verifying level gamedata\levels\mp_atp\ completed
Looks like I have luck with mp_atp, the AI map is valid at first try, but we'll not be always so lucky. More bigger and more complex the map is, more elevations/depressions are on the level geometry, the chance will also grow that the automatically generated AI map will be invalid.
The 6 „single linked nodes" are not game breaking errors*, don't cause CTD, but you may experience some weird move from npcs/monsters. If I want to be precise, I used to fix single linked nodes too.
*Note: the AI maps of vanilla SOC scenes are full of single linked nodes, and yeah, despite these nodes the AI works (?) - so this problem didn't care the game's developers
Correcting NOT valid AI maps
Ok, I had luck with mp_atp, but what's the situation with the invalid AI maps? Let's see a more problematic map, Generators from June 2006. Pretty complex terrain geometry, many elevations, large underground part. Sure thing, after automatic AI map creation, I get a long error log, with „Congratulation!" and „AI-map is NOT valid" message:

Node
13705[-210.000000][36.516769][-151.899963]
cannot be reached from the node
794[-255.500000][32.622856][-83.999969]
Well, we have an unconnected, isolated ai node in the first designated coordinates ([-210.000000][36.516769][-151.899963]), which is not part of the main AI map. These ai nodes are separated ai node islands, without connection to the main AI map. These errors can break the game, break alife, and the xrAI cries, if the AI map is not valid, and it will deny to make level.graph, game.graph and all.spawn for us.
-to fix it, I open the scene, and add a shape to search the coordinates (instead of flying over the map, watching the coordinates below...):
-switch to „Shape" on Edit Mode panel and add a shape with pressing „A" + left mouse click, then right mouse click on the green sphere, and choose „Properties...":

I type in the first coordinates (sometimes the second coordinates), what can be find in the xrAI errorlog (-210 ; 36,516769 ; -151,899963) in the Position:
 in the Position:")
... and I have just visually search* for the shape. We have to type in the shape properties the position coordinate numbers with , (comma) instead of . (period).
*Tip: To see the shape's pivot, what we can see from greater distance in the scene: choose on „Scene" panel „Preferences", and open „Objects" drop down menu, and choose „Show", check „Pivot".

A typical error with automatic AI map generating, an ai node is duplicated at the elevation - 2 ai node on the same place:

I can fix this error with deleting the surplus green (1 linked) ai node, and done, next one please. Switch to AI Map Edit Mode, and delete such ai nodes.
To see the next error, we have to export the AI map again, and make a draft AI map and verify it. Save the scene, then export only the AI map at „Scene" panel, by choosing the „Compile" menu and clicking on „Make AI Map" (exports a new build.aimap file in the C:\Program Files\X-Ray SDK\level_editor\gamedata\levels\yourmap folder), then run the batch with these commands:
@start /wait bins\compiler_ai\xrAI.exe -draft -f yourmap
@start /wait bins\compiler_ai\xrAI.exe -verify yourmap
I get this:
There are 387 single linked nodes!
AI-map is NOT valid :
Node
127311[-76.300003][33.924732][-187.599976]
cannot be reached from the node
794[-255.500000][32.622856][-83.999969]
Verifying level gamedata\levels\l13_generators\ completed
The searching with shape starts again, the next unconnected ai node is at [-76.300003][33.924732][-187.599976], and so on, and so on, until our AI Map become valid.
Correcting single linked nodes - looks not so important, but who knows...
Back to mp_atp scene. The „... is single linked!" means, that some nodes try to connect incorrectly to an other ai node, but they are not isolated, they have connections to the main AI Map. The 3 numbers in the log like: [108.500000][-6.956611][10.500000] give an ai node coordinate, what we can search in level editor with a shape, as above. I can't imagine, what happens, if an npc walks on these 3 nodes:

The 3 ai nodes on the stairs want to connect the 3 ai nodes on the ground, but those nodes on the ground already have connections with the ground ai nodes - the 3 ai nodes are connecting to the nothing
So I just delete these 3 ai nodes, and re-add them manually with the correct connections:

Other 3 errors, and how to fix them:

Both ai nodes would connect to the nodes on the ground, but the ground ai nodes have no connection arrow upside - I just deleted the 2 orange from above

... and again, the ai node at upper level wants to connect to the ground, but it has no connection above, so I just deleted it again - plus I deleted all the ai nodes from the machine and done, it would be a weird place to walk for AI
After we fixed the AI map, save the scene, then export only the AI map at „Scene" panel, by choosing the „Compile" menu and clicking on „Make AI Map" (exports a new build.aimap file in the C:\Program Files\X-Ray SDK\level_editor\gamedata\levels\yourmap folder):
:")
We check again the fixed AI map with xrAI:
@start /wait bins\compiler_ai\xrAI.exe -draft -f mp_atp
@start /wait bins\compiler_ai\xrAI.exe -verify mp_atp
Now it's perfect, xrAI didn't found even a single linked ai node, AI map is still valid, so we can move to next phase, adding graph points:

Step 11 - Adding graph points:
It would be enough just one graph point to compile a graph for our map, but for a properly working alife we have to add a graph point network. The number of graph points depend on the AI map size, and where we want to create smart terrains, where we would like to direct storyline scenes and such.
-before you add any spawn object, choose at Scene Options a „Name prefix" for the current map's objects, which helps to avoid confusion in all.spawn, if you make map packs:

-Choose Edit Mode - „Spawn Element", and at the „Spawn" panel, open the „ai" drop down menu and choose „graph point" spawn:

-Click on the bucket "Add" icon at the upper panel or press „A" on the keyboard, and left mouse click on the map, so you add a graph point, which will be named with the scene name prefix:

- Be careful, to add graph points only on the AI map. Otherwise xrAI compiler will discard all the graph points outside of the AI map. I added 42 graph points, it's more then enough for such a small map:

You can hide the AI map after it's generated, because it can be annoying to see the nodes everywhere all the time. To do that, in AI Map Edit Mode go to Properties, and uncheck Draw Nodes, and the AI grid will disappear. To turn it on, click on it again.
-save the scene and export the new spawn (because the graph points are considered as spawn objects), choose at „Scene" panel „Compile"and select „Make Game" (exports a level.spawn and a level.game file in the C:\Program Files\X-Ray SDK\level_editor\gamedata\levels\yourmap folder):
, choose at „Scene” panel „Compile”and select „Make Game” (exports a level.spawn and a level.game file in the C:\\\\\\\\Program Files\\\\\\\\X-Ray SDK\\\\\\\\level_editor\\\\\\\\gamedata\\\\\\\\levels\\\\\\\\yourmap folder):")
Step 12 - compiling final AI map:
To compile a final AI map, the xrAI needs a build.cform, which we can get if we compile the map with xrLC. We saved the scene with Draft lighting quality settings, now it's good enough to test maps and compile a test graph.
So I edit my xrLC batch to run this command:
@start bins\compiler\xrLC.exe -f mp_atp
All went fine, xrLC succesfully compiled the map with Draft quality settings in 1 minutes 27 seconds:

We have the desired build.cform for our map - if the xrAI misses a build.aimap, open your scene in level editor and export AI-map. Now we can race for the final AI map with covers*, so we insert this command into a batch file :
@start bins\compiler_ai\xrAI.exe -f mp_atp
*Note: I never tested if it's necessary, but you should re-make the final ai map with xrAI, after you compiled via xrLC the map geometry with the final (Custom or High) lighting quality settings - the xrAI calculates here the lighting of AI map nodes, so lighting quality can become important
There are no errors, I have the final AI map, ai nodes are lighted, coverage is calculated in 2 minutes 40 seconds:

Step 13 - compiling graph for a single map (*step for ShOC only)
Now we can generate a level.graph for our map with this command:
@start bins\compiler_ai\xrAI.exe -g mp_atp
For testing purposes, of course you can generate a level.graph with draft AI map too, however I don't recommend the using of draft AI maps for serious modding, as AI can act weird on the draft AI maps.
CS and COP modders must skip this step, their next move would be the making of the all.spawn.
Creating a level.graph lasted only a blink of an eye:

That's it, the map is prepared for the single player game!
A next article in the future will cover, how to link maps with graph points for AI, and how to link maps with level changers for actor, finally how to make a new all.spawn (and game.graph for SOC only), basically how to make a map pack from more single map.
Credit goes for dezodor too, some parts used from his modwiki tutorial
© Bangalore
26-05-2013


Brilliant, Thanks for taking the time and doing the work required for this.
This is amazing work, sir! Detailed, sharp and with screenshots! Mind about complete modder's PDF manual for X-ray map creator.
Great tutorial mate, well done. Concise but explanatory and great pictures. Awesome!
You are welcome guys, and of course i accept constructive criticism too. Also i'm not sure about my grammar. A native english could correct my errors. :D
Regarding modding, help me improve this article with new ideas/methods.
I know some talented modelers and modders, who created some awesome SP map, but left the scene because of ai map fixing hell.
You really did well, sir. Hats off! Pity, I really don't know what to add. A lot of things were done since release of X-ray instruments. OGSE Team even did a merging of Escape and Garbage locations, and merging of both Pripyat locations from ShoC and CoP. I even think that they found a way to circumvent the limitations on AI nodes and graph points.
Try to cover more difficult stuff in the same manner, sir.
Excellent tutorial.
Thanks for detailed steps and correcting the AI map tips.
Exactly what I need to work on :-).
Thank you very much.
Do not underestimate the modding !
Good work! As always!
Bangalore ,infinitly thank you for a such tutorial! Extraordinary!
When I think of evil and time (in months!)that I had to succeed to make one (correct aimap)!
That really makes you want to dive again into the "depth" of the SDK!
Thank you for always sharing all your knowledge of these hard tools and help the beginners like you do!
I wanna try this to see and maybe to edit a few ai points in the jupiter level but can't find the right file to open jupiter with the level editor. How can I do that?
Once I get able to open levels I guess I'll be using this great tut a lot. Thanks a lot for it
Hi i'm having some problems with the CoP Level Editor, maybe someone here can help. i'm trying to import a object into the level editor but the dialog box is some how "invisible" when i click import object. can someone help me out real fast? where is it?
Hi! You don't have to import object files to LE, just copy them to rawdata\objects folder's subfolder.
Just O_O !
WOW!! Nice tutorial! Oh I was also wondering how to add or modify the name of anomalies. For example, in CoP in the default game there are circles that the name of that specific anomaly when moving your mouse over, like "Oakpine Anomaly", "Claw Anomaly" and etc. Is there a way to edit and change that name to something else? Appreciate it thanks!!
That's really a complex process to get a valid AI map there. Must be the most painful and time consuming part in making a stalker map. O_O
CSS and CSGO ai mapping isn't better.
Don't they use a way-point system like old CS used? Not that way-point systems are better than this but seems to be less complex. Worked once with it and I god acceptable results quickly without much effort. That is unless CSS/CSGO messed it up meanwhile :D
What is the effect on performance when you change then on-offline distance?
What is the name of program for creating new map in stalker?
Hello !
This is great but I can't use xrLC. I only added some ai nodes in dead city (and my aimap is valid)
Then I make game and try to use xrLC and I have a fatal error during the optimizing phase : 3 invalid faces.
Can someone help me, please ? Do you have an idea where it can come from ?
My goal is to make the apartments building in the dead city map valid locaiton to spawn npcs. I juste started by putting some ai nodes in one entrance and stairs.
xrLC compile all level which take time hours. Is this normal?
Depending on the map size and your pc's performance, it can take from minutes to 12-18 (or more) hours.
COP SDK tools work faster with more cpu core.
Does anybody know whether one can edit levels by following approach?
1. Decompile/unpack all.spawn (f.e. with ACDC.pl or some other non-SDK tool)
2. Import for beginning one of the unpacked levels into Blender, bforartists, or so.
3. Export from the program used in step (2) and, if necessary:
4. Build/pack the changed components with everything else gained in step 1 to receive all.spawn...