Originally posted: Rune Mod Menu Tutorial
Mirrored for archival purposes
Introduction
Okay. You have a spiffy new mod just begging to be played. One small problem, though. There's no way to set up the player, instead, relying on directly editing an .INI file (eeewww). This document will show how to make your own Player Setup using Rune's Menu Mod functionality.
There are a few things being assumed:
- Basic understanding of Unreal Script
- Basic understanding of UWindows and RMenu
An invaluable tool for looking over Human Head's code is UnDox. This will especially come in handy when wading through UWindows and RMenu.
The RMenuModItem Class
The RModMenuItem class is new to the 1.06 patch. With this class, a coder has a 'hook' into Rune's GUI, enabling them to add a player setup, a server browser for their mod, start a server using any special setting for that mod, or anything else that comes to mind. To start your custom menu, subclass RMenuModItem, like so:
MMT1_ModItem.uc
class MMT1_ModItem expands RMenuModItem;
defaultproperties
{
ModPageWindowClass=Class'ModMenuTest1.MMT1_ScrollClient'
MenuCaption="MMT1"
MenuHeight=50
}
Pretty straightforward. MMT1_ModItem is a child of RMenuModItem. ModPageWindowClass defines your 'framework' class, meaning what kind of window it is. MenuCaption is the text that will be displayed on the dropdown-box. MenuHeight is how tall the menu is.
Now we'll look at the Scroll Client:
MMT1_ScrollClient.uc
class MMT1_ScrollClient expands RMenuModScrollingDialogClient;
function Created()
{
ClientClass = class'ModMenuTest1.MMT1_ClientWindow';
FixedAreaClass = None;
Super.Created();
}
defaultproperties
{
}
Note the parent class:
RMenuModScrollingDialogClient. Your scroll client MUST be subclassed from this class, since this class 'knows' about the Mod Menu. None of the other framework classes do. ClientClass points to your client window, where all of the buttons, drop-down boxes, check boxes, etc. are made. FixedAreaClass is seldom used, so just set that to None. Then, call Super.Created(), and that's it for the Scroll Client.
Here's the fun part, the Client Window:
MMT1_ClientWindow.uc
class MMT1_ClientWindow expands RuneMenuPageWindow;
var UWindowCheckBox SomeCheck;
function Created()
{
Super.Created();
SomeCheck = UWindowCheckBox(CreateControl(class'UWindowCheckBox', 10, 10, 100, 1));
SomeCheck.SetText("Some Option");
SomeCheck.SetFont(F_Normal);
SomeCheck.Align = TA_Left;
}
function Notify(UWindowDialogControl C, byte E)
{
switch(E)
{
case DE_Change:
switch(C)
{
case SomeCheck:
break;
}
break;
}
}
defaultproperties
{
}
This class isn't any different than a Client Window class you would find in Rune. There aren't any special variables, subclasses, anything. The only thing that is created with this code is a check box. There is only one thing missing to make this all work.
On startup, Rune searches your System directory for any .int files, and looks for any mods that need to be added to it's mod list. Either create or edit your mod's .INT file, adding an entry telling Rune you want to add your player setup to the list:
ModMenuTest1.int
[Public]
Object(Name=ModMenuTest1.MMT1_ModItem,Class=Class,MetaClass=RMenu.RMenuModItem)
Let's go through the Object line:
Name is the name of the class that has subclassed RMenuModItem, in this case ModMenuTest1.MMT1_ModItem. Class=Class. Always. MetaClass is the parent of MM1_ModItem, which is RMenu.RMenuModItem. In short, the only entry that should be changed for your mod is Name. Everything else should remain as is.
Alrighty then, we have all this code, but what does it do? Let's find out:
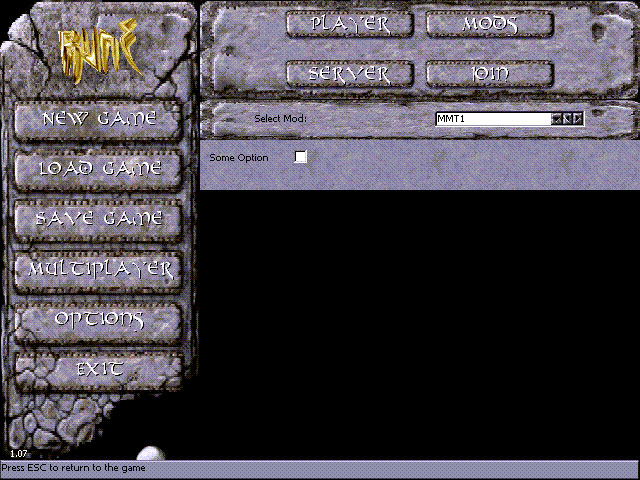
If you haven't seen the Mod button before, "Hello!" It only appears if Rune finds an .INT file with a reference to RMenuModItem. In the drop-down box, you see MMT1. That's the name it was assigned in MMT1_ModItem with the MenuCaption variable. And there's our lonely check-box. It's not really doing anything, just sitting there. We'll remedy that shortly.
Tabs
Yep, we have a single screen with a check box. Well, that's just just the start. What if we wanted to have 3 pages, with a different check box on each one? No problem, here's the code:
ModMenuTest3.int
[Public]
Object=(Name=ModMenuTest3.MMT3_ModItem,Class=Class,MetaClass=RMenu.RMenuModItem)
MMT3_ModItem.uc
class MMT3_ModItem expands RMenuModItem;
defaultproperties
{
ModPageWindowClass=Class'ModMenuTest3.MMT3_ScrollClient'
MenuCaption="MMT3"
}
MMT3_ScrollClient.uc
class MMT3_ScrollClient expands RMenuModScrollingDialogClient;
function Created()
{
ClientClass = class'MMT3_ClientWindow';
FixedAreaClass = None;
Super.Created();
}
defaultproperties
{
}
MMT3_ClientWindow.uc
class MMT3_ClientWindow extends RuneMenuPageWindow;
var UWindowPageControlPage Tab1, Tab2, Tab3;
var UWindowPageControl Pages;
var localized string Tab1Text;
var localized string Tab2Text;
var localized string Tab3Text;
function Created()
{
Pages = UWindowPageControl(CreateWindow(class'UWindowPageControl', 0, 0, WinWidth, WinHeight-25));
Pages.SetMultiLine(True);
Tab1 = Pages.AddPage(Tab1Text, class'MMT3_Tab1ScrollClient');
Tab2 = Pages.AddPage(Tab2Text, class'MMT3_Tab2ScrollClient');
Tab3 = Pages.AddPage(Tab3Text, class'MMT3_Tab3ScrollClient');
Super.Created();
}
function Paint(Canvas C, float X, float Y)
{
local Texture T;
T = GetLookAndFeelTexture();
DrawUpBevel( C, 0, LookAndFeel.TabUnselectedM.H, WinWidth, WinHeight-LookAndFeel.TabUnselectedM.H, T);
}
function Notify(UWindowDialogControl C, byte E)
{
Super.Notify(C, E);
switch(E)
{
case DE_Click:
switch (C)
{
}
}
}
defaultproperties
{
Tab1Text="Tab1"
Tab2Text="Tab2"
Tab3Text="Tab3"
}
MMT3_Tab1ScrollClient.uc
class MMT3_Tab1ScrollClient expands RMenuModScrollingDialogClient;
function Created()
{
ClientClass = class'MMT3_Tab1ClientWindow';
FixedAreaClass = None;
Super.Created();
}
defaultproperties
{
}
MMT3_Tab1ClientWindow.uc
class MMT3_Tab1ClientWindow expands RuneMenuPageWindow;
var UWindowCheckBox SomeCheck;
function Created()
{
Super.Created();
SomeCheck = UWindowCheckBox(CreateControl(class'UWindowCheckBox', 10, 10, 100, 1));
SomeCheck.SetText("Some Checkbox");
SomeCheck.SetFont(F_Normal);
SomeCheck.Align = TA_Left;
}
function Notify(UWindowDialogControl C, byte E)
{
switch(E)
{
case DE_Change:
switch(C)
{
case SomeCheck:
break;
}
break;
}
}
defaultproperties
{
}
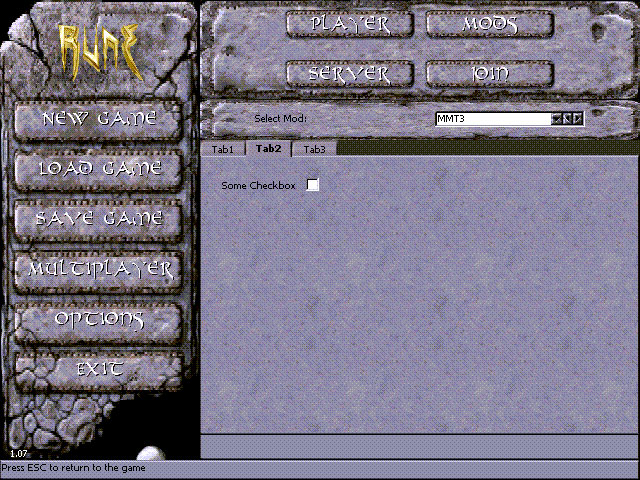
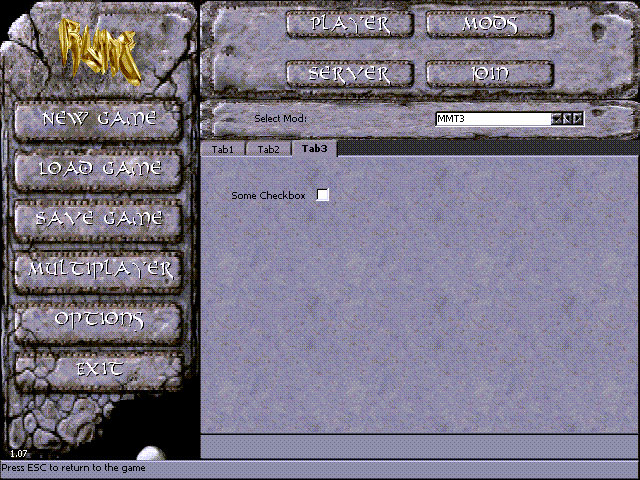
For the sake of brevity, I'm only giving the full listing of Tab1, since all three tabs are similar, except for the check box placement. As an exercise, given the code I've just listed, code MMT3_Tab2ScrollClient.uc, MMT3_Tab2ClientWindow.uc, MMT3_Tab3ScrollClient.uc, and MMT3_Tab3ClientWindow.uc, generating the following menus in Rune:

That wraps up Rune Mod Menu 101, but there's one topic I want to touch on.
Getting values from and saving items to an .INI file
These menus aren't much without the ability to get and save values to an .INI file. Here's the skinny on that:
In my mod, SarkDM, I've coded the ability to jump off walls. It give a bit of a boost for those 'hard to reach' places. Not everyone might be thrilled at that idea, so I decided to make it an option for the server to enable this function. First off, I edited SarkDM.INI, adding this:
bAllowWallJump=True
Then I defined the variable for this in the class SarkDM:
class SarkDM extends RuneMultiPlayer config(SarkDM);
var() config bool bAllowWallJump;
Right off the bat, you should notice the extra parameter in the class declaration: config(SarkDM). This tells Rune to use SarkDM.INI as the INI to get and save changes. Next, there's this: var() config bool bAllowWallJump;. config tells Rune to get this value from the INI file, and the parentheses make the variable editable, and give what catagory the variable is in. This is accessed through 'Properties' in RuneEd.
Okay, the variable is defined, let's use it. Here's a snippet from another class in the mod:
function Created()
{
local int ControlWidth, ControlLeft, ControlRight;
local int CenterWidth, CenterPos;
C />bInitialized = False;
Super.Created();
C />C - ControlWidth)/2;
C + ControlLeft;
CenterWidth = (WinWidth/7)*6;
CenterPos = (WinWidth - CenterWidth)/2;
...
...
...
WallJumpCheck = UWindowCheckBox(CreateControl(class'SarkDM.SarkDM_CheckBox', CenterPos, ControlOffset, CenterWidth, 1));
WallJumpCheck.SetText("Enable Wall Jumping");
WallJumpCheck.bChecked = class'SarkDM'.default.bAllowWallJump;
}
function Notify(UWindowDialogControl C, byte E)
{
switch(E)
{
case DE_Change:
switch(C)
{
case WallJumpCheck:
class'SarkDM.SarkDM'.default.bAllowWallJump = WallJumpCheck.bChecked;
class'SarkDM.SarkDM'.static.StaticSaveConfig();
break;
...
...
...
}
break;
}
Super.Notify(C, E);
}
The first thing to take notice of is where WallJumpCheck.bChecked is getting initialized from. It's the 'default' value of bAllowWallJump. Guess where that's coming from? Yup, SarkDM.INI.
Next, if the option changes, this code executes:
case WallJumpCheck:
class'SarkDM.SarkDM'.default.bAllowWallJump = WallJumpCheck.bChecked;
class'SarkDM.SarkDM'.static.StaticSaveConfig();
break;
First, the variable bChecked (this is the boolean that tells whether the check box is 'Checked' or 'Unchecked') is written to the default bAllowWallJump. The next line saves that value to SarkDM.INI. Neat, huh?


