Tutorial originally released on Running With Scissor's Postal website. Was taken down more than 10 years ago. Mirrored here for archival purposes.
POSTAL 2 Editor and Modifications
How to use InterestPoints and their kin
This tutorial covers how making working queues and cash registers.
It assumes you have some understanding of and experience with PostEd and you have some knowledge of pathnoding and pawns. If you are unfamiliar with these we suggest you familiarize yourself with these using tutorials available on other sites.
Concerns: InterestPoint, StorePoint, QStartPoint
Interest Points
Extends Keypoint
As a pawn (with at least a LambController guiding it) walks randomly around the world (with the help of pathnodes) it will pass through the radii of various interest points. These will invite/exclude pawns based on their type and their interest level. Use these to do any small task (stare at something, laugh, smoke) or chain them together for complicated events (look at store window, then walk into store, buy things).
Variables
bAllowConsecutiveReturns: Usually a pawn will not be allowed to return to the same interest point twice in a row. This makes it possible.
bExcludes:Excludes the ConcernedClasses and all their children (defaults to false, so usually the concerned classes are INCLUDED)
ConcernedClasses: All the classes and their children of this are by default ALLOWED to use this interest point. If you set it to P2Pawn by default then only people will be allowed to use this interest point. If you set it to Police (the pawn class, NOT the PoliceController) then only police can use this point. If you set it to Police and then set bExcludes to True, then everyone BUT police can use it.
ConcernedBaseClass: This just makes sure stuff like static meshes and particle effects aren’t bothering the interest points all the time. The default is P2Pawn, so that means with the above case, only P2Pawns are considered, and then Police are either included or excluded. If you wanted something else to use interest points and we had functionality for them in the action type, then you’d have to lower this to their level. Like, to make a karma static mesh use interest points, you’d have to start by setting this class to StaticMesh and the ConcernedClasses probably to P2Pawn and bExcludes to true, so you only look at static meshes and not characters.
InterestLevel: If a person of the concerned classes that’s included walks by and hits the interest point, AND the interest level is high enough for them, they’ll try to use it. If you set this to 1, every one will try to use it. If you set it to 0.1, very few people will try to use it.
InterestTag: Used in conjunction with ActionType, this what the actor usually looks at, or laughs at, or shoots at, or sits on or whatever. You must set the Events:Tag in the interest actor you want this to link to. So if you have an interest point, and you want it to link to a certain store sign, you go to the store sign and click open Events, and change Tag to something SPECIFIC/UNIQUE like StoreSign93. Then in InterestTag set it to StoreSign93, and whoever uses this interest point will use that sign for things. So this must be unique. If it’s not unique then the first actor with this tag (if you pick something generic like Pickup) will be used and you will probably get unexpected results.
LinkToTag: This is the actor this interest point links to AFTER it’s performed it’s action. It needs to use a tag of a specific actor also. So InterestPoint23 can have it’s LinkToTag be StoreEntrance12 (also an interest point, but it’s Events:Tag is set to this name). So in InterestPoint23, we have LinkToTag as StoreEntrance12, and ActionType set to StopAndWait. So the guy stops at this first point, then walks(or runs, or whatever, explained next) to StoreEntrance12.
LinkType: 
MaxAllowed: At any one time, this is how many actors may use this. If it’s 1, then only person can use this thing at once. If it’s set to 3, and someone walks by it, and there’s only 2 people using it, and their interest is high enough and they’re allowed to use it, then they will.
TotalUsersLimit: Once this number is hit, the interest point is made invalid and can never be used again (till the level is loaded again, at least). Zero (0) is infinite use (Default).
WaitTimeMax, WaitTimeMin: Maximum and minimum range for the wait time. The wait time can get used by a variety of ActionTypes, such as StopAndWait and LookAt, and probably Sit, or Eat, and things like that. Tips
- CollisionHeight and CollisionRadius are used for the collision of the interest points with actors.
- If you just drop an interest point in and link it to another interest point, the way the defaults are, it will cause the pawn to hit the first one, and then simply and immediately walk to the second one, wherein he will go back to thinking. They’re good to play with, right off the bat. Don’t allow interest points to overlap/intersect.
- Don’t start things inside Interest points. If you want them to interact with the interest point, that is, don’t start them inside the interest point’s collision radius.
- If you get a person going to a point (keypoint or interestpoint) and they seem to get there but jitter, the points are either too high or too low. Usually make them about waist height for people to use them. Like pathnodes.
Store Points
Extends InterestPoint
More inclusive than interest points. Can be linked and used just like interest points. Basically their InterestTag can be more generic. So before, on interest points, the interest tag needed to be unique. Now it can be a little less specific. LinkToTag can also be less specific now.
Take this case of shopping in a grocery: An interest point outside set to LookAt, makes the person wait some, while looking at the sign. It’s MaxAllowed is set to 20. The person hits this and is linked to (walking) a storepoint, placed just inside the store doors. This store point controls the whole grocery. Its MaxAllowed is also set to 20 (if it were less, the person could be potentially turned away early, and it would look silly). Once they hit this store point (Tag is ‘GroceryMainPoint’), the perform a StopAndWait for 0 seconds, which makes them proceed immediately to their link actor. This main point has it’s link tags as ‘GroceryFoodPoint’ and its InterestTag is blank.
There are 12 other storepoints in this grocery. They are ALL Tagged as ‘GroceryFoodPoint’. The main point will link to these. And most of these other storepoints have their LinkToTag set to ‘GroceryFoodPoint’. Their InterestTags are set to specific things in front of them (‘BroccoliStand1’, ‘FrozenFood1’) and their ActionType is LookAt or PickThrough (or something that makes sense). This will make people shop forever. So the trick is to make one or two of these store points have it’s LinkToTag set to the check out line interest point (this will be a QStartPoint). This will cause them to leave once they’ve finished using that point.
Variables
MaxInterestActors, MaxLinkActors: These help prevent crazy memory explosions. They default to 16. If you set your InterestTag on a store point to be something like ‘PathNode’ and you have 849 pathnodes in your level, you’ve made a big mistake. And instead of allowing to do this, it locks in the CLOSEST 16 of those path nodes. Works the same for link and interest actors.QStartPoint
Extends QPoint
Relevant associated classes:
QPathPoint: Required. It marks the entry point of the Queue. The actual QStartPoint itself marks the exit point (where you deal with the cashier or walk to the cashier).
BuyerStandPoint: Not required. This can extend a QStartPoint and say that from where you leave the queue (QStartPoint) this is where you walk to, to deal with the cashier. If the QStartPoint is not linked to one of these, then it defaults and selects the QStartPoint itself as where the cashier will deal with customers. (Think of a bank, were people stand at a ‘wait behind this line for the next representative’ spot, then they walk forward to the cashier when called. In a grocery store, most people walk straight to the cashier and don’t wait behind a certain point).
CashRegPoint: Required inasmuch as a cashier is required for a Queue. This designates where a cashier will stand to do business. Pawns set with a CashierController will walk to this point when the level starts, and stay there while dealing with people.
CashierController: Required to run a QStartPoint. Given to the pawn designated to run the cash register. Variables
B>EndTag: This is a tag to a QPathPoint and is required to link correctly. This will find the nearest QPathPoint actor and use it as the entry point for the queue. From here to the QStartPoint is then checked for people being in the way. They are then treated as wanting to be in line, or cutting in line.
QStartPoints are used to have people stand in line and then interact with someone at the end of the line in some fashion. In their simplest form they are a start point and end an endpoint. But even this simple form requires several supporting elements. For the simplest working line, here is a setup method:
- Create a QStartPoint.
- Create a QPathPoint and give it a Tag in Events.
- In the QStartPoint, set EndTag to the above’s Tag.
- Set the End point that you’ve now linked the QStartPoint to, some distance away from the QStartPoint. Think of a person requiring at least 2 full shoulder widths to occupy a space. Some people will require more. Know that a distance between the start and end points of about 1024 will allow around 9 people all in line at once. Perhaps fewer people, so give them plenty of room if you want a lot in line. Make sure there are NO OBSTRUCTIONS in between the start and the finish, for about a person and half’s width. Don’t let any static mesh, geometry or any blocking thing be in the way, or you’re line will have much trouble. Give your QStartPoint a unique tag in Events:Tag.
- Now decide where you’re cashier will stand. Place a CashRegPoint here. There can be obstructions in between this point and the QStartPoint, a like a counter top, for instance. Make sure there are path nodes around all this to allow people to get places.
- Now create a pawn of some extended sort and place them very close to the CashRegPoint, so they can walk to that point (or just be there) easily. Set his Pawn:ControllerClass to ‘Postal2Game.CashierController’. This will cause him to seek out the CashRegPoint.
- Now give the pawn a unique tag in Events:Tag.
CashRegPoint: extends OperateMePoints.
These basically run the qpoint and people who work behind it. They are very important. So to link things, first set the InputTag to the Tag for your QStartPoint. The queue is feeding your CashRegPoint, so it is the input. Then add a tag to the OperatorTagList. Make this the tag of a cashier (the pawn with the CashierController) that is to walk to this point. They work at this cash register. You can make multiple people work at this cash register, but you’d have to add more tags to the OperatorTagList.
Making Multiple people work at a single CashRegPoint:
Each tag in OperatorTagList must be a unique tag to a unique pawn somewhere in the map who has a CashierController. Pawns currently cannot be told to work if they are spawned by a PawnSpawn, sorry. So set the OperatorTagList to have ‘Bob’ and ‘Tommy’. Now, set Bob next to the cashregpoint. He’ll go to work first. Do set Tommy somewhere in the level. You could possibly set him in his home (see the HomeNodes Tutorial).
You must then make a StandHerePoint nearby to the cashregpoint. Give it a unique tag like ‘WorkWait1’. This is where operators who show up for work, wait for the guy currently working to get done. When the guy working is done (he’ll do it eventually if someone is waiting to work next) he’ll walk over near this point and talk to the other guy. Then the new guy will walk to the Cashregpoint and start working and the other guy will do whatever—maybe even go home if you gave him one. Click on your Cashregpoint again. Go the ‘CashRegPoint’ part of it, and open that. Set the Tag NextOperatorStandTag to be the tag of this StandHerePoint. Make sure the way between the cashregpoint and this standherepoint is pretty clear and open so they don’t get too easily hung up.
Finishing up:
Now that the QStartPoint has an end point of QPathPoint type, and there is a pawn with a CashierController and a CashRegPoint to stand on, you ALMOST have a working queue. The dude can currently use this, but AI pawns/controllers CAN’T yet. To make this work all you need to do is make a InterestPoint with ActionType of StopAndWait (default) and a WaitTime Min and Max of 0. Then set the LinkToTag to be the QStartPoint tag. This will cause people to hit this and immediately walk to the QStartPoint. To make sure they aim at the QStartPoint, it’s a good idea to put them in line with the QStartPoint and the QPathPoint. DO NOT place this InterestPoint in between the two. It would still work, but would make wiggy things happen. So in a line going away from QStartPoint, you then have QStartPointPath, then your InterestPoint that points to the QStartPoint. Place that InterestPoint at least far enough away from the ending QPathPoint so that neither of the two’s collision radii touch each other.
Multiple Cashiers for one QStartPoint:
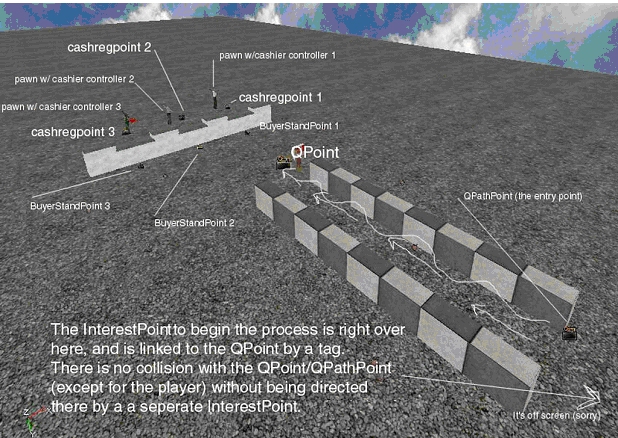
You can have QStartPoints that link to multiple cashiers. For instance, in some small banks, there is often a straight line, that empties to three cashiers. For this you would need BuyerStandPoints so the people now where to stand to interact with a cashier. So you would set up the QStartPoint as before with an end being a QPathPoint. Make sure the QStartPoint is at least its collisionradius away from the places where the customers are to stand. Now place a BuyerStandPoint on the other side of the counter (other side from the CashRegPoint). Place it about a person’s width from the counter (pretty close). Give this new BuyerStandPoint a Tag.
Now, for it’s accompanying CashRegPoint, set that CashRegPoint’s variable CustomerStandTag to the BuyerStandPoint you just named. For each cashier you want to link to a QStartPoint, you need to make a pawn with a CashierController, then make a CashRegPoint for this, then a BuyerStandPoint. The QStartPoint will be linked up to the BuyerStandPoint you made by it’s link to the CashRegPoint.
Tips:
If you’re people are going straight for the QStartPoint and not seeming to follow along where you’d expect, make sure to the put the InterestPoint that start this in line with the QPathPoint and QStartPoint and outside of these two (away from them).
To see a QPathPoint’s collision radius TEMPORARILY set its bCollideActors to true while in a viewport with Right-Click:Actors:RadiiView turned on. Make sure you set bCollideActors back to false for your QpathPoints.
If you get a person going to a point (QPathPoint or interestpoint) and they seem to get there but jitter, the points are either too high or too low. Usually make them about waist height for people to use them. Like pathnodes.