We've been talking a lot about decals recently, showing off our editor and explaining how the shading works. However, we haven't explained how the decals are actually projected geometrically onto complicated objects. We've been getting some questions about that, and I remember how hard it was to find information about decals when I was getting started, so here's an overview of the decal projection algorithm I created for Overgrowth. Let's start with this scene here.

It's a bit too clean for me... I want to add a decal to give it some subtle weathering. To place a decal, I need to first set up the projector. The projector is just a 3D rectangular prism with three properties: size, position, and orientation. Of these, the orientation can be the most confusing. For decal projectors, I represent the orientation as an orthogonal basis, which is a set of three vectors that are all perpendicular to each other. For example as the XYZ axes form an orthogonal basis, as do 'forward', 'up', and 'right'. This gives us a complete orientation in 3D space, and is easier to think about than matrices and quaternions.

The secret to projecting decals is to not think about creating a mesh that conforms to the model. Instead, think of it as starting with the model, and cutting away everything that is not in the projector box. I found that thinking of the problem like this made it easier to figure out what to do. Let's start by checking which triangles in the scene intersect with the decal projector. I first implemented this in a brute force fashion, and once that was working, changed it to work hierarchically using octrees [to bring the runtime from O(n) to O(logn)].

Next is the hardest part: we have to crop the triangles so that they don't extend out from the projector. Why is this important? Think about firing a thousand machine gun shots at a wall that is made of just two triangles. If we don't crop our bullet holes, we will have to draw the entire wall a thousand times! Since the wall is so much bigger on the screen than the bullet holes, this will use up too much fillrate, and bring the framerate to a crawl. However, with decal cropping, I can do this and maintain maximum framerate!
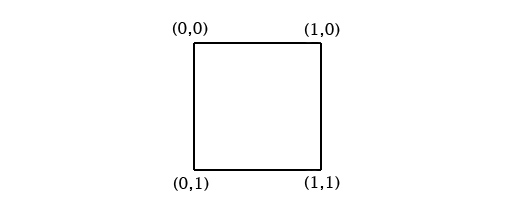
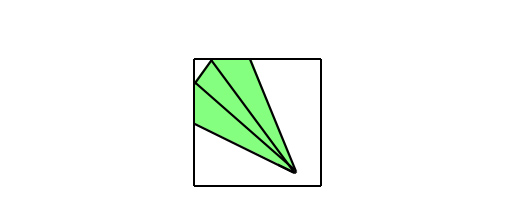
So now that you're convinced that decal cropping is important, how do we actually do it? Cutting arbitrary 3D triangles to fit in an arbitrary 3D box is a daunting task. To make it easier, I thought about it in 2D. We can transform the triangles from world space to projector space, crop them, and transform them back. This makes the problem much simpler. In projector space, the projector box is just a square from (0,0) to (1,1), like this:
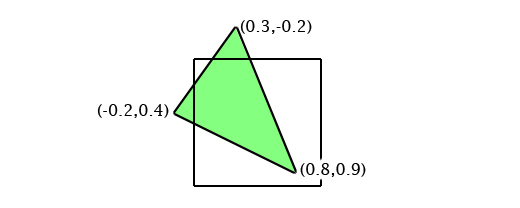
A triangle in projector space might look like this:
So now all we have to do is crop the triangle to fit in the square. This seems like a tricky task itself, but we can break it down even more. First, we can start with one border at a time. Let's pick the left border. To crop the triangle, we start by marking every vertex in violation of the rule -- in this case, the leftmost one. Then we look at every line between a marked vertex and an unmarked vertex, and add a vertex at the point at which it crosses the border.
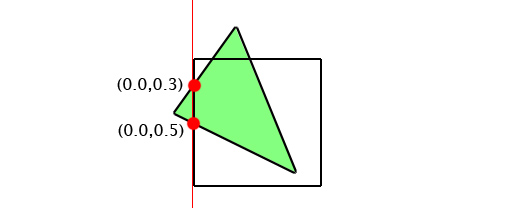
We can then simply remove the marked vertex (or vertices), and move onto the next border.
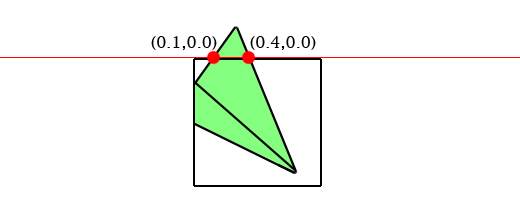
Once we've checked all the borders, we have a cropped triangle!
After doing this for every triangle, and projecting back into world space, we have a cropped decal mesh.

If we keep track of each vertex's coordinates in projector space, those are also the projected texture coordinates! That's why I set up the projector space to be (0,0) to (1,1) -- that's the range that OpenGL uses for texture coordinates. Here's what the decal looks like using those texture coordinates on a test texture.

Now we can just substitute in our real decal texture, and we're done!

Here's the original camera angle with the finished decal applied. It's a pretty subtle effect, but I think the extra detail helps make the damaged area look more realistic -- nothing would be able to take a huge chunk out of that block without scuffing up the surfaces around it.

So that's an overview of how decal projection works in Overgrowth! If you're not familiar with linear algebra, you might be confused about how to transform triangles from one space to another, and why it's important to have a complete orientation. I could write a blog post explaining vector spaces and transformations in game development terms, but I'm not sure if anybody would be interested. Do you have any other technical subjects you would like me to talk about?
(permalink)
Track us on ModDB (see our cool page)
and also join:
- Facebook
- Steam
- Twitter
- YouTube


blew right over my head! lol. but cool, i never knew how much complicated thinking would have to go into making something like that. but
Where Babies come from? Joking.
Great article though, i'm sure many beginners and indie developers will appreciate that article.
Now I remember why I screwed up my linear algebra exam last week :P
Amazing! So much work!
"I could write a blog post explaining vector spaces and transformations in game development terms, but I'm not sure if anybody would be interested. Do you have any other technical subjects you would like me to talk about?"
Hell Yes
I looked and compared the pictures but I don't notice any significant changes???
The second one has the decal the article is talking about projected onto it. :)
I can see it, and it's an amazing effect.
I've been interested in that engine for a long time, but just got in love since the first time I see that Wolf Symbol projected into the objects.
Great work.
It's not in your mod profile. Somehow the link is missing or I cannot find it there.
EDIT: I see why - I was looking for it in video tutorials, because I thought I had watched a video about this. Must have been a dream...
Seriously...this sort of feature (if resource friendly) should be in every editor out there!