What are seams?
Tiling textures are much more efficient than unique textures, which is especially important for large objects. The main cost of this efficiency is that tiling textures can look unrealistic when used incorrectly -- real rocks are not made of repeating tiles. The tiling is most obvious when there are distinct details that repeat, and the worst kind of distinct detail is an edge seam -- a sharp discontinuity between the tiles. Here is an example of a tiling rock texture with seams (highlighted on the left, but still present on the right).

How do we remove seams?
First, let's get our initial texture (with seams). For photosourced textures, I usually start by getting a photo from CGTextures.com, and cutting out a square. I pick an area that looks fairly uniform.

I paste that into a new file, and then use the 'offset' filter to expose the seams. The offset filter lets you shift the image over in a way that 'wraps around', so that the pixels that go off the right edge show up on the left.

Now that I've offset the image by half its size in each direction, the seam shows up as a cross through the middle of the image -- you can see it clearly if you click the image below. I then pick a soft brush, and paint out the seams using the clone (rubber stamp) tool. The rubber stamp tool lets you paint pixels from one part of the image onto another part.

Here is the texture after painting out the seams.

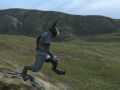
That's really all there is to basic seam removal. Here is the final seamless tiling material in the engine:

This could still use a lot of work though. Even without seams, the tiling is obvious because of the features and colors in the texture. For example, there is one dark shadow underneath a rock which is obviously repeated over and over -- if we end up using this particular texture in the game I will have to fix that! When making tiling textures, we have to walk a fine line between making it tile invisibly, and making it visually interesting.
How do we test tiling textures in the Phoenix engine?
There are a few more details you'll have to know to make tiling texture blocks like this in Phoenix (in the Overgrowth alphas). First you will need to add a normal map and specular map to take full advantage of the lighting system. If you want, you can just use the default 'diffusebump.tga' texture and skip making a normal map, but I'll explain how to use normal maps for anyone who is interested. You can make a decent normal map from a color map very easily using CrazyBump. If you don't have CrazyBump there is a free Nvidia plugin that works in Photoshop.

You will also probably want a specular map (showing how shiny the texture is, from black [matte] to white [chrome]). If you don't want your texture to be shiny at all, leave the alpha channel black. To make my specular map I just grabbed the one calculated by CrazyBump, but you can also just use a darker desaturated version of your color map. Here are the color, normal and specular maps for this texture.

To use fewer textures, Phoenix uses the alpha channel of the color map to store the specular map. To do this, you have to make sure your color map has an alpha channel, and then copy your specular map into it. Here is the 'channels' panel for the color map in photoshop, with the specular in the alpha channel.

Now you can export both the color/specular map and normal map as .tga files, and create the .xml object file to load them in the game. The easiest way to make this file is to copy an existing block object .xml file and just edit the paths to the textures. Here I copied "blackCatRoad.xml" file and edited the and paths to point to my GrayRock images:


I noticed your meshes are obj files, yet I cannot import any of my own obj-files into the editor. Do I have to change ini files in order to do that, or is this simply not possible or wanted, at this point.
I wanted to look at the light and shading for one of our Character Models for Mech Override, but didn't know how to open it.
Seems like the material editor works with xml files, but I'm not sure how to convert from obj to xml. Great Editor btw, Alpha 32 rocks!
No, it should work just fine. You should definitely talk to us on AIM or MSN: Wolfire.com and we will get you set up.
Nice tutorial :D I think a lot more people could take a lot of value from learning texturing.
Sure its seamless but you cant say its tiling, very ugly repeating pattern but i guess its for the sake of the tutorial.
I believe they covered that when they said they would have to fix the obvious repeating features if it was an actual asset they were going to use in-game.
Good tutorial, the only thing I can add as a suggestion to others is that you should be careful when using photo ref and then using a program like Crazybump or Nvidia's Normal Map Filter. Often photographs, (if not taken under proper conditions) will have shadows that will contribute to the depth of a normal map which really isn't there. Here's a few tutorials that talk about these issues more at length.
Katsbits.com
Katsbits.com