
The only reason that this tutorial is in any coherent form is probably
because Methril did an editing job on it. Sorry if I kept repeating
myself even if you understood the first time, as I was thinking more
along the lines of "never mapped before" while I was working on this.
If you have already worked on Quake or Half Life engine based games,
then you probably don't really need this tutorial, and can start out by
reading the FAQ post.
For this tutorial you will need the latest version of Ogier and the GDK from Ogier.starbreeze.com
I HIGHLY suggest that you read through the FAQ topic on the Ogier
forums, as it explains a great number of features. Keys and their uses,
and so on.
The finished xmp file for the map can be downloaded at:
Also, I will not mention saving until the end of this tutorial, but I do suggest you save after every few steps just in case.
----Setup----
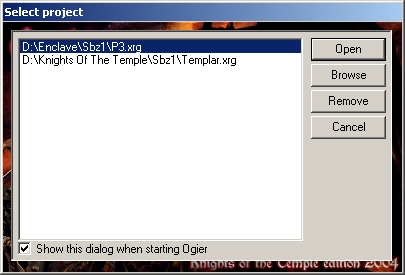
When you first open up Ogier, a window entitled "Select Project"
will pop up. You must select the xrg file located in the games Sbz1
directory for the game you wish to work on, which is in this case
Enclave. (If this is the first time running Ogier, click "Browse" and
navigate to the xrg of choice.) Once selected, click "Open"
Ogier's main window will now open onto a flat gray screen with
three menus at the top. In this tutorial we are creating a new map, so
we will select "File" and then "New Map". (Ctrl-N for short) The editor
will load the resources and then bring up a new window containing all
of the tools we need to create our level.

There will be four view windows covering the majority of the screen. These windows are named top, side, front, and 3D.
Also on the screen are a number of menus and other items. Two of the most important being:
-Located on the right side of the screen is the Node bar. This area
contains the most recent textures that we have been using, as well as
the properties of the brushes and entities we have selected. If the
window titled "Node bar" isn't showing up, hit "E" to toggle it on and
off.
-Running along the bottom there are buttons which are used for editing the brushes, curves, textures, etc of the map.

1. Resize/Scale
2. Rotate
3. Bend (For use with curves/splines)
4. Vertex Editing (To edit the corners of a shape or spline)
5. Texturing Mode
6. ?
7. Delete selected
8. ?
9. ?
10. Texture Lock
Some basic navigation info: To move around the three 2D views
(top/front/side), hold the shift button while the cursor is over the
view and move the mouse. Also, in the top/front/side views, use the +/-
keys or the mouse wheel to zoom in and out. In the 3D view hold shift
and then either move the mouse to look, or use the W,S,A,D keys to move
around.
----Zoom----
Let's get started by zooming our 2D views in closer. Place your
cursor over the center of the top view and press the + button three
times. Repeat this step with both the front and side view.

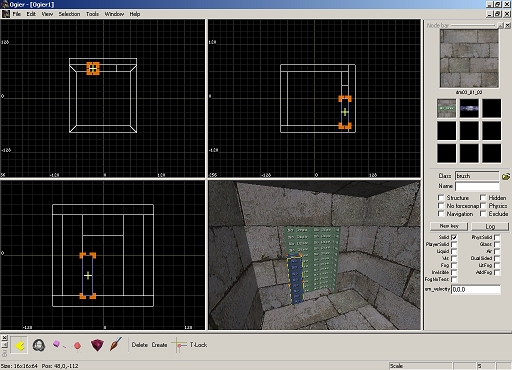
----Creating and Resizing the First Brush----
Now, let's make our first brush. Hit the "1" key to create a box at
the cursor's location. (The number keys create brushes, while holding
shift and pressing a number key creates a curved surface or spline.)

Making sure the scale tool is selected (The yellow L shaped icon on
the left side of the Button bar.) click and drag the orange colored
corners of the box outwards as shown.

Now, click and drag the corners of the box in the front (or side) view to resize it as shown below.

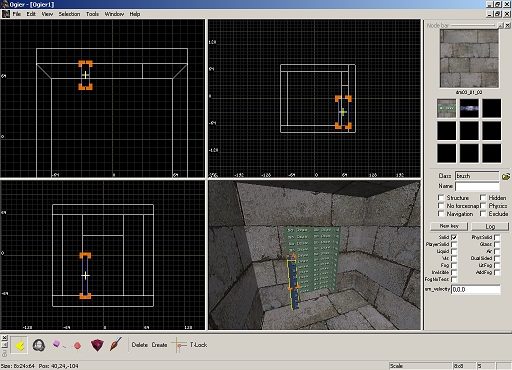
----Vertex Editing----
All right, now let's take a look at some vertex editing. Click the
vertex editing button in the Button bar (the sphere with three grey
lines extending out from it) then click on one of the pink corners in
the top view and extend it outwards one grid spacing.

As you can see, the brush has now turned red due to the way one
vertex is projecting out. (It will either not compile, or will compile
but have problems, I am unsure how the Enclave engine handles this.)
You must fix this by dragging the other corner over as well.

Much better. Now repeat these steps for the other side of the brush.

----Duplication----
Next, we will duplicate this brush to make the walls of our room.
With the brush still selected, hit Ctrl-C then Ctrl-V to create another
copy of it.

With the mouse cursor over the top view, tap the "V" key twice to
rotate it 90' then click and drag anywhere inside the brush to move it
into position.

Holding down Ctrl, click on the original brush. This will select
both at the same time. Now do another Ctrl-C Ctrl-V and with the cursor
over the top view tap "V" four times. Move these two duplicated
sections into place like below.

To deselect our brushes right click anywhere off of them in any view.

----Floor/Cieling----
Let's now add a floor and ceiling to our room now shall we? Hold
the cursor over a 2D view window again and hit the "1" key to create
another box. Re select the resize tool in the Button bar and
resize/move the box as shown.

Duplicate this brush and then move it into place to form a ceiling for the room.

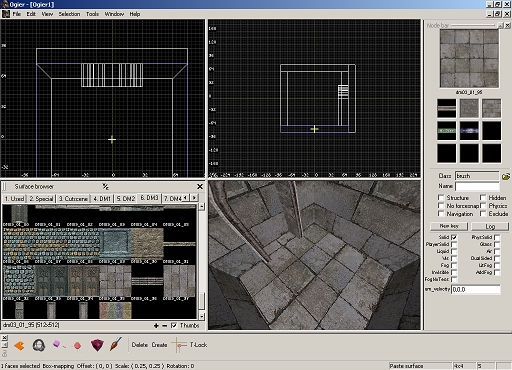
----Texturing the Room----
And now we have a simple room made with some of the basic tools.
Let's add a few textures. First, right click off your ceiling to
deselect it, then holding the right mouse button, drag a selection box
over your entire room and release the mouse button. Now your whole room
will be selected and you can see in the 3d view that all the brushes
have a tint showing this.

Click on the texture tool in the Button bar (the dark purple box)
and you will see the brushes in the 3d view are now purple. Click once
with the left mouse on the surface in front of the 3D views camera and
it will return to having no tint. In texturing mode this means that
that surface is now selected.

Place the cursor over the 3D view and hold shift. Using the mouse
and W,S,A,D look and move around the room so that you can see the other
surfaces. Now, while holding Ctrl, click with the left mouse button on
the other 5 surfaces to add them to the selection.

We now have all of the surfaces on the inside of our room selected
for texturing. You'll notice how they currently all have the NoDraw
texture applied by default which means that the engine will not render
them, and they will appear invisible in game. Let's find a texture and
change that.
Place the cursor over top of any of the 4 view windows and hit the
~ key to bring up the texture browser. The various texture collections
are in groups listed on the tabs on the top, and the textures
themselves are displayed in the window below. Lets use DM3 for now.
Click on the DM3 tab and you will see the textures for that group.

Click once with the left mouse button on the third texture shown
(DM03_01_02) to select it causing the texture browser to close and this
texture to appear up in the Node bar's currently selected texture
window.

To apply the texture to all selected surfaces, tap the "K" key
once. You should now see the inside of your room with the brick texture
applied to it.

Right click anywhere off your room to deselect it, and move around
in your 3d view to see that the texture was only applied to what you
selected, and not the outside or edges of the room where the player
will not be able to see.

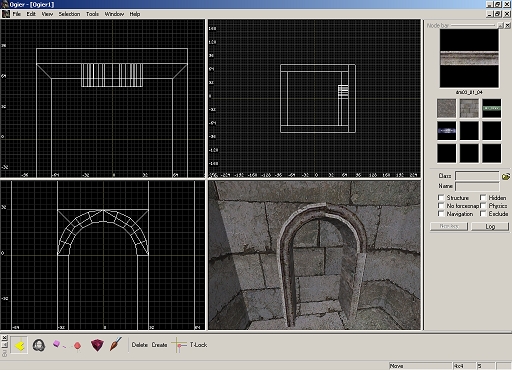
----Adding Some Detail: Carve and Grid Size----
Time to add a little detail and demonstrate some more features. Lets add an alcove with an arch above to the upper most wall.
Select the resize tool, and move the cursor over a 2D window then
hit "1" to create another box. Move this box and resize it as shown.

At the top of the screen, click on the selection menu, then click "Carve" (Ctrl-X)

The box will disappear, and split up the wall leaving a doorway.

(*Note* Personally I don't use the carve function for creating
doorways and the like, I prefer to create them "by hand" to be sure
there are not any unnecessary brushes created in the splitting of the
surface. The reason why I use it to do so in this tutorial is mainly to
show different features of Ogier, and ways of accomplishing things.)
Lets block off the back of this hole with another box. Repeat the
usual step of creating a new box and then resize it so it covers the
hole that we made in the previous step.

Make another box and drag it into place like so.
Now we want to adjust the size of this a little more finely, but we
can't with the current grid. To decrease the grid size hit " Q" once.
You will see this change immediately, and are then able to resize the
box as below. (I zoomed in some more in the top view.)
----Adding Some Detail: Splines----
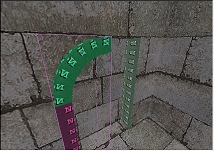
The next step is to make half of the arch that will go above this.
Put the cursor over a 2D view and hold shift then hit "4". This
creates a type of curve or spline for us to use as the top of our arch.
With the cursor over the top view, hit "V" twice to rotate it the
correct direction, then resize and move it into place.
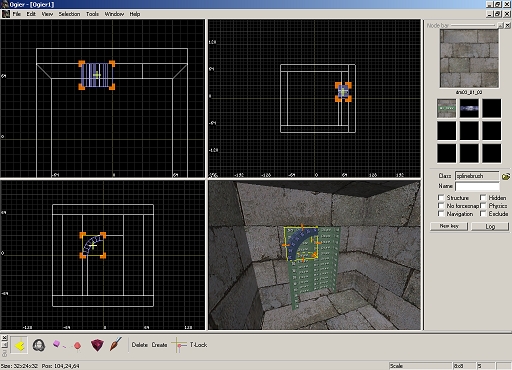
For some fun, lets decrease the number of sides in this spline.
With it still selected, click the bend tool. (the purple box with a
line in the bottom right corner.) You will now see a series of points
appear allowing you to modify this spline. Hold the right mouse button
and drag a selection box over top of the four points within the curve
in the front view to select them. (The selected points will become
yellow.)
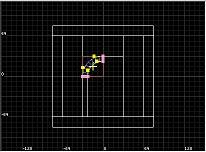
Hit the KEYPAD + sign to change the number of sides in the spline. We'll hit it 5 times, giving the spline 5 sides.
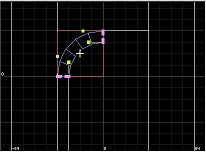
Right click off of it to deselect.
----Adding Some Detail: Filling in the Gaps----
We will need to add some wedges to fill in the gap between the arch
and wall. Put the cursor over a 2D view and hit "2" to create a wedge.
Hold the cursor over the top view and tap "V" twice to rotate it.
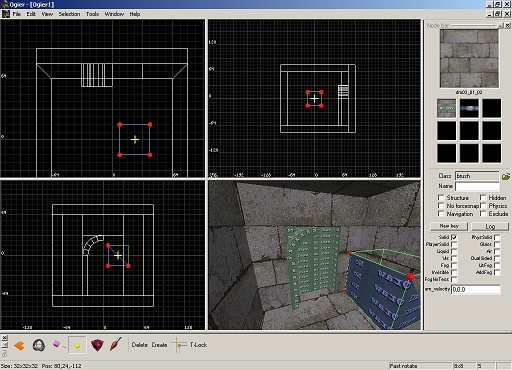
Click on the resize tool, and place it like so.
Click the vertex editing tool, hit "Q" again to decrease the grid size, and edit the vertices of the wedge as shown below.
Duplicate it with a copy and paste and again, vertex edit like so.

Right click off of the shape to deselect.
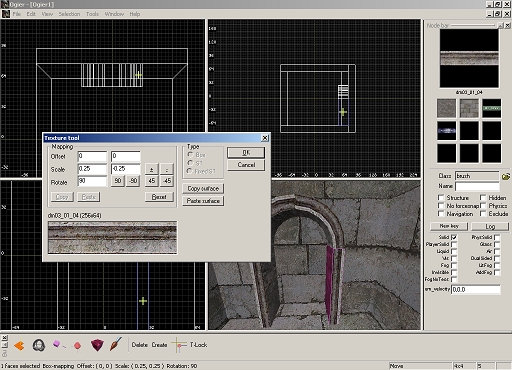
----Texturing Additions: Alignment----
Now let's texture these additions. Select the two wedges and the
wall placed to block the back off (Ctrl click), then click on the
texture mode icon.
Left click the surface of the back wall facing towards your room,
then Ctrl left click on the two faces of the wedges facing towards the
room so that all three surfaces are selected. As the brick texture we
want is still selected, hit "K".
Right click to the side to deselect.
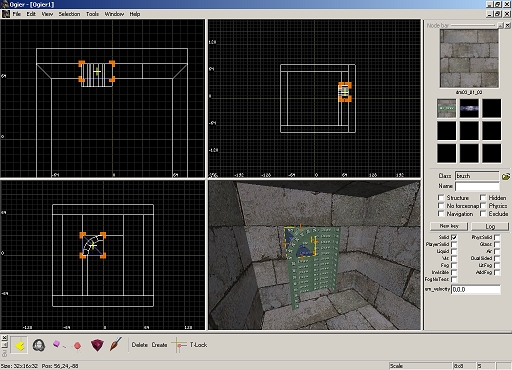
Next, select the side and top pieces of the arch. (Left click the side piece, Ctrl left click the top piece)
Adjust your 3D view and left click on the insides of the side piece
to select the surface, then Ctrl click the other three surfaces shown:
Put the cursor over a view and hit "~" to open the texture browser
again. Click on the texture DM3_01_01. The texture browser will close
like before, and the texture will be added to the Node bar. Hit "K" to
apply this texture to the four selected surfaces.
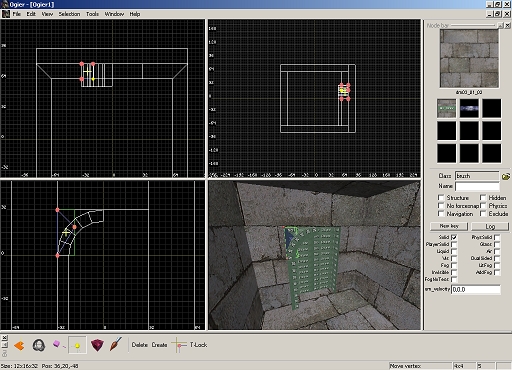
Left click on the front of the side piece and then Ctrl left click
on the front of the top piece. The other four surfaces will be
automatically deselected, and you will now only have two surfaces
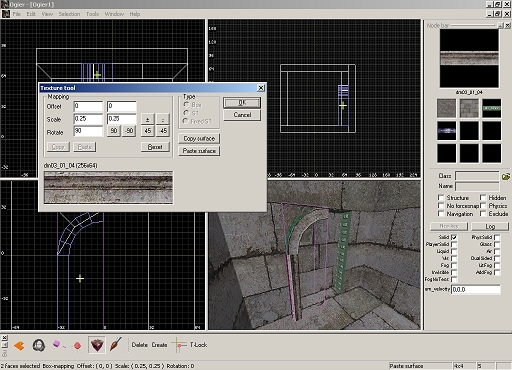
selected. Reopen the texture browser, and left click on DM03_01_04. Hit
"K"
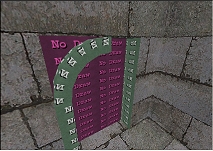
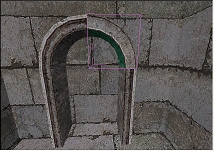
The way this texture will apply won't look very good as you will
see. This is because it is rotated in the wrong direction. To fix this,
hit "Enter" to bring up the alignment window.
To the right of "Rotate", click "90" once.
Well with that done, it looks better, but they still are not
aligned properly. Let's adjust the arches texture some more. Hit "Ok"
on the alignment window, and Ctrl left click the texture on the lower
part of the arch to deselect it leaving only the texture on the curved
part selected. Left click on the selected surface and holding the mouse
button down, drag it to move the texture and align it with the other.
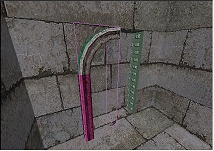
right click off of the brush to deselect.
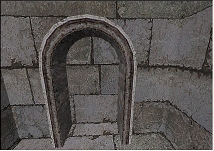
----Texturing Additions: Duplication and Alignment----
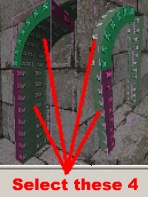
We will now duplicate the half arch we have created and flip it to
create a whole one. Click on the resize tool and then select all the
pieces of the arch we have made so far.
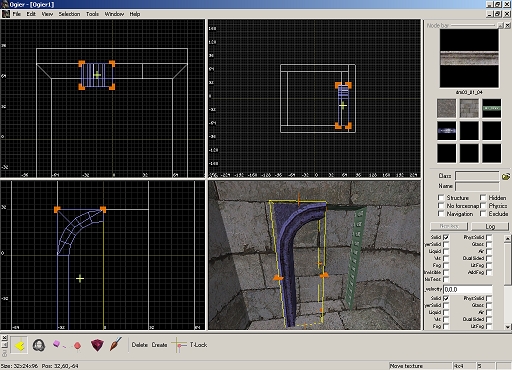
Copy/paste this selection, and then with it still selected go "Selection", "Flip X" (Alt+X)
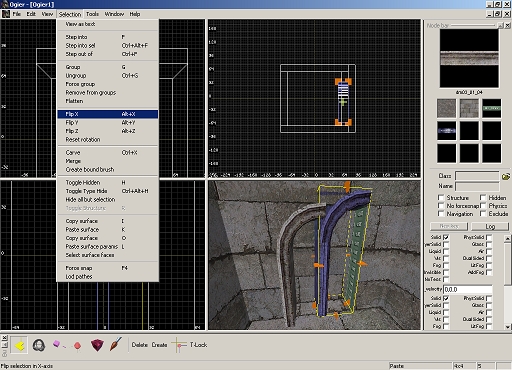
Move it into position so it lines up with the first. Right click off the brushes to deselect.
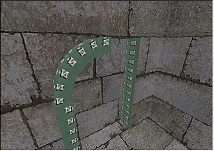
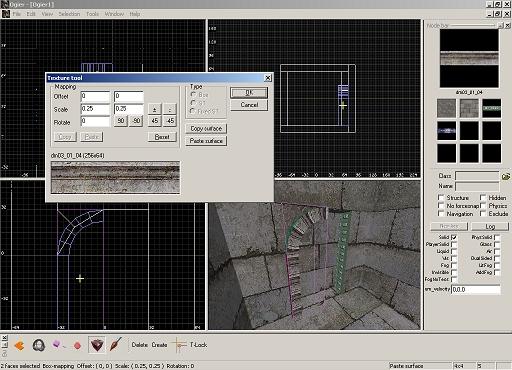
Select the side part of the right half of the arch and then enter
texture mode. Click the misaligned texture on the front and hit
"Enter". To the right side of "Scale" there are two fields with the
current scale of the texture. To flip this texture, we must add a -
before the 0.25 in the right most box.
That's now fixed, so lets move on to the curved section. Hit OK and
right click off of the brush, then click the curved section, select the
face with the misaligned texture. This time around lets try it with a
different method. Hold down the right mouse button and click/drag on
the surface to rotate it by hand. Do this to rotate the texture 180' on
the surface.
Hold the left mouse button and drag the texture so it lines up with the others. Deselect it.
While we're at it we may as well give the floor a new texture. I used DM03_01_95.
----Structure----
OK so now we have a room with a nice little alcove attached. The
next thing we'll need to take care of is Structure. I'll just paste in
the section from the faq on this as it explains it well.
"This is an art form. I'll give you a quick summary, but this section would benefit from more detail by someone better than me.
Structure is what the engine uses to find out what polygons to
exclude when rendering the world. Basically, if the polygon is behind a
Structure block it won't be rendered.
The thing is that a Structure brush is extremely taxing for the
cpu so unless it covers a lot of polygons it's cheaper to just render
the polygons.
STRUCTURE SHOULD BE BUILT AS PRIMITIVELY AS POSSIBLE WITH AS FEW
BRUSHES AS POSSIBLE. Basically, if you build a room you should encase
it in a box of structure that has as small holes as possible for the
doors.
Never make structure at an angle (unless you really really know
what you're doing). Always let the brushes follow the grid lines.
A Structure brush should always have the "NoOverlap" texture on all
faces. This will make it invisible in the engine as long as it is
inside of a regular visible brush (the face of the structure block can
be in the exact same space as a regular visible face if you wish)."
Now as this is only a test map we'll just add a structure bush
outside the level so it will compile. (If one of these isn't in the
level it will not compile or run.)
Create a new box and place it outside the room we've created.
Adjust it's size with the resize tool and then with it selected click
on the texture tool.
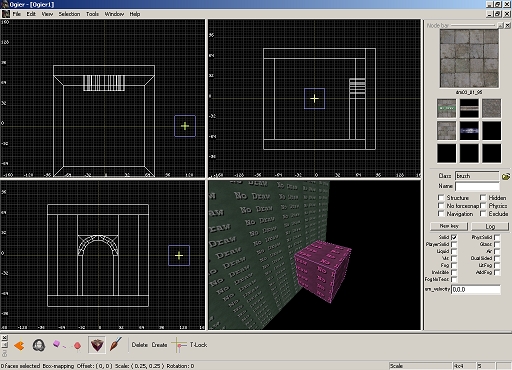
Hit "X" to select of all the faces of this brush at once, then open
the texture browser with "~" and click on the "Special" tab. Click
*Nooverlap and hit "K". Now switch back to the resize tool and on the
right side of the screen in the Node bar, check off the box that says
"Structure". Press Ctrl-R to show only structure brushes to make sure
everything is correct, then hit Crtl-R again to go show all.

Deselect the brush.
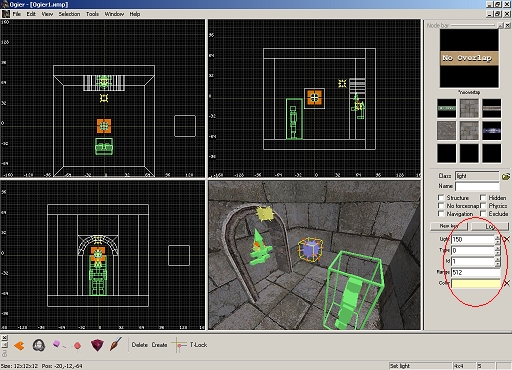
----Objects and Lighting----
All of our geometry is now complete, lets add some lighting and objects.
Go "Edit", "Create Object"
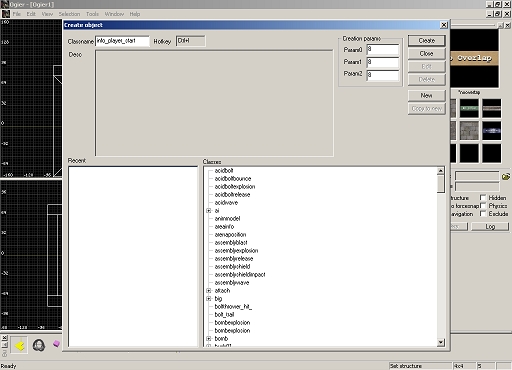
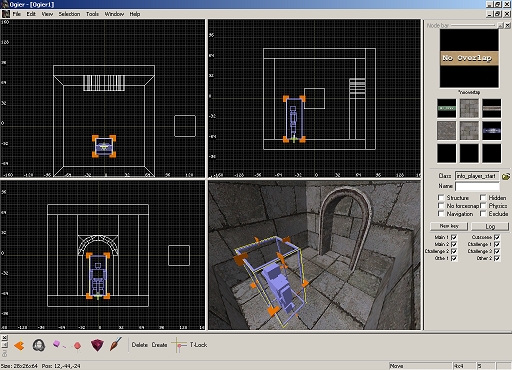
Scroll down through the list and expand the group "info". Click on
player_start then click "Create" in the top right corner.
(Alternatively, you can just double click on player_start.)
A player start will now be inserted into your map. Move it into
position on the floor of your room, and use "V" on the top view to
rotate it until it's facing the alcove.
Go back into create object and this time expand "light" and select "light_metaltorch" then create.
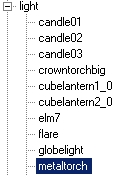
Rotate it with v until the arrow points outwards from the alcove then move it into position.
Go to create object a third time and select "light" then create.
You will note that the lighting properties are displayed in the
bottom of the Node bar, and can be edited. Let's click on "color" and
give it a yellowish tint. Now change the "light" (brightness) field to
150 and move it into the center of your room.
(*Note* You can preview the lighting by going into "View", "Preview
Lighting". I suggest saving before this though as with version 1.02 of
Ogier it has been giving me troubles.)
We may as well increase the grid size by one again now. Do this by
holding Ctrl and hitting "Q". You can always change this as you please.
----Saving----
That's it! We can now compile and see how it plays. "File", "Save"
the map as TestLevel.xmp (For the sake of this tutorial, I saved it in
the Enclave folder.)

Close Ogier.
----Compiling the Map and Playing----
Open up "XWC_Static.exe" (Installed with the GDK) and then DRAG the
TestLevel.xmp file from the windows explorer window into the area
containing the text in the XW-Compiler window.
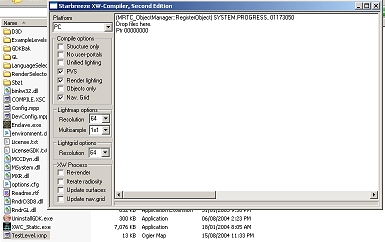
The map will now compile, and place TestLevel.XW (the compiled level) into ...EnclaveSbz1Worlds.
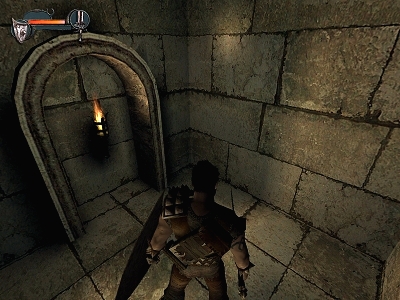
Ok, it's time to check this sucker out, pop open enclave and when
you reach the main screen hit the "~" key to bring down the console.
Type "Map TestLevel" (Without the quotes) and then hit enter.
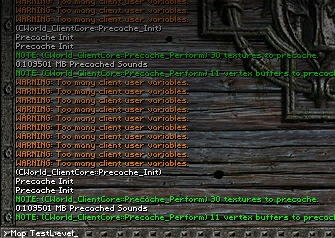
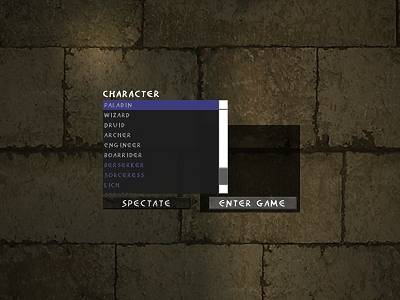
After it loads, hit the "~" key again to remove the console and then use the arrow keys and enter to select a class and begin.
If your esc key miraculously has stopped working at this point, bring the console back down and type Quit. ![]()
Well that's all! You now have a small test level running in
Enclave. Hopefully this tutorial was understandable enough to help you,
and good luck with future mapping projects!
-Written by Shawn "AmranX Davison & Edited by Curtis "Methril" Hielema


reminds me of HL2 builder
It's based on the Quake level editor as Half life started using the Quake 2 engine.
Something like that.
If you want to read this tutorial with images working go to archive.org. They have a backup there with images
Web.archive.org