Tutorial originally posted on Fileplanet. Mirrored here for archival purposes.
Blood2 level building 101
![]() 1st. Today we are going to learn how to make a multiplayer add-on level for blood2. Install the DEdit tools for Blood2.
1st. Today we are going to learn how to make a multiplayer add-on level for blood2. Install the DEdit tools for Blood2.![]() 2nd. In your C:/games directory create a new folder called "B2stuff" (example: C:/games/B2stuff )
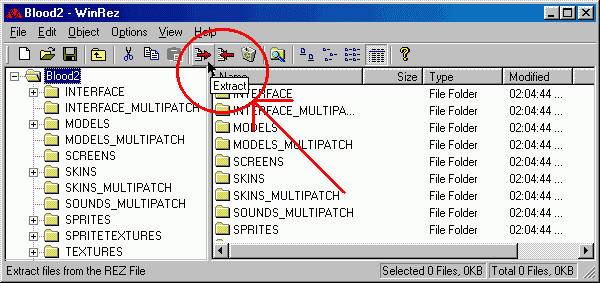
2nd. In your C:/games directory create a new folder called "B2stuff" (example: C:/games/B2stuff )![]() 3rd. For this tutorial we are going to use the WinRez program. After you install WinRez you will be able to open rez files simply by dubble clicking on the .REZ file. Open the Blood2.REZ and extract them to your new "C:/games/B2stuff" directory. Do the same for Sound.REZ, Blood2p, & Blood2p2.
3rd. For this tutorial we are going to use the WinRez program. After you install WinRez you will be able to open rez files simply by dubble clicking on the .REZ file. Open the Blood2.REZ and extract them to your new "C:/games/B2stuff" directory. Do the same for Sound.REZ, Blood2p, & Blood2p2.
(Note: easyunrezer could do the 2nd, & 3rd step for you. & if you did't fully install Blood2 some of the REZ files will be on your CD.)
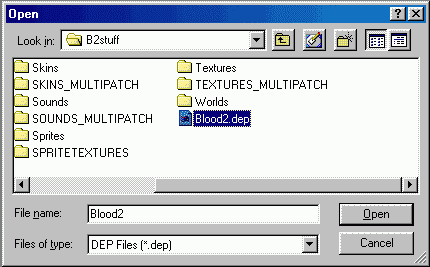
![]() 4th. Start the DEdit Program, click 'File' on your top left, select 'Open Project' then it will ask you to find a .Dep file. Just go to our C:/games/B2stuff and click 'blood2.dep'.
4th. Start the DEdit Program, click 'File' on your top left, select 'Open Project' then it will ask you to find a .Dep file. Just go to our C:/games/B2stuff and click 'blood2.dep'.
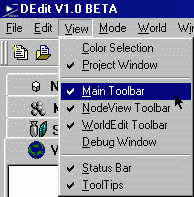
![]() 5th. Click 'View' on the to left of DEdit and make sure you have these checked: Project Window, Main Toolbar NodeView Toolbar, WorldEdit Toolbar, Status Bar & ToolTips. Next create a new world, and name it "BBtest". The BB part is so it will be recognized as a Blood Bath level.
5th. Click 'View' on the to left of DEdit and make sure you have these checked: Project Window, Main Toolbar NodeView Toolbar, WorldEdit Toolbar, Status Bar & ToolTips. Next create a new world, and name it "BBtest". The BB part is so it will be recognized as a Blood Bath level.
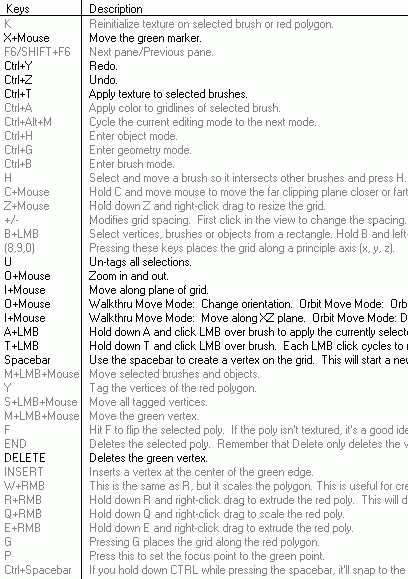
![]() 6th. DEdit looks hard but it is not as bad as it looks, all you need to do is teach your self with some of the basic keys which are highlighted in the darker print. You should save this image, or print it out so you have something to look at while you are working with Dedit. (LMB=Left Mouse Button.)
6th. DEdit looks hard but it is not as bad as it looks, all you need to do is teach your self with some of the basic keys which are highlighted in the darker print. You should save this image, or print it out so you have something to look at while you are working with Dedit. (LMB=Left Mouse Button.)
Tip: you have 4 viewing windows, here is what each plane is...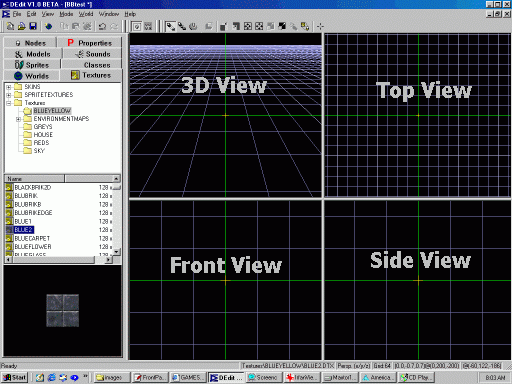
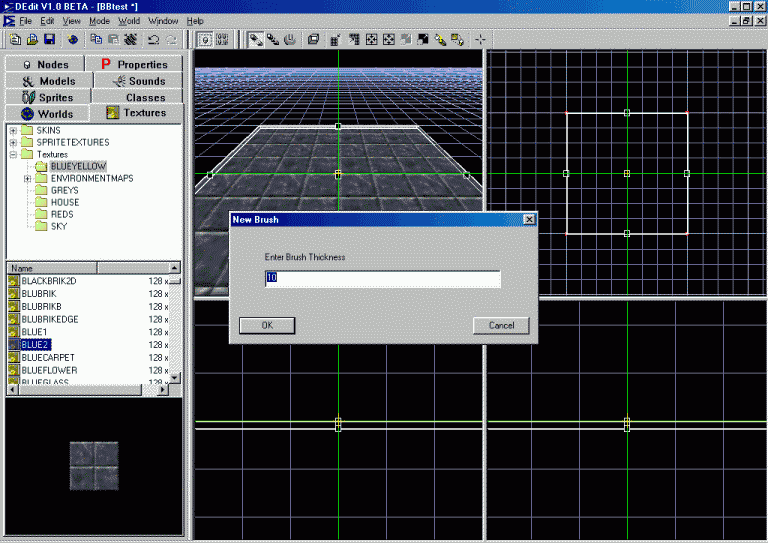
![]() 7th. Now lets start to Edit... Click the Textures tab and there will be a file listing, move it down to textures/ The texture that we are looking for will be the floor. I am going to use the 'Blue2' texture from the Blueyellow directory. In your Top View window move your mouse around and use the Space bar to make the out side corners of our floor. After you connect the last of the corners it will ask you to enter Brush Thickness, this is asking you how thick do you want the floor, this is the 'Pixel size'. A good rule of thumb for pixel size is the thickness can be compared to Inches (10inches=10 brush thickness ect...) You should use 8, 16, 32, 64, 128 & 256 more often then any other sizes because these also equal texture sizes... It just makes life more easier!
7th. Now lets start to Edit... Click the Textures tab and there will be a file listing, move it down to textures/ The texture that we are looking for will be the floor. I am going to use the 'Blue2' texture from the Blueyellow directory. In your Top View window move your mouse around and use the Space bar to make the out side corners of our floor. After you connect the last of the corners it will ask you to enter Brush Thickness, this is asking you how thick do you want the floor, this is the 'Pixel size'. A good rule of thumb for pixel size is the thickness can be compared to Inches (10inches=10 brush thickness ect...) You should use 8, 16, 32, 64, 128 & 256 more often then any other sizes because these also equal texture sizes... It just makes life more easier!
![]() 8th. Walls... In the Top View, hold the 'X' key down and move your mouse around, notice how the Green Marker follows your mouse. Move the Green Marker the top left corner of our floor. Next, pick a new texture from our textures list, move your mouse to the Side View window. Move your mouse around and use the Space bar to make the out side corners of our wall. After you connect the last of the corners it will ask you to enter Brush Thickness again.
8th. Walls... In the Top View, hold the 'X' key down and move your mouse around, notice how the Green Marker follows your mouse. Move the Green Marker the top left corner of our floor. Next, pick a new texture from our textures list, move your mouse to the Side View window. Move your mouse around and use the Space bar to make the out side corners of our wall. After you connect the last of the corners it will ask you to enter Brush Thickness again.
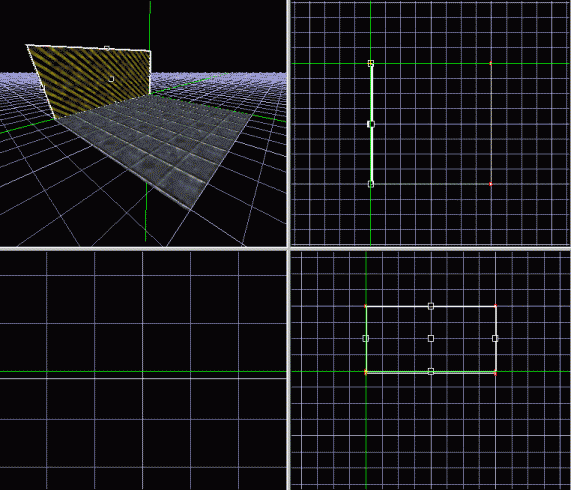
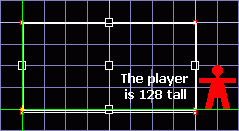
!NOTE! The player needs 128 pixels to stand and about 256 to jump. In the picture above and below grids were preset at 64x64pixels. If you want to change the grid size, these buttons will change the grid sizes.
![]()
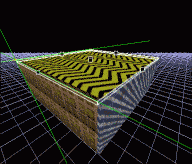
![]() 9th. Repeat #8 by using the 'Front View' and the 'Side View' to make the rest of the walls. For now, make sure you use a different texture for each wall so you don't get lost.
9th. Repeat #8 by using the 'Front View' and the 'Side View' to make the rest of the walls. For now, make sure you use a different texture for each wall so you don't get lost.![]() 10th. Now let's top it off... Use the Front or Side View to move your Green Maker to the top of the walls, In your Top View window move your mouse around and use the Space bar to make the out side corners of our ceiling. After you connect the last of the corners it will ask you to enter Brush Thickness again.
10th. Now let's top it off... Use the Front or Side View to move your Green Maker to the top of the walls, In your Top View window move your mouse around and use the Space bar to make the out side corners of our ceiling. After you connect the last of the corners it will ask you to enter Brush Thickness again.
![]() 10th. use the 'I' and 'O' key to move into the box, Because you have to add the Objects. We will add the player starting point, first move the Green Maker to the middle of the box, and then click the 'Classes" tab, and dubble click "GameStartPoint" It will add the Object to where ever the Green marker is. For most objects (starting points, ammo, power ups, ect...) you do not have to put it next to the ground, you can have it floating up a little bit.
10th. use the 'I' and 'O' key to move into the box, Because you have to add the Objects. We will add the player starting point, first move the Green Maker to the middle of the box, and then click the 'Classes" tab, and dubble click "GameStartPoint" It will add the Object to where ever the Green marker is. For most objects (starting points, ammo, power ups, ect...) you do not have to put it next to the ground, you can have it floating up a little bit.
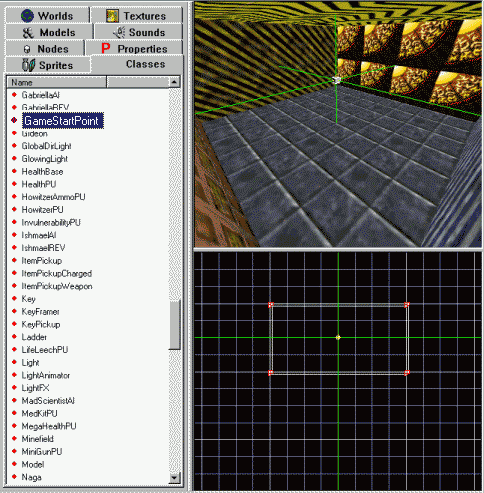
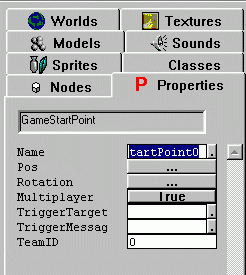
![]() 10th. After you add the Starting point, click the 'Properties' tab and make sure you set the Multiplayer button to True!
10th. After you add the Starting point, click the 'Properties' tab and make sure you set the Multiplayer button to True!
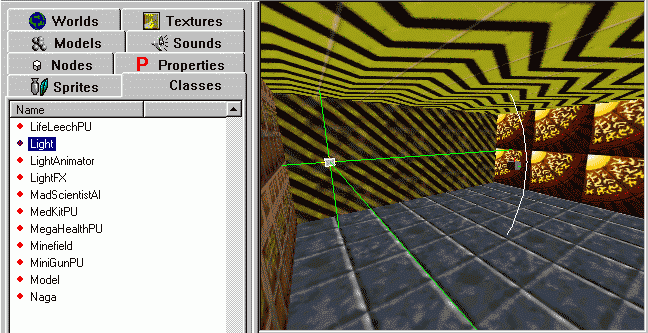
![]() 11th. We are going to need some light. Move the Green Marker to any where in the box, and go over to the 'Classes' tab and find "Light".
11th. We are going to need some light. Move the Green Marker to any where in the box, and go over to the 'Classes' tab and find "Light".
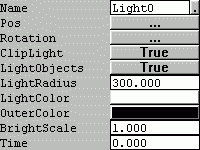
Tip: this is what the options are for the light, but you don not need change any of these settings right now.
![]() 12th. Now click the little Save button
12th. Now click the little Save button![]()
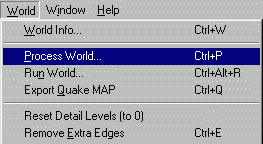
![]() That will save the level into a .ED format, only used for DEdit. To play your level you must Process it, open World and click 'Process World'
That will save the level into a .ED format, only used for DEdit. To play your level you must Process it, open World and click 'Process World'
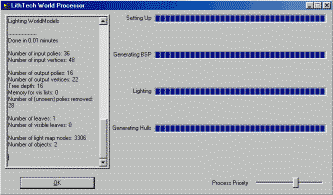
![]() 13th. Processing the level is easy. When just testing a level you DO NOT check 'Full Optimization' because when you check this it takes 3 to 10 times longer to process... you only have to Full Optimize the level when you are done. Anther thing you should do is set the 'Project Directory,' click 'Advanced,' remember we were using c:/games/B2stuff fill this into the blank. Now you can see bullet holes and you can hear foot steps in your level.
13th. Processing the level is easy. When just testing a level you DO NOT check 'Full Optimization' because when you check this it takes 3 to 10 times longer to process... you only have to Full Optimize the level when you are done. Anther thing you should do is set the 'Project Directory,' click 'Advanced,' remember we were using c:/games/B2stuff fill this into the blank. Now you can see bullet holes and you can hear foot steps in your level.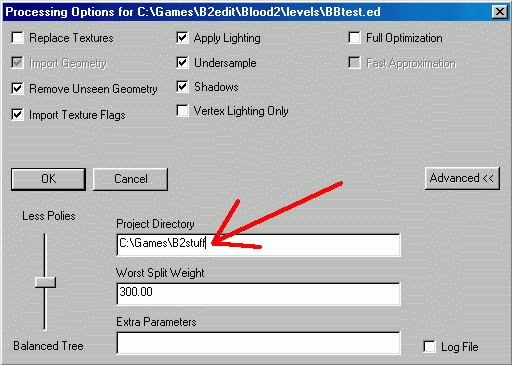
![]() 14th. Go and find your new level, where ever saved it. There will be files there named BBtest.ed & BBtest.dat, add BBtest.dat to your custom folder in your Blood2 directory, and run!
14th. Go and find your new level, where ever saved it. There will be files there named BBtest.ed & BBtest.dat, add BBtest.dat to your custom folder in your Blood2 directory, and run!
Tip: in the the B2-tools folder (where DEdit is installed) there is a folder called 'Levels' in there you will find about a dozen .ED files... Move of Copy the Level folder into you B2stuff directory, now you be able to see how other levels were done... play around with them for awhile to figure out DEdit alittle more!