Doctor_Dolor here.
I joined Badcat5550 in the development of this mod some time after he started it, and shortly after I joined we decided to pretty much restart the project from scratch while keeping things or concepts he already made previously.
The purpose of this article is to show a couple effects we made related to rain, and slightly explain how they work so that anybody can make their own.
First of all, I must clarify I'm no expert in anything, and a newcomer to anything Amnesia related, but I do have some experience with Photoshop which allowed me to make several things more easily.
Here are a couple of features that we made for now, related to rain:
Material that simulates water sliding on glass:
The gif is shorter than it should be but the texture of water sliding down is actually seamless.
Animated raindrop shadows:
It may not be very visible in this gif, maximize it for better visibility. This was made by Badcat5550 and I don't know how to explain properly in detail, so I won't be explaining how he did it for now. But basically it's an animated gobo for a spotlight, taking several different images as frames for the animation.
How to make the effect for water sliding on glass:
This effect is kinda simple to achieve:
1. First thing needed is to get a seamless texture. The one I used is not originally seamless though, I had to make it seamless myself with pain. Thankfully I'm a masochist. I may show how to make it seamless in a separate article, but for now, let's imagine you got a rain on glass seamless texture somewhere on the internet. For example, this one.
You can skip the next 3 paragraphs if your texture of choice is more suitable already, or if you just want the final texture we'll use for this tutorial.
Let's use the "Height" map under "Flat maps" that they offer us free for now since it seems it's probably good enough to work with. However, we want the background to be as white as possible while the parts that are raindrops should be greyer.
Open the image on Photoshop and Invert the colors (Shortcut: Ctrl + I) (on GIMP click Colors at the top left, then Invert) then save (as .dds preferably), so that the darker areas are the rain drops, and the background is white.
However, I also slightly modified the texture quick plus upscaled it to 1024x1024 (using Topaz AI Gigapixel), but surely you are almost as lazy to do this as me, so here it is:

We could further modify the texture to make it look better but for now this is enough to show the effect.
2. Next step is to make a normal map. You can just use the normal map that comes with the texture if you want, however sometimes you may only have a diffuse image. You can easily make decent normal maps using this website (this page doesn't support .dds but it does support .tif or .png).
You can skip the next paragraph since it's a brief incomplete and uninteresting explanation on how to use the page or if you skipped above too and just want the normal map.
In this case we're gonna use that website and make our own normal map based in the upscaled version I generated. Click the left square that says "HeightMap" to open your image (remember it needs to be .png, .jpg or .tif). At the top right you can uncheck rotation, displacement and AO since we won't be using those (you can keep specular if you want but not needed in this case either). In the middle square, click Normal above it. Modify the values at the top until you're happy with the result (shown on the right square). Then below the middle square write the filename you want and download.
I made the normal map for you again:

Remember to convert both images from .png to .dds using Photoshop or GIMP, it'll work as png but it's better as dds.
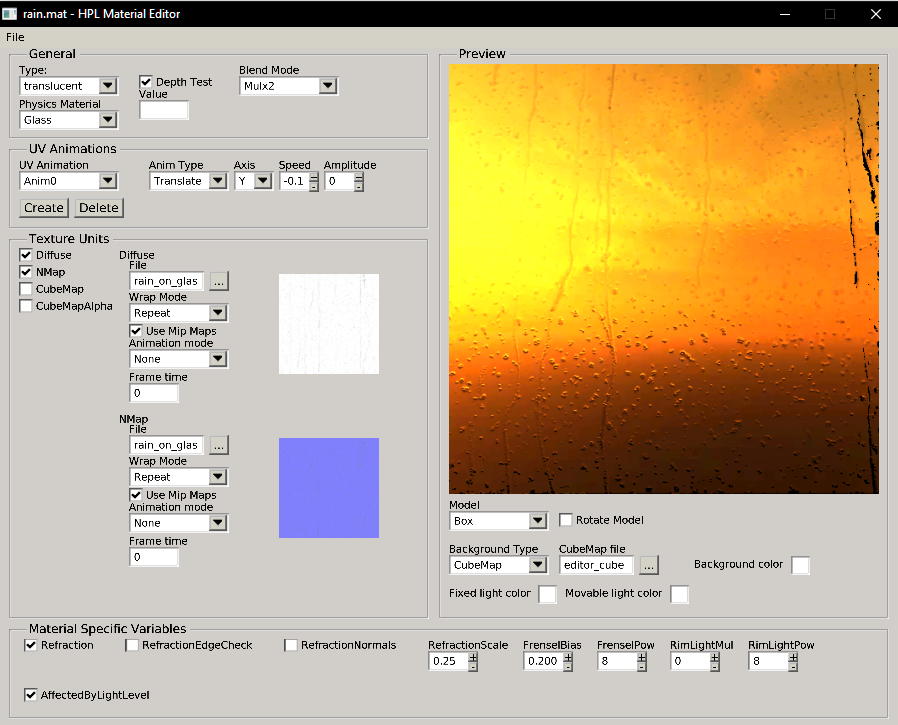
3. Create the material.
After this, you're pretty much done.
Open the Material editor. At the top left under General select Type: translucent. Select whichever blend mode you prefer, in this case Mulx2. Under Texture Units check Diffuse, on file click the button and select the rain texture (if you want, the one we made), then check NMap and the same way select the normal map image (also the one we made if you want).
Now, under UV Animations, click on Create, then on the right change Axis to Y, and Speed to -0.1 or whichever speed you desire.
After this, at the bottom check Refraction and you can mess with the Refraction Scale at the right until you get the proper refraction.
Click on File at the top left and save.
4. Done.
We can already use this material as a plane in the level editor. Let's place it slightly behind a window when it's raining outside.

Not bad. We could modify the texture to make it look way better, or you could surely find a better one, but this will do for now.
State and progression of mod
The mod still has a lot of work to be done in it. However, progression is going swiftly enough: Story is already completely done, we have most of the events and areas planned, some of them already done, and we'll be excited to show or give a sneak peek of some of the features in these articles.
Soon I will start my classes but hopefully that won't slow the progression of the mod too much.
Hope you enjoyed, or at least that the material tutorial was useful in any way to you, and see ya in the next dev log!