Animations is one of the big topics in the development of the Drag[en]gine. One reason for this is the Epsylon game which is not based on programmed camera motions but animated camera motions. This is a tough nut to crack since conventional animation systems can handle this only in specific cases but what we are looking for is a more general way of doing this kind of things. In this article the animator used for creating the flashlight demonstration video is looked at in a general fashion to given an idea how the system works.
Animation Techniques
To get an idea of where the problem arises one has to take a quick look at the existing animation techniques. The Drag[en]gine does not invent a new technique but tries to combine them in a clever way. In general there exist two animation techniques: parametric and procedural. Parametric animations compose of playing back one or more precanned animations applying them to different body groups or blending them together. The well known Motion Capture system uses animation blending in a clever way. Procedural animations on the other hand produce an animation using programs. Two sub groups can be dstinguished with one being fully procedural and the other partial procedural. Fully procedural animation systems use no precanned animations creating all from scratch while partial systems use precanned animations but modifying them using procedural methods. Constraints in modelling applications are a typical example of a partial procedural system. Each of the systems has their pros and cons which results in none of them being a viable solution for the generic case. A clever combination is required to get the result we are looking for.
Drag[en]gine Animators
To combine these two worlds the Drag[en]gine features animators which are in general a collection of rules ( or constraints in modelling application terms ) which govern how an animation is build. Different types of rules exist belonging to either the parametric or procedural category. To make this system developer and artist friendly animators feature also controllers which are like an interface in programming. The developer does not need to know what rules the animation artist uses nor does the animation artist have to know how the code of the developer uses the animator. The only thing the two of them need to know is which controllers do exist and what meaning they have. This allows for parallel workflow which is vital for large projects. In the case of the flashlight sample video the following controllers have been defined:
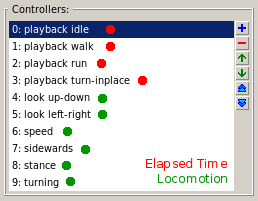
These is everything each party has to know. The entire complex animation is hidden this way. The controllers marked with a red dot are temporal controllers which means the game scripts simply increment those using the elapsed time in each frame update. They are set to wrap around so no need to worry about that. The controllers marked with a green dot take values calculated by a locomotion script class. They are set to clamp the values to a given range. The range is allowed to be anything you want doing normalization inside the engine. Hence the "look up-down" controller for example has the range -80 to 80 which is the looking up and down range in degrees. This is all the programmer needs to know to use an animator created by the artist. I won't detail the code here since the locomotion class is a bit complex. You don't need to know how this class works just feed the values it calculates straight to the controllers and you are all set and done. Now for the artists things get interesting from here on.
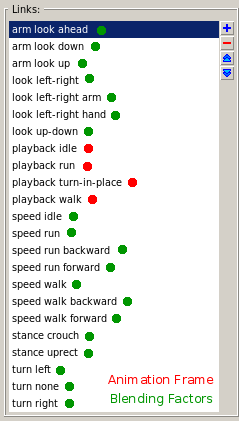
The above image shows all the links created in the animator using the animator editor. Links can be used for anything from deciding which animation frame to use down to determining the blending weight of a rule. The red marked links determine frames in animations while the green ones determine blending weights. A link has the job of taking a controller value and converting it into any kind of value we wish for. In fact a link is a linear mapping function in the end.
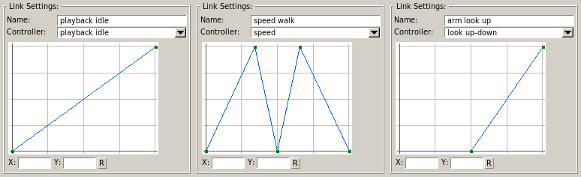
The above image shows three links in detail to given an idea on how this mapping actually works. You get a linear 1-to-1 mapping to start with which you can then improve by adding additional points altering the shape of the curve. The left example shows a typical mapping used for simply playing an animation. The controller value is not altered playing back the animation. Altering the shape would allow to speed up or slow down the animation at elected points. The middle curve is used as a blending weight for the walking animation. To understand this curve imagine the X axis ranging from -4[m/s] to 4[m/s] which is the movement speed. At 1.25[m/s] the walking speed is located and there the curve has the maximum since there only the walk animation is played back. Moving towards the middle ( standing still ) or the border ( running forward/backward ) the weight drops to zero. This is the most complex curve used in the entire example. Most curves are more shaped like the right example which determines the blending weight for looking up. As you might guess left border is looking down so the blending weight increases from looking ahead to looking up. You can play around with those values in the editor with direct feedback so it is not as daunting as it might look right now. Using these links the actual rules can be driven.

This image shows all the rules used for the flashlight example. There are relatively many rules since to get fine grained control over looking around multiple rules are used but they technically are the same. Here the combined approach can be seen very well. The red marked rules are parametric animation rules hence they play back a pre-canned animation sequence created by the artist. These are the only animations he has to create and can be reused for all kinds of other animations using procedural tricks. These rules use the red marked links to determine which animation frame to use and the green links to weight them.
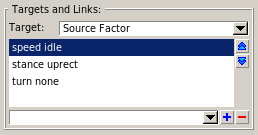
This image shows the links used for the "source blend factor" target of the "stand" rule. Multiple links can be used which are then multiplied together. You can imagine this as being a verbal rule like: "play stand animation if speed is 0 and stance is uprect and not turning in place". The result is though not true or false but a gradual blending factor mixing all the requirements. In the flashlight example at max 3 links are used as blending weights. Each rule can have different targets. So in the case of the example "stand" rule the "source factor" target is used to determine the blend weighting and the "move time" target is used to determine which frame of the animation to play. Again you can play with all this getting direct feedback.
The main magic is done with the yellow and green rules. The yellow rules are a special kind of animation created by the artist. It's what I call a difference animation. For each of the three at frame 0s the model looks to the left, at 0.5s it looks straight ahead and at 1s it looks to the right. This is a simple animation to produce but putting them together properly the flashlight points into the direction we want it to look. The biggest magic is though done by the green rules which are procedural rules. These bone rotator rules take the bone states produced by the previous rules and rotate them relative to the actor ( instead of relative to their bone parent ). This rule type is the key to get the smooth and player friendly camera motion as known from programmed first person cameras. You simply specify how much a bone can be rotated and assing a controller to pick a rotation from this range.
Conclusion
Putting all these techniques together a smooth animation with lots of dynamic aspects can be done with a minimal amount of code while having lots of flexibility. The key pad from one of the movies is done using one animator doing everything from moving the hand to the key pad, pushing buttons, moving the hand back and turning Inverse Kinematics on and off when required while using not more controllers than the example above. The limits to what can be done in a short amount of time is only given by your imagination. I hope this article de-mystified a bit the animation system used without getting too technical.

![Drag[en]gine](https://media.moddb.com/cache/images/engines/1/1/9/crop_120x90/banner_large.png)

looking good dragon. I was expecting something like this from you lol. I've always wondered how it could be possible to have multiple moving parts that animated independently from one another in 3D games and it looks like you've got that problem solved. I so can't wait to see this technology in a game- does this mean the age of crappy Fallout 3 style animation is coming to an end.. lets hope so! Dynamic Animation ftw.
It's especially not too much work for an artist since a lot of animations can be reused. For example moving with empty hands, with a flashlight, a notepad or a computer pad in your hands the same basic animations are used ( red rules 0-11 and the green rules ) but small alterations are applied to them. This way a much richer set of animations can be faked although a small set of actual animations have been created.
Is this a commercial engine?
L-GPL ( Lesser General Public License )