SVN stands for subversion and its a tool used to control the versions of any files. It is invaluable for teams for a number of reasons. It allows an easy way for new team members to gain access to the code or assets. Different people can work on the same file at the same time and the changes can be merged. It ensures easy integration of patches for your base code and—one of the most important features—the ability to branch versions off from the main section.
SVN used to be command line only and only for the hardcore geeks but this is not the case anymore. There are fantastic GUI versions of it available for Mac OS X, Linux and Windows that even non-programmers types can use.
What You Need
To use SVN a couple of things are needed. The major one is a SVN server which will host your repository. This server is usually accessible via the web and allows for a user administrator as well. A SVN server can be hosted on a dedicated box, or hosting can be bought from one of the many SVN hosting providers. Google and Sourceforge also provide free hosting for open source projects.
Setting a SVN server up is out of the scope of this tutorial but there are many good tutorials to be found after a quick google. Here a some that I have used before:
Windows: click here
Linux: click here
The other important thing that is needed is the SVN client on each users computer. This allows that user to perform the core functionality (i.e. check files in). I recommend a GUI SVN client as the command line can be tiresome and confusing. The client of choice for windows is TortoiseSVN and its the one ill be using for this demonstration. It can be downloaded from Tortoisesvn.tigris.org .
Setting it up
Once the SVN server is running and the client is installed there are a couple of basic things to do before you should start using the SVN.
Step 1
The first thing to do is to set up the repository. Somewhere on your computer, create a new folder with the name of your project. For this example im going to use sample_mod. Once that is done right click on that folder, go down to TortoiseSvn menu and select "Import..."
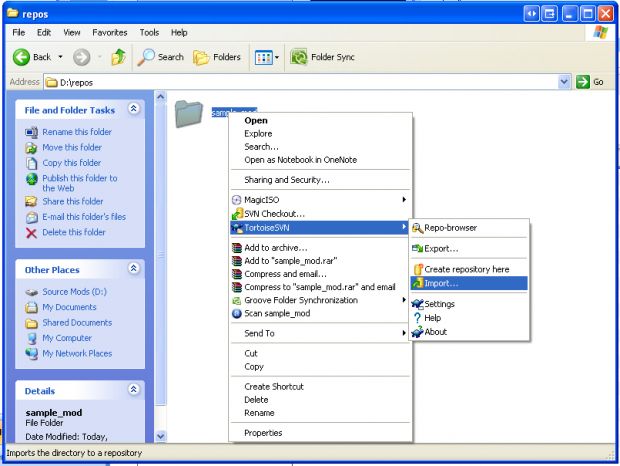
A prompt should come up. Now you need to fill in the url of the repository. This should be the ip address of the svn server starting with svn:// and ending with the name of the file (for example Svn.moddb.com). Note that not all urls will start with svn:// as http:// and https:// can also be used. Enter a message (something like start of project X) and then click ok. If needed, it will ask you for your user name and password and once completed it should bring up a window saying Completed At revision 1.
Step 2
For the second step, what you have to do is check that folder out from the svn. Right click on it, go down to the menu option "SVN Checkout..."
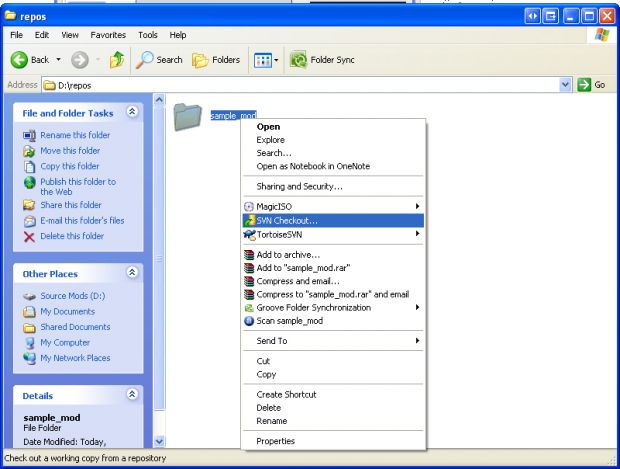
A prompt should pop up asking for some information. The url is the same from step one and no other options need to be changed. Go ahead and click ok again. If every thing completed successfully there should be a green tick on the folder.
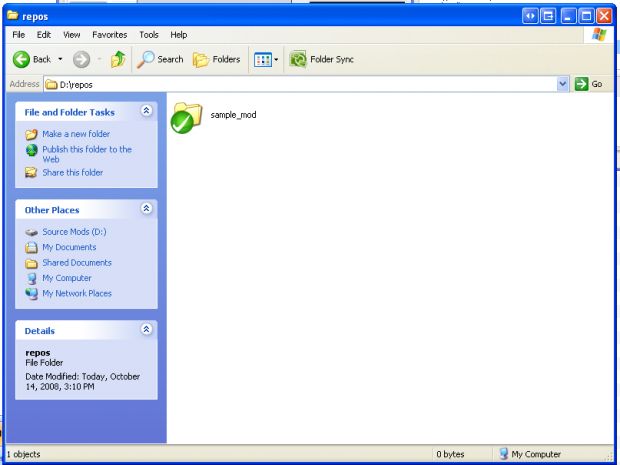
Ok, now we have to set up the basic folders for the repository. In the main folder that we created above, make three new folders called trunk, tags and branches. While you are at it, create three folders inside trunk that are called code, mod and assets.
It is important to understand the use of each folder. The trunk folder is going to hold the all the current working files (i.e. code, assets and mod files). Tags are going to hold release branches (i.e. when you release a version of your mod you will make a "copy" and place it in the tags folder) and the branches folder will hold branches (more on that later).
Once completed, select the three folders and right click on them. Go to the TortoiseSVN menu again and select add and then hit OK at the prompt. This tells the svn server you want to add these files to the repository but it is important to note that they are not added till you do a commit. This is one way of adding files.
The folders should come up with an exclamation mark in a red circle. This means the files are different from the version that is on the repository.
To submit your changes (in this case the new files) right click on the root folder (in this example its sample_mod) and select SVN commit. A new prompt should come up. It is important that you add a descriptive message into the message box. The reason for this is that it shows on the log and is helpful to see why those files where added (and to get a good overview of changes of the project). For this commit im going to use the message "Set up basic files for repository". Also note down the bottom half you have a list of files and folders. This shows changes, deletions and additions which can be selected by the check box. Once done click on ok and the icons on the files should now be green.
Step 3
This is where we start adding the core files. For most mods you will be developing from a sdk which contains a bunch of code and files. For this tutorial im going to use the Source SDK and all ready have made a new mod called sample_mod.
Goto the folder which contains the code for your mod and copy the files inside it into the trunk/code folder of the SVN repository (for this example i would copy them to sample_mod/trunk/code).
Goto the folder that has the mod files and copy the files inside to the trunk/mod folder of the SVN repository (for this example i would copy them to sample_mod/trunk/mod).
Select both folders right click on them and select add from the TortoiseSVN menu. Go ahead and commit them like before and give it a useful message like "standard mod files". This will take a while as it is the first time but it only needs to be done once.
Note: As you can guess, the code folder houses the code, the mod folder houses the mod files but the asset folder houses all things developed for your mod that are not being used or being worked on (like maps, art and so on). It should not only contained the final version but also all files used to make that asset. In the case of a Source mod it should have the folders mapsrc, modelsrc and materialsrc in it.
Step 4
This step is the most important if you want your life to be easy and is missed by most people that use SVN. Right click on the trunk folder and select branch from the TorsoiseSVN menu. In the prompt change the to URL from trunk to branches/modname with modname being the name of your mod. Add a descriptive message again (i.e. "My mod branch") and then hit ok.
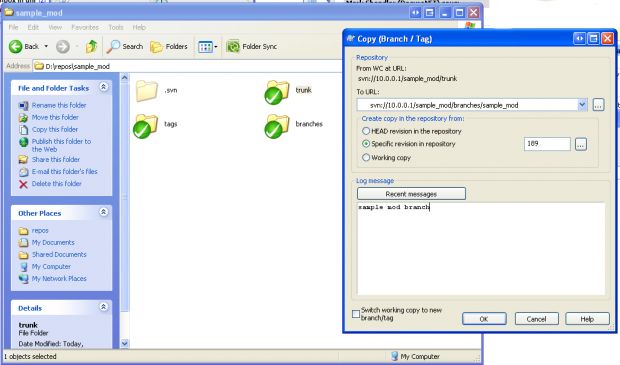
Now to update your copy to reflect the changes you just made goto the root SVN folder, right click and select SVN Update.
The good thing about SVN is that it only keeps one copy of a file thus branching (making a copy) this way takes no extra space on the server. The reason we do this is because it makes integrating changes to the SDK files really simple (thus making your life easier down the track). I will be covering this in a future tutorial. The files in trunk should never be changed (unless its a sdk update) and only the files in the branches folder should be used for your mod!
Step 5
Some games like Half-Life 2 need the mod files to be in a special spot other wise it wont work. If this is the case i got an easy solution that keeps the SVN folders where they are (other wise you can ignore this step).
Download a tool from Microsoft (download) called junction and install it into your system32 folder (C:\windows\system32). What junction does is allows virtual folder (a folder that doesn't really exsist but points to another folder).
Open up command (in the run prompt type cmd) and change to the folder (by using the command cd followed by the path) where the game needs the mod files. For the example, we need to change to the source mods folder in steamapps. The command will be 'cd "C:\program files\steam\steamapps\SourceMods " ' (if the path has a space in it, it needs to be encased with double quotes.
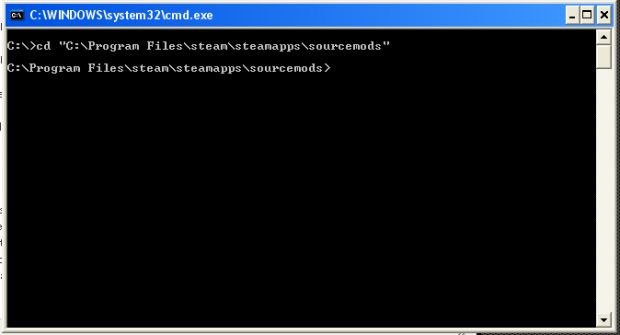
Check to make sure your in the right folder by typing cd with no commands. If you are in the right folder now type "junction [mod folder name] [path to svn/branches/modname/mod]" where [mod folder name] is the name of the folder for that game and the path is the path to the SVN folders we made before. For this example [mod folder name] will be sample_mod and the path will be D:\repos\sample_mod\branches\sample_mod\mod.
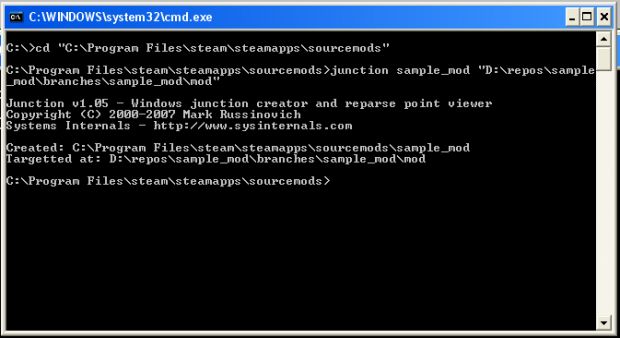
Now there should be a new folder with the name you provided and when you open it, it should show your mod files.
Working with SVN
Well that's it for setup. Go start making changes to your mod making sure to do so in the branches/modname folder. Every day you should aim to commit your changes to the SVN for your other team members to use but make sure your changes wont break any thing other wise their build wont work. Before you commit you should update your copy of the SVN to get any changes that have been made in the mean time and make sure your code still compiles. If you add new files make sure to commit them as well.
That's all for now. I will be making another tutorial about some advanced SVN topics. Thanks goes to the GoldenEye Source team for getting me hooked on SVN.
Lodle
A very usefull tutorial.
Nice one. TortoiseSVN is a very useful little program. :>
Yeah, our mod team is also using SVN.
Yeh, nice tutorial, we´re using a Trac/SVN system too.
It saves us a lot of time and makes the playtests really easy.
Nice tut! SVN is kinda essential while working on a large mod.
Not meant as an add, just want to help:
For people who don't work on opensource projects, you might want to have a look at Assembla.com and sign up for a free account (SVN, TRAC, WIKI).
Or sign up at Modcenter.com for a SVN. They use the same software as sourceforge. They are also free.
Modcenter is great.
It should be essential for any size mods.
Also please digit if you like it.
Assembla is VERY nice to use, I highly recommend it. It is easy to privatize, to manage several users, and is way less of a hassle than setting up svn servers on your own. Also the cost is nice.
Great Tutorial, only negative thing I can say about it is the lack of MacOS but aside from that this is an essential tutorial and every developer NEEDS an SVN. Great Job.
I agree with everyone that SVNs are very useful. We (The Darkmod) are using them and its great for everything (bugfixes, maps, backups, other little changes etc.) keeps everyone on the same page.
Just a quick suggestion. You can actually skip the import step and go right to the SVN Checkout selection.
Saves you a few moments of time.
Yeah, this is what I do every time. When starting a new repo, I just do a checkout, then start adding files.
Ah, I have all ways done it this way. Ill update it in a bit
great tutorial, very useful