Originally posted here: Lighting Properties
Mirrored for archival purposes
So, you're working on a level, and you rebuild. But when it finishes rebuilding your whole level is black, and you can't see a thing. "What am I missing here," you wonder. Well George, it's lighting. And it's always a good thing to add lighting before you rebuild, so you don't have to rebuild again.
Basic Lighting:
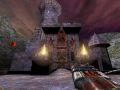
Basic lighting is laying down lights and a basic rebuild. Let's lay down some lights. Over a surface right click and select "Add Light Here." That will add a basic light. Adding them where needed will allow the player to see where needed.
Properties Of a Light:
Right click over the light we just added and select "Lighting Properties," which will pull up another window. In this window are several sub-properties. We are going to focus on only three of those sub-properties - Display, LightColor, and Lighting.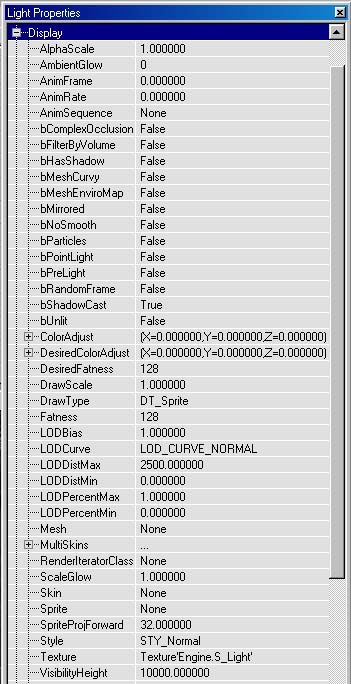
This screenshot shows the display screen and its sub options, several of these options I personally do not know, but find most to be un-necessary. We are mainly going to pay attention to Ambient Glow, Draw Scale and Skin. The other sub options are pretty much set as their respective types, but I will delve into those options in a later tutorials.
Ambient Glow is what I call the doom and gloom factor. Adding a light color and pumping the Ambient Glow to 128 can usually create some cool effects like shadowing with colors that is very effective, and can help create more of a pitch black effect if so desired. having 128 as the setting is probably the most optimal setting I use, but as I said, if you're going for a pitch black effect drop the Ambient Glow to something like 64 and you can create deep shadows.
Draw Scale and Skin go hand and hand. They are both 2/3 of the main settings for a corona, or lens flair. Setting the draw scale below 1.0 will actually set the lens flare radias, or how big or small it will appear when you see the flare. A normal setting is .3 or below. Having it set to 1.0 and above will probably create something awfully bright and very annoying.
As for skin, in your texture browser look for a lens flare skin, select it and click the "use" button that appears besides the SKIN option. This will be the skin viewable in the game for the flare.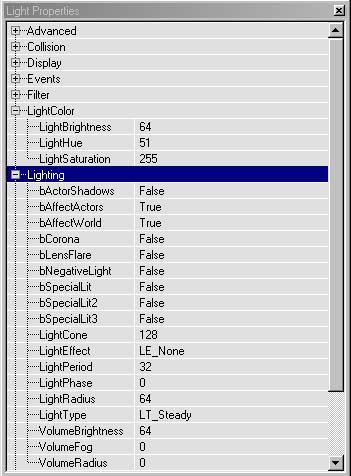
Here we see the Light Color, and Lighting sub-directories, with their options. We are not going into the whole list, only a few that are important will be highlighted. The others we'll look at some other time.
We will look at bCorona, LightCone, LightEffect, LightRadius, LightType, Volume Brightness, Volume Fog and Volume Radius.
The first, bCorona, is the third part of making a lens flare. By setting this to "true" the game will code the level so that light source will become a lens flare. Remember that the drawscale will effect the size of the flare as seen IN-GAME.
LightCone is the radial effect at the bottom of the light and the top. Having it set at its current state is usually a good thing, but tweaking the number down a bit will make things more dark for that cone and the light source itself.
LightEffect is a submenu you can choose a desired effect for that light, such as Firey Wave, CloudCast and Watery Shimmer, allowing you to make the area's lighting more realistic.
LightRadius is a very important setting to know. By raising the radius you lessen the amount of lights to be placed, and you increase performance with less light sources. So by increasing the radius you are not only saving yourself time by adding more lights here and there, but you are also increasing performance in the level.
LightType is a setting where you can select the lighting properties, such as flicker or backdrop light. Backdrop light is what I use in my skyboxes. They usually take care of the whole skybox itself, but in order for you to understand this menu better take a look at it with the editor and try every type.
Volume Brightness is how much light the source is creating - 64 is its normal number and is the default. By lowering and raising the number you can change the output of the light. But remember there is such a thing as TOO MUCH light and the game will know when and will let you know. If you have to much light then that areas lights will become green and they are very bright in game. Green effect is not good.
Volume Fog actually does two things. One, it creates thickness in the lighting, and two, it creates a fog layer. Its default is 0 and if you want a fog layer for a certain part of the level, then you can go from 0 to 255 as the setting - 255 will pretty much cover the level.
Volume Radius is how much light will reach a certain area. This and Light Radius work hand in hand, keeping it low or the same as the Light Radius usually keeps performance up.
We have touched on the lighting properties that are a MUST know. I will discuss the other lighting options in another tutorial, but for now you know the basics. Good Luck in your leveling experience.