Introduction:
This tutorial will take you through process of importing custom created models in Half Life 2 Death Match. This tutorial is assuming that you are using 3D Studio Max 9 and you are familiar with basic terms in relation to 3D models and textures. This tutorial is also written in terms of importing a prop called “mailbox,” and saving the files into a root folder called “custom models.” For your own prop you’re using while following along, simply replace “mailbox” with whatever prop you’re using, and “custom models” with whatever folder name you prefer. Just make sure that you remember which folder houses your custom materials. Lastly, this tutorial is written only for importing models as static props.
In order to import your models into Half Life 2, you need to have specific folders set up in specific locations. You need to have the SMD Exporter for 3D Studio Max 9, a tool called studiomdl.exe, another called VTFEdit, and lastly, while not mandatory, you will want another tool called hlmv.exe.
Acquiring Tools and Setting Up Folders:
Half of the tools you need you already have on your computer, it’s just a matter of knowing where to find them. In windows explorer, navigate to the following location:
A note, the only real difference in the path for you will be where it says “marriden.” This will be replaced by whatever your username is that you sign into Steam with. In this folder find studiomdl.exe, right click and copy it, then paste a shortcut onto your desktop. While in this same folder, find hlmv.exe and paste a shortcut onto the desktop for this tool as well. Creating the shortcuts onto the desktop will enable you to drag and drop your files onto the icons and perform the necessary functions towards importing your models.
The next tool that we’re going to acquire is VTFEdit.exe, and unfortunately, this tool is not found within your program files, you’ll have to obtain it from the internet. You can find it simply performing a Google search for VTFEdit, but here’s the direct link:
Download and run the installer and you will be ready to import your model’s texture files.
The last tool you need is the SMD Exporter plugin that will work with 3D Studio Max 9. Again you could find this through another Google search, but here’s the direct link in which you can download the files:
While this plugin is actually only a beta, it works fine for the purposes of this tutorial. Download and extract the files to your desktop. Please note that the author of this plugin has created the tool for 3D Studio Max 9, 2008, and 2009. Once the files have been extracted, open the Max 9 & 2008 folder, then the 32-bit folder, then drag and drop the SMDExporter.dle file into your 3D Studio Max 9 plugins folder. If you do not know how to get to that folder, here’s the path:
Now that you have all the required tools to successfully import your models into Half Life 2 Death Match, it’s time to set up the required folders that will house your models textures, and the actual model files. Create a folder called “custom models” and a folder within that folder called “mailbox” in the following locations:
The first location is going to hold all your models texture files while the second will hold the model files.
Exporting from 3D Studio Max:
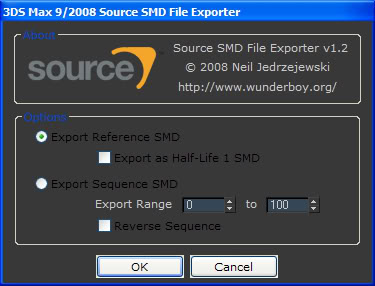
Create a folder on your desktop called “mailbox.” Open the model you want to import into Half Life 2 Death Match with 3D Studio Max 9 and make sure that everything you want is visible in the scene and hide everything else. Also ensure that the textures for your model are applied. Go to File > Export and save your file as “mailbox”, selecting Source SMD for Save as type into the “mailbox” folder you created on your desktop. Press Save As and you will be presented with the following:
As you are creating a static prop for Half Life 2 Death Match, the only option you need to worry about having selected is Export Reference SMD. The other options are pretty self explanatory as to what they’re for, Export Sequence SMD is for any animation that you may have on your model but that’s unnecessary for the purpose of this tutorial. Press OK and you’ll see a screen informing you that your file has been created successfully. If you look in your “mailbox” folder on the desktop, you’ll notice that “mailbox.smd” is there and is the first official piece towards importing your model. After confirming that your .smd has been created, close 3D Studio Max 9.
Creating Model Texture Files, .VTF and .VMT:
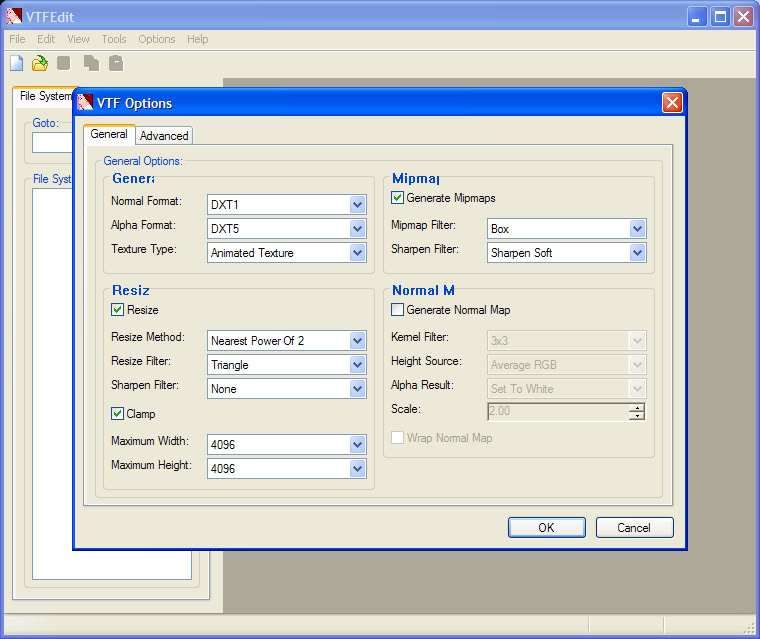
In Windows Explorer, navigate to where you have your .tga texture file and drag it onto VTFEdit where you’ll be presented with the following screen:
There’s no need to adjust anything, simply press OK and move on to see your models texture appear in the right hand window. Go to File > Save As and save your file as “mailbox” in the following location:
Please recall that you should have created an appropriate folder for this specific file, thus the “mailbox” at the end of the path. This file you just created is a .vtf which is essentially the graphical part of your texture, the next step is to create the data file which will tell Half Life 2 Death Match what texture to use and what that texture’s material is supposed to be.
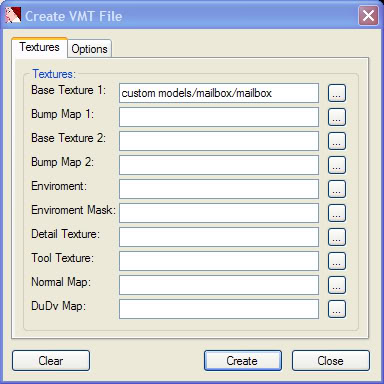
With your texture still opened in VTFEdit, click on Tools > Create VMT File to get the following menu:
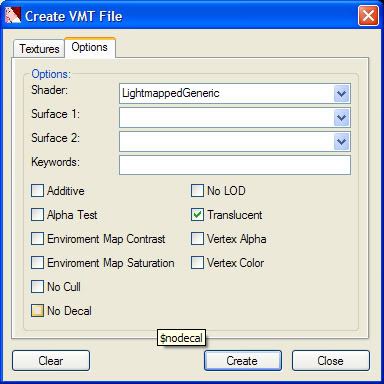
As you can see, the .vtf that you just created is being used as Base Texture 1, if you have any Bump Maps or Normal Maps, you can add those to the file by clicking on the buttons with the “…” in them. Since there’s no Normal Map to include at this point, click on the Options tab at the top:
Change Shader: to VertexlitGeneric, Surface 1: to whatever material your texture is supposed to be made of, and uncheck the Translucent checkbox unless your texture file has some translucency to it. Click Create and save this .vmt file in the same folder as your .vtf file. Close VTFEdit. For a quick explanation of what your .vmt file is doing, right click on the file and open it with notepad to see the following:
{
"$basetexture" "custom models/mailbox/mailbox"
"$surfaceprop" "Metal"
}
“VertexlitGeneric” is the shader being used for the file. “$basetexture” is which .vtf file is being used in the texture. You’ll notice that next to it the path starts with “custom models,” Half Life 2 Death Match already knows where to look for your file up until the “custom models” folder. “$surfaceprop” is telling Half Life 2 Death Match what type of material your texture is, in this case, Metal. If you’re going to use VTFEdit then you really don’t need to know what all this text does, but if you ever plan to write your own .vmt files, this is good basic information to know. There’s more information on different attributes you can include in .vmt files on Valve’s Developer Wiki.
Creating a .QC File:
Open Notepad and immediately save the file as “mailbox.qc” in the “mailbox” folder you created on your desktop. Copy and paste the following into the Notepad file changing the bold font to fit your specific model:
$body "Body" "mailbox.smd"
$cdmaterials "custom models/mailbox/"
$staticprop
$scale 1.0
$surfaceprop "Metal"
$sequence "idle" "mailbox" fps 30
$collisionmodel “mailbox.smd”
{
$concave
}
As with the .vmt, here’s a rundown of what each command is doing. “$modelname” is defining which directory and file name to look for, very similar to the example in the .vmt file above. “$body “Body”” defines the base model. “$cdmaterials” tells Half Life 2 Death Match where to look for the models texture files, do not put the actual material name at the end of this path, just the folder otherwise it wont work properly. “$staticprop” is defining this prop as a static prop. “$scale 1.0” determines how large your prop is, a value of 1.0 will be how it was modeled while a value of 1.5 and 2.0 will be one and a half times and two times larger respectively. This allows you to change the size of your model without actually having to resize it in 3D Studio Max 9. Also note you can input any number you wish here. “$surfaceprop” defines what kind of material the" model is, put the same thing here that you put in your .vmt file. “$sequence “idle”” since this prop doesn’t have an animation, it will remain “idle”. Both the “idle” and “fps 30” can be changed if you’re creating a prop with animation. “$collisionmodel” defines the collision detection in Half Life 2 Death Match, without it, players and gun fire will simply pass through the model. “$concave” tells studiomdl.exe to assume that the collision model is concave. For more information on .qc files, refer to either the Valve Developer Wiki or The SnarkPit.
Creating a .MDL File:
Open the “mailbox” folder located on your desktop, right click on “mailbox.smd” and choose Open With selecting Wordpad. Wordpad should come standard on all Windows programs but if you don’t see the option to open the file with that program, click on your Start button and select Run. Type Wordpad into the text box and press OK to open the program.
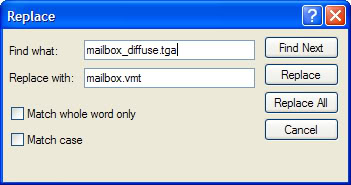
In Wordpad, select File > Open and browse to “mailbox.smd” to open the file. When it opens you’ll see it’s a very large file with lots of numbers, but you’ll also notice that your models original texture file, “mailbox_diffuse.tga” in this case is located every few lines in the file. Navigate to your textures .vmt file and copy the name of the file, including the file extension. In Wordpad select Edit > Replace. In the Find what: text box enter “mailbox_diffuse.tga,” and in the Replace with: text box paste “mailbox.vmt" and press Replace All; close the dialog box:
Save and close “mailbox.smd.” The last step in the process is to drag your .smd file onto Shortcut to studiomdl.exe that’s on your desktop. Make sure that you’re currently running Steam or the program wont work. When you drag the file onto the shortcut, you’ll see a DOS Prompt window appear and after a few seconds it will close. Check your “mailbox folder” in the following location:
You’ll notice that all sorts of files now populate this folder, including your .mdl file.
Viewing and Testing the .MDL File:
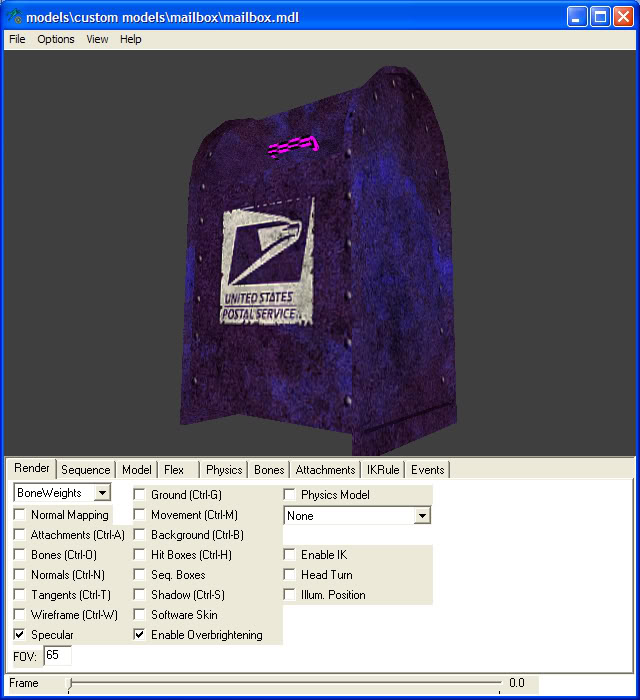
Now, the whole reason for having a shortcut to hlmv.exe that was mentioned at the beginning of the tutorial. Again, while not a mandatory tool, it makes the testing process faster as it will show you if everything was imported properly. To view your file, select File > Load Model and browse to “custom models” where you’ll find “mailbox.mdl.” Open this file and the model will appear in the window fully textured. If any texture files are missing you’ll notice a purple and black checker pattern on the model:
There you have it, you’ll notice that everything on this model is good except for the handle which is missing its texture. The reason for this is the way in which it was modeled, the handle was attached as a separate object and does not share any real estate with the mailboxes texture map. The convenient thing about this is it illustrates the point that if you’re missing a texture file for your model, that area will render with a black and purple checker pattern. You can bet that if it looks like this in hlmv.exe then it will look like this in Half Life 2 Death Match. When you’re satisfied, close hlmv.exe, it’s time to test the prop in-game.
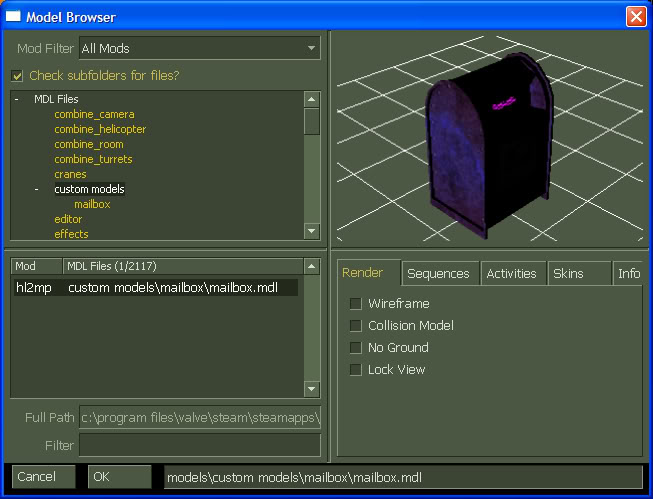
Open Hammer, create a small room with an info_player_deathmatch and a prop_static entity. Open the Object Properties for the prop_static and adjust the World_Model parameter by clicking the Browse button:
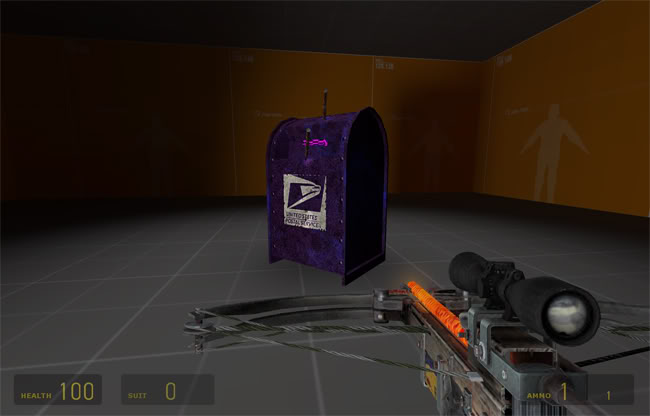
As you can see, the MDL Files main folder contains all the sub-folders that house all the models in Half Life 2 Death Match, you’ll also notice the folder you created for your custom models. In order to browse to them faster, just select this folder instead of using the filter option to find your model. After you insert your model into the test level, add some lighting including light_spot entities to see how your model will react with in-game lighting. Once everything is set up, save and compile your map to make sure the collision model works:
Perhaps one of the best ways to ensure that your prop has proper collision detection is to use the crossbow and fire a few bolts into the model. If they are sticking into mid-air, then you need to adjust you collision model. However, the way that the .qc file was created, this shouldn’t be an issue. As you can see, your model should work perfectly, casting shadows and all.
Conclusion:
This tutorial just covers the basics of importing custom created models into Half Life 2 Death Match. There’s still the matter of importing models as prop_dynamic and prop_physics entities, not to mention importing models as characters, weapons, etc… however this tutorial should have given you a good foundation on which you can build off of to achieve those types of imports.





Great tutorial, well done!
thats a very purple mailbox
forgot to mention that you have to drag the vmt on the material editor and compile with that material on or it wont skin properly
That's a pretty well-written tutorial.
Great tutorial! I got one question... How many polys should a phys-model have? I'm mooding Licor de Cactus and I don't would like to know if my phys models are too "crispy".
For example, if I got a 200 polys model, can I use a 30 polys phys-model? Or can I reach 100? Thank you!
Erwaitin make your physmodel as low poly as you can without losing the shape of your main model. I got another question, I exported my model, got the texture working(main thing this tut helped me fix), it shows up in Model Viewer, the position of the collision and main model match perfectly, it shows up in Hammer but ingame it doesn't appear, even if I set it to prop_static. Great tutorial, helped me out alot. I'll mess around with the settings and see if i get any reply.
Uhm, perhaps, when you complie the model, on your .qc, did you forget to write $staticprop?
Developer.valvesoftware.com
Good idea, I never thought of that, I'll go check now thanks
Sorry I wasn't able to respond sooner. Unfortunately I haven't really attempted to get them into the game before but it's something I'll work on and try to incorporate into this tutorial in about a week. Sorry I'm not any help on this topic, but I'm glad that Tornronim was able to help you out.
Hm it didn't work :(.
woah triple post, anyways I managed to get it to work :D, thanks for helping. Great tut again.
Glad to hear it :), what was the problem?
thank you for this tutorial it helped me lots. i felt that your descriptions were clear and easy to understand, and didnt leave any of the programs out i needed to use! im now on the road to getting my own physical props in game :D
cruckz
Nice tutorial but i want to put my pistol that i made in half life 2.. how do i do this? could someone please tell me how?
thanks for this tutorial, however i get stuck at the 'drag your smd file onto the shortcut of the studio mdl'. it works and a pop up dos box appears but when i check my models folder nothing is in it....
any suggestions?
Unfortunately I need to see the stuff in front of me, perhaps when I get my stuff installed again I'll be able to help resolve your issue.
so thats a no the stuff won't work ima guess X D
hey, king of moose, does this tutorial still work with that latest versions of all the tools, also, well, is there anyway to make it like, a porp_phys block in hammer?, i wonder this because well, props aren't fun unless they do stuff X D, and i mean like a little hatch or door, axis, you know
for that fact how do you make it gmod accesable?
Okay I have a few issues that you might be able to help me with... (1) when I drop the smd file I created onto the hlmv.exe it gives me this error "unable to load manifest file 'script/game_sounds_manifest.txt' and when I drop the smd file onto the studiomdl.exe I get the dos run box pop up but then nothing gets added into my folder. I don't know what i'm doing wrong... maybe it's cuz i'm running vista...
No matter how many times I go through this tutorial, I cannot get my textures to show on my object. What do I do?
I had hard time getting those materials right, key for success was to read this tutorial carefully:) My mistake was that I didnt make folder for materials,as it was guided in begining of this tutorial.
I made this in episode 2, in that game folder there wasnt folders for models or materials. So if u dont have those you can just create them.
Hope this helps
Just a question. Is it compatible with 3DS Max 2009?
Hey i followed the tutorial step by step but when i got to the part of dragging the .smd file into studiomdl.exe it didn't create the .mdl file! i have tried and retried the DOS Prompt window comes up and goes but it doesnt create the file! Help...
Hey guys, sorry I haven't really been responsive, I haven't actually been working on this stuff in a while now. I'm reinstalling the software as I type this so I'll see if I can figure anything out.
This tutorial was really helpful, thanks for it alot!
had the same problem with the missing texture. i get it to work i will throw a tut up, but this one is great tut thanks for it.
I'm also having problems with the textures not showing up, I'm trying to use this for L4D and i'd assume it's basically the same thing, just using the "left 4 dead" root directory instead of the "half life dm" root. I've tried so many different variations with putting the vmt and vtf files in all sorts of different places while also changing the locations in the .qc and .vmt files themselves, still nothing. I don't want to give up but this is ******* me off, any help would be hugely appreciated.
As a side note, could valve have made this process any longer and more complicated? Probably not...
I figured it out! I tried so many different things and this finally worked!!!!!!!!
I just placed all my .vmt, .vtf, .smd, and .qc files in the C:\Program Files\Steam\steamapps\common\left 4 dead\left4dead\models\custom_models\Thompson
this is what my .qc files looks like:
Code:
$modelname "custom_models/Thompson/Thompson.mdl"
$body "Body" "Thompson.smd"
$cdmaterials "custom_models/Thompson/"
$staticprop
$scale 1.0
$surfaceprop "Metal"
$sequence "idle" "Thompson" fps 30
$collisionmodel “Thompson_Collision.smd”
{
$concave
}
this is what my .vmt file looks like:
Code:
"VertexlitGeneric"
{
"$basetexture" "custom_models/Thompson/TX_Thompson_Dif"
"$normalmap" "custom_models/Thompson/TX_Thompson_Nor"
"$surfaceprop" "Metal"
}
I dragged my .smd file from the location listed above onto my studiomdl.exe shortcut and looked like nothing had happened different than the previous hundred times before, but when I put the .mdl file into the hlmv.exe shortcut, voila! I hope this helps someone out that was getting just as ****** about this big stupid process as I was. Cheers!!!
use Gui-studio 2
If you have missing textures, open your .vmt (in notepad or etc.)
And check your $cdmaterials is right.
You might get this wrong depending where you load your materials to VTFedit.
i got 1 problem, im making a basket ball hoop and i got it in-game and when i tried to throw a grenade through the hoop it just bounced off. i then tried making a collision model...i did and yet it kept the same collison model data, wat do i do?
too bad 3d studio max is $3,000+
I want to learn to give depth to the game like counterstrike who want to help my facebook add me sulahkan erikbaeh@yahoo.com