"How to: Make your own Portal 2 mod!" originally appeared on my blog on September 15, 2011.
Se51.net
STATUS: ALMOST COMPLETE
Only the icon is left
Updated: 17/09/11
What works:
- Running the mod directly from Steam!
- Custom logo
- Custom menu labels
- Custom loading screens!
- Loading any given map from main menu!
- Custom menu background and retain it after quitting out of a map
- Custom chapter titles and subtitles
- Custom image for each chapter in main menu
What is yet to be determined:
- Custom icon
A how-to in six parts
Part 1: Create a runnable mod
Part 2: Remap and rename core menu functions
Part 3: Implement your own logo and menu background
The advanced chambers! -
Part 4: Replace "Extras" and "Portal 2" with your mod title
Part 5: Implement thumbnails for your chapters in the modified Extras menu
Part 6: Replace the loading screens
Reference material: The complete Portal 2 file list (2 MB txt file)
This next test took some figuring out... to figure out. Until I completely know how to do it, I'll update it with information I find about this very interesting topic. Particularly if you want to make your own mod, much in the way like you could with the original Portal. So if you want to make one, and really want to make it your own (other than just mapping), you should read on.
Let's start with what I know:
- Portal 2 is a game based on the engine Source 2009
- The UI is rendered by something Valve refers to as VGUI (technically: VGUI2)
- The Source SDK available from Steam is NOT applicable for Portal 2 [1]
- Portal 2 has its own Authoring Tools (which is commonly known)
- Authoring Tools apparently are an update to the Source SDK in some form [2]
- Steps from Portal 1 to create a mod, only partially apply
- Most, if not all textures in Portal 2, have been upgraded to VTF version 7.5 [3]
- Engine remains backward compatible with VTF textures of older versions (confirmed for at least 7.2) [4]
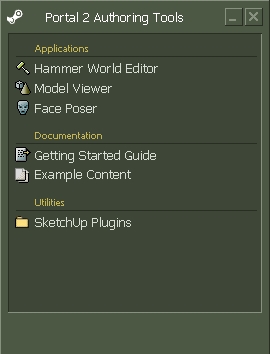
As of this writing, Valve provides you with a package for Portal 2 which you can get from Steam as long as you own a legitimate copy of the game. This package is known as the Portal 2 Authoring Tools. Among those tools you will find Hammer, the same tool Valve used to create the entirety of all chambers in the game, including the parts underground. You're also given the Face Poser for lip syncing, and example content.
I won't go into any detail about Hammer and map-making, because that is not the focus of this post. If you were looking for that, sorry to disappoint. But I can assure you: using Hammer is not as hard as you might think.
I'll show you what I have done so far to create a custom mod for the game. There are some things you will have to do. Some theorized you'll have to copy the entire game and customize its contents then - don't worry, this is not the case. At least not at this point. Even if you'd do that, you'd still be stuck with the standard menu screens. Besides, you cannot re-distribute the entire game itself for obvious reasons.
So let's get started. For science.
1. Create a folder for your mod
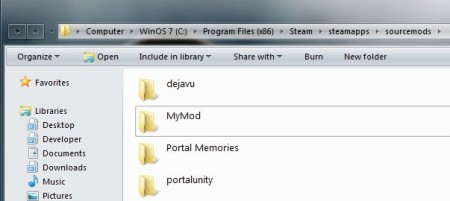
Navigate to where ever you have Steam installed (C:\Program Files (x86)\Steam for example), in there look for a folder called steamapps. Enter that folder. In there you will find sourcemods. Enter that folder too. Now, create a folder that has the name of your mod - let's just say MyMod.
This doesn't do so much, but in here you'll put everything of your mod. Putting it here makes it easy for Steam to detect it.
2. Create the most important file: GameInfo.txt
Enter the MyMod folder. In there create a text file called GameInfo.txt. This is practically the most important file of them all - you now have a mod! Well, kinda. Don't get your hopes up yet.
This file has to have some content. These contents define the name of your mod, what game it is for, which engine to use, which paths to look in for additional required content (meaning textures, models, sounds... you get the picture). Open the file, and paste the following into it:
{
game "MyMod"
title "MyMod"
gamelogo 1
SupportsDX8 0
SupportsXbox360 1
FileSystem
{
SteamAppId 620 // Portal 2 has ID 620
ToolsAppId 211 // Hammer
SearchPaths
{
Game |gameinfo_path|.
Game portal2
}
}
}
3. Create the map folder
Good work getting this far, future-starter! That said, if you are simple-minded, old, or irradiated in such a way that the future should not start with you, please return to your primitive tribe and send back someone better-qualified for testing.
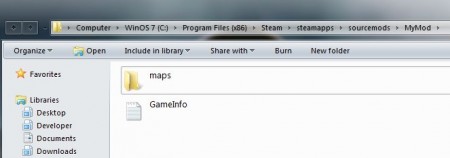
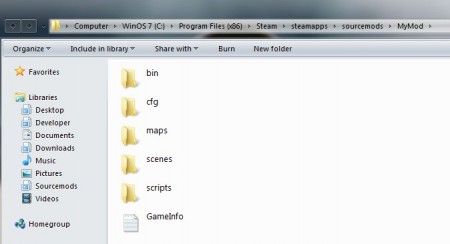
Thanks, announcer. Anyways. You'll need to create the folder that will hold all your test chambers. Go ahead and create that one now. Once you did that, your structure should look like this:
Also, I would recommend copying all your maps into that folder right after you created it.
4. Copy over the required files from Portal 2
It's not as big or as bad as you think. You won't have to copy exabytes of data. So it's all good. You will have to copy at these folders, as far as I know:
bin
cfg
You can find those in C:\Program Files (x86)\Steam\steamapps\common\portal 2\portal2. Adapt the program files folder to where you have it installed.
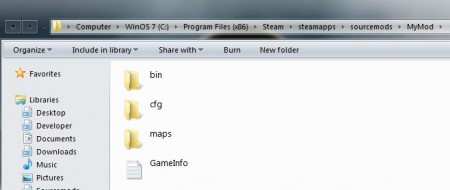
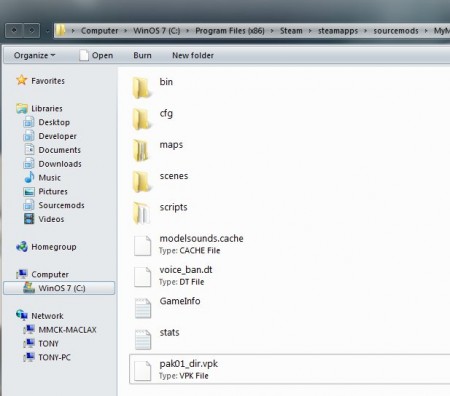
Once you paste those, it should look like this:
5. Copy required script file and scenes
In my experimentation, it seems that in the very least one file has to be present in these two folders:
scenes
scripts
I'm guessing that the engine requires those for correct operation. So since we're missing those folders at this moment, we need to go ahead and create them. You should end up with this:
You don't have to have all scripts from the game, just one file. This file is called game_sounds_manifest.txt. So - enter the scripts folder, create a new text file with that name - and put in the following contents:
//
// Due to a limitation in the sound emitter system that we shipped on PS3,
// the original sound scripts must NOT be changed after ship on PC/Mac
// until we can patch PS3 and fix the issue for real.
//
// You will get a fatal error on startup if you do so.
//
// If you need to add more sounds, you MUST add them to a NEW sound script file
// and reference that file at the BOTTOM of this list after the designated
// marker ("new_sound_scripts_must_go_below_here").
//
game_sounds_manifest
{
"precache_file" "scripts/game_sounds.txt"
"precache_file" "scripts/game_sounds_ui.txt"
"precache_file" "scripts/game_sounds_player.txt"
// HL2 World, Ambient Generic, Items, Physics, Vehicles
"precache_file" "scripts/game_sounds_physics.txt"
// Game level sounds
"precache_file" "scripts/level_sounds_aperture.txt"
"precache_file" "scripts/game_sounds_portal.txt"
"precache_file" "scripts/game_sounds_weapons_portal.txt"
"precache_file" "scripts/npc_sounds_energy_ball.txt"
// Aperture
"precache_file" "scripts/game_sounds_props_aperture.txt"
"precache_file" "scripts/game_sounds_vo.txt"
"precache_file" "scripts/game_sounds_animation.txt"
"precache_file" "scripts/game_sounds_auto_generated.txt"
"precache_file" "scripts/game_sounds_turret_auto_generated.txt"
"precache_file" "scripts/game_sounds_cave_auto_generated.txt"
"precache_file" "scripts/game_sounds_sphere03_auto_generated.txt"
"precache_file" "scripts/game_sounds_world.txt"
"precache_file" "scripts/game_sounds_announcer_auto_generated.txt"
"precache_file" "scripts/game_sounds_cores_auto_generated.txt"
//Portal content Sounds
"precache_file" "scripts/level_sounds_music_portal.txt"
"precache_file" "scripts/level_sounds_escape.txt"
"precache_file" "scripts/npc_sounds_aperture_ai.txt"
"precache_file" "scripts/npc_sounds_energy_ball.txt"
"precache_file" "scripts/npc_sounds_turret_portal.txt"
"precache_file" "scripts/npc_sounds_rocket_turret.txt"
"precache_file" "scripts/npc_sounds_glados_cores.txt"
//Co-op bots
"precache_file" "scripts/game_sounds_ballbot.txt"
"precache_file" "scripts/game_sounds_eggbot.txt"
// NPC Sounds
"precache_file" "scripts/npc_sounds_combine_ball.txt"
"precache_file" "scripts/npc_sounds_combine_ball_episodic.txt"
"precache_file" "scripts/npc_sounds_hover_turret.txt"
"precache_file" "scripts/npc_sounds_turret.txt"
"precache_file" "scripts/game_sounds_npc.txt"
// Player
"precache_file" "scripts/game_sounds_player_portal2.txt"
// Items
"precache_file" "scripts/game_sounds_nugget.txt"
// FIXME / REMOVEME / whatever: tempcontent
"precache_file" "scripts/level_sounds_tempcontent.txt"
// Paint
"precache_file" "scripts/game_sounds_weapons_paintgun.txt"
"precache_file" "scripts/game_sounds_paint_player.txt"
"precache_file" "scripts/game_sounds_paint.txt"
// Scripted Sequences / Cinematics / Set Pieces
"precache_file" "scripts/game_sounds_scripted_sequence.txt"
// VFX / Particles / Beams
"precache_file" "scripts/game_sounds_vfx.txt"
// Music
"precache_file" "scripts/game_sounds_music.txt"
"precache_file" "scripts/game_sounds_music_A1.txt"
"precache_file" "scripts/game_sounds_music_A2.txt"
"precache_file" "scripts/game_sounds_music_A3.txt"
"precache_file" "scripts/game_sounds_music_A4.txt"
"precache_file" "scripts/game_sounds_music_mp.txt"
"new_sound_scripts_must_go_below_here" ""
// ----
// PRECACHE NEW SOUND SCRIPTS HERE!
// ----
//BR
"precache_file" "scripts/game_sounds_BR_world.txt"
// taunts for the store
"precache_file" "scripts/game_sounds_taunts_egg.txt"
"precache_file" "scripts/game_sounds_taunts_ball.txt"
}
Of course - you can leave out the comments in the beginning - but I thought I leave them in so you too can learn about this very interesting issue they seem to be having.
Save the file and close your editor. I won't show you a screen of the file in your scripts folder though.
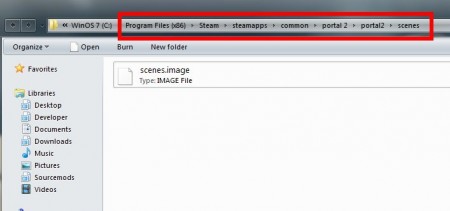
We will need a file calles scenes.image. This is a file you can't edit by hand, so you will have to go into your Portal 2 installation location - for example C:\Program Files (x86)\Steam\steamapps\common\portal 2\portal2, and find it in the "scenes" folder:
Copy this file into the "scenes" folder inside your mod.
6. Run the mod for the first time to create caches
At this point, it is required that you run your mod at least once for a very interesting reason. It seems that the engine requires a certain cache for your maps, mostly. It is possible that maybe you have put in your own sounds into the maps, and for some reason, I'm not quite sure of myself, the engine will need a cache for that.
So... restart Steam and see your mod having appeared in the list! Yay! :)
Click on "PLAY" - you monster.
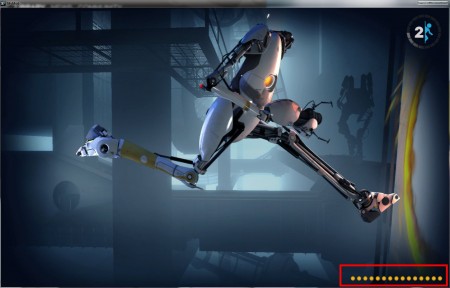
Dude where's my menu?! Before you scream in agony, let me explain. Remember what I said about caches? Let the engine create them. The dots in the lower right will turn yellow when it's finished. Depending on the amount of maps and custom content you have, that may take a moment. After those dots turned yellow, wait for a couple of seconds.
After that, start your Task Manager, and find portal2.exe. End that process. Don't worry, it's safe.
If you have a look into your "maps" folder, you will that the engine created a new folder named soundcache. Inside it you will find a file that contains said caches - don't touch it. Do not move it. In fact, leave it alone.
If you now hit "PLAY" again in Steam, you will see the game start up normally. At first glance you will not notice any difference at all - but this is where it gets interesting!
"Oh God... this is the part where they mod us!"
CHAPTER 2: THE PART WHERE THEY MOD YOU
Achievement Unlocked: The Part Where They Mod You
Description: This is that part.
7. Remap and reconfigure main menu
Just a heads up: that coffee we gave you earlier had fluorescent calcium in it so we can track the neuronic activity in your brain. There's a slight chance the calcium could harden and vitrify your frontal lobe. Anyway, don't stress yourself thinking about it. I'm serious, visualizing the scenario while under stress actually triggers the reaction.
This next test is pretty tricky. Be advised.
You heard that right. It took me a while to figure this one out, but this is indeed possible. So let's get to it.
Things you will need from here on out:
- Portal 2 Authoring Tools
- GCFScape
In case you don't have them, go to Steam and install those now. This may take a moment. Once you have them, you can go on with your mod. I'm assuming you came here because you already made some maps and want to have your own menu and whatnot... but just in case. You need them. The reason is that it comes with a certain tool, and that is called vpk.
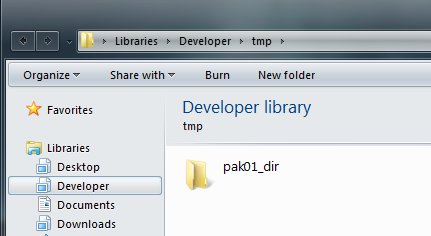
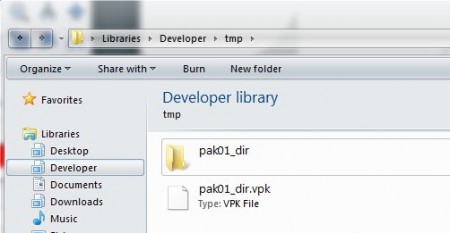
We need GCFScape in order to extract a few files from the original Portal 2 installation. But first things first. Somewhere on your hard drive, outside your mod, create a new folder. Call it pak01_dir. Really. That.
The structure inside this folder will resemble the actual structure of Portal 2. This is very important to remember. You cannot use your own directory conventions.
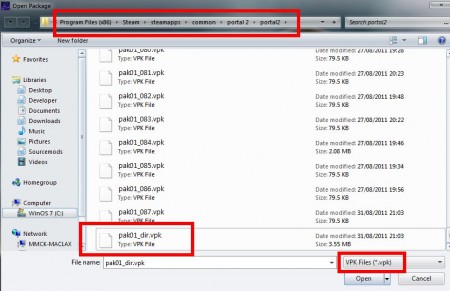
VGUI reads the menu from a few .res files. We need the ones from the game in order to modify those. Fire up GCFScape (which I hope you downloaded and installed - if not, go up, I put the link there). As the file type to open, choose VPK Files.
Go to your Portal 2 installation folder, and find the file "pak01_dir.vpk". This file is the first of the batch and contains the index of all the other files you can see.
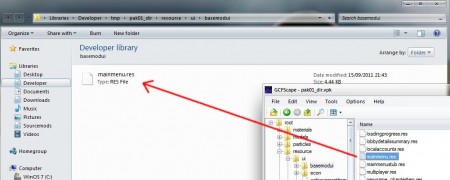
For the moment, we want a file called "mainmenu.res". As you can see, this file is stored under
resource/ui/basemodui
Now that we know this information, go ahead and create this subfolder structure in the pak01_dir folder you created, and enter "basemodui". You should be in this path:
Now, from GCFScape, drag the "mainmenu.res" into this folder.
Now. Open that file with a text editor of your choice. The first thing we want to do, is remove the Co-Op functionality. Let's do that.
When you have the file open, you'll see something like:
{
"ControlName" "BaseModHybridButton"
"fieldName" "BtnCoOp"
"xpos" "88" [$GAMECONSOLE && ($GAMECONSOLEWIDE && !$ANAMORPHIC)]
"xpos" "63" [$GAMECONSOLE && (!$GAMECONSOLEWIDE || $ANAMORPHIC)]
"xpos" "88" [!$GAMECONSOLE && $WIN32WIDE]
"xpos" "63" [!$GAMECONSOLE && !$WIN32WIDE]
"ypos" "310" [$GAMECONSOLE]
"ypos" "288" [!$GAMECONSOLE]
"wide" "220"
"tall" "20"
"autoResize" "1"
"pinCorner" "0"
"visible" "1"
"enabled" "1"
"tabPosition" "0"
"navUp" "BtnPlaySolo"
"navDown" "BtnOptions"
"labelText" "#PORTAL2_MainMenu_CoOp"
"style" "MainMenuButton"
"command" "CoopPlay"
"ActivationType" "1"
}
This is the item that describes the Co-Op button, which string to display, what to do when clicked, and which buttons come next and before with arrow keys. You can delete all of that now.
Now find this bit (right at the start):
"BtnPlaySolo"
This is where the single player button is. We need to a few things:
- Rename it
- Change the buttons that are selected with arrow keys
In that segment of that button, you find something like
You can change the label to what ever you want. Say for example:
The other cryptic string is a variable for a string inside the actual game. Makes sense? :) Save that file now. But don't close it.
Also you will find something like
Replace this with
to make it jump into the Extras menu.
Next we need to change the navigation.
Find
and replace it with
Below, for the Options button, you will have to remap that as well. So... find
and replace it with
We need to remove the Extras menu in here. So find the part that looks like this:
{
"ControlName" "BaseModHybridButton"
"fieldName" "BtnExtras"
"xpos" "88" [$WIN32WIDE]
"xpos" "63" [!$WIN32WIDE]
"ypos" "348"
"wide" "220"
"tall" "20"
"autoResize" "1"
"pinCorner" "0"
"visible" "1"
"enabled" "1"
"tabPosition" "0"
"navUp" "BtnOptions"
"navDown" "BtnQuit"
"labelText" "#L4D360UI_MainMenu_Extras"
"style" "MainMenuButton"
"command" "Extras"
"ActivationType" "1"
}
Remove that completely.
Now, inside the "BtnOptions" button, find
and replace it with
And in the "BtnQuit" section, find
and replace it with
You can save that file now. This is all we need in here for the moment.
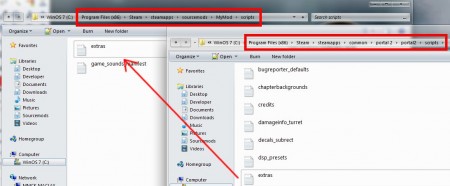
In order to edit the Extras and thus, make it our own, you will have to copy over the "extras.txt" file from the original game and put it in to your scripts folder:
Open up that file with your text editor and replace the contents of it with this example:
{
"mymod_lvl01"
{
"title" "MyMod Chapter 1"
"subtitle" "MyMod starts here"
"command" "map mymod_lvl01"
}
}
I'm pretty sure you'll figure out what's what.
In my experimentation it turned out that the engine has a bug, and that the "map" command in the "extras" script WILL NOT WORK. Use the "command" workaround, and use the command you would normally use to spawn a map in the console. This will make it load!
Now. You can save that file too.
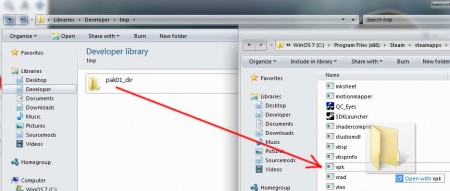
One last thing to do in order to implement these new menus though, and that's what we need the "vpk" tool for. So now that everything is in place in that particular folder, open a new Explorer and find the "bin" folder that contains the vpk.exe - in my case it's
C:\Program Files (x86)\Steam\steamapps\common\portal 2\bin
Drag the vpk01_dir folder you created on to the vpk.exe - this will create a new file, named "vpk01_dir.vpk".
And now - one last thing. Copy the newly created file "pak01_dir.vpk" into your mod folder!
This will now force the engine to read the contents of that file, overriding the existing defaults.
8. Dry run with new menu configuration!
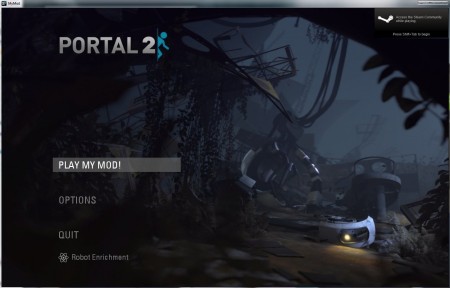
Go ahead. Try it. Behold your changed menu configuration!
9. Implement your own custom logo
I'm sure that, in your own mod, you do not want the "Portal 2" logo on it, but your own - right? No problem. I figured that one out too.
First thing you'll have to get is GIMP - as this supports saving in VTFs in version 7.5, which is what we need. So go ahead and download and install it, in case you don't have it yet.
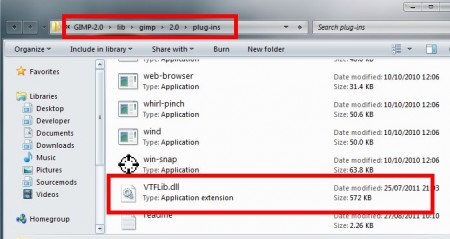
The next thing you will need is the VTF plugin for GIMP, so that you can open and save Valve files. You need to extract it, and put its contents into C:\Program Files (x86)\GIMP-2.0\lib\gimp\2.0\plug-ins (adapt path for your installation directory).
If you now open/restart GIMP, you will be able to read and save VTF files.
Before you go ahead and create your logo, it's important to know the exact dimensions. VTFs require dimensions in the power of 2 - so you can't go and create a logo with some exotic dimensions. In our case it has to be EXACTLY 512x128 pixels.
Go ahead and make your logo. Create one background layer with any color of your choosing, best is white or black - depending on the contrast of your logo. The original one in the game for example, has a white background. Do your artwork.
Once you're finished, you want to save it, obviously. Save the file and add a ".vtf" as its extension. This will bring up the save dialog - and it's important to make the right choices here. Let me show you:
Enable Alpha. On the bottom select the layer that has your white or black color. Choose version 7.5. And you're good.
Now, rename that file to "portal2logo.vtf".
However, that's not enough. You will also need a file that defines the properties of the texture, to make it display correctly. Open a text editor, and paste in these contents:
{
$basetexture "vgui/portal2logo"
$translucent 1
$vertexcolor 1
$vertexalpha 1
$ignorez 1
$additive 0
$no_fullbright 1
$SHADERSRGBREAD360 1
}
Save this file in the same directory where you just save the .vtf file - as "portal2logo.vmt".
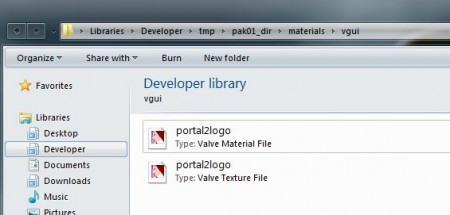
In your pak01_dir folder, create the folder "materials". Inside that, create a folder "vgui". Bopy both - "portal2logo.vtf" and "portal2logo.vmt" - into the newly created "vgui" folder.
Nice. Now that this is done, drag the "pak01_dir" folder again onto the "vpk.exe" like earlier, to create an updated build of your contents.
Move the new "pak01_dir.vpk" into your mod folder, overwriting the old one. Start your mod... and behold!
Pretty awesome eh? You can now go wild with your imagination and create any logo you like.
10. Replace the standard menu backgrounds
And now for the last bit. In my experimentation, I always thought that the backgrounds you see are animated textures. They are not. They are, in fact, movies. Little movie sequences that endlessly repeat.
Don't be afraid. You can use images, too.
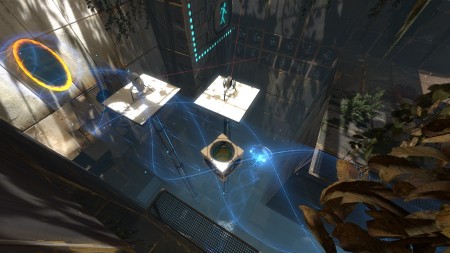
So... for this example, let's use a Portal 2 wallpaper, and put it there instead. For the moment, let's use this picture (click for full version):
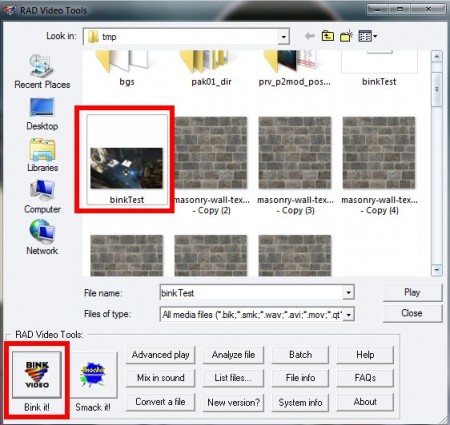
You will need the RAD Video Tools to convert just about anything into a bik file, which the game understands and can play back for you. So go to that page, and download and install those tools.
Once you have installed them, open the RAD Video Tools from your Start Menu.
Find the image, and choose "Bink it!":
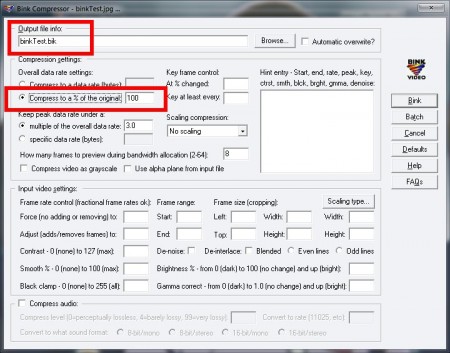
Once you select that, you'll see a pretty huge screen that takes you back to Windows 95. Depending on the options you want, you will have to fine-tune your choices, especially for videos. But since we are using an image only, perform only this one setting as highlighted below, and adjust the file name to output (you will have to rename it anyway in a moment).
Click on "Bink", and it will create a Bink movie file for you.
Rename that file to "menu_act01.bik"
Now, go back to your mod folder, top level. In there, create a new folder, called "media". Paste the "menu_act01.bik" file into that folder:
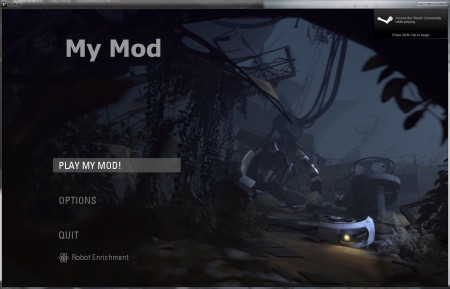
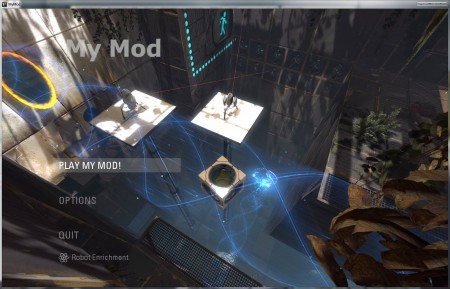
Alrighty. All done. Start your mod from Steam. And behold!
OMGWTFBBQ!!! :)
It should be noted that the game has five different menu backgrounds like this. So if you want to have just one, copy and paste your file four times, and increase the number at the end by 1 each time, so each one ends with 02, 03, and so on.
11. Replace "EXTRAS" and "PORTAL 2" in menu dialogs (Extras and Quit)
All these modding files are made of asbestos by the way, keeps out the rats. Let us know if you feel a shortness of breath, a persistent dry cough or your heart stopping, because that's not part of modding -- that's asbestos.
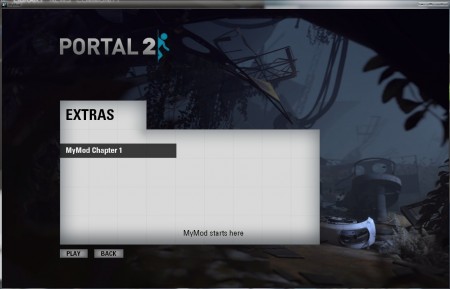
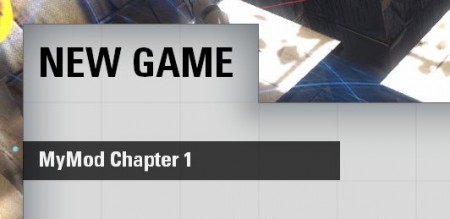
While all of this has been quite interesting so far, I'm sure you still want to add that extra little touch to your mod. You probably noticed that, while having your maps and chapters in the main menu is nice, it still says "Extras" on top - because we remapped the Extras menu to show up when you hit "Play My Mod".
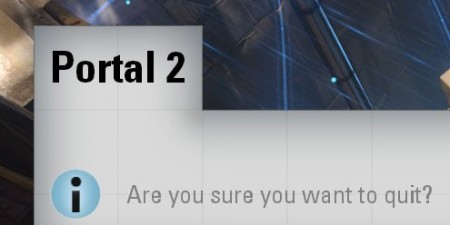
Also, when you hit "Quit", it will say "Portal 2" on top.
So let's replace that now. For that, we will have to copy over one file from the original, and change it. This file is called "basemodui_english.txt".
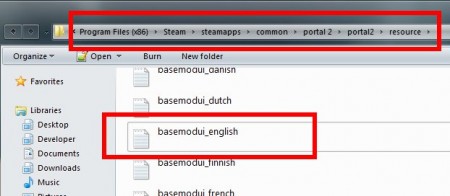
Go to your real Portal 2 installation folder, enter the resource folder, and find the file "basemodui_english.txt".
In your mod folder, create a folder, also called "resource". You will have to put this text file in there. Create it, paste the text file in there. It should look like this:
Open that file with your favorite text editor. In that file, look for this section:
For me, this was on line 440 in the document. I'm guessing they are using the same type of menu for a lot of games, and Left 4 Dead 2 uses the same engine as Portal 2 - so that should come as no surprise. I think you can see where this is going. Replace the "EXTRAS" with what ever you want.
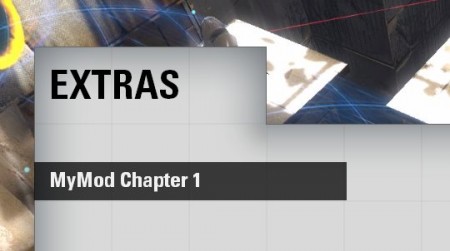
So save that file, run your mod, and check out the result:
Cool eh? :)
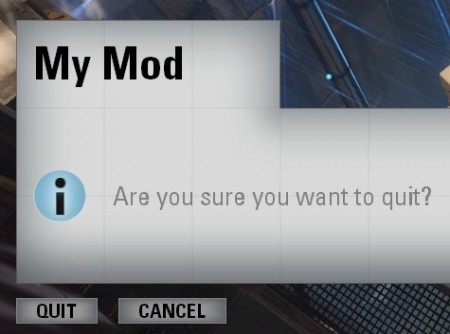
Now let's get to the "Quit" dialog. Leave the text file open. Look for this string:
For me, I found this on line 1672. It should be obvious to you what comes next. 60 bucks extra. Cash. Tax-free. If you figured it out.
Feel free to hit the save button. Run your mod, and check out the result:
Ha! I like your style, you make up your own rules just like me.
12. Implement your own chapter thumbnails.
We are nearly at the end of this test track. If you're still with me, you really have some endurance. So let's finish this.
We're not gonna release this stuff into the wild until it's good and damn ready so as long as you keep yourself in top physical form there will always be a limo waiting for you.
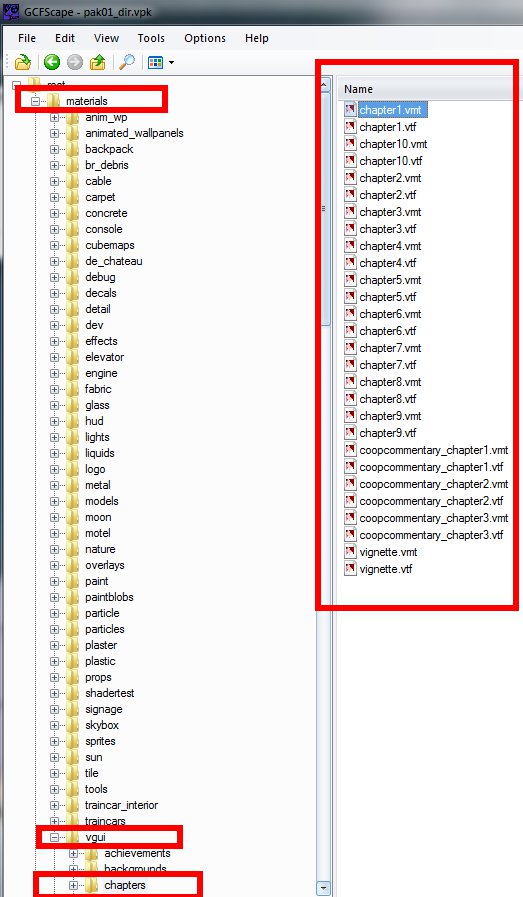
That's pretty much why we have to put your thumbnails in as well. So, the first thing we need to do, is fire up GCFScape again, open the "pak01_dir.vpk" in your original Portal 2 folder, and go to materials/vgui/chapters. You will find this:
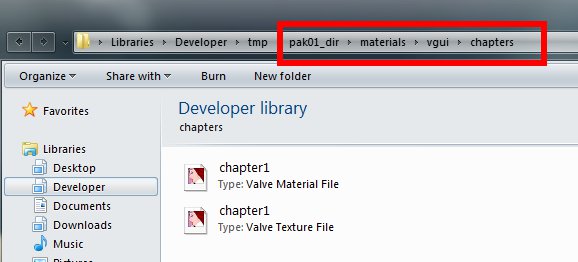
Extract the first two into your own temporary "pak01_dir" folder, while retaining the same structure. You will have to create the necessary subfolders as shown, and drag the files in to that folder:
It is important to know that the thumbnails !!MUST!! have a dimension of 256x256. Nothing else. You can go and use any screenshot of your mod (make it descriptive - the thumbnail for Chapter 1 in the original is a screenshot of the good-minded Wheatley). Resize it to 256x256. I know - it will look strange... but just do it.
For this example, I created a very sophisticated image:
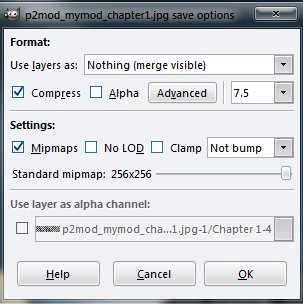
Once you have your image the way you want it, overwrite "chapter1.vtf" with GIMP and these settings:
Now then. One more thing to do. In your mod folder, go to "scripts", and open the "extras.txt" file. We have to add one line so that the image appears. The line would be:
The complete text file should now look like this:
{
"mymod_lvl01"
{
"title" "MyMod Chapter 1"
"subtitle" "MyMod starts here"
"command" "map mymod_lvl01"
"pic" "vgui/chapters/chapter1"
}
}
Save that file.
As the very last thing to implement your image, you will have to drag the "pak01_dir" folder of yours onto the "vpk.exe" again, to create a new, updated build of it. Move the new file into your mod folder.
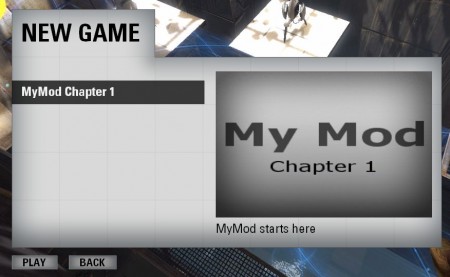
Now then. Have a look at the fruit of your labour:
OMGWTFHOLYSHITSHOESBATMAN!! :)
(Now, my image is stretched because the image was square. If you use an image, say 1440x900, and resize to 256x256, you should get good results).
13. The final test: Loading screen
Good news is, the lab boys say the symptoms of asbestos poisoning show a median latency of forty-four point six years, so if you're thirty or older, you're laughing. Worst case scenario, you miss out on a few rounds of canasta, plus you forwarded the cause of science by three centuries. I punch those numbers into my calculator and it makes a happy face.
That's great... Cave.
Anyways, back to modding. When ever you start your mod at this stage, you will see a loading screen. For me it's P-Body jumping into a Portal. Let's see what we can do about that.
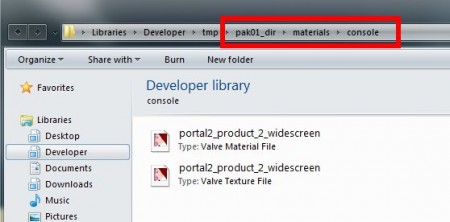
So... apparently the loading screens are located in this folder: materials/console
Open up GCFScape and find your "pak01_dir.vpk" in your original Portal 2 installation. Among others, you will find these files:
portal2_product_2
portal2_product_1_widescreen
portal2_product_2_widescreen
One of those will randomly be chosen, depending on the screen configuration. Some may still play in 4:3 format - you will have to respect that.
Next thing you will have to do, in your vpk01_dir folder, is to replicate that structure. If you do not have it already, create "materials". Within that, create "console".
From GCFScape, extract one of the screens - but be sure to extract the vtf and vmt.
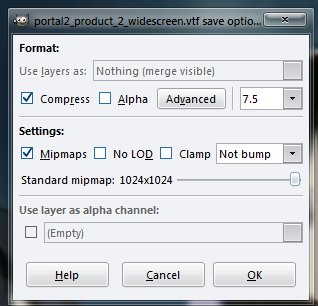
The loading screens have a resolution of 1024x1024. So like with the chapter thumbnails, be sure that you take good artwork and resize it to those dimensions.
Save it with these settings:
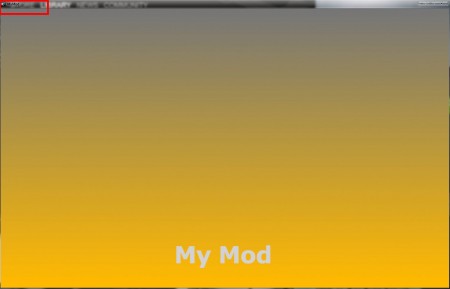
Once again - drag your pak01_dir.vpk onto "vpk.exe", and move your new vpk file into your mod. If you only replaced one, you may have to start your mod a couple of times to see the new loading screen - but it will show up.
Check it!
Now obviously this is a pretty cheap example... but it gets the job done. You get the idea. You should use something more meaningful to your mod. Again: there are two of those. You will have to either duplicate the one you made, or create two different ones, depending on what you want.
Conclusion
I hope this opened the floodgates to all you modders and developers out there... I sincerely hope that this post has been somewhat helpful to you. Leave a comment if it did.
Now that you know how to completely customize the engine, I wish you very well and only the best in creating unique mods and storylines on one of the most advanced game engines in the world. Have fun mapping, have fun customizing... I hope all of this sent you on your way.
Congratulations! The simple fact that you're standing here listening to me means you've made a glorious contribution to science. As founder and CEO of Aperture Science I thank you for your participation and hope that we can count on you for another round of tests!
References:
[1] - "The Source SDK is a software development kit compiled by Valve Software that is used to create maps or mods for the Source engine, with the exception of Left 4 Dead, Left 4 Dead 2, Alien Swarm, and Portal 2." - Taken from the Wikipedia article
[2] - "The authoring tools is a special edition by Valve released as an update to the original Source SDK." - Valve Developer Wiki, Portal 2 SDK
[3] - "Portal 2 uses VTF version 7.5 whereas TF2 uses 7.4. You'll have to get VTFEdit and re-save every VTF file you have as version 7.4." - Steam Forums
[4] - Own research: Saving textures with VTFEdit 1.25 (Win 7, 64 bit), which automatically get version 7.2. Maps using those textures, even animated, work without issue.











Wow. Well done! You really helped me! Thank you.
I'm glad I could both help you :)
Can you show us how to make the Extras menu not say Extras?
The main menu didn't change at all when i did all the stuff, can you please oh please give me some help?
really Cool
Its not showing up on my steam list!
Did you add
text code:
to your gameinfo.txt?
that's wat happened to me the first time
Is that needed, or are you not supposed to have that?
Yes it's needed
Sounds do not work, even though I have a game_sounds_manifest.txt.
I looked at the console - the error always is something like "Failed to load ´sound name`, file is missing from disk/repository." I do not use any custom sounds.
Can you please update it, the new dlc has put our mods on the verge of collapse! So an updated tutorial regarding the fix of the menu system would be appreciated!
you just change mainmenu.res to mainmenu_new.res AND on the very first line of it, change resource/ui/mainmenu.res to resource/ui/basemodui/mainmenu_new.res
I DID ALL OF THAT AND NOTHINGS HAS CHANGED ON THE MENU
THANK you
This comment is currently awaiting admin approval, join now to view.
dont change the first line
The guy gave up, please can you update it???? =\
FIX: when repacking the mainmenu.res into a vpk. rename it mainmenu_new.vpk, that's what valve renamed it. BOOM menu fixed.
doesnt work for me :<
Wobbier means mainmenu_new.res in the location of mainmenu.res, then pack that into pak01_dir.vpk and it should work.
FIX: when repacking the mainmenu.res into a vpk. rename it mainmenu_new.vpk, that's what valve renamed it. BOOM menu fixed.
Thank you so much
still does not work
when i add the game logo (portal2logo.vmt,vtf) and make a vpk. it gives me an empty vpk file... plz help
İ FİXED İT
is it possible to make Cutscenes?
Very possible but somewhat hard.
I followed all the steps in Part 1, but my mod won't show up in my Steam library. What should I do?
Update: I figured out what the problem was. In case anyone else had the same problem: When you copy the code (for GameInfo.txt, etc., make sure not to copy the "text code:" line.
The VGUI textures don't show up for me. Any idea what the problem might be?
Not sure but I would do the "verify integrity of game files" thing for your Portal 2 install, which you can do by right-clicking on Portal 2 in your Steam Library, clicking properties, then local files, then verify integrity of game files. If that doesn't work I would re-install Portal 2.
How do you make a map have a loading screen unique to that specific map?
As far as I know, you can only have specific loading screens for maps in a chapter, which is detected if the map name has sp_a(number from 1 - 4) in it, for example the first map is sp_a1_intro1 which plays the loading screens of destroyed GLaDOS. I hope that helps :)
The mod cant apear in the Steam list :( Please help
Dont add "text code:" to anything.
If u hav any more problems, do wat i did and reverse engineer another mod.
how do you do dat
This comment is currently awaiting admin approval, join now to view.
hm :/ the Menu dont works with mine ... all Buttons stayed where they were .... damn.. how can i fix that?
Same with me, you had to rename the mainmenu.res file to mainmenu_new.res
This comment is currently awaiting admin approval, join now to view.
Can you please tell me how to add custom sounds? I put a custom sound in pak01_dir/root/sound/vo/glados/sound_filename.wav but when my map runs it, the fiddlesticks sound file plays. Please help me.
This comment is currently awaiting admin approval, join now to view.
do you have a folder named root in your pak01dir? thats the problem
Can you show us how to make the extras menu not say extras?
I'm sorry, I am an impatient idiot who didn't read all the way through. :P Thanks 4 the amazing tutorials, I've been inspired.
"In your pak01_dir folder, create the folder "materials". Inside that, create a folder "vgui". Bopy both - "portal2logo.vtf" and "portal2logo.vmt" - into the newly created "vgui" folder."
"Bopy both" - Fruitlessly a mistake. Correct it to "Copy both".
Is there any way we can make the gui look different and less portal 2 like?
You can change the textures for the panels, but I don't know if there's much else you can do to it. For my game I've changed the panel textures and it looks pretty good lol.
I need help... When I create the logo it works fine on the loading screen, but doesn't show up on the menu. Is there something I missed?
Have you pasted UnlitGeneric in the vmt file ?
sorry for the bad english, I'm french.