Originally posted here: ghostdog.nolfworld.com
Created by: Ghostdog
Mirrored here for archival purposes
AIRegion
AIRegions are used to define the behavoir of AIs triggered into 'Search' state.
- If an AI is triggered into 'Search' state, it can always use the SearchNodes in the AIVolume it is currently in. If you want him to use SeachNodes in other AIVolumes too, you have to connect these AIVolumes through an AIRegion.
- The AI will then first use the SearchNodes in it's current AIVolume, then it will continue with the SearchNodes in the AIVolumes that are in it's current AIRegion. To connect AIVolumes with an AIRegion you just need to put in the names of these AIVolumes in the Volumes fields of the AIRegion.
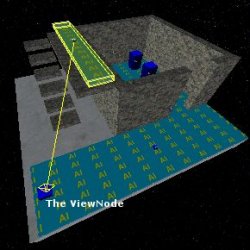
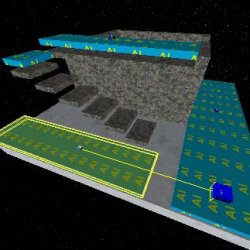
- In the situation shown bellow are several AIVolumes, some of them connected to an AIRegion (indicated by the yellow arrows if the AIRegion is currently selected in the NodeTree).
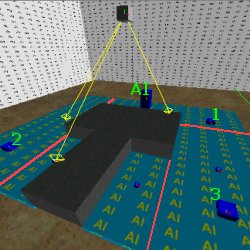
- The AI - if triggered to 'Search' state by any event - will first search on SearchNode1 (because it's in the AIVolumeit is currently in) and then continue to SearchNode2 (because it's in an AIVolume that's connected to the AIRegion it's currently in). The AI will not use SeachNode3.
- If the AI is in the AIVolume that SearchNode3 is in while triggered to 'Search' state, it will only use SearchNode3.
- If two or more AIs are searching in an AIRegion, every SearchNode will only be used one time, means if one of the AIs has been there, the others will not consider using this Node again (until they are triggered to 'Search' state the next time).
The properties of the AIRegion are:
- Pos: The absolute position of the AIRegion object (has no effect).
- Rotation: The rotation of the AIRegion object (has no effect).
- Volumes: As already said, here you have to put in the names of the AIVolumes connected to this AIRegion.
- Search: You can use the PostSearchMsgxx fields to send messages. The first message will be sent if the first of the searching AIs has no more SearchNodes left, the second message will be sent if the second of the AIs has no more SearchNodes left etc...
AIVolume
AIVolumes define the space which AI can travel.
- An AI can not really see the brushes that make up the world, in the way of "There's a wall, I cannot go this way". They navigate through the world by using the AIVolumes. The AIVolumes tell the AI where it can go and where not, while the physics of the game hold his feet onto the next ground.
This leads to the following notes: - Note: You should avoid having any objects inside and AIVolume, besides from stairs/steps which you want the AI to be able to go up and down or small objects that the AI can step over.
If you put bigger objects - for example a 128px high wall - into an AIVolume, the AI will walk up to it (because the AIVolume tells the AI it can go there) and suddenly be on top of the wall (because the physics of the game request this). To make it even worse: The AI may just walk right into the wall. - Note: To make sure an AI can get from one AIVolume to another, they should touch each other a minimum of 64px wide (it may work with less, but it can cause problems).
- You can create an AIVolume by setting up a brush floating 16px above the floor, 16px high (These values are not absolutely necessary ones, but generally good ones. Remember: the phyics hold the AI on ground level, the AIVolumes tell him where it can go).
Now place the marker somewhere on the top surface of the brush, select it and bind it to an AIVolume Object.
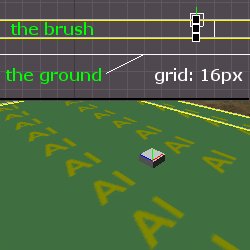
- That's basically all, the brush will be invisible in-game and the AI will be able to move through the space it takes.
- Note: There's an extra texture for AIVolume-brushes in the main TEX folder. This helps keeping the overview.
- Now on to stairs/steps. You actually don't need to make an extra AIVolume for every step. As said before, if the steps are not to high you can cover them completely by one AIVolume. If you do it like shown in the picture, it should work correctly.
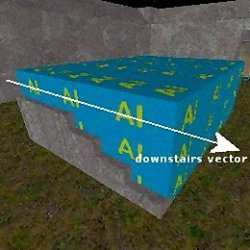
- The vector shown in the picture can be put in the StairsDir field, which will cause dead AIs to fall down the stairs. The vector is parallel to the floor, means the y-value is always zero (-1 0 0 or 0 0 1 ...)
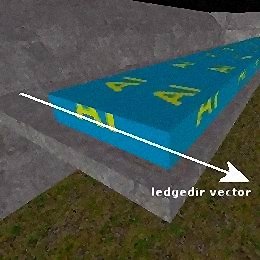
- At last the LedgeDir field can be used if you have an AIVolume along a ledge like shown in the picture.
If you set a LedgeDir vector here, dead AIs will fall down the ledge.
This vector is also parallel to the floor.
The properties of the AIVolume are:
- Pos: The absolute position of the AIVolume object.
- Rotation: The rotation of the AIRegion object.
- StairsDir: Can be used to make dead AIs falling down stairs (as described above).
- LedgeDir: Can be used to make dead AIs falling down ledges (as described above).
- Vertical: This is for underwater scenarios. You can connect two AIVolumes on different heights by a third one which has it's vertical flag set to 'True'. The AI can then move up and down between the different heights.
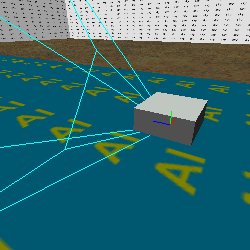
- ViewNode(s): These fields are for putting in the names of AINodes that work as ViewNodes to this
- AIVolume. Read more about ViewNodes.
AINode
AINode are special points the AI can use for special purposes.
- As I already said, AIs do not really see the brushes the world consists of, so they will not be able to think something like "There's a crate, let's duck behind it". If you want them to do such things, you have to tell them where.
If you do not use AINodes, the only thing they can do is 'rush' after you. - You must place AINodes in AIVolumes, so that they are reachable to the AI. Place the marker on the top surface of an AIVolume, and add an AINode object to the world.
- Note: Don't put AINodes to close to walls (or other brushes), so that the AI will not clip into them. 16px should be the minimum.
- You can use the Rotation tab to set the direction the AI will look if using this AINode.
- Until now the AINode has no purpose, so it's not more like a point the AI can run to and look in the specified direction. Actually I don't know if it will use it at all.
- You can now set the purpose of this AINode by setting one of the flags under one of the tabs (CoverInfo,PanicInfo,...) to 'True'.
- Note: Avoid using one AINode for more that one purpose, this may cause problems.
- We will talk about the different purposes of the AINode in seperate chapters.
The properties of the AINode are:
- Pos: The absolute position of the AINode object.
- Rotation: The rotation of the AINode object sets the view direction of an AI using this AINode.
- CoverInfo
- PanicInfo
- VantageInfo
- SearchInfo
- MiscInfo
- ViewNode at last isn't a property, but one of the things you can use an AINode for.
AIGroup
AIGroups allow AIs to share there senses, means all AIs in a group can react on an event that happens to one of them.
- There's not much more to say to this. Just put in the names of the member AIs in the Member fields. This activates the GroupReactions tabs of the AIs belonging to this AIGroup.
- Note: Although I didn't try I guess it's no good idea to have an AI in more than one AIGroup.
The properties of the AIGroup are:
- Pos: The absolute position of the AIGroup object (doesn't affect anything).
- Rotation: The rotation of the AIGroup object (no effects again).
- Memberx: The names of the AIs belonging to this AIGroup.
CAI
These are the different kind of computer controlled characters you can use.
- There are three groups of AIs: good, neutral and bad. While 'good' AIs attack 'bad' ones and the other way round, 'neutral' ones seem to attack everyone who threatens them with a weapon - if they have a weapon themselves that is.
- Every AI will switch to 'Panic' mode if they don't have a weapon, the difference is that 'good' or 'bad' ones will switch directly when they see an AI of the opposite site, while 'neutral' ones only switch when they are threatened, i.e. when somebody with a weapon gets to close to them for too long.
- Note: The player is per default a 'good' character.
- If you place an AI in your level, just make sure that it's bounding box (which is displayed) doesn't clip into any objects. If you place the AI hovering over the ground, the game will take care that it's placed on the next ground underneeth when the level starts.
- The AIs have many different attributes which set their behaviour. You can find them all in 'aibutes.txt' in the 'attributes' folder. Because every attribute has a short description, it's very useful to have a look at this file.
- First there are different kinds of 'brains', which set the 'dynamical' behaviour of an AI, things like 'how often to check for cover', 'how often to consider throwing a grenade' or 'how often to play a partol sound'. Most of these values have and additional random amount to make reactions less determinated.
- Next are the global values which affect every AI. Things like 'rate at which senses are increased when alerted' or 'how far carries an ally death noise'.
- At last the templates for every CAI which set the 'static' attributes of this CAI, here you will find things like 'WalkSpeed', 'Hitpoints' or 'Accuracy'. These are the ones that can be overridden by the AttributeOverride tab. - Most important are the IndividualReactions and GroupReactions tabs:
If you have a single AI (not in an AIGroup), it will react to an event according to the setting in it's IndividualReactions tab.
If you have a several AIs in an AIGroup, the one that the event happens to will react according to it's IndividualReactions tab while all other AIs in the group will react according to their settings in the GroupReactions tab. - The prefixes of the event names:
ISE... - Individual Sees Enemy...
IHE... - Individual Hears Enemy...
ISA... - Individual Sees Ally...
IHA... - Individual Hears Ally...
GSE... - Group Sees Enemy...
GHE... - Group Hears Enemy...
GSA... - Group Sees Ally...
GHA... - Group Hears Ally...
Now to the suffixes:
...1st is the first time the event occurs. Let's say the ISE1st event occurs. Now - according to the actual state of the AI (normal,aware,alerted etc.) - there's a reaction time until it checks for this event the next time. There are two possibilities what happens then. If the event still happens (the AI stills sees the enemy) that would be the ISE event and the according reaction would be performed. The other possible event is the ...False1st one (in this case ISEFalse1st) and again the specified reaction takes place. That leaves the ISEFalse event left. This is the event that happens if the AI looses sight after the ISE already happened.
So the 'event chain' for the ISE (Individual Sees Enemy) event looks like this:

The properties of the CAI are:
- Pos: The absolute position of the CAI.
- Rotation: The rotation of the CAI (sets it's initial view direction).
- DamageProperties: These values are most self-explanatory. Because they are present for many WorldObjects, I may cover them in an extra chapter.
- MoveToFloor: Not quite sure. I guess it tells the game to 'put' this CAI on ground-level when the level starts.
- ShowDeadBody: Don't know what the possible values are. I guess it's just a time value, where '-1' means forever.
- HeadExtension: ?
- CinematicExtension: ??
- BodySkinExtension: ???
- ModelStyle: The style of this model.
- Brain: Defines which 'brain' this CAI uses, means the according values in the 'aibutes.txt'.
- Attachments: You can attach objects to the CAI here. Weapons and stuff.
- IndividualReactions: Defines the reactions to events that happen to this CAI.
- GroupReactions: Defines the reactions to events that happen to another CAI in the same AIGroup as this one.
- Commands: The 'initial' field is for commands the AI should perform right at start of the level (patroling etc.), the other ones I'm not sure about.
CoverNode
A CoverNode tells the AI where it can take cover.
- Place the AINode in a place that can be used for cover. Then activate one of the flags under the CoverInfo tab. This AINode is now a CoverNode.
- The Rotation (i.e. the view direction) should be set to the direction from which the enemy will approach. If the enemy comes from a different direction, not crossing the FOV (Field of View) assigned to this AINode, it will not be used.
- I will loose a few extra words about the 1WayStep property here, the rest of them are quite self-explanatory or can be explained in a few words down in the properties section.
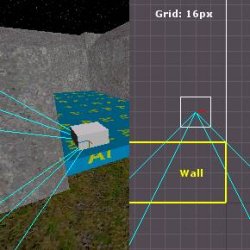
- For the 1WayStep- sidestepping out of a cover - you will have to set the stepout-direction by setting the Roll property (in the rotation tab) to 0 or 180, where 0 means right (according to view direction) and 180 means left. It is also indicated by a little red line in the Node object.
Place the Node as shown in the picture (16px away from the corner in each direction), and set view direction direct to the wall.
The properties of the CoverNode are:
- Pos: The absolute position of the CoverNode.
- Rotation: The rotation of the CoverNode sets the view direction of an AI using this Node, and (together with the CoverFov) the area in which the player has to be to make the AI consider using this Node.
- Vantage: The AI will duck here.
- Blindfire: The AI will duck, hold his gun over his head and shoot blindly over the object before him.
- 1WayRoll: I could not see what this is good for, since they do this rolling thing without AINodes too. Maybe a leftover from a previous version?
- 2WayRoll: Same as for 1WayRoll.
- 1WayStep: The AI steps out of the cover (described above).
- 2WayStep: For thin cover objects. The AI can step out of the cover in both directions.
- IgnoreCoverDir: If set to 'True', The AI can use this point to cover in all directions, ignoring the direction settings (i.e. a 360° FOV).
- CoverFov: Field (angle) Of View.
- CoverRadius: The area in which the AI has to be to consider using this Node.
- CoverThreatRadius: If the player gets into this radius, the AI will perform the CoverThreadReadiusReaction.
- CoverThreadReadiusReaction: See above. Default command is 'attack': the AI leaves cover and attacks.
- CoverObject: A 'trigger' command will be sent to this Object when the AI reaches the point. Good for flipping over tables and such things.
- CoverTimeout: After this period of time, the AI will execute the CoverTimeoutCmd.
- CoverTimeoutCmd: See above. Default command is 'reevaluate', means the AI 'overthinks' the actual situation.
- CoverDamageCmd: This command is executed if the AI takes damage while using the cover. Don't know how much damage is has to get...
- CoverHitPointsBoost: If the AI takes the cover, it will get this times as much as it's actual hitpoints? Not quite sure about this. Anyone?
Note unfortunately the page on "Vantage Node" is broken and cannot be viewed
ViewNode
The ViewNode tells the AI where to look for the player if it has not traversible path to the AIVolume the player is currently in.
- You can make a Node to a ViewNode by not activating any of it's purposes (cover, vantage etc.) and giving the name of this AINode to the AIVolume(s) that should be seen from this ViewNode.
- Note: For this to work the AI must know in which AIVolume the player is currently in. The ViewNode has no search function.
- As I mentioned before the AI can not see and consider the brushes that make up the world, so if AI looses sight of the player it basically does nothing else but to try reaching the AIVolume the player got to by moving through the AIVolumes it can reach. So if there's not path to the player (an AI on top of the roofs while the player is on the streets below), he will often not be able to get the player back in sight - without (carefully) placed ViewNodes.
A few examples:
- In this case the player goes up the stairs to start shooting at the two AIs in the room.
- Without the ViewNode the AIs will stay inside an shoot at you as long as they can see you. They will not leave their current AIVolume, because there is no traversal path to the upper AIVolume for them, so they just can not imagine whereelse to go to shoot at you.
- With the ViewNode however the AI has a clue about an alternative viewing point to the AIVolume you're currently in. This leads to the situation that one AI stays in the room, while the other one goes out to the ViewNode. Crossfire!
- Now a slightly different situation. I must say I'm still not quite sure about this, I tested it many times with small variations and I can only say: I THINK it's like this.
- After you showed up at the upper AIVolume you step back to the small AIVolume on the stairs. The enemy now still knows where you are for a certain amount of time, although he cannot see you. But he has no ViewNode to this AIVolume, so he stays inside.
- Now if you jump down to the AIVolume to which he has a ViewNode, BEFORE this certain amount of time is over, he will use the ViewNode.
If you jump down AFTER this certain amount of time, he will have 'lost knowledge' about your position and stays inside.
...which leads - IF RIGHT - to the following:
- Note: If the AI looses sight of you, it will know for a certain amount of time in which AIVolume you currently are, no matter
- if this AIVolume is connected to the one the AI is currently in.
- if you crossed an area which is not covered by any AIVolume to get there.
If the AI don't manage to get you back in sight in this time, it will loose knowledge about you position. - As a last example I shamelessly copy-pasted in what John Mulkey said about the ViewNodes in the forum:
- "View nodes are used when an AI can fight the player but does not have a traversible path to the player. (makes them appear to be jockeying for the best firing angle and anticipating the players moves). An example would be a bridge over a crevass. If the bridge has AIs on it and the player is at the bottom of the crevass, there will be a point where the player can cross under the bridge and emerge on the other side. The effect you would want would be that the AIs cross to the opposite side of the bridge to catch the player coming out from under the other side."
- "That's where the view nodes come into play. First you would put an AI volume on each side of the bridge down in the crevass where the player will be. Now in each of the AIVolume objects refence AINodes that you have placed on the corresponding sides of the bridge. This way, when the AI loses sight of you, they will ask "What volume is the player in?" and then "Is there a view node associated with that AI Volume?" They will then go to that AINode and try to blow you away."
Well, that does it, I think :)
The properties of the ViewNode are:
- Pos: The absolute position of the ViewNode.
- Rotation: The rotation of the AINode sets the view direction of an AI using this AINode.
SearchNode
SearchNodes tell the AI where to look for the enemy if triggered to 'Search' state.
- Most thing concerning SearchNodes are already described in the AIRegion section. You just have to set the view direction of the AINode an then activate at least one of the flags in the SearchInfo tab.
- All of the flags you can set here are animations the AI can perform at this SearchNode.
The properties of the CoverNode are:
- Pos: The absolute position of the SearchNode.
- Rotation: The rotation of the SearchNode sets the view direction of an AI using this AINode.
- ShineFlashlight: The AI uses a flashlight.
- LookUnder: The AI seems to look under an object.
- LookOver: The AI looks up.
- LookLeft: The AI looks left.
- LookRight: You'll never find out.
- Alert1: A generic animation.
- Alert2: A generic animation.
- Alert3: A generic animation. These ones are mainly if you want to make a SearchNode, but don't want to use one of the more 'special' animations above. Flashlights are stupid in daylight levels and the other 4 affect the FOV.
PanicNode
PanicNodes are used by AIs triggered into 'Panic' state.
- AIs are (per default) triggered into 'Panic' state if they have no weapon and someone threatens them. Main use for the PanicNode is for creating scenarios with civilians.
The properties of the CoverNode are:
- Pos: The absolute position of the PanicNode.
- Rotation: The rotation of the PanicNode sets the view direction of an AI using this AINode.
- Stand: The AI will stand here.
- Crouch: The AI will crouch here.
- PanicRadius: The area in which the AI has to be to consider using this Node.
- PanicObject: A 'trigger' command will be sent to this Object when the AI reaches the point. Good for flipping over tables and such things.
MiscNode
MiscNodes allow AIs to interact with WorldObjects like buttons, switches etc.
- This is most useful for having AIs press buttons. If you want them to do that you have to set 'Sound alarm' or 'Hit switch' as a reaction in the IndividualReactions orGroupReactions tab of the AI.
Then place the Node and an 'Alarm' Prop or a 'Switch' next to it. Give the name of the Prop or Switch to the UseObject field of the Node. - Now if the event happens and you have - for example - set 'Sound alarm' as a reaction to this, the AI will look if it's in the UseObjectRadius of a MiscNode that is assigned to an 'Alarm' Prop, then run there and use it, which causes the 'Alarm' Prop to fire it's message.
- Note: The button does not have to be in reachable distance to the AI, it will perform it's animation and the Prop/Switch will fire, nomatter where it is.
- At last I need to say that I didn't figure out what kind of Objects the AI can use at the MiscNode. 'Alarm' and 'Switch' are clear because you can set them in their Reactions tab, but for every other (if possible) there must be messages you can send to them, which I just don't know.
The properties of the MiscNode are:
- Pos: The absolute position of the MiscNode.
- Rotation: The rotation of the MiscNode sets the view direction of an AI using this AINode.
- UseObject: The AI will use this Object when it reaches the Node.
- UseObjectRadius: The area in which the AI has to be to consider using this Node (i.e. use the Object).
- PickupObject: The AI will pick up this Object when it reaches the Node. Don't know under which circumstances, or which message to send.
- PickupRadius: The area in which the AI has to be to consider using this Node (i.e. pickup the Object).
- BackupCmd: The AI will go to this Node (when a 'Get backup' reaction is set) and perform this command.
- BackupRadius: The area in which the AI has to be to consider using this Node (i.e. 'getting backup').
- TrainingFailureCmd: If anybody can tell me what TrainingFailure means... thank you.
- Poodle: hmmmmm...
KeyFramer
The KeyFramer is used to move WorldObjects along a given path.
- This is done by giving the KeyFramer the names of the Object that shall be moved and setting up Keys that define the path.
An example:
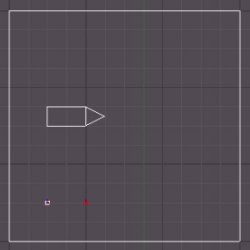
- We will start with the situation shown in the picture. The gridsize is 64. The big square is the floor (seal the whole thing with a big box), the red thingie is the GameStartPoint, the white one a Light.
- Now on to the brush that we actually want to move. It's a simple arrow-like thing, consisting of a rectangle and a triangle (Height:64px). Both are floating 64px above the ground.

- Place the cursor as shown in the picture (Grid is now 32) an create a WorldModel that we can move (just use a Door), and call it 'arrow'.
- After you have done this, go to the Nodes View and drag and drop the two brushes into that WorldModel.
- Now at the same position as the WorldModel 'arrow' create a KeyFramer and call it 'arrowmover'. Under it's properties tab set the following:
- StartActive to 'True', so we don't have to trigger it to start.
Looping to 'True'.
ObjectName is 'arrow', the object we want to move.
BaseKeyName is 'arrowpath', the BaseName of the Keys that describe the path. - At last we create the Keys. Make your KeyFramer 'arrowmover' as active Node in the NodeTree and add the first Key (same place as KeyFramer itself) called 'arrowpath0'. The next Key is called 'arrowpath01', followed by 'arrowpath02' and 'arrowpath03'.
- Right-klick the KeyFramer 'arrowpath' and choose 'Set Path', this will cause DEdit to visualize the path
- Under the Keys properties set their TimeStamps (the time needed for the Object to move to this Key from the Key before): '0' for 'arrowpath0', '3' for 'arrowpath01', '1' for 'arrowpath02' and '3' for 'arrowpath03'.
- Let's process the thing now and have a look at it. As you can see, that's not exactly what we wanted, as the arrow should point at the direction it moves. For this we have to set the Rotation of the Keys correct. So let's set the following rotation parameters: '90' for 'arrowpath0, '135' for 'arrowpath01', '180' for 'arrowpath02' and '180' for 'arrowpath03'. Run again.
- That was better, although not perfect. But it will do it for now, because I actually did not figure out yet how to get a really smooth curve. I thought the Bezier thingies should do it, but I didn't got them to work...
- Next thing we want to try is to have the arrow point at some Object while traveling down it's path. I first thought the KeyFramer's or WorldObjects Rotation would set the forward facing vector of the Object, but it seems 'forward' in this case is always '+z', means 'up' in Top View. Correct me if I'm wrong.
- So put an object somewhere (a brush bound to a Door), call it 'pointhere' and rotate the 'arrow' (remember to use the right rotation center) +90 degrees - so that it's aligned with the vector. After that go to the KeyFramer's properties and write 'pointhere' in theTargetName field.
- Last thing we want to do is have the arrow cast shadows as it travels. You can't do that with a normal light, so go to the light's properties and change it's class type to 'KeyFramerLight'.
- Then under the KeyFramer's properties set Lightning to the name of the light (if you left it's default it should be 'Light0').
- In the properties of the 'arrow' change BlockLight to 'True'.
- This should work already (remember to turn on 'Shadows' and 'Light Animations' when processing), but to make it look better you can set UseShadowMaps in the KeyFramerLight's properties to false, and give every Key more LightFrames.
- Note: There seems to be a problem with the KeyFramerLight, which causes it not to work after saving and reloading in a level. You should therefor only use it for cutscenes. Maybe I did something wrong, so if you know what: Please tell me.
The properties of the KeyFramer are:
- Pos: The absolute position of the KeyFramer object.
- Rotation: The rotation of the KeyFramer object.
- ObjectName: This field holds the name of the object that shall be moved.
- BaseKeyName: Holds the BaseName of the Keys that make up the path. Keys are named BaseName0, BaseName01, BaseName02, BaseName03 and so on.
- PushObjects: If set to 'True' the KeyFramer (i.e. the Object that is moved) will push objects in it's path. You need to set this if you want to create keyframed moving platforms the player can stand on.
- StartActive: The KeyFramer will start active instead of a waiting for a trigger message.
- StartPaused: The KeyFramer will start in pause mode.
- Lopping: The KeyFramer will restart at the first Key after it reached the last one.
- AlignToPath: Not quite sure.
- IgnoreOffsets: The KeyFramer object will acquire the absolute position of the Keys that make up the path, instead of trying to 'smooth' the movement.
- TargetName: The KeyFramer will try to keep his forward facing vector pointing to this object.
- TargetOffset: Here you can enter an Offset to the TargetObject given above.
- ActiveSound: The sound that is played constantly while the KeyFramer is moving.
- SoundRadius: The area in which this sound can be heard.
- RotationWave: Not supported.
- WaveForm:
- TotalPathTime: This setting overrides the TimeStamps of the Keys. It will take the KeyFramer this amount of time to get from the first Key to the last.
- Linear: The speed of the movement is linear.
- Sine: The KeyFramer will accelerate at the start and decelerate at the end.
- SlowOff: The KeyFramer will only decelerate at the end.
- SlowOn: The KeyFramer will only accelerate at the start.
- Lightning: Here you can enter the name(s) of KeyFramerLight(s) for animated shadows.
The properties of the Key are:
- Pos: The absolute position of the Key object.
- Rotation: The rotation of the Key object sets the direction of the forward facing vector of the KeyFramer when it reaches this Key.
- TimeStamp: The time it takes the KeyFramer to get to this Key from the one before (if not overridden by TotalPathTime).
- SoundName: A sound file that will be played when the KeyFramer reaches this point.
- SoundRadius: The area in which this sound can be heard.
- MessageTarget: A message can be sent to the desired target when the KeyFramer reaches this Key.
- MessageName: The message that will be sent.
- BPrintMessage: Not supported.
- BezierPrev: Not sure.
- BezierNext: Not sure.
- LightFrames: Sets how many LightFrames are used for this Key if animated lightning is used.
Elevator (KeyFramer pt.2)
This tutorial describes how to create an elevator using the KeyFramer. It's a good practise in message sending and controlling a KeyFramer.
An elevator created by using the door objects internal moving abilities has the basic disadvantage of beeing limited to two floors, because the door has only two states: open and closed. So using the KeyFramer with it's virtually unlimited amout of Keys is a better, although a little tricky solution (well, as far as I know). But I guess after one practised this a bit, it's actually a more elegant solution - and a good practise in using the KeyFramer itself.
- MOVING THE CABIN
The movement itself is very basic stuff. The Elevator cabin itself consists of a few brushes setting up a box, bound to a Door object. Set all the State Flags to 'false', so the Door won't work as a door in any way. Now set the IsKeyframed flag to 'true'. I suggest aligning the Door Object to the top of the cabin floor. - Now place a KeyFramer somewhere and set it up to move the cabin (Door). I already described on how to set up a KeyFramer to move an object (ObjectName,BaseKeyName and setting up Keys) in the KeyFramer tutorial.
Set the first two Keys (key0 and key01) at the same position as the cabin, i.e. Door object. Due to the fact that the first Key is aligned with the Door object (and the cabin floor) you can place the rest of the Keys exactly at ground height of the other floors in your building, setting up a straight vertical path (for a normal elevator that is - you can have it move around any way you want). Also place another Key after the last one at your last stop point (at same position if you want). Why we need the additional first and last Key will be explained later.
At last set PushObjects and StartActive to 'true'. PushObjects is needed because the cabin should move the player, StartActive is explained later.
Set the timestamps of the Keys to your desire (how long it takes to get from one floor to the next). - Now you have the basics together. The KeyFramer, i.e. the cabin can be moved to every floor (no matter where it currently is) by sending it a 'moveto keyx' message. They cabin stops there and waits for the next 'moveto' command.
- THE PROBLEMS WITH MOVING
There are two problems I came across:
First the KeyFramer won't react to the moveto command if doesn't start active, even starting paused and sending a 'resume' message didn't work for some reasons. As workaround I suggest simple having it start active and placing a trigger at PlayerStart which directly sends a 'moveto' message to send the cabin to the floor (Key) it should start on.
Second the KeyFramer refuses to react to the moveto command any more if it (at any time) reaches the first or last Key of the path. That's why we added the two extra Keys: They should never be used!
In both cases I would be really happy if someone proves me wrong... - I will continue this later (i.e. how to set up the triggers, adding doors and stuff)...
CinematicTrigger
This is an example on how to use the CinematicTrigger to create an opening cinematic for your level.
You may want to add a few Cinematic sequences to your level, especially at it's beginning. You will need the following things for this:
Cate (AI_Neutral_Hero),
a TeleportPoint,
a CinematicTrigger and
a few Keys.
For this example I will assume that the player (i.e. Cate) should be seen in the movie and that the movie starts right at the beginnig of the level. Keep that in mind while reading.
- To do an opening cinematic, place the GameStartPoint somewhere in the level where it can not be seen by the cinematic camera and by AIs (this last thing isn't a MUST, but if you don't, you first have to trigger nearby AIs to 'senses 0', because otherwise they will probably see and kill you while you're enjoying the movie. You can also remove any Bad AI for movie time by setting the according flag in the Cinematic Trigger, but that's half the fun in most cases).
Note that the Cate you will see in the movie is not the actual player, because with the AI replacement you can do more things (like using animations and so on). - Place your Cate (AI_Neutral_Hero) in your desired place, and put the TeleportPoint a the place the player should be after the movie (the same place as your Cate, if she doesn't move during the movie).
- Now place the CinematicTrigger at the first camera position and set the following properties:
- StartOn: 'true' (You can use a seperate Trigger to start a cinematic while already playing the level, but then you will have to teleport player away an create placeholder AI before starting the cinematic). I will try to make an example for this too.
CleanUpTriggerTarget is some non-existing target - Read more about this here. The messages are send when the end of the cinema is reached.
CleanUpTriggerMessage is 'msg Cate remove;msg player (teleport tp)' , where Cate is the name you've given your AI_Neutral_Hero and tp the name of your TeleportPoint.
You can also add 'msg player (fadein x)' so the cut to players view is not too hard (x is a time value).
Under Camera set CreateCamera to true. The KeyFrames will move this camera.
Under KeyFramer set CreateKeyFramer to 'true' and enter a name in the BaseKeyName field. For this example I will use the name 'Camera'. - On to the actual camera movement: Just make your Cinematic Tigger as ActiveNode in the NodeTree, and then start placing the Keys in your world. The first one is named 'Camera0', the following 'Camera0x' where x counts up. Give every Key it's desired position, viewing angle and the time the camera will need to get there from the Key before.
- Note that every Key can send messages when the camera reaches it. With this some very cool things can be done!
AI Messages
A list of messages you can send to an AI. Please help me completing this list. Most of the reactions should somehow work as commands too.
- attack: The AI attacks the player.
- attackfromcover: The AI attacks from cover (if possible).
- Attributes:
dest= followed by the name of a CoverNode.
Example:
"attackfromcover dest=CoverNode03"
- Attributes:
- attackfromvantage: Similar to 'attackfromcover'.
- animate: Used to have AIs performing animations.
- Attributes:
anim= followed by the name of the animation (needed).
loop=1 the AI loops the animation.
interrupt=1 the AI can interrupt the animation due to events.
Example:
"animate anim=LeanOnWall loop=1 interrupt=1"
- Attributes:
- aware: Still not sure about this.
- goto: Used to make an AI go to an AINode.
- Attributes:
pts= followed by the name of the Node (needed).
move= specifies the movement type. Possible values: run
interrupt=1 the AI can interrupt it's due to events.
Example:
"goto pts=AINode0 move=run"
- Attributes:
- patrol: Used to have AIs patroling several AINodes.
- Attributes:
pts= followed by a list of AINodes,seperated by commas (needed).
loop=1 the AI loops through the points.
Example:
"patrol pts=AINode0,AINode3,AINode8 loop=1"
- Attributes:
- remove: Removes the AI from the level.
- senses: Sets the sense state of an AI.
- Attributes:
0 No senses.
1 Normal senses (one of both is of course needed).
Example:
"senses 0"
- Attributes:
- targetplayer: The AI targets the player.
- teleport: Teleports the AI to the given TeleportPoint.
- Attributes:
The Name of the TeleportPoint (needed).
Example:
"teleport TeleportPoint01"
- Attributes:
Object Messages
A list of messages you can send to different WorldObjects.
Under every WorldObject you will find the messages this object understands (as far as I know of course). I will not explain every one of them, because most are self-explanatory. In some case I didn't try, but think it's right (Like most Objects who have an 'StartActive' flag or something similar should react on the 'on' message).
- CinematicTrigger
- on
- off
- goto: This message can be sent to the KeyFramer that can be created by the CinematicTrigger. In this case you must send the message to the KeyFramer itself (through the CinematicTrigger). The syntax is then 'KeyFramer (goto Key03)'. The KeyFramer (i.e. the camera) goes directly to that Key.
- pause,resume,forward,reverse: I didn't try that, but because you can send them to a normal KeyFramer, they should work on the CinematicTrigger's KeyFramer too. Syntax should be like for 'goto' then.
- Controller
- The Controller controlls the properties of several objects. Read more about this in the Docs that come with the tools.
- fade <parameter type> <destination value> <duration>: Fades to the specified destination value over time, where the parameter is a color (or the alpha channel).
- flicker <interval min> <interval max> <message to send> [count, default -1 which means forever]: Sends a message repeatingly (and randomly) to the targets in a specified interval.
- off: Stops whatever the targets are doing.
- Door
- trigger: The Door opens/closes (depending on it's current state).
- lock:The Door is locked.
- unlock: The Door is unlocked again.
- EventCounter
- inc: Increments the EventCounter's value.
- dec: Decrements the EventCounter's value.
- lock:The above messages don't affect the Counter any more.
- unlock: The EventCounter is unlocked again.
- Explosion
- on
- Fire
- on
- off
- KeyFramer
- on
- off
- pause: Pauses the motion.
- resume: Resumes previously paused motion.
- forward: The KeyFramer moves forward.
- reverse: The KeyFramer moves reverse.
- goto: The KeyFramer jumps directly to the specified key in no time (ex.: 'goto key03').
- moveto: The KeyFramer moves along the path to the specified key, using the TimeStamps you defined (ex.: 'moveto key03'). Read more about this command in the Elevator tutorial.
- Lightning
- on
- off
- ObjectiveSprite
- on
- off
- RotatingWorldModel
- on
- off
- Screenshake
- on
- off
- SecurityCamera
- on
- off
- SoundFX
- on
- off
- Steam
- on
- off
- Trigger
- trigger: The Trigger will sent all it's messages.
- lock: The Trigger get's locked, means it will not react on the player/AIs passing.
- unlock: Unlocks the trigger again.
Surface Flags
Surface flags influence the surface properties of a brush or texture.
You can edit the them by right-clicking on a surface while in Geometry Mode and selecting 'edit surface flags...' or by right-clicking a texture and selecting 'texture properties'. In the first case the flags only apply to this special surface, in the second case the will influence every surface you use this texture for.You can find them (and add new ones) in the 'surface.txt':
- 8: Electronics (computers, machines, with activation sound).
- 9: Chainlink Fence (masked metal).
- 10: Stone: Smooth (stone tile, concrete, ceramic, etc.).
- 11: Stone: Rough (outside stone, pebbles, rocks, etc).
- 20: Metal.
- 21: Tin (light metal; can shoot through).
- 23: trussing (masked metal).
- 30: Wood.
- 31: Drywall.
- 32: Wood: transparent (can shoot through).
- 40: Glass.
- 41: Bullet-Proof Glass.
- 70: Terrain: Dirt.
- 71: Terrain: Snow.
- 72: Terrain: Mud.
- 73: Terrain: Grass.
- 74: Terrain: Dirt Road.
- 80: Cloth.
- 81: Cloth (can shoot through).
- 90: Linoleum.
- 100: Wood Door (with activation sound).
- 101: Metal Door (with activation sound).
- 205: Force Field ().
AI Animations
Just a short list of animations the AI can perform throught the 'anim' command.
The AIs have many animations they can perform, from the default ones (walking,aiming, shooting etc.) to special ones (sleeping,dancing etc.). You can watch at all of them with ModelEdit. These are just a few ones, and I suggest taking a look at them to see what they really look like and how you can use them.
- LeanOnWall: Seems clear.
- PullLeverHi: Pulling a lever (on wall, aprox. breast height).
- PullLeverLo: Pulling a lever (table height).
- Conv1: Conversation animation.
- M2ThrowDown: Pushing something to fall down.
- M3StndPlan: Standing, looking at something an 'planing'.
- M3StndFixW: Fixing something (on wall, head height) with a wrench.
- M3StndFixW: Fixing something (on wall, head height) with a hammer.
- M3CrouchRepairW; M3CrouchRepairH: As above, just crouching.
- Smoke: The bad guys always do, right?
- Drunk: The bad guys always are, as we know.
- F3Dance1, M3Dance2: Fun, fun, fun.
- Si: Just sitting.
- SiDrAs: Sitting asleep.
- St-Si: From Standing to Sitting.
- Si-St: Guess.
- SitUp: Standing up again
- Si-StRifle, Si-StPistol: Standing up and drawing a weapon.
- DrwBa: Sitting asleep again.
- Write: Writing on a blackboard/wall.
- DrwWoke: Wake up, Stand up, Look around.
- Wipe: Wipe a table.
- Sweep: Sweep the floor.