Requirements:
Character Animation Model - Updated 9-7-2019 - Mega
Character Animation Model - Updated 9-7-2019 - Media
Character Animation Model - Updated 9-7-2019 - Drop
Character Animation Model - Updated 9-7-2019 - Google
Gerrys Mod to 3D Max - Google Drive
Gerrys Mod to 3D Max - Dropbox
Garry's Mod to 3D Max - Media Fire
Combine Pack Updated on 23-8-2019 Media Fire
Combine Pack Updated on 23-8-2019 Mega
Combine Pack Updated on 23-8-2019 Google Drive
Combine Pack Updated on 23-8-2019 Drop Box
From 3d Max to MOW Export Plug in - Official
Important Note:
For animation and other detail, please review Basic tutorial.
Special Note: Auto Animation will not required any FUNCTIONAL name, you can give its function any name like JOJO, KOKO etc., instead of predefine functions like fire, idle, recoil etc., as it will apply over any object despite of that object nature.
Weapons and Armors can be linked with any kind of BONES in skeleton just add following command in any equipment files in following folders:
-resource\set\stuff\hand
-resource\set\stuff\head
-resource\set\stuff\mask
-resource\set\stuff\body
-To add bone in any entity, add following line in arguments / commands
{item
	{desc "S Shield in hand"}
	{tag "smallitemin1hand armor"}
	{entity "shild0"}
	{mass 0.1}
    {inventory
	{size 3 2}
=====================================
=====================================
        {link_bone "Hand2L"}
=====================================
=====================================
    }
}
OR
{from "bodygear pattern"
	{desc "Backpack 3"}
	{entity "backpack_3"}
	{inventory
		{link_bone "IK_UpDown"}
	}
}
-By that It will move with defined bone instead of default bones like head or body or hand etc, so you can create whole body armor like Exo Skeleton, or Predator Gun at Shoulder etc etc (depend on your creativity).
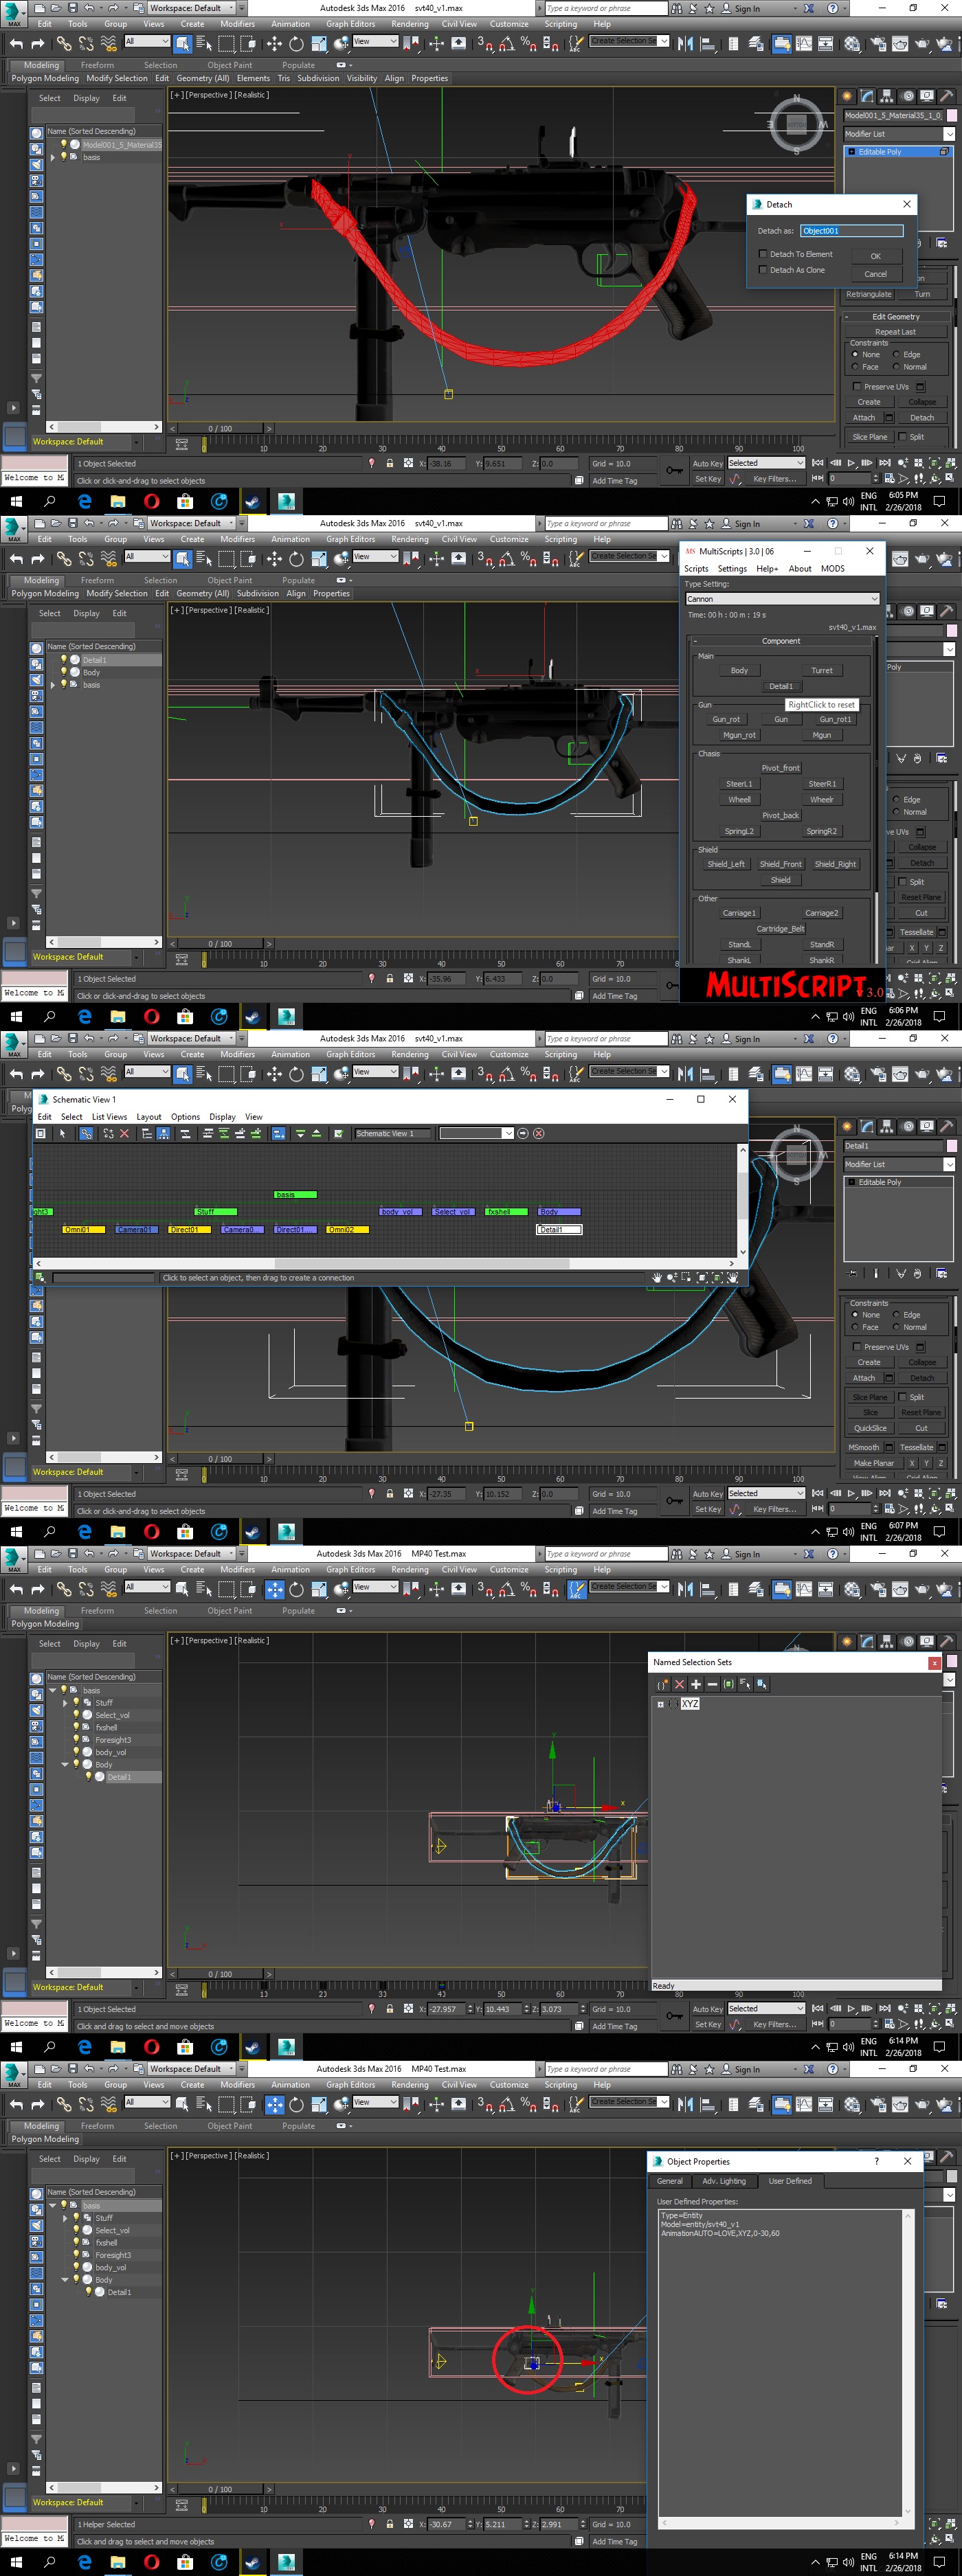
Weapon Porting:
- Open provided sample file and import/merge your weapon model, place it in center of BODY VOLUME, name its main object as BODY and rest of parts as DETAIL by multi script, set FORESIGHT and FXSHELL according to weapon structure.
- If weapon have objects on whom animation can apply then proceed by applying animation over them or else select and DETACH objects to apply animation over them.
- for placing weapon you have to place weapon handle right in middle of BASES (BOX) as its the center point of weapon placing where character will hold weapon from.
- to setup weapon in game you have to create description about it in set\stuff\mgun (or set\stuff\pistol depend on what you are porting) and also have to link your entity which would be in entity\inventory\-weapon, by getting values from IDENTICAL entities from game resources.
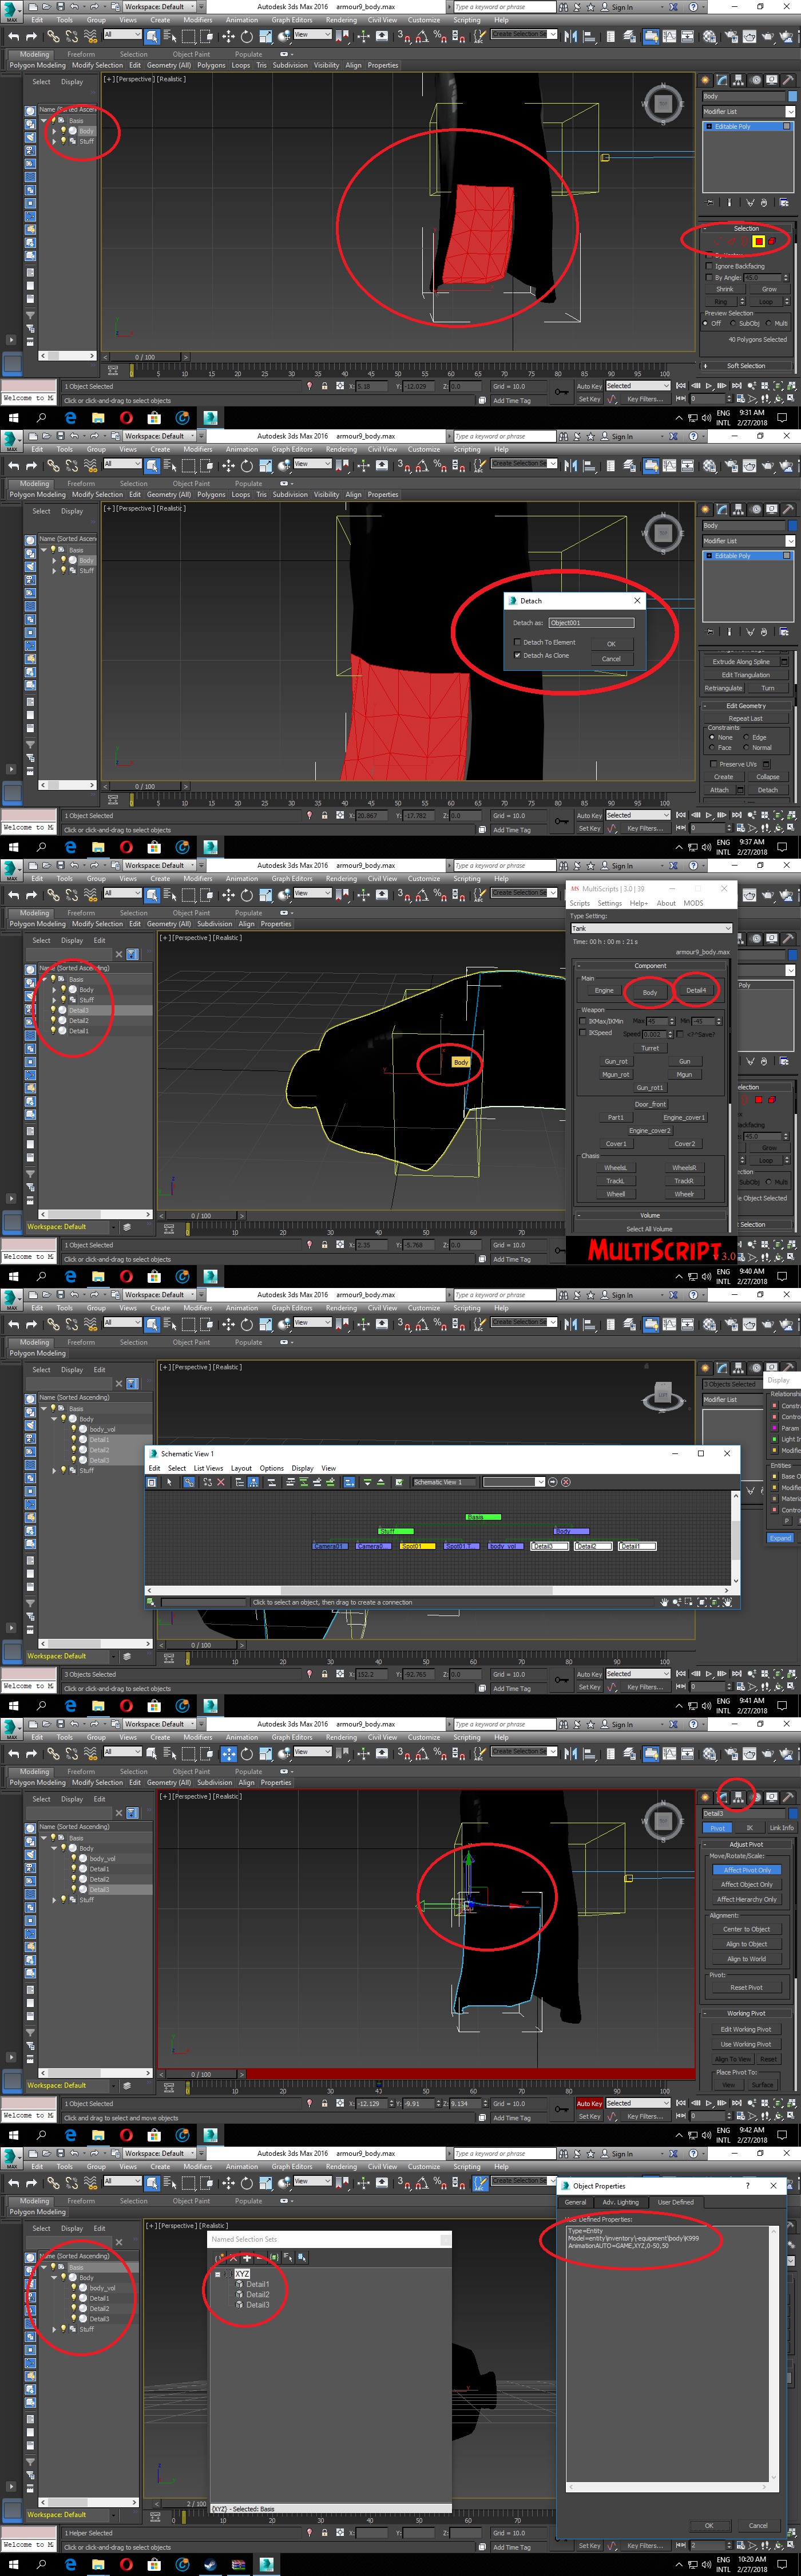
Armor Porting:
- Armor porting have same procedure as does have weapon porting, you have to open provided sample file and import/merge your armor model, place it in center of BODY VOLUME, but you can also create MULTIPLE body volume like body1_vol or body2_vol or body3_vol, name its main object as BODY and rest of parts as DETAIL by multi script.
- If body have objects on whom animation can apply then proceed by applying animation over them or else select and DETACH objects to apply animation over them.
-for placing armor you have to place it by provided same model, at right in middle of BASES (BOX) as its the center point of armor placing where character will have it upon them.
- to setup armor in game you have to create description about it in set\stuff\body (or set\stuff\head depend on what you are porting, helmet or armor) and also have to link your entity which would be in entity\inventory\-equipment\body (or head), by getting values from IDENTICAL entities from game resources.
Special Note:
- for head gear there are 3 patterns (patterns will effect there placing)
- fieldcap_rus (for non armored entity)
- helmet pattern (for armored entity)
- pattern headgear for non armored entity)
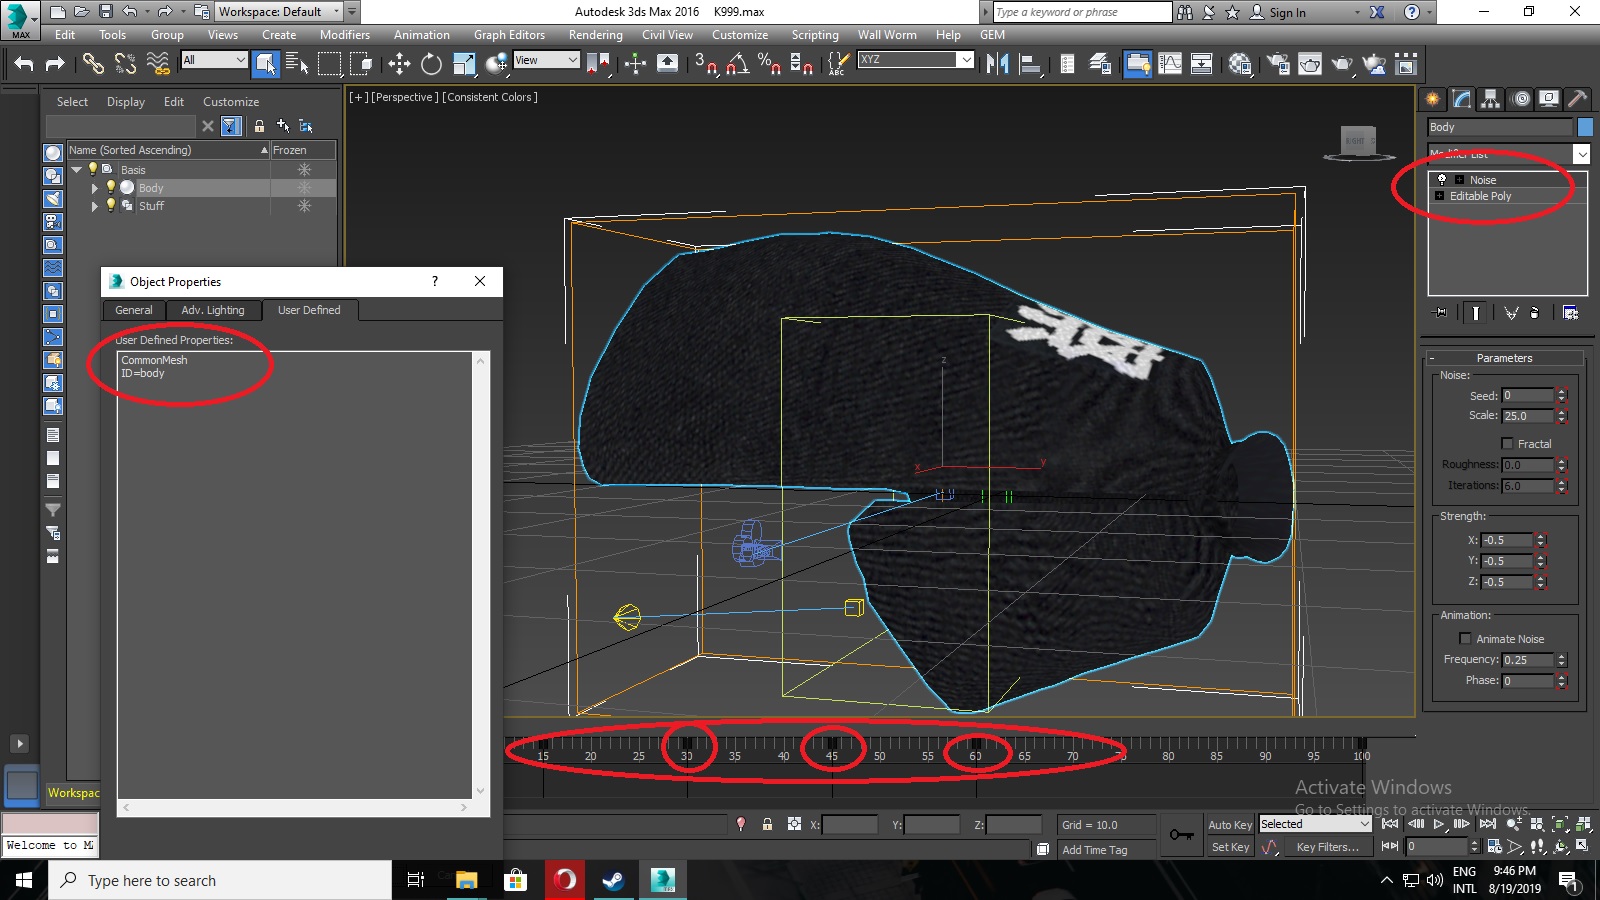
-After completion of your ENTITY, You must have to manually REPLACE "Poly" command line with "CommonMesh" in each object PROPERTIES > USER DEFINED or else 3d Max MODIFIERS will not effect on ANIMATIONS or VERTEX based animations will not play upon entity
:
Could you please make the NTW 20 ?
This comment is currently awaiting admin approval, join now to view.