Originally posted here: Planetshogo.com
Created by: Jeff Ploetner aka Bunghole.
Mirrored here for archival purposes. Note the links for the examples still work. So I suggest downloading them.
Adding New Surfaces to Shogo
Version 1.0
March 28th, 1999
by Jeff Ploetner aka Bunghole.
bung@planetshogo.com
This tutorial will explain how to make, update, and display new surfaces in shogo. I have also included 2 updated files (ClientInfoMgr.cpp and .h) that you can replace the standard ones in shogo with, and it will work.
Source art: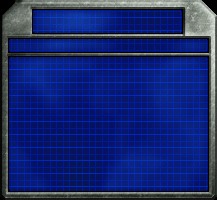
In-game surface: 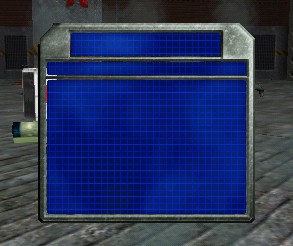
First of all, before you start working with a new surface, you must first declare the surfaces, the dimensions of the surface, and functions that will update and draw your surface:
ClientInfoMgr.h:
class CClientInfoMgr
{
public:
CClientInfoMgr();
~CClientInfoMgr();
...
void Draw (DBOOL bDrawSingleFragCount, DBOOL bDrawAllFragCounts);
//JSP
void UpdateWeaponsSurface();//<- This will update the surface. If you want to change it, you must update it.
void DrawWeaponsSurface();//<- This will actually draw the surface to the screen.
///
protected:
...
HSURFACE m_hFragDisplay;
DDWORD m_cxFragDisplay;
DDWORD m_cyFragDisplay;
//JSP
HSURFACE m_hWeapons;//<- This is the surface.
DDWORD m_cxWeapons;//<- This is the x dimension of the surface.
DDWORD m_cyWeapons;//<- This is the y dimension of the surface.
///
};
Now that we have it declared, let's go define our stuff in ClientInfoMgr.cpp:
CClientInfoMgr::CClientInfoMgr()
{
m_pClients = DNULL;
m_pClientDE = DNULL;
m nLastF
m_bFragSurfacesUpToDate = DFALSE;
m_hFragDisplay = DNULL;
m_cxFragDisplay = 0;
m_cyFragDisplay = 0;
//JSP
m_hWeap
m_cxWeap
m_cyWeap
///
}
Here we are just initializing our surface to DNULL, and our dimensions to 0...
CClientInfoMgr::~CClientInfoMgr()
{
if (!m_pClientDE) return;
ClearAllFragSurfaces();
CLIENT_INFO* ptr = DNULL;
while (m_pClients)
{
ptr = m_pClients->pNext;
m_pClientDE->FreeString (m_pClients->hstrName);
delete m_pClients;
m_pClients = ptr;
}
if (m_hFragDisplay) m_pClientDE->DeleteSurface (m_hFragDisplay);
//JSP
if (m_hWeapons) m_pClientDE->DeleteSurface (m_hWeapons);
///
}
Here we are simply deleting the surface if it exists. You must do this or you will have a memory leak.
Now let's move on to actually doing something with the surface.
void CClientInfoMgr::UpdateWeaponsSurface()
{
//Clear all stuff
if (m_hWeapons) m_pClientDE->DeleteSurface (m_hWeapons);
m_hWeap
m_cxWeap
m_cyWeap
m hWeap
m_pClientDE->GetSurfaceDims (m_hWeapons, &m_cxWeapons, &m_cyWeapons);
HDECOLOR hTransColor = m_pClientDE->SetupColor1(0.0f, 0.0f, 0.0f, DTRUE);
m_pClientDE->OptimizeSurface(m_hWeapons, hTransColor);
}
Before we update a surface, you must delete it, set the surface to DNULL. If you don't delete it, you will have a memory leak. If you don't set it to DNULL, weird stuff will happen (like drawing the surface multiple times in semi-random positions). So do yourself a favor and MAKE SURE that you do both of the above.
Next, we are creating a surface from the bitmap. It is pretty much self explanatory.
Next, we are getting the dimensions of the surface, and storing them in our diminution variables that we made. These are going to be used for formatting.
Finally, we need to optimize the surface. To do this, just call the OptimizeSurface function. The hTransColor is the there because we are going to be making part of the surface transparent, as you will see later. SetupColor1 (or 2) just creates a color. The first 3 parameters are RGB values for the color, and the last one is a boolean value of whether it will be a transparent color or not. More on the transparency later.
void CClientInfoMgr::DrawWeaponsSurface()
{
HSURFACE hScreen = m_pClientDE->GetScreenSurface();
DDWORD nScreenWidth = 0;
DDWORD nScreenHeight = 0;
m_pClientDE->GetSurfaceDims (hScreen, &nScreenWidth, &nScreenHeight);
m_pClientDE->DrawSurfaceToSurfaceTransparent (hScreen, m_hWeapons, DNULL, (int)(nScreenWidth/2.0f-m_cxWeapons/2.0f), (int)(nScreenHeight/2.0f-m_cyWeapons/2.0f), DNULL);
}
First we have to get the screen surface, as well as it's dimensions. hScreen is the actual screen surface of shogo. It's dimensions will be stored next (ex. nScreenWidth=800, nScreenHeight = 600).
Next, and last, we are actually drawing our surface, m_hWeapons, to the screen, hScreen. hScreen is the destination surface, m_hWeapons in the source surface, DNULL is the source rectangle, the next two parameters are the destination x and y coordinates, and the last DNULL is the transparent color. Let's talk about these.
What the source rectangle allows you to do is let you take only a portion of the source surface to draw to the destination surface. I used this in Tow Arena to draw the health and armor bars. Here's a quick example of how to use it:
DRect fillRect;
fillRect.left = fillRect.top = 0;
fillRect.bottom = 20;
fillRect.right = 40;
m_pClientDE->DrawSurfaceToSurfaceTransparent (hScreen, m_hWeapons, &fillRect, ... );
The above would draw a rectangle 40 x 20 pixel rectangle from the source surface (m_hWeapons) to the destination surface (hScreen). Notice the & before the fillRect. Don't forget it. Here is what it looks like:
Notice how it only drew the 40x20 part of the source surface onto the hScreen...
The destination x and y coordinates are just that. They are the x and y coordinates that the TOP LEFT CORNER of the source surface will be drawn to the destination surface. What I did up there was just center it. In case you didn't know, to center something horizontally, you need to find the horizontal center of the screen (which is nScreenWidth/2.0f) and subtract a half of the width of the destination surface (which is m_cxWeapons/2.0f). The same goes for the vertical center.
Finally, the transparent color is the color that will be transparent from your source image. In this case, we set it to DNULL because DNULL means black. What this does is make transparent all the pixels of your source image/surface that are of that color, black. Had we wanted to make all the, say, white pixels from our source image/surface transparent (say we had a black surface), then we would have had to set up another color and passed it in. We also would have had to optimize the surface with that color.
Example:
Updating it:
HDECOLOR hTransColor = m_pClientDE->SetupColor1(1.0f, 1.0f, 1.0f, DTRUE);
m_pClientDE->OptimizeSurface(m_hWeapons, hTransColor);//<- MAKE SURE YOU OPTIMIZE!!
Drawing it:
HDECOLOR hTransColor = m_pClientDE->SetupColor1(1.0f, 1.0f, 1.0f, DTRUE);
m_pClientDE->DrawSurfaceToSurfaceTransparent (hScreen, m_hWeapons, DNULL, (int)(nScreenWidth/2.0f-m_cxWeapons/2.0f), (int)(nScreenHeight/2.0f-m_cyWeapons/2.0f), hTransColor);
1.0f, 1.0f, 1.0f = White
0.0f, 0.0f, 0.0f = Black.
Remember, these are RGB values, so if we wanted to make the color green, it would be 0.0f, 1.0f, 0.0f. You can figure other colors out by yourself. : P. I find that using paint program is useful. Speaking of which, say you have an odd color that you want to be transparent. All you need to do is take the RGB values from your paint program, (which will be 0-255) and divide them by 255 to get your floating point value for it.
Example:
Say you want cyan type color, and it is 28, 223, 245 (RGB values from 0-255). To get these to a floating point value from 0.0-1.0, simple divide them by 255. In this case it would be approximately 0.11, 0.87, 0.96. So you would do a:
HDECOLOR hTransColor = m_pClientDE->SetupColor1(0.11f, 0.87f, 0.96f, DTRUE);
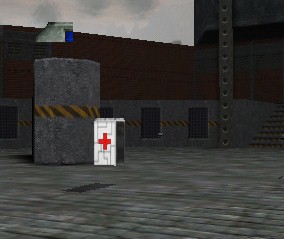
If we did this:
HDECOLOR hTransColor = m_pClientDE->SetupColor1(1.0f, 1.0f, 1.0f, DTRUE);
m_pClientDE->DrawSurfaceToSurfaceTransparent (hScreen, m_hWeapons, ... , hTransColor);
Then it would look like this:

Because there is no TRUE 255,255,255 white in the source surface, there is no transparency, and therefore everything is displayed. Notice the black corners.
You probably could have figured this out...it's fairly easy. Just remember that the color has to be exactly the same.
Keep in mind that ClientInfoMgr is not the only place where surfaces are drawn. The hud is in PlayerStats, so you may want to check that out as well.
You can download the files that I modified for this tutorial, and use them to get started making your own new surfaces if you want:
ClientInfoMgr.cpp
ClientInfoMgr.h
Well...I think that about covers it. This is just a very basic surface tutorial. There are many more things you can do, so open up AppHeaders/client_de.h and scroll down to about line 500 to find a lot more things that you can do with surfaces.
One last thing. This is the ultimate rule for using surfaces. DO NOT UPDATE THE SURFACE EVERY FRAME!! Updating the surface takes a LOT longer than drawing the surface, so only update it when it changes (ex. the fragcount is only updated when it changes). Feel free to draw it every frame though, just not update it....
I hope this helped! :) Thanks for reading.