We've discussed a lot of the subtle techniques we're using to make the Overgrowth characters look realistic, but we still haven't explained the most important graphics technique in modern games: normal mapping. You probably know that normal mapping lets us render detailed models very efficiently. But what is it actually doing?
Let's break the name down. The "normal" is a vector perpendicular to a surface, which we can use to calculate lighting. "Mapping" is usually used in graphics to describe the connection between a 3D model and a 2D image. So, normal mapping is when we create an image with high-resolution surface normal information, and map it into a simple model to make it look more detailed. Here's an example of a detailed model, a simple model, and the simple model with a normal map applied.
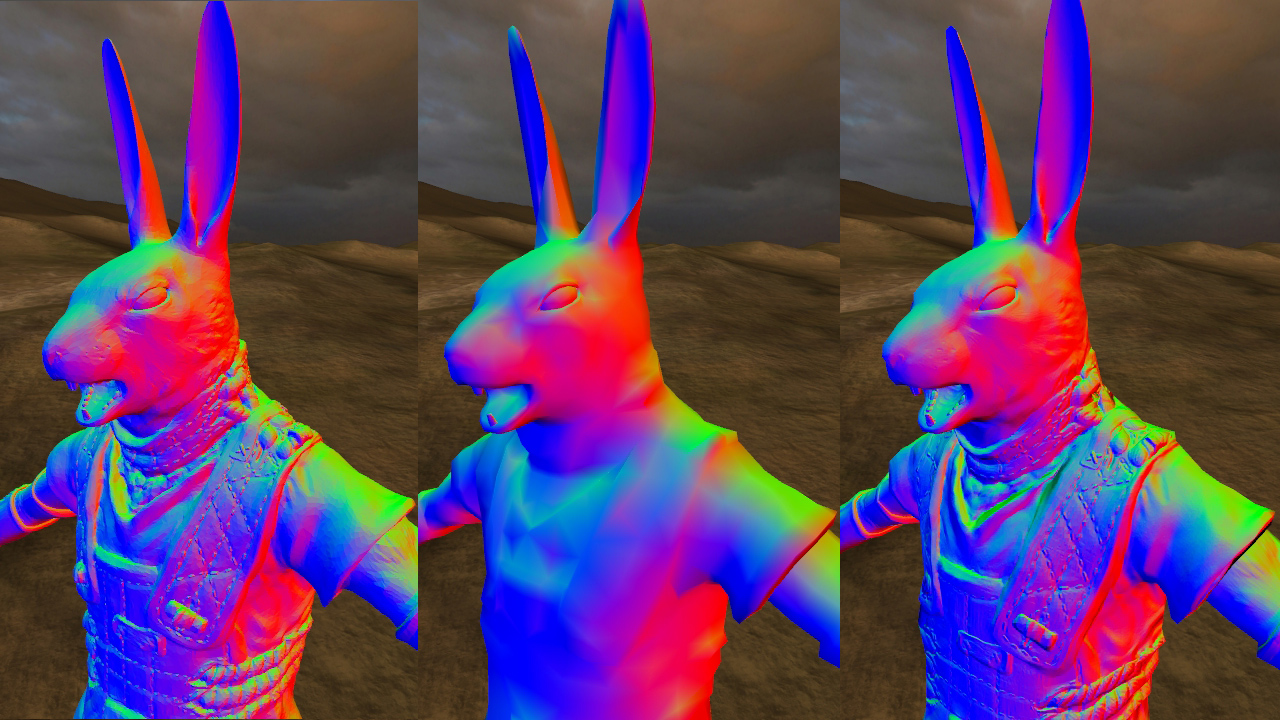
As you can see, the high-detail model and the low-detail normal-mapped model look almost identical, even though the high-detail model has too many polygons to draw in real time. In case you were wondering, the colors here represent the surface normal information. The red represents the x-component (how much it is facing right), green represents the y-component (how much it is facing up), and blue represents the z-component (how much it is facing forwards). Here's another comparison of these models:

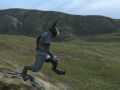
From this distance, the left and right models look pretty much the same. In fact, since the lighting is exactly the same, there is no difference if you look at the surface details from the front! However, this technique isn't magic -- it can't add detail to the silhouette. If you look at the edges of the low-detail model, you can start to make out some of the polygons. Below is a close-up of some of the silhouette simplifications in the character's neck:

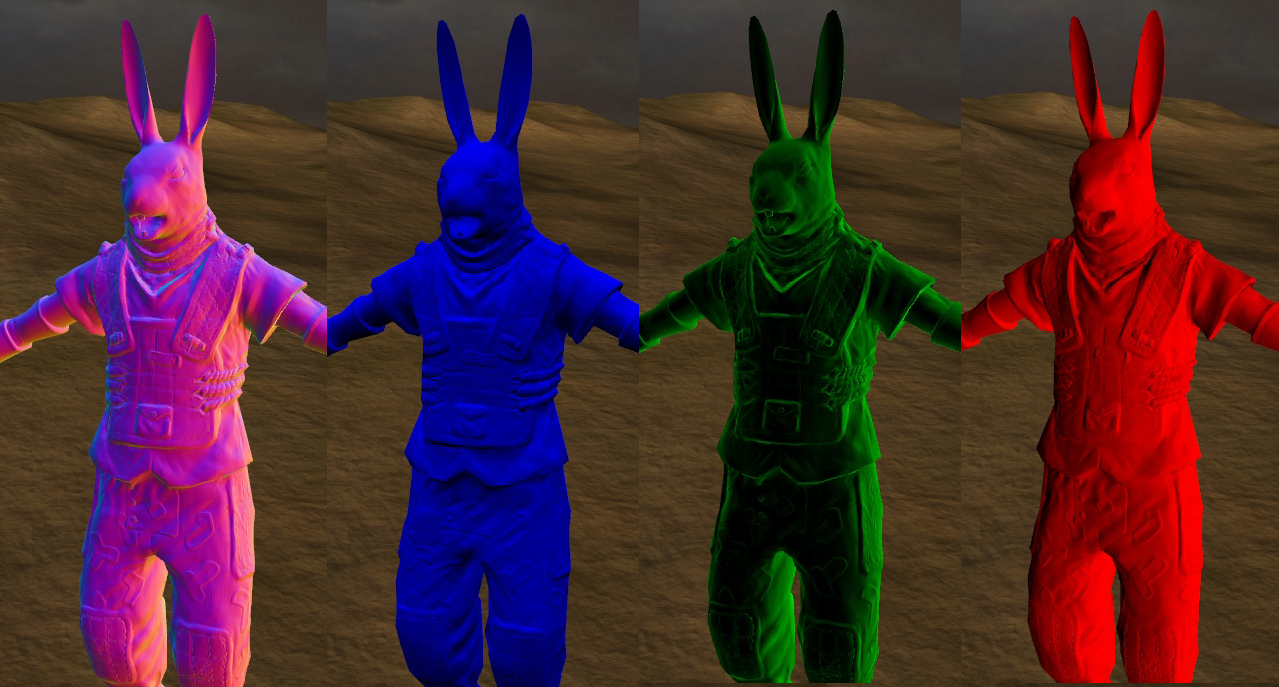
So now you get the idea of what normal maps do... but how are they made? We create them by 'baking' the surface information from the high-detail model into an image like the one below. The normal map is on the left, and its component channels (red, green and blue) are shown next to it.

Here the normal map is applied to the low-detail model, and you can see how each channel encodes the surface information along each axis. In this case, blue represents the y-component (up and down), red represents the x-component (left and right), and green represents the z-component (front and back).
Once we have a normal map, it's easy to use it to calculate lighting from different directions. For example, if we have a light source directly to the right, we can just use the red channel. First we make it greyscale, and then scale it so that the entire left half is in shadow.

Using these three channels, we can calculate the lighting from any direction by just combining them with different weights. For example, if light is coming from up and to the right, we can just combine the red and blue channels. Of course, in the vertex shader I just write a general equation so we don't have to deal with each special case individually like this.

When it's all put together, the normal-mapped lighting provides an excellent foundation, so that the final result looks much more detailed than its underlying geometry. This allows us to deliver detailed visuals while keeping the framerate smooth and stable.

This is review material for anyone familiar with modern graphics techniques, but I hope it was informative to some of you! Our normal maps are different from those in most games, and easier to understand and work with, because they're stored in object-space instead of tangent-space. Maybe I'll write about that next time! (permalink)
Track us on ModDB (visit our page)
Please join us here too:


Great. Although I would have loved to have seen the final image with and without normal maps, so people could see what difference it made to the final product.
Disco Fever?
awesome job! i cant wait for the article about UV mapping! or maybe that already out....
Will be there any customisation of characters? If so, will it be an advanced/complete one? (I guess it's a must in case of a game having multiplayer mode.)
There will be different armors and stuff.
I really want to see your article about tangent space vs. object space, sounds interesting.
Fantastic, the problem i have with normal map generation is that i enhance the blue channel waaaay to much. But it would be awesome to separate the channels like you have, and enhance them that way.
Can't you just use the channels tab in Photoshop for that? (Just select the 'blue' channel and fiddle away...)
Very good article, like how its aimed at explaining to us who dont know to better understand how its done and how it works =] ive always wondered how normal mapping works exactly lol, just one question though... You show in image4 the 3three colours that make up a normal map, and then also the normal map with those 3 colours already merged, question is, how do you merge the 3 into 1 to make that normal map?
Yeah, I had been wondering how normal mapping worked also, programmers are so smart! :D
I understand that object space normal maps may be a bit easier to work with, but wouldn't it complicate things in the sense that every surface will require a unique texture..?
For example if you wanted to make a simple prop like a box, you couldn't use the same texture on different sides of the box (that face in different directions) because the normals would always point in the same direction rather than relating to the surface the normal map is applied on.
You'd have to make a unique texture for every side of the box, which again would lead to larger texture files.
This might not be a big issue, but are there any significant advantages of using object space instead of tangent space that really makes it worth it?
I'm not an expert, so I'm also wondering... how will this work on a character where the mesh will be deformed? Won't the normals always be in object space (even when the mesh is deformed), and thus not point in the correct direction if for example the character lifts his arm?
If so, how is this compensated for?
Sadly though, a lot of shaders nowadays in many popular games make everything look "wet" or like "plastic", but I guess that is a trade off. At least these seem to have the specular levels under control.
If you cover bloom don't make every surface look like you are looking into the sun. :P
fraps..........bunnies!!!!
Planning on using a phong shader? Those are awesome.
So... to clarify: you steal the lightmap from the high-polygon character, apply it to the low-poly character and he still illuminates like the high-poly guy? Cool.
Thanks for the well-explained insight.
Just btw, that guys pants looked pretty awesome in fluro/ with some colour
You should teach guys from Piranha Bytes how to make good models. Awesome, really impressive.
Thats one angry bunny! :D
You can't deform your mesh when using Object Space normal maps! D: Why use them on a character model? I use them on weapons, and things that don't deform. :P
I'm really liking that model :D