RavenShield 2.0
FEATURES
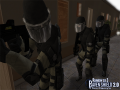
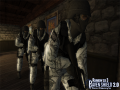
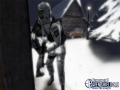
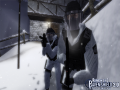
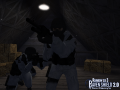
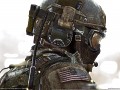
*Completely Updated Characters.
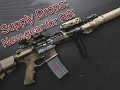
*Redefined Armaments Textures.
*Improved Visual Particle Effects.
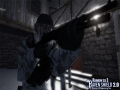
*Implemented Ironsight System's.
*Fundamentally Improved Reality.
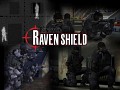
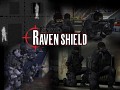
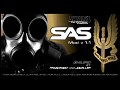
*Revisualized Menu Background.
*Updated AI, improving on squad.
*Hostile AI behaviour is balanced.
*Immersive GoggleHUD & Health.
INSTALLATION_
-1- Download from the download page.
-2- Extract the data from the archive.
-3- Overwrite your existing RVS folder.
-4- OPTIONAL: Please make a backup.
-5- Enjoy.
Articles
1. Getting Started
In this easy tutorial, you will create a multiplayer mod that is installed server side. Programming a multiplayer mod can be confusing in the Raven Shield engine, because the UBISoft developers stripped out a lot of support for modding from the original code. However, this tutorial will walk you through the basics.
You will need:
1) My SDK2 - download here: Mediafire.com
2) Raven Shield source code reference (included in the above download)
3) A text editor like Notepad, Notepad++, or my favorite, Crimson Editor.
2. Basic Code
Open up your text editor, and copy and paste the following:
class ModName extends Actor;

var bool bOne,bTwo;

//replication is basically determining what code should run on client and server
//this stuff with the replication will check to make sure that the mod runs properly
replication
{
   reliable if ( Role == ROLE_Authority )
   bTwo;
}

//more replication stuff
event PostBeginPlay()
{
   super.PostBeginPlay();
   bTwo = bOne;
}

//this function is where the work of your mod gets done
simulated event PostNetBeginPlay()
{
   local color y;
   super.PostNetBeginPlay();
   if ( !bTwo )
   log("Replication FAILED");

   //here you can change the color of the console alert
   //just look up online a RGB color chart to get the correct numbers
   y.R = 57;
   y.B = 255;
   y.G = 150;

   //here is the message that will be added when a player joins the server
   AddMessageToConsole("--- This server is running MODNAME ---",y);
   AddMessageToConsole("   Mod created by AUTHOR - NAME@EMAIL.COM",y);

   //here is what your mod can change
   //for example, right now it changes the normal and silenced FAMAS to have a 50 round clip
   class'NormalAssaultFAMASG2'.default.m_iClipCapacity=50;
   class'SilencedAssaultFAMASG2'.default.m_iClipCapacity=50;
}

//these are just housekeeping code
//it makes sure that the mod runs without bothering gameplay
defaultproperties
{
   bOne=true
   bHidden=true
   RemoteRole=ROLE_SimulatedProxy
   bAlwaysRelevant=true
}
That is the complete source code to a simple mod that changes the ammo capacity of the FAMAS G2. You can see that the comments (behind the double slashes) explain what each element does. Essentially, this code is designed to fulfill two functions:
1: Test to see if client/server communication is working, and
2: If it is working, make the proper changes to a game element (in this case, FAMAS ammo).
3. Make Your Changes
Start by changing the "ModName" in the very first line to the name of your mod. It must be a single word, but can have capitals and small letters. Save the file in SDK2 > Code Environment > (Whatever you just named your mod) > Classes > (Whatever you just named your mod).uc. The *.uc ending is VERY important. It won't work without it!
In the function "PostNetBeginPlay," at the section with "AddMessageToConsole", change it to say what you like. This is the text that adds to players' consoles when they join your server. Tell players a bit about your mod. Just above that, you can also change the color of the text by modifying those three numbers.
Now you need to make the mod do what you want. Go into the Raven Shield source code. Most classes will have a section at the bottom called "defaultproperties." These are simple variables that you can easily change with your new mod. In the above code, I am changing the defaultproperties for the classes NormalAssaultFAMASG2 and SilencedAssaultFAMASG2 -- specifically, I am changing the value m_iClipCapacity.
For another example, check out the class R6SniperRifle. It has the defaultproperties entry of m_fMaxZoom. If I were to delete the two lines referring to the FAMAS G2, and enter this line:
class'R6SniperRifle'.default.m_fMaxZoom=5.00;My mod would now change the zoom amount for all snipers to 5x instead of 10x.
You just always need to make sure your line follows this format:
class'NAMEOFCLASS'.default.NAMEOFVARIABLE = NEWVALUE;
So in the code above that you copied and pasted, where I changed the default ammo amount of the FAMAS, you can delete those two lines and put in your own changes. Just look at some of the original source code classes and decide what you want to change.
4. Make It Work
Save all your changes, then close the text editor. Run ToolBelt in SDK2, and type Compile at the command prompt. Then type the name you gave your mod. It should compile in a few seconds with no errors. Then type UTX, then your mod name again. This gives you a file that will work as a multiplayer mod!
(NOTE: One of the features that UBI removed from Raven Shield is the ability to transfer *.u files between players and servers. Because code is by default compiled into *.u files, we need to change that into a *.utx file. This is why we use the UTX command in ToolBelt. Alternately, you could just rename the file extension.)
To install this mod, place the final UTX file in your server's textures folder, then add these lines to the bottom of your ravenshield.mod file:
ServerActors=NameOfMod.NameOfMod
ServerPackages=NameOfMod
Change "NameOfMod" to whatever you named your mod. And start your server up! Post any questions you may have, and I'll try to help.
Files
Rainbow Six 3®: Raven Shield 2.0 (Retail Version)
Full VersionRainbow Six returns! An all exclusive, definitive redux of the most popular tactical game of 2003 makes a comeback, in the form of Rainbow Six® Raven...
Rainbow Six 3®: Raven Shield 2.0 (Steam Version)
Full Version 2 commentsEngage in over a dozen locations, neutralizing terrorism wherever it appears, fully designed to provide the most realistic and capable
Post a comment
Profile
X
Tags
Embed Buttons
Link to RavenShield 2.0 by selecting a button and using the embed code provided more...


You may also like


blood stains disappear
Is Jun 4 2013 version last one ?
Nope. Beta versions are out for v2.1.
Hey is this compatible with other mods? Like if I wanted guns or camos from another mod would they both work?
This comment is currently awaiting admin approval, join now to view.
is there a way to only download the armor texture?
the m82 valvet rifle has no ironsight when attaching the silencer,you guys have the same issue?,and is there any tutorial how to fix it?
The Raven Shield 2.0 mod seems to be gone from here but can still be found at
gamepressure.com/download.asp?ID=51022
What the heck?? What happend to this mod? I used to play this all the time and now it's gone. Anyone got a download link?
Drive.google.com