Welcome back, I'm sure can't get enough of me...
Its been awhile, like 3 weeks but that doesn't matter, does it? I'm sure you've been waiting calmly for this post...
Lots of work has happened in the media-less time, new items, more tests, can't wait to show them off. But today's update is using the G.E.C.K, so lets jump in!
The G.E.C.K is a powerful tool, used to modify Fallout 3. It can do anything from change a weapon's output damage to creating a whole new world, such as a total conversion (There are a number of them on the go, check out all of the mods avaliable for Fallout 3 here)
for anyone that has accually tried making a whole new map, its a long and painful process, first the land editing, then the texturing and finally placing objects. Wouldn't it be so much easier to place objects with out having to drag and drop? well the G.E.C.K has a useful tool for this, its called the object palette.
lets say hello!
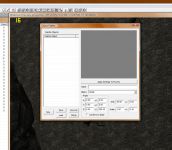
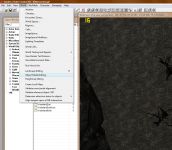
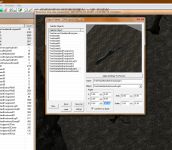
so where is this nifty little tool located?
its found in 'world' header, here's a another picture in case your lost
Maybe I havn't explained it very well so far. The object palette allows you to add a number of objects into the palette to make a group of them, and then easily place them in-game already scaled, rotated etc.
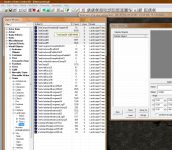
for this (tutorial?) I will be using tree's, as its part of a level that I dont want to spend 2 hours working on, trying to make the trees look natural (yeah it took me 2 hours the first time, I'm slow...). With the object palette open you can go back to your object window (try not to get confused). from here you can do a search for the objects you want, if you are following what I am doing (why would you though?) the trees can be found under
World Objects -> Static -> Landscape -> Trees
I'm using the .nif trees as they give greater control of the in game modifaction of them (scale, rotation etc) and there's no dead trees under the World Objects -> Tree
from there you drag and select the objects you want to go in the palette and drag them into it. In the picture below I have selected a number of trees, unfortunately vista's highlighting options are hard to see in the picture.
Once you have placed all the objects you want in the palette you can rename them (in the palette, it wont rename the files) for easy reference, I didn't but you can. Now we can start messing around with each objects options.
We have a number of them, allowing for rotation on each axis, scale and location above/below ground.
First up is 'sink', which determines how far below the surface the object is (0 means its placed along the same Z plane as the ground)
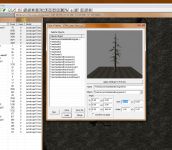
The first box is a defined amount, a.k.a I have put the number '30' in there, so if I click 'Apply Settings To Preview' the tree sink by 30 points (great for hiding that silly base on the tree). The second box (this is the same for all the options [left hand box is a defined amount, right hand is variable] allows for a variation, so if I put 5 in that box and 30 on the left the tree would beplaced underground by 30 +- 5 = 25 to 35 points.
below that is 'Scale', once again left hand box if defined, right is variable. since we dont want all the trees to be the same height we will use the variable, right hand box (the left hand box should have the number '1.00' in it, just leave that, its the default size) I placed '0.2' in the variable box, which is fine for me, and the trees (you can always just apply the settings to the preview to see a brand new example of the object ingame)
The last set of options relates to the rotation along certain planes, so we can make the objects tilt, or even better not face the same way (one of the worst things when playing a game is seeing 2 identical tress next to each other)
the X axis and Y axis options are for you to mess around with, once again the variable amount should be used. I placed '5' in the both of the variable options, you will be able to see the final result in the video below.
the Z axis is where this shines. Setting this to '360' will enable full rotation of any object, no more looking the same in game! (just pointing out that, in the video below, I only had '5' in this box aswell, which is why the logs face the same way)
If you notice the option below these ('Conform to Slope'). This can be used to make the slope that you are placing it on as the base axis, a.k.a placing an object on a wall will automaticaly angle it to the wall, making a placed decal so much easier! (posters, blood etc)
Now how we place these objects in game?
simple, you just click on the object you want (in the palette) and then click on the render window. Hold 'Control' and 'Alt' and click - hey! you just placed your first 'object palette-erised' object! congradulations!
It can be really useful for boring and dull work, like placing trees, or clutter to make your levels more realistic! here's a video showing how easy and quick it is.
Otherworld Mod for Fallout 3 Object palette example video - Mod DB
(Thanks to NIGHTkilla for the music [avaliable here])
Until next time (fingers crossed it aint 3 weeks...) happy modding!
Rev