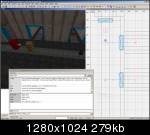
Let's start from a simple map with 4 doors: 2 in the background, 1 on a side aligned with the player and another one on a side, but aligned with another street placed in the foreground.
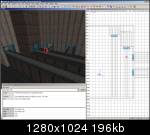
1) Simple Teleports
Teleporting the player is really easy:
Let's say we want to teleport the player to the street placed in the foreground when he touches a trigger_multiple.
All we have to do is to make that trigger to target a func_teleporter or a func_teleporter_fx (they are the same, but the "_fx" one also plays the default fx on teleport).
That's it.
The player will be automatically locked on the new plane defined by the origin of the teleporter.
Tip: you can set the angle on the teleporter entity to specify which side the player should face after being teleported.
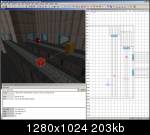
2) Teleport after entering a door in the background
We have 2 doors in the background. Let's say we want the player to enter the first one and then to exit from the second one.
We have to place 4 entities chained together from the first one to the last one. It's like describing the path the player has to do.
The 4 entities are:
- a trigger_interact_change_x_pos: the player can start the movement by pressing the "up" button while touching this trigger. It targets is the next entity.
- a trigger_relay: it's just in between the 1st and the 3th entity. It defines the target position of the first movement. When the player reaches this entity, it triggers the next one.
- func_teleporter_change_x_pos: as soon as it's triggered it teleports the player at its own position and force it to move toward its target (the 4th entity).
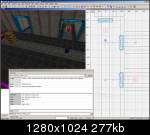
- the 4th entity can be anything. For example, you can use a target_null or a trigger_relay. The origin of this entity defines the final destination of the movement and the position of the plane on which the player will be able to move after this entity has been reached.
Tip1: Also the 4th entity is triggered when reached. This allows you to call script functions or trigger other things if you choose to use a trigger_relay as 4th entity.
Tip2: Never set "wait" "-1" on one of these trigger_relay, otherwise it will auto-remove itself and the path won't work anymore.
Tip3: If you don't need the "exit from the background" part of the movement, just use a func_teleporter instead of func_teleporter_change_x_pos. In this case, there's no a 4th entity needed.
Tip4: Do the same (other 4 entities like these ones) for the other door to make this 2-ways.
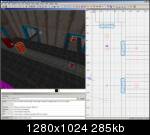
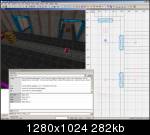
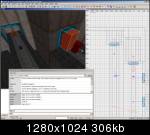
3) Teleport after entering a door on a side.
We have 2 doors in the left side. Let's say we want the player to enter the first one and then to exit from the second one.
This is almost like the previous one. We still need connect 4 entities to build a path.

The 4 entities are:
- a trigger_force_movement_multiple: when player touches this entity, he is forced to walk toward its entity.
- a trigger_relay: it's just in between the 1st and the 3th entity. It defines the target position of the first movement. When the player reaches this entity, it triggers the next one.
- func_teleporter_force_movement: as soon as it's triggered it teleports the player at its own position and force it to move toward its target (the 4th entity).
- the 4th entity can be anything. For example, you can use a target_null or a trigger_relay. The origin of this entity defines the final position of the movement and the position of the plane on which the player will be able to move after this entity has been reached.
That's it!
Note that we use a func_teleporter_force_movement instead of func_teleporter_change_x_pos.
They are quite similar, but the "force_movement" one is more strict because it also disables any user input during the movement and makes sure the player reaches the exact origin of its target (not counting the Z axis), while the func_teleporter_change_x_pos only checks the X-axis position.
All of the tips I wrote for doors in the background are also valid in this case.
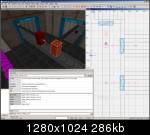
4) Other examples
Once again, the Playground map features many examples for this kind of stuff. ;)