Once successfully installed the MOD SDK we will find the following picture:
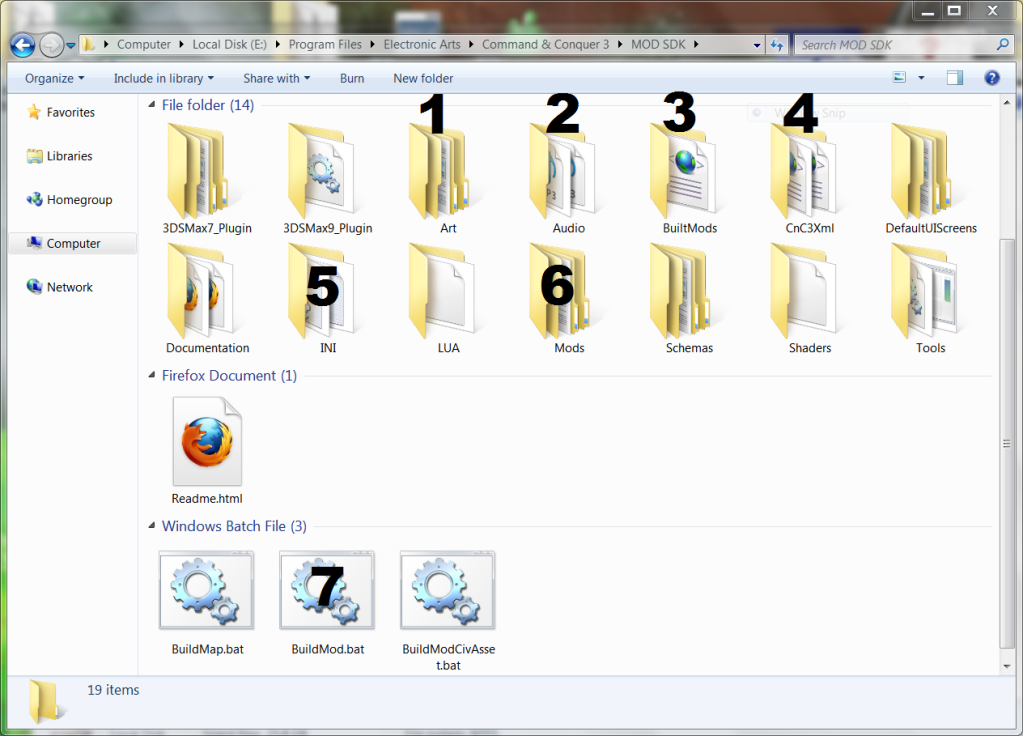
- * In the Folders 1, 2 and 6 must save all files that were part of our MOD.
- * In the folders 4 and 5 is a copy of all files in "code" and "configuration" of each unit and each aspect of the game to use as the basis for our modifications.
- * The file number 7 will be the command you use to "compile" all files that were part of our MOD and finally into the folder 3 is where you keep our MOD once compiled.
Now explain these folders one by one.
1- Art: This is the default folder to save the "Art" graphic and 3d, of the game. For example terrain textures , 3d models textures, etc. The way they should be ordered this "art" is a bit complex. Not required to keep the art in this folder so I would not recommend it. Later I will explain in detail this issue.
2- Audio: Inside this folder should be all files of sound, voices, music, atmosphere and special effects that we insert in our MOD.
3- BuiltMods: Inside this folder will store all of our MOD encrypted files after compiling. It should be noted that the "compiler" also automatically creates a copy of the file .BIG ready to use within the folder: /My Documents\Command & Conquer 3 Tiberium Wars\mods\YourModName
4- CnC3Xml: In this folder is an exact copy of all files ."XML" will use to configure, connect and give life to every aspect of the game. Each party, each faction, each unit has a file ". XML", which specifies all features and configurations. Since routes location of your images, sounds and textures, to the times and construction costs in the case of a unit. Or infantry types can create certain race or faction in the game.All this can be changed by changing the parameters of the files ".XML".
5- INI: This folder contains an exact copy of the files ".Ini". Most of these files contains basic information such as credit menu text, the conditions of victory in a skirmish, camera configuration,etc. You may not use most of these files as a template but that depends on the type of modification that you create.
6- Mods: This folder is one of the most important. Within it we must create a new folder with the name you want for each of our projects, and inside the folder of your project must create a new folder called "DATA". For example, if our project is called "MYMOD, the exact path would be as follows: "X":\Program Files\Electronic Arts\Command & Conquer 3\MOD SDK\Mods\MYMOD\data
Inside the folder "Mods\Yourmodname\data" will all the modified files: ".xml", ".str", models ".W3X", images and textures. Except for the sounds that belong in the "Audio" folder.
At the same time we put all the files in this folder should be identified within a file ".Xml" main called "Mod.xml". As if it were a list of all files that make up the MOD.
 : The modification of videos is different, explain in more advanced tutorials.
7- BuildMod.bat: Main tool needed for the compilation of our MOD. Once placed all the files in place, this command will be responsible for compiling and encrypt your file .BIG ready for use and share with the world.
NOTE:
If you use "Bibber Mod SDK Expansion", the path of these folders can be changed. Please read " C&C mod sdk faq " for more details:
Once practice their first modification , and successfully pass, you will realize that all this theory it is much easier to make, they explain in words . So I invite you to see below the following Videotutorial created especially to discharge any initial concerns that arise when starting a new learning.
In short, to end this initial manual, we will link the Videotutoriales, with two examples of the steps outlined to follow in making certain modification...
- Example 1: We edit the time and cost of construction of the particular unit: We seek your file ".xml" inside the folder "CnC3Xml", Copy it into our mod folder Example...\MOD SDK\Mods\MYMOD\data , edit it, put it inside Mod.xml archive and finally compile with BuildMod.bat or preferred method of compiling... See the VideoTutorial.
- Example 2: We want to replace the 3d model of a particular units: Copy all the models and textures in a folder of our mod Example ...\MOD SDK\Mods\MYMOD\data\My3DModel... We look for the file ".Xml", on the unit we want to replace, in the folder "CnC3Xml, copy it into our mod folder, edit it by inserting into our model, edit the file Mod.xml and finally compile with BuildMod.bat or the compilation method preferred.. VideoTutorial in Progress...


It's hard to understand because of the bad grammar :/
I'm really sorry :)
Found easy to understand and very informative thanks x3n