Stormrage256
Rohit joined
Gamer, Game Designer, likes Sci-Fi, Astronomy, Classic Rock Music
My Blogs
For the past few days, I've been working on the landscape for Helm's Deep. I just came across a few bugs in landscape in relation to the foliage editor and I started hitting up the forums for some possible solutions. And I found this youtube tutorial playlist among one of the posts. It doesn't contain anything related to the issues with my landscape, but nevertheless contains a detailed description on how to set up your landscape and corresponding materials in UDK. So after watching through most of the videos in the playlist, I just decided to make a post on a collection of good UDK landscape tutorials over here. Also I will add some details regarding the material that's covered in those tutorials. This will make it easier to find the tutorials that you're actually looking for. Any other good tutorial I come across in the future will be added here. But first, here's a video that demonstrates the awesome powers of UDK's landscape. :D
So without further delay, I'll post the first link:
1) UDK Learning Landscapes Part 2 >> Youtube.com
- This is basically a playlist of 25 videos, made by the youtube user 'Unreal Learning University'. He starts off with a few videos on how to import height maps and weight maps into UDK from TerreSculptor. Details regarding how to set up non-repeating textures for the different landscape layers are explained as well. The playlist mainly deals with detailed tutorials on how to set up a complex material (yet, easy to understand for anyone with a basic knowledge of UDK's material editor) for texturing the landscape. [Note: This is not a tutorial series for teaching how to paint the height map and texture layers inside UDK. All those details are taken care of with the TerreSculptor import itself.]
2) UDK Landscape texture painting and Materials
- It's from the same user 'Unreal learning University'. The first half of this tutorial teaches the basics of how to set up a height map within the material itself. This way, we can quickly paint materials onto a landscape using World Normals. The second half of this tutorial deals with the topic of hand painting materials onto the landscape.
[Note: This tutorial does not cover the parts related to setting up the layers in Landscape edit mode. So you might want to check on that before hitting up the landscape painting]
So that's about it for now. I'll update the blog post, when I come across new good tutorials about UDK's Landscape.
[Note: This is a post from my blog: Unrealpossibilities.blogspot.in]
About a few days back, I decided to try out Skyrim's Creation Kit during my free time. I had bought Skyrim during last year's Steam Winter Sales. Back then, I played it for a while, but never got to finish the game. I think I hit up the Creation Kit a couple of times, but didn't go ahead since I knew nothing about it. And it looked vastly different from UDK. So this time, I checked out a few tutorials in youtube before diving into Creation Kit. For starters, I checked out the tutorial series by BestinSlot. It covered the basics required for making your own mod with custom quests, dungeons, etc. And he does a good job of explaining how to start working with the Creation Kit. You can find the playlist over here:
I did not go through all of those tutorials. Just the areas that I wanted to focus on for now. And then I started looking for tutorials on how to export my Blender models into Skyrim. Surprisingly, in spite of having such a huge modding community, I was disappointed to notice that there weren't any useful tutorials in youtube for what I was searching for. Sure there were a handful of them, detailing bits and pieces of the process. I had seen this issue when I first worked with UDK. Doing something based on a video, only to realize that there was some other video explaining some other part of the workflow. I didn't wanna go through the same shit again. And the import/export thing was starting to look like a more difficult process this time around with the Creation Kit. I got a few links from some of my friends, but almost all of those tutorials covered only certain parts of the process. So I started checking out other websites for tutorials on how to use Blender models in Skyrim. I soon came to realize that, it was a more time consuming process compared to the Blender UDK workflow. And yet again, I failed to find all the necessary details in one single place. So I decided to make one myself. I'm not going to explain all the steps in detail over here. This is just a collection of useful resources that people can use to get their models in Skyrim. However, I will give a small description about the links that I have posted over here.
First of all I'll provide the links to all the softwares that you need to download. For some of them, details about how and where to install them are given below. I'm using Windows 7 64-bit version, but you can find 32-bit versions of the softwares in the same links. So depending on your version, feel free to download the appropriate installer of these softwares.
1) Blender v2.49b 32-bit >> Niftools.sourceforge.net [Note: If you're a Blender 2.6,2.7 user, no need to fret. There is a workaround listed below. Just download the 32 bit version of 2.49b first]
2) Python v2.6.6 >> Niftools.sourceforge.net
3) PyFFI v2.1.11 >> Niftools.sourceforge.net
4) Blender Nif Scripts v2.5.9 >> Sourceforge.net
5) NifSkope v1.1.3 >> Sourceforge.net
6) NifUtilsSuite v1.2.2 >> Niftools.sourceforge.net
7) 7-zip Archiver >> 7-zip.org
8) GIMP (or Photoshop) >> Gimp.org
9) BSAopt >> Nexusmods.com
10) DDS file support plug-in for GIMP >> Code.google.com
For BSAopt and DDS plug-in for GIMP, I've given links below on how to install them. As for the rest of the softwares, just install all of them. They're pretty straight forward.
For importing your Blender models into Skyrim, first you need an existing Skyrim mesh to act as the template for copying it's settings to your mesh. This is where BSAopt comes in. It can be used to unpack the .bsa game files into nif files that we can use for our modding purposes. Instructions can be found here:
Wiki.tesnexus.com
Creation Kit recognizes only the .dds file format for it's textures. So your .png file is not going to cut it. If you're using GIMP, you can download the plug-in from the 10th link given above. For setting up the plug-in for GIMP, you can check out this video:
Once that's done you need to convert the textures for your model into .dds format. Youtube user Vornez has covered that part in this tutorial: (6:00 to 9:00)
Youtube.com
Also, if you're like me, and would like to use Blender 2.6/2.7 versions, this link is for you:
Forums.nexusmods.com
However, note that you do need a 2.49 version at least for exporting the models in nif format. For the rest of the modeling process, you can use your own version. I run a 64-bit 2.7 version for my modeling purposes and 2.49b only for exporting it.
After all the installations are done, first create a model in Blender. And then you can hit up this link:
Tesalliance.org
[Note: He uses two softwares called Nifconvert and ChunkMerge. There's no need to download them. It's already part of your NifUtilsSuite that you installed earlier]He explains it really well. It consists of the workflow from Blender to NIfskope only. You can see the rest in the next link.
Once you set up your model in Nifskope properly, you can easily import your model into Skyrim. First save your nif file. Details on how to use it in the Creation Kit can be found here:
[Note: Go directly to part 6: Exporting mesh to Creation Kit]
Creationkit.com
Other links which might be useful:
1) Darkcreations.org
2) Darkcreations.org
3) If you're having trouble with your textures not getting displayed in NifSkope, in spite of having it in the Skyrim textures folder in .dds format, post#7 in this link might be worth checking out:
Forums.nexusmods.com
So there it is. All the resources that helped me get my first model into Skyrim. I hope this would be helpful to others who are new to Creation Kit. And here's a picture of my Skyrim character standing proudly next to my first in-game model. :D
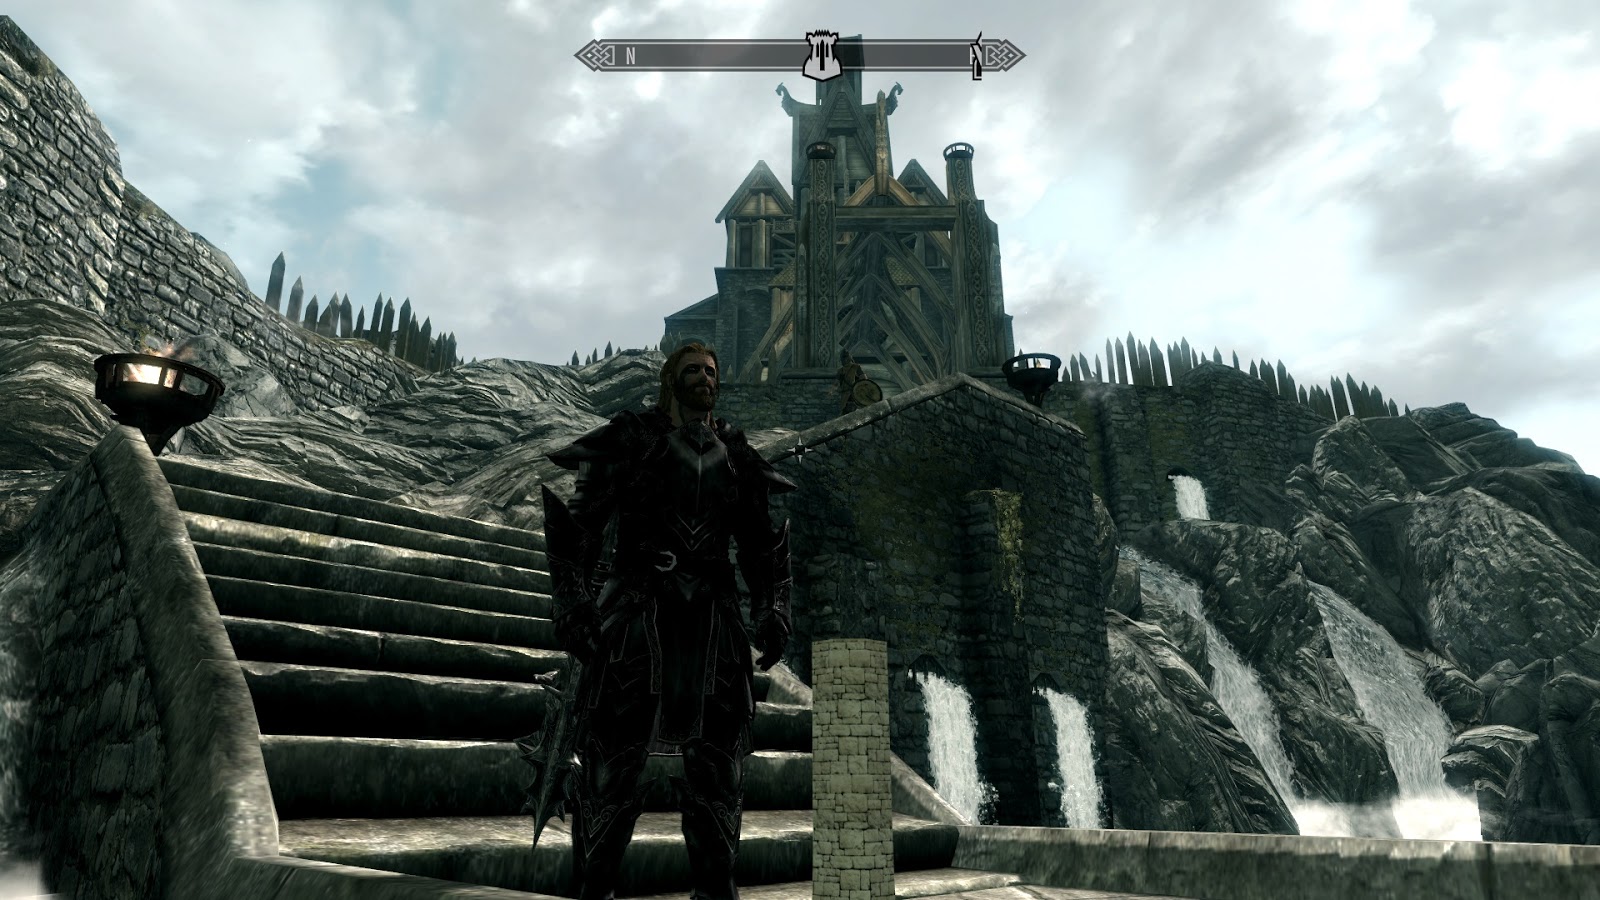
A miniature version of my tower mesh from Helm's Deep
[Note: This is an archived post from my blog: Unrealpossibilities.blogspot.in written at an earlier stage of my project on the recreation of Helm's Deep in UDK]
Alright, welcome back to the blog. I've been posting quite frequently over the last few days because I just wanted to document what I did somewhere. Better to have it in Google's servers than my already getting worn out notebook. So I thought I might as well write it over here. Plus if the blog picks up more traction in the future, it might help prevent others from making the same mistakes that I did. So anyways getting back to the topic at hand, over the last couple of posts, I had managed to make all the textures necessary for making my basic material in UDK. Of course there is the option of baking normal maps of my static meshes (3D models), but I'm still considering whether to go that route or to improvise along some other direction. Of the four textures that I made, I will be using only my diffuse and normal map in UDK's material editor. I've already given the reasons for this in my previous post, so feel free to check it out. In UDK, you don't directly apply textures onto your models. You create a material first by combining your textures in the material editor. The material editor is basically a network of nodes. A texture is just a single image file, whereas a material not only helps to control the color of the surfaces, but also how each surface interacts with light. For starters, a very basic material would look like this in the material editor:
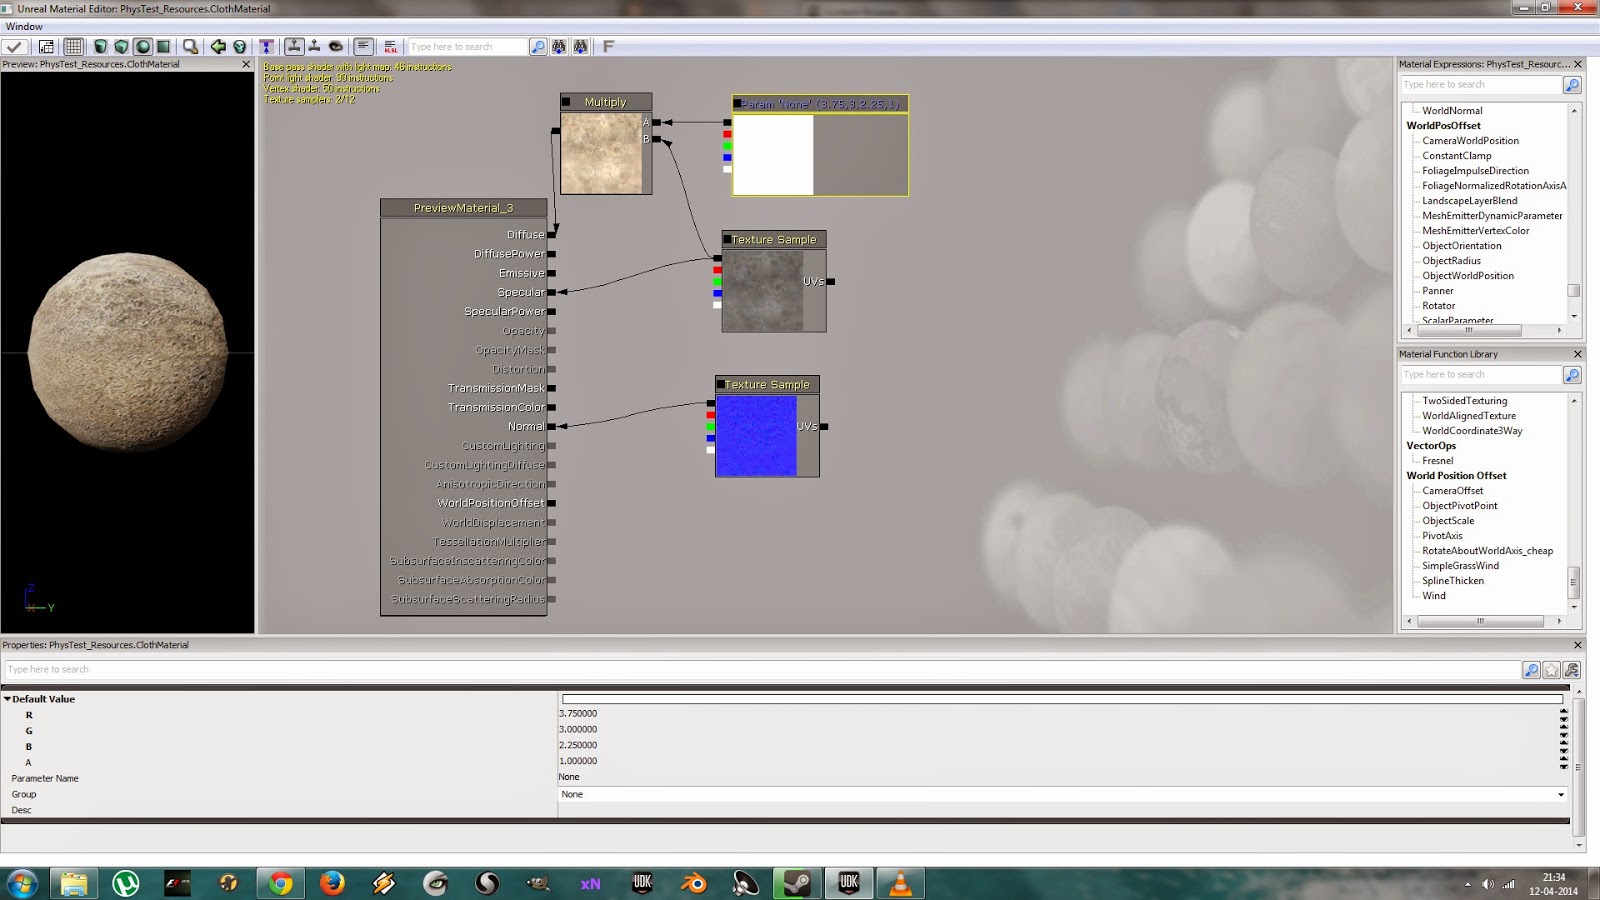
It can get a lot more complex as you start adding more nodes to control how your material behaves under various conditions. After importing my textures into the UDK, I created a material using my diffuse and normal maps. Ideally there should be a separate specular map as well. But since my meshes are mainly stone surfaces which are far less reflective that metals, I'm not gonna use a separate texture to control it's reflectivity. Rather I'm gonna use the red channel of my diffuse for my specular. This will also help a lot in reducing the memory usage. So removing an average of 1 MB of specular texture per mesh, I would be saving a decent amount of memory when you take the big picture. After messing around a bit in the editor, this is the material I made for testing it out.
Now that a basic material has been created, the next thing to do would be to test it out on the static meshes. And that I did. I haven't changed the UV layout of my meshes to match my new texture, so this is just a sample screenshot to see the new material in action. As a result, you may notice some stretching of textures here and there and also more than realistic reflections since the specularity is kinda high right now.
Honestly when I started out with this approach, I wasn't sure if it might work. It was just an idea born out of desperation. But after I saw this rough sample, I was happy with what I did. I mean it's not like super-awesome graphics or anything, but it looks a lot better than my previous iterations. I'll post a graphics comparison of this version and my previous iterations in another post. And with that I end this post. Goodbye and have a great weekend. :D
[Note: This is an archived post from my blog: Unrealpossibilities.blogspot.in written at an earlier stage of my project on the recreation of Helm's Deep in UDK]
Well this is a continuation of my last post. By the end of my last post, I had managed to bake a normal map, a height map and an A.O. map. I intend to use that normal map in UDK's material editor. As for the A.O. map, UDK already has it's own ambient occlusion scene going on. So I decided to take my A.O. map and merge it with my original diffuse map in GIMP. Currently I'm using DirectX 9 to render the game, and so that means I do not have access to the Tessellation features in DirectX 11 version. I'm doing this for two reasons. One is that seams in UV mesh tend to tear up the mesh when Tessellation is enabled. The second is the performance drop it would cause for the small increase in the detail of my meshes. A height map will also have to be added thus increasing the memory footprint. I might enable Tessellation later on for Landscape objects and objects like rocks which actually benefit a lot from displacement maps and Tessellation. In that case I could probably hide the area where UV seams occur so that mesh tearing isn't evident to the player. Anyways for my current situation, I decided to merge my height map with my diffuse texture as well. All this can be done pretty easily using GIMP. Below I've shown a detailed description with screenshots of how to set this up in GIMP. So this post is basically like a tutorial for people who are starting out with GIMP and game development. First open up the diffuse texture in GIMP. You'll get a screen like what's shown below. Nothing fancy, just the image that you've opened.
Now similarly open up the Height map as well as the A.O. map in GIMP as well. So basically there'll be three windows: one for diffuse, one for height map and one for A.O. map. What we need to do is to have all this in the same scene. But directly copying it into another will just put the second image on top of the first. So first go to the diffuse map window, in the menu bar, go to Windows menu and click on new ToolBox. So now you can see a basic Toolbox with all the different types of tools you can use in GIMP. Press M to select the Move tool.
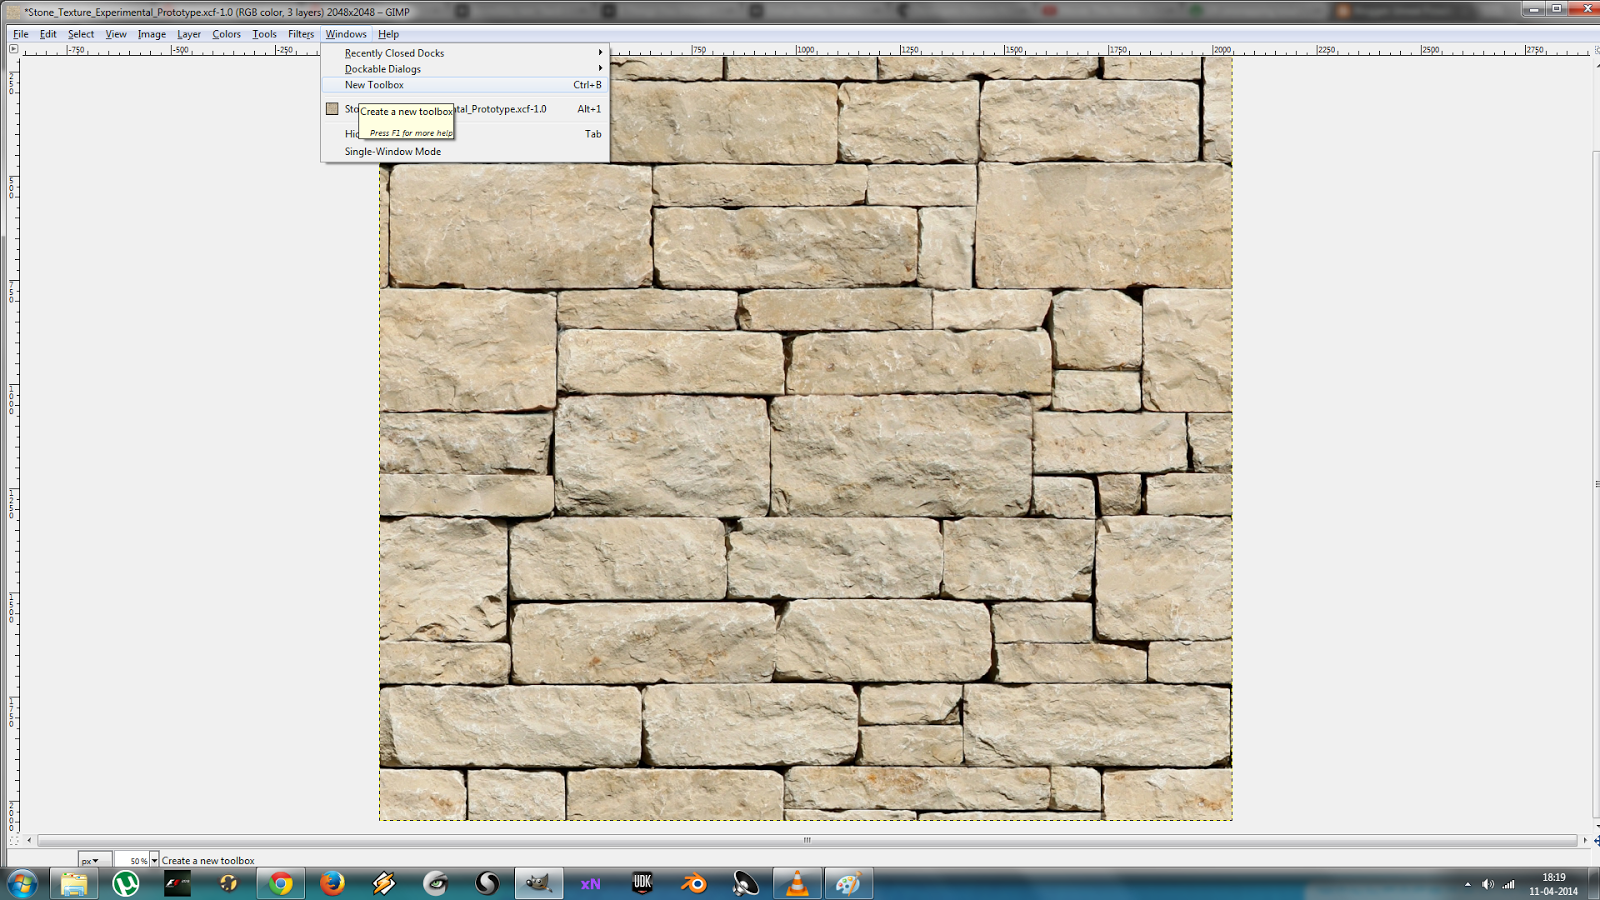
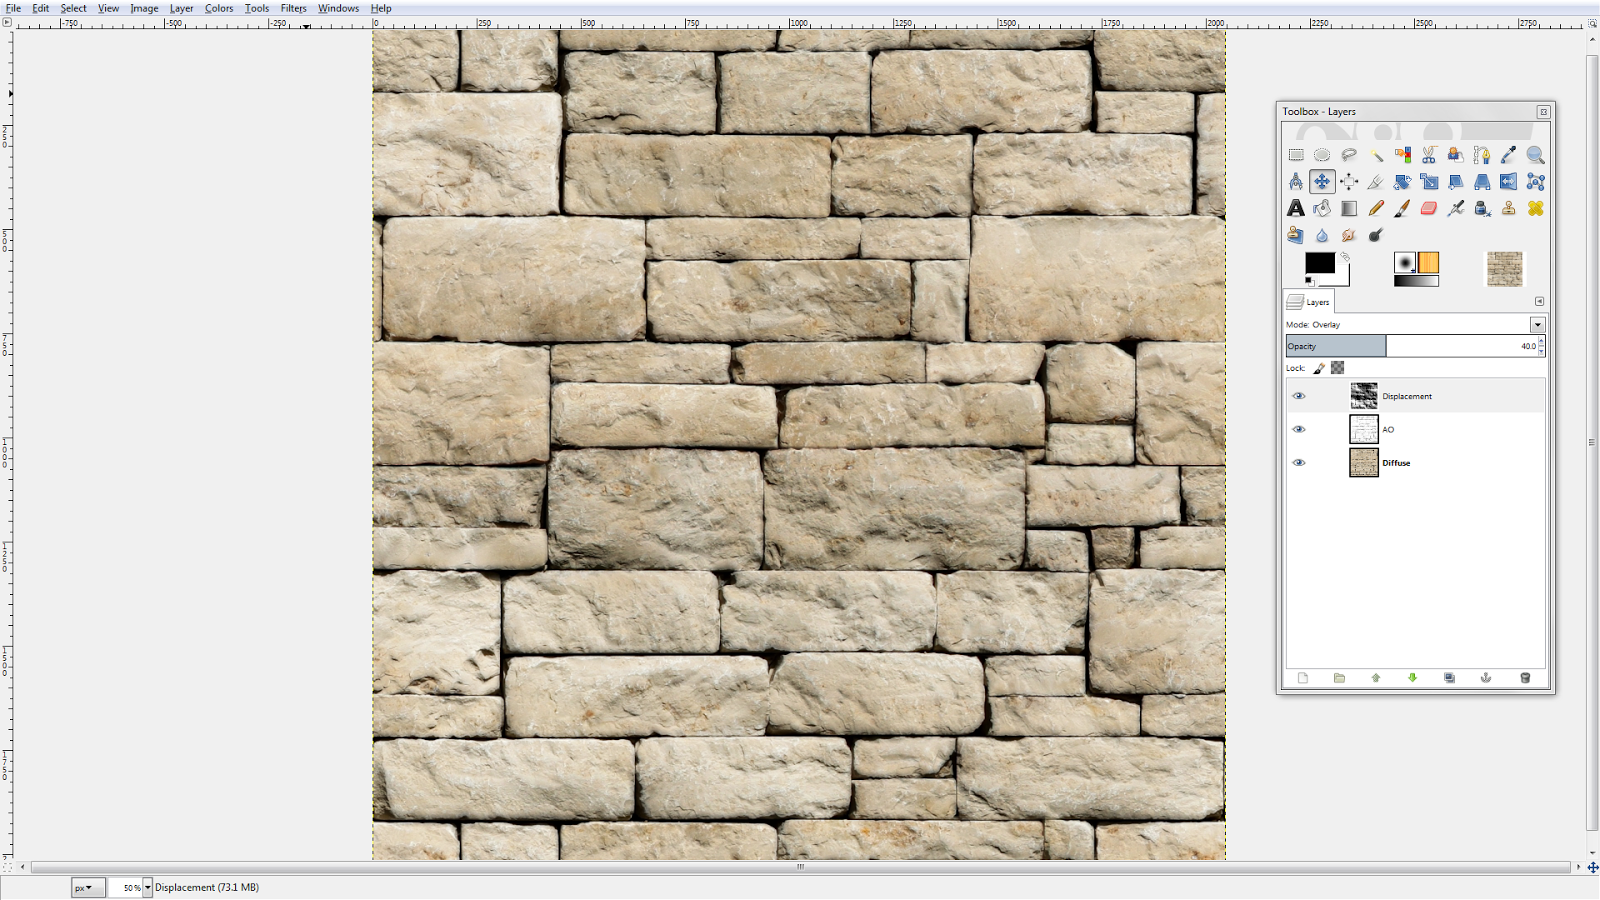
Now we need to add layers. Layers enable different textures to be merged together based on a set of factors like opacity and blend types. This way you can add more textures on top of the diffuse without losing it's detail. For that, a layers toolbar has to be added. This can be done by again going to the Windows menu >> Dockable Dialogues >> Layers. Simple Ctrl + L would suffice, but if you're a beginner like me, it helps to know where to find all the toolbars.
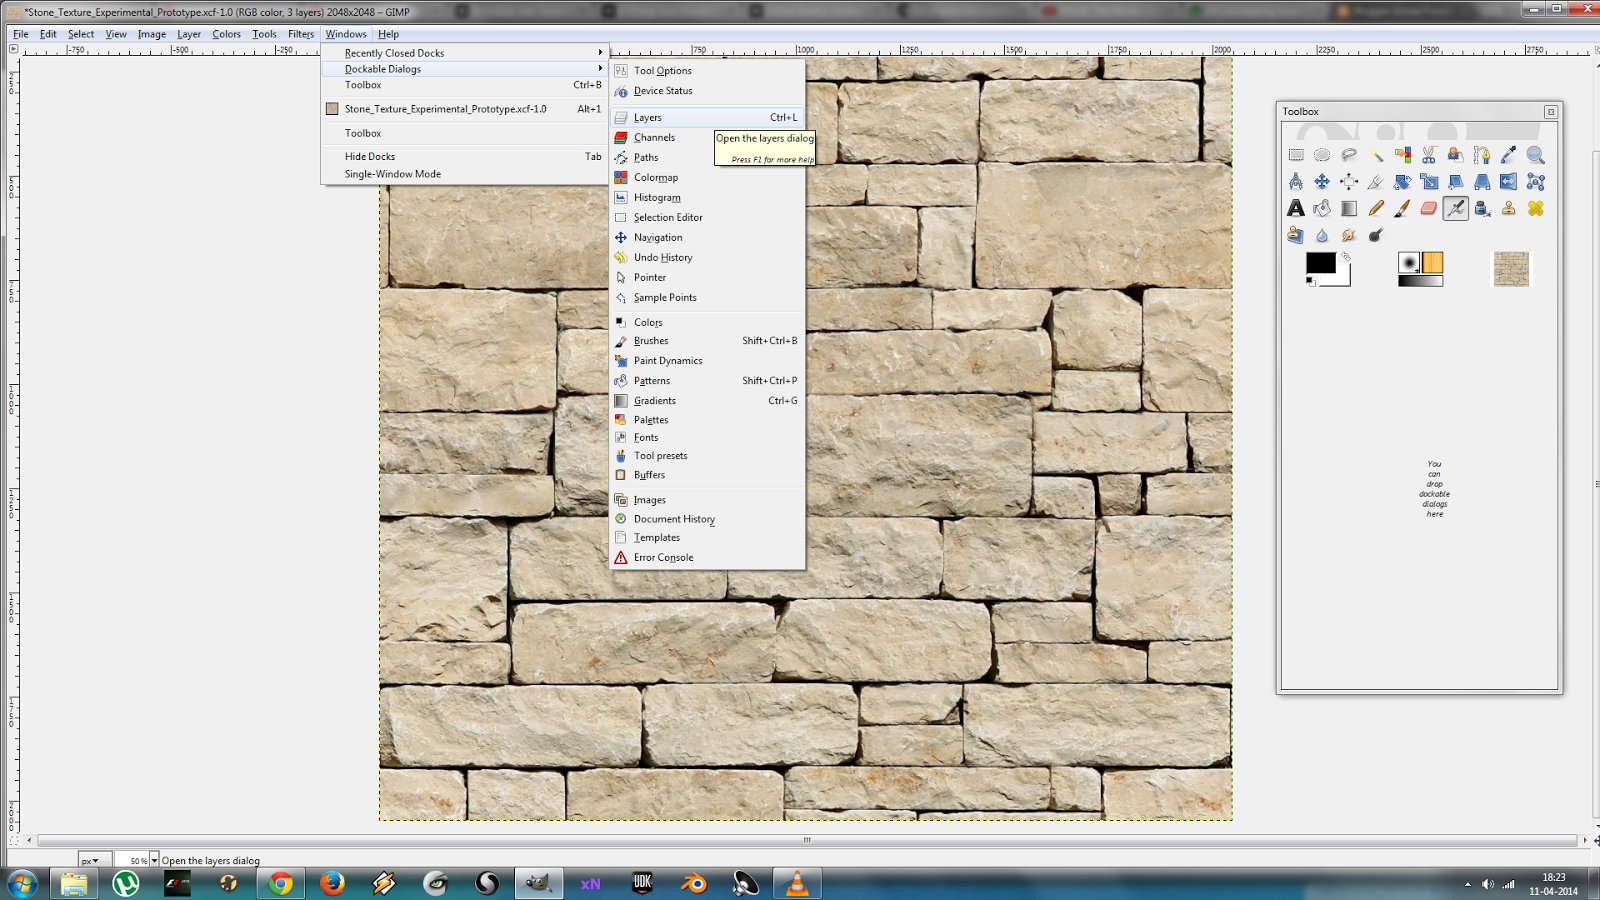
The layers toolbar can be added to the main toolbox in order to keep it clean while working with multiple windows. Just click on the layers tab in the toolbox like you would for a tab in google chrome, then move it into the the main toolbox.
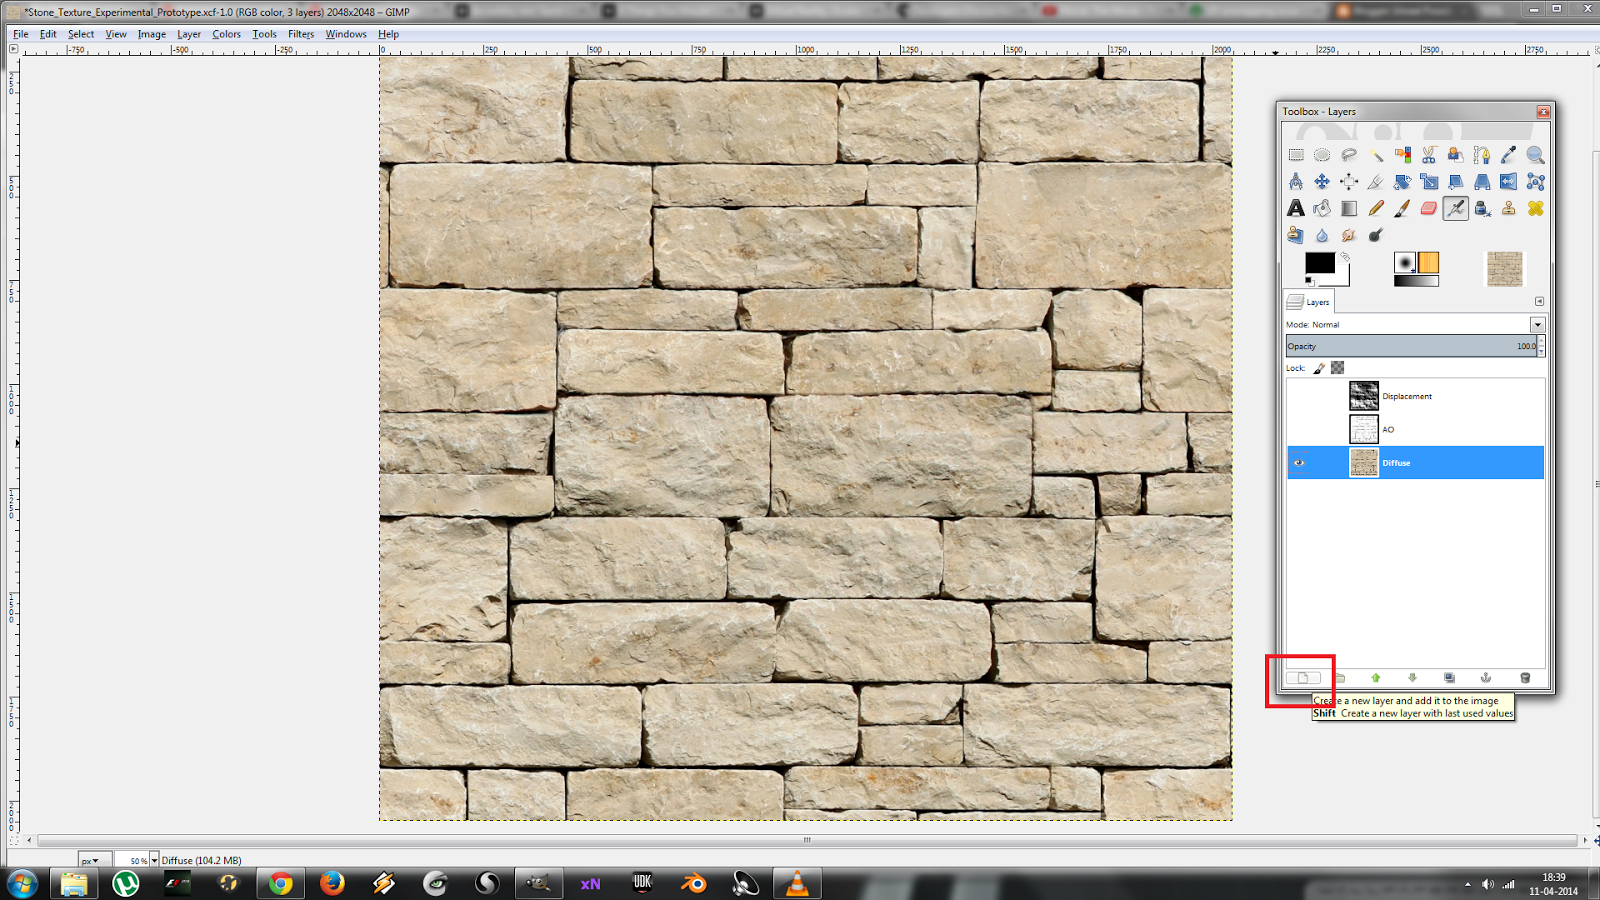
Once that's done, we need to add a new layer so that the other images can be added on top of the diffuse. Currently there'll be one default layer in the toolbox, which you can rename by right clicking on layer and clicking on 'Edit Layer Attributes'. Now onto adding a new layer. Click on the extreme left button at the bottom of the layer toolbar.
A pop-up window will appear. Give some name to the new layer and ensure that the resolution matches the resolution of the original image. Now go to the A.O. map window, press Ctrl + A to select the image and Ctrl + C to copy. Go back to the diffuse window, click on the second layer in the layer toolbar. Then click on the image and Ctrl + V to paste. As soon as you do this, a new floating layer gets added on the layer toolbar as well as a new image on top of the existing image. Now in order to merge these two images, right click on the floating layer in the layers toolbar, and click on Anchor Layer. It gets anchored to the new layer that you just added before.
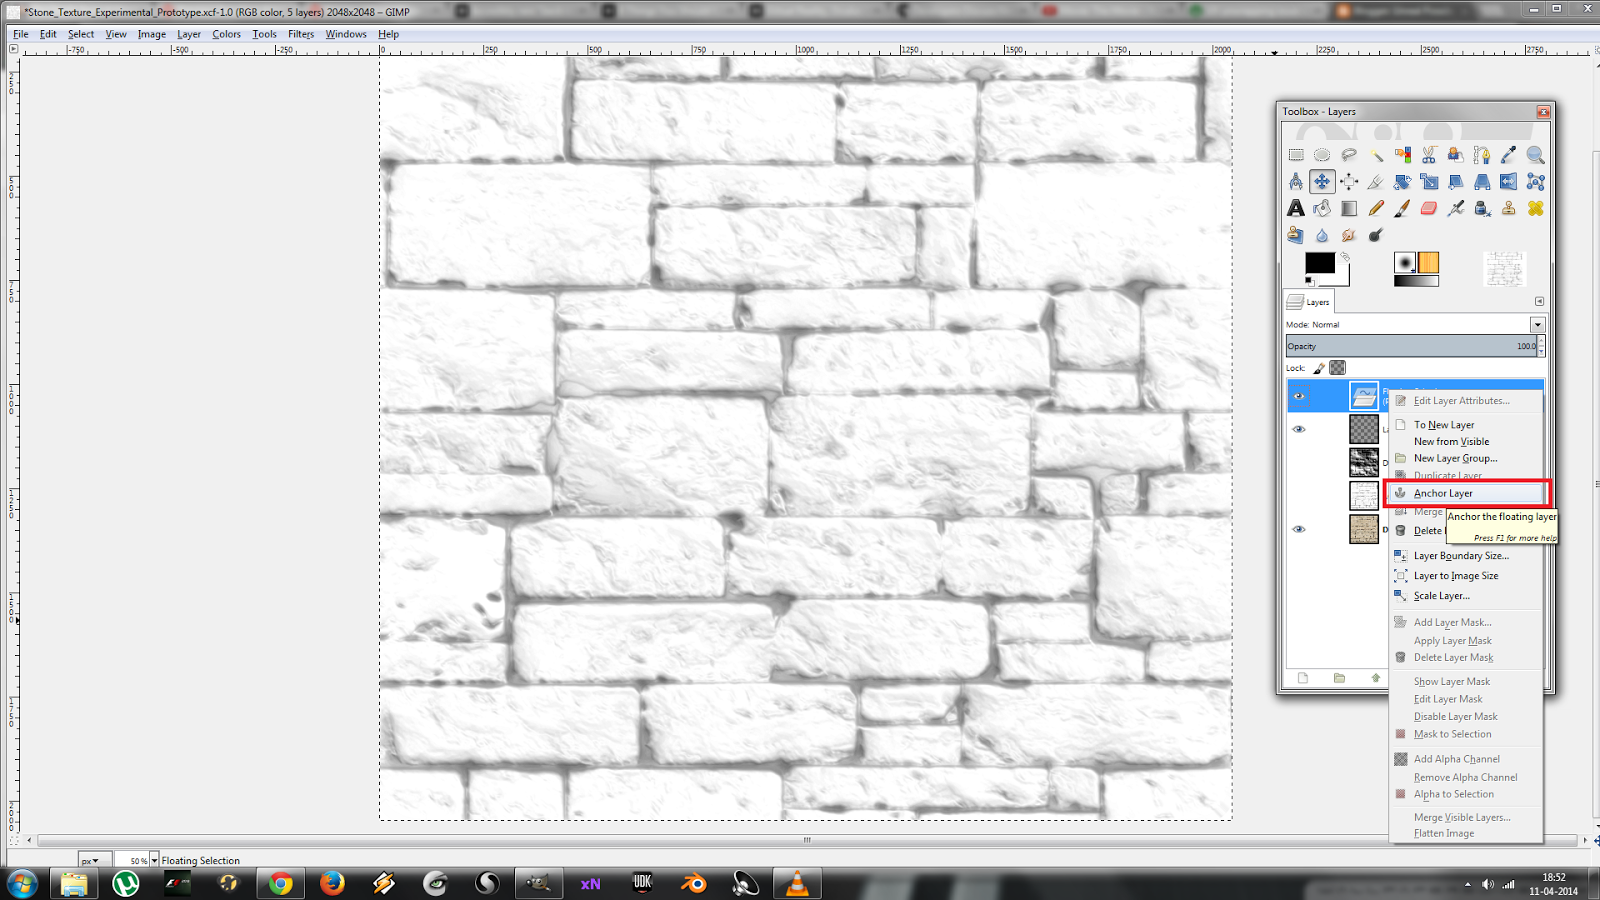
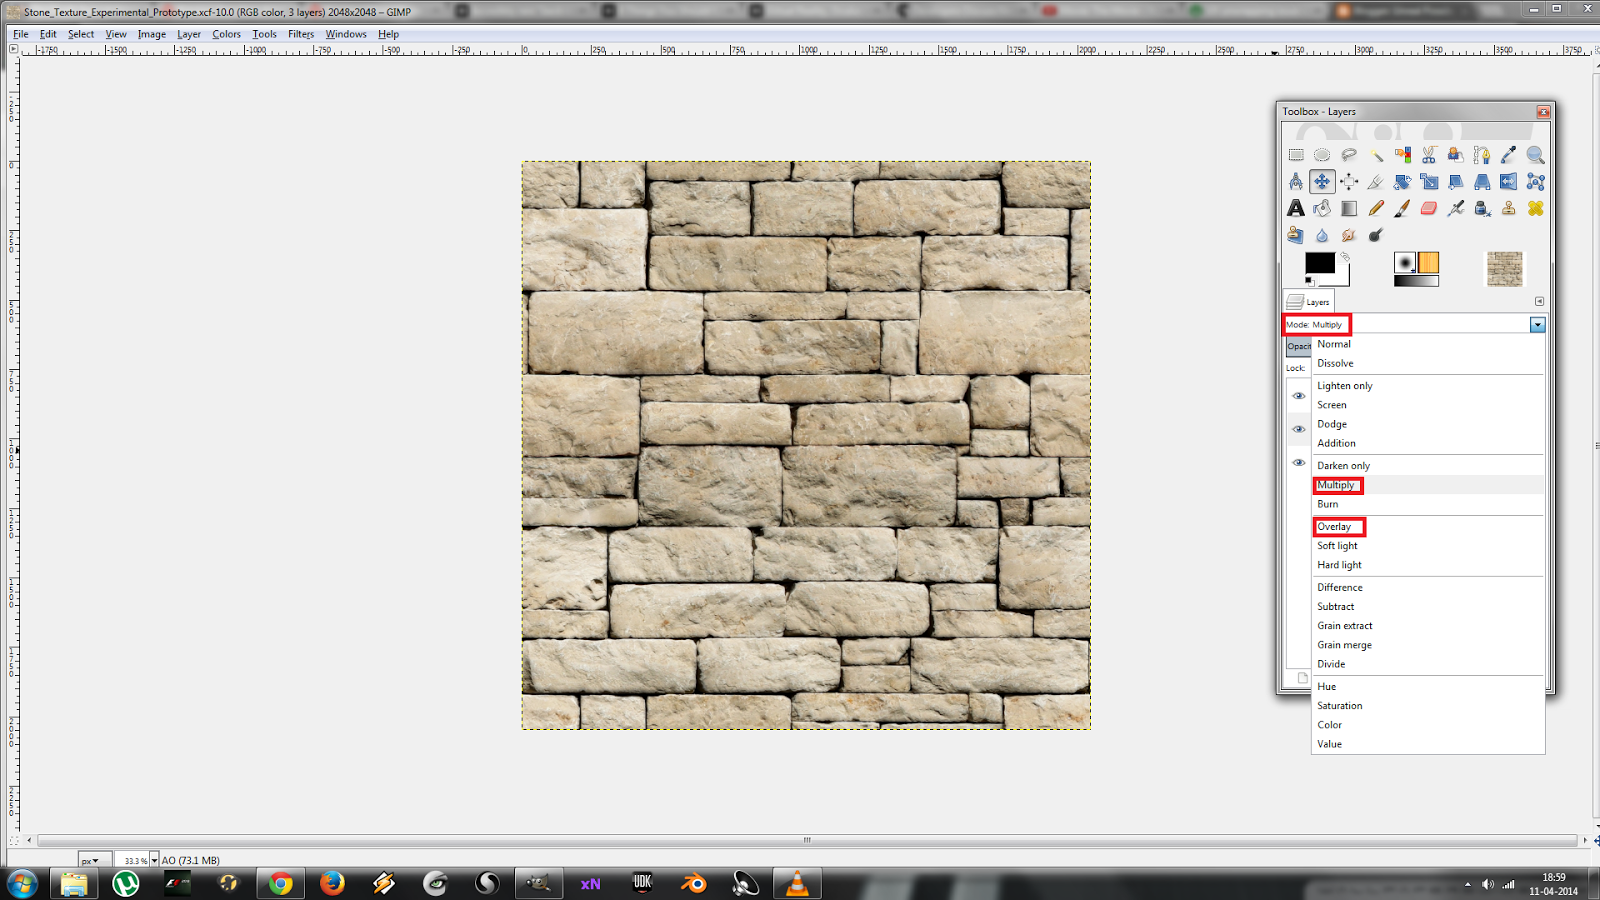
Now as you can notice, the original image is lost behind this current image. This is because the layer mode is set to normal. This can be seen in the mode option under the layers toolbar. Change it to Overlay or Multiply and you have that problem solved. Also try changing the opacity to see what fits your description. In my case, I set the mode to Multiply and an Opacity of 60.00 %.
A pop-up window will appear. Give some name to the new layer and ensure that the resolution matches the resolution of the original image. Now go to the A.O. map window, press Ctrl + A to select the image and Ctrl + C to copy. Go back to the diffuse window, click on the second layer in the layer toolbar. Then click on the image and Ctrl + V to paste. As soon as you do this, a new floating layer gets added on the layer toolbar as well as a new image on top of the existing image. Now in order to merge these two images, right click on the floating layer in the layers toolbar, and click on Anchor Layer. It gets anchored to the new layer that you just added before.
Now as you can notice, the original image is lost behind this current image. This is because the layer mode is set to normal. This can be seen in the mode option under the layers toolbar. Change it to Overlay or Multiply and you have that problem solved. Also try changing the opacity to see what fits your description. In my case, I set the mode to Multiply and an Opacity of 60.00 %.
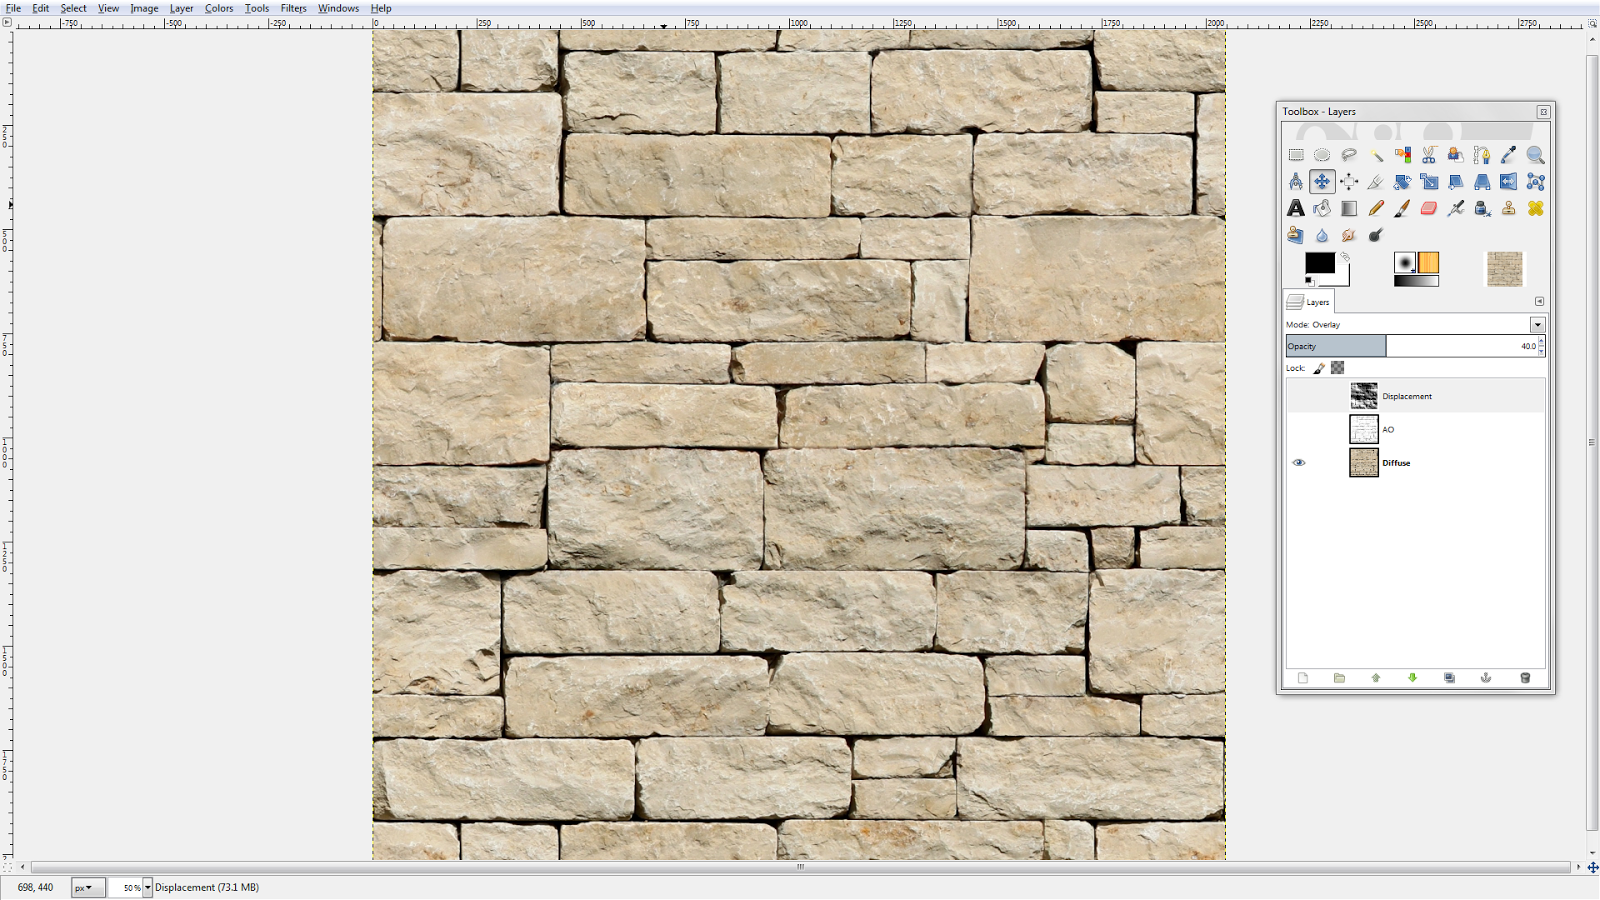
Do the same process for you height map. Try playing around with the different layer modes as well as the opacity settings until you get the desired look. Make sure the original diffuse image doesn't lose too much color, as that is the texture we intend to use in UDK. For height map, I set the layer mode to Overlay and an opacity of 40.00 %.
So basically that's all you have to do inside GIMP. We need the normal map inside UDK, so no point in adding it here anyways. Just to show the difference between the original diffuse texture and the one we get after adding the A.O. and height maps, I will post the images below. You can see that the texture starts to develop more features as the other two are added to it.
Original Diffuse Texture
Diffuse + A.O.
Diffuse + A.O. + Height Map
From the last image, it can be seen that the various features ranging from the small slopes along the bricks to the gaps in-between them are more visible now. After checking in UDK, I then reduced all the images from 2048x2048 to 1024x1024 as it hardly made any difference in-game. But the memory footprint can be reduced by a pretty good amount by doing so. Also you need to make sure that the textures are in power of 2 resolution before importing it into UDK. UDK also doesn't accept all image types, so I use PNG format for all my textures. Now that we have a game-ready texture available, it can be added to the UDK for use in the game. I'll have that in a different post. Lots of images to load in a single page already. So goodbye till then.
[Note: This is an archived post from my blog: Unrealpossibilities.blogspot.in written at an earlier stage of my project on the recreation of Helm's Deep in UDK]

Original Normal Map
As mentioned in my previous post, the development on my game is going through an almost complete overhaul. Everything from textures to models are getting changed or optimized. However the level layout remains pretty much the same for now. Moreover I've taken a liking to the 3rd person view, so I'll most probably end up using that as the default view in the game. I feel that it kind of gives a better sense of the scale of the level. I may add an optional 1st person view later on.
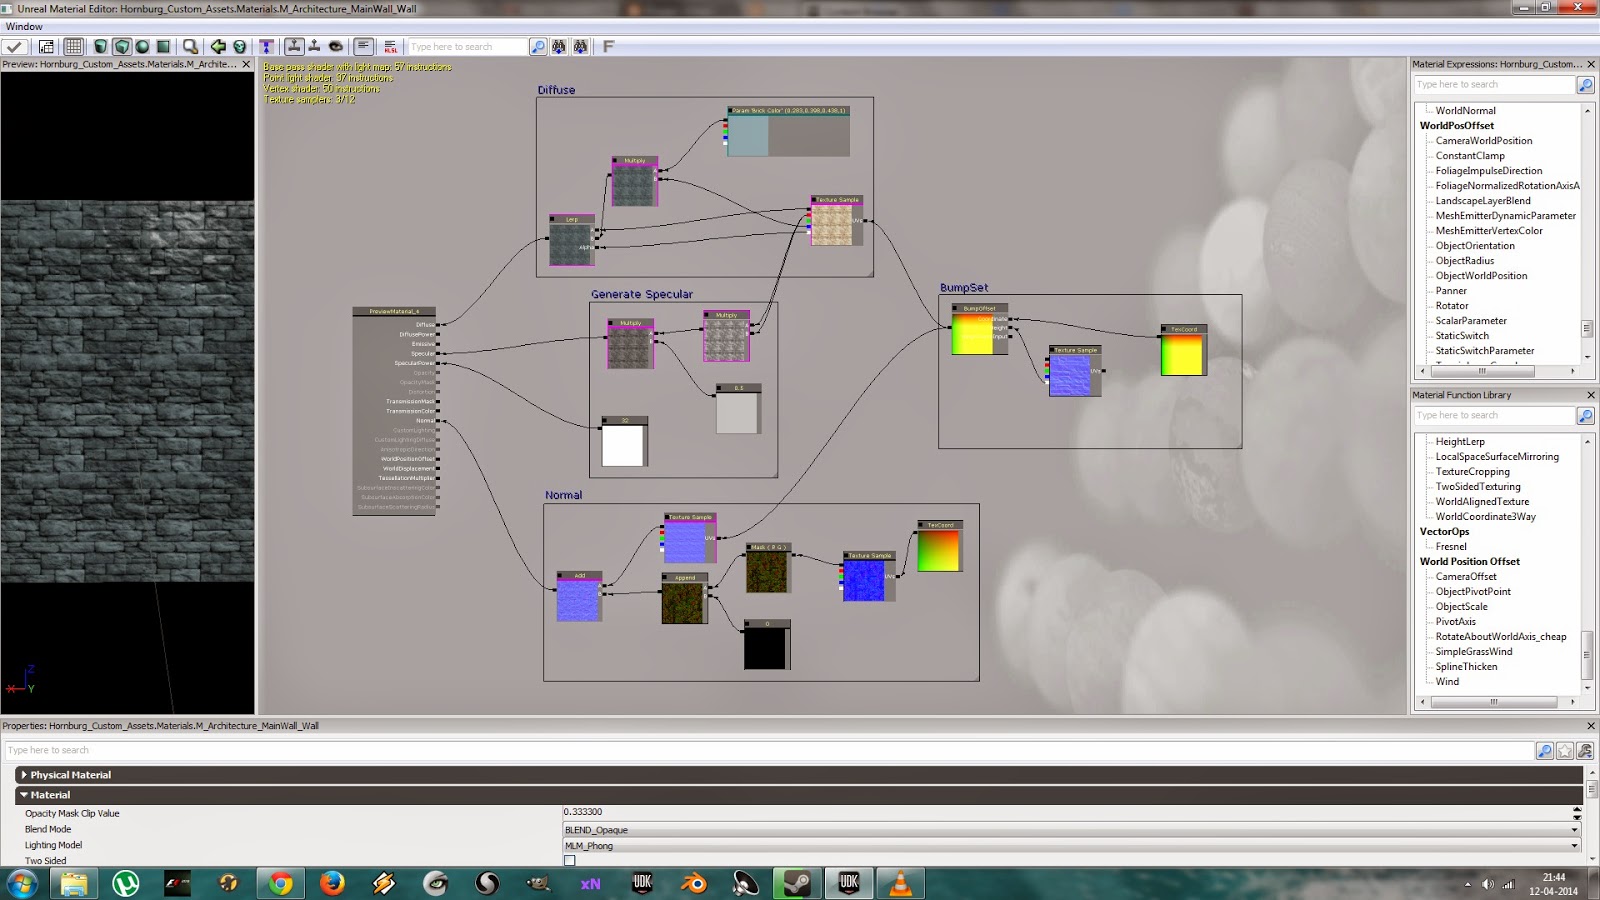
Anyways my initial search for a new texture for the walls from some of the popular free texture sites ended up in vain, as I didn't get anything satisfactory. But somehow after almost a day of searching, I ended up in deviant art. And there I found the perfect texture in the gallery of the user AGF81. It was a seamless texture and had a pretty good variation in the size of bricks. Plus it came in a power of two resolution, which means I didn't have to do any cropping or resizing in order to import it into UDK. Also AGF81 was kind enough to let everyone use his textures for their personal uses. A thousand thanks to him. You can find his page in the link given below. He has lots of good textures in his gallery.
So basically this is the texture that I've selected for the walls. The color doesn't match the one I want, but I've already managed to change it in UDK's Material Editor. So that's not a problem.
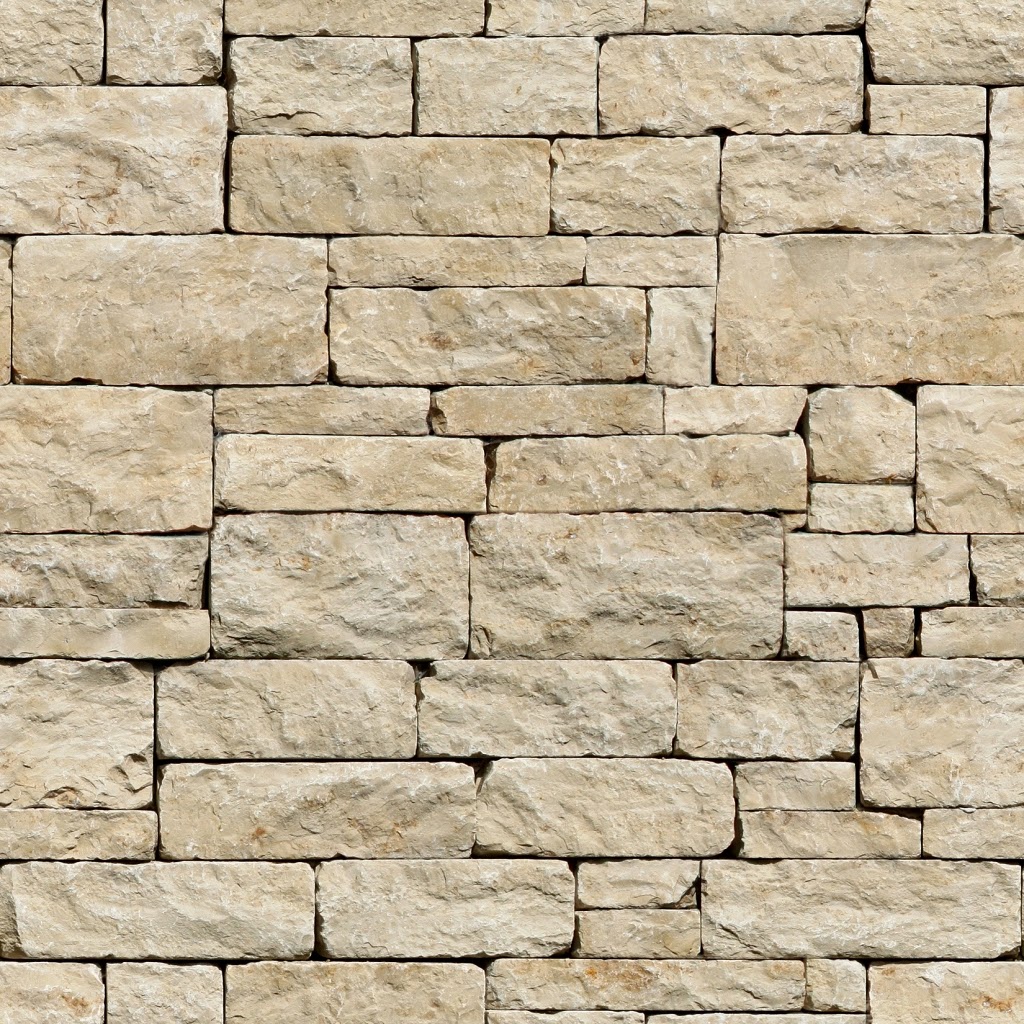
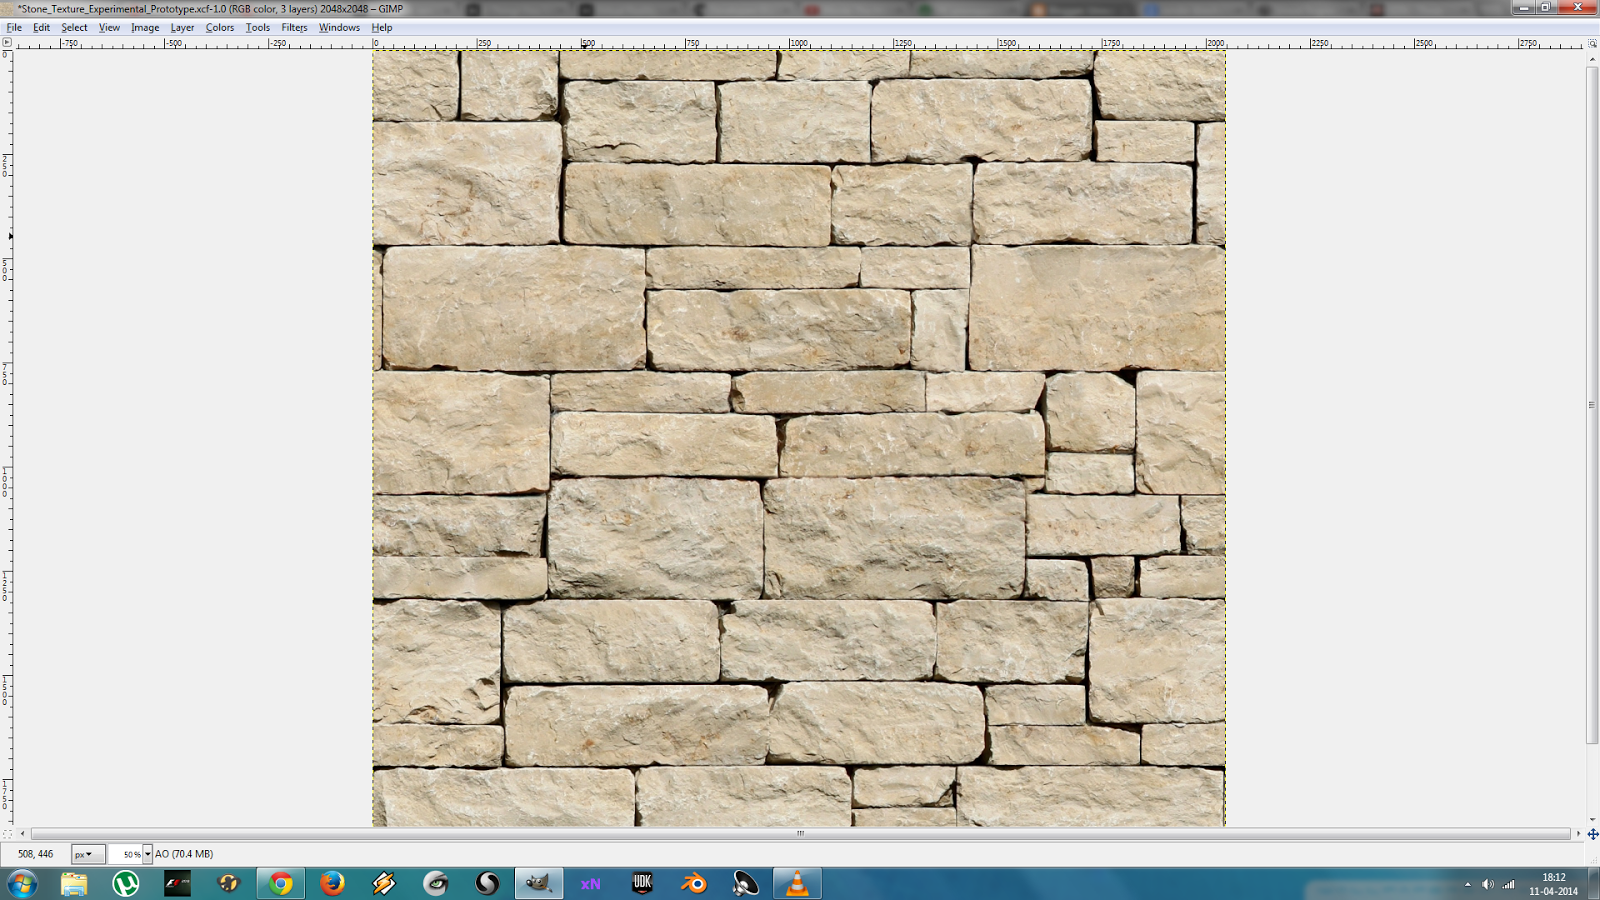
Stone Texture from DeviantArt
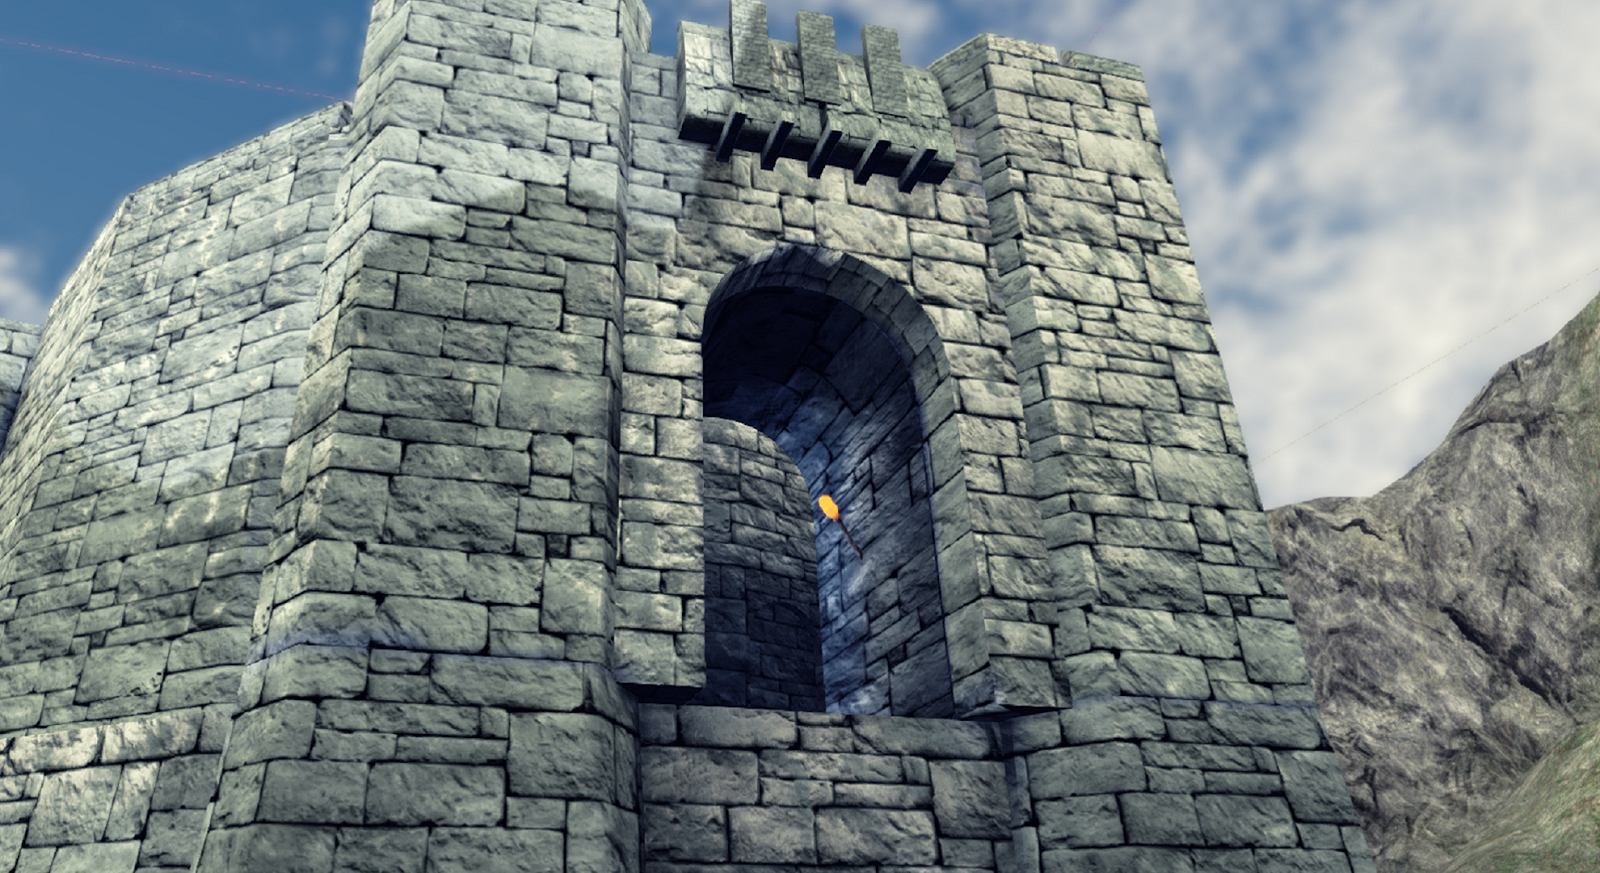
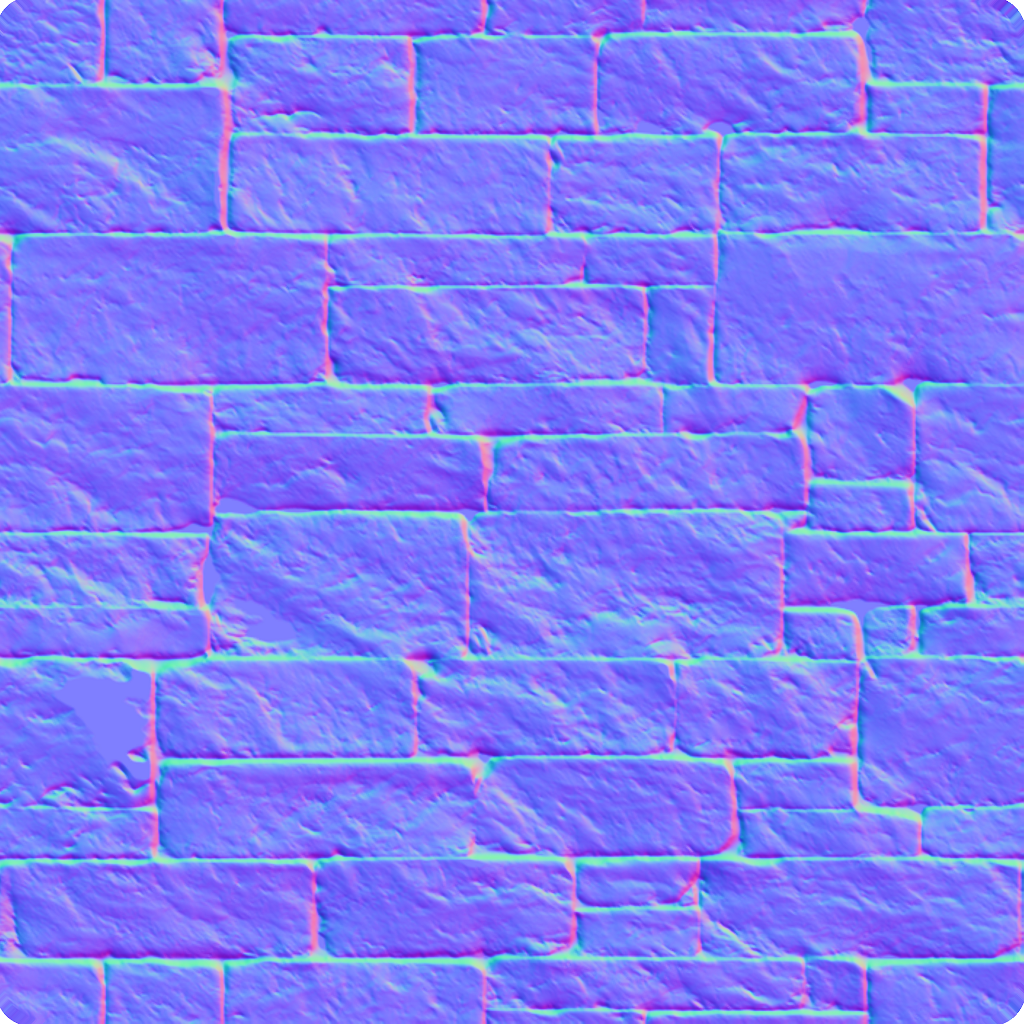
The texture is pretty good by itself, it has some good details that can be extracted into normal and height maps. But as I realized during my previous iterations, when you directly apply it to a static mesh in UDK, it will look like some poster that is stuck on top of some rock rather than actual bricks. I didn't want to make the same mistake again. So I thought about ways to make it more realistic, and then the idea struck me. I could get the normal and height map from it using CrazyBump and rather than directly using it in UDK, I could first use it on a plane mesh in Blender. I could then amplify the details on the plane using the displacement modifier. Of course the mesh had to be a very high-poly in order to get the fine details right. I could then bake the details onto a low-poly version of the mesh using xNormal. Below are the original normal and height maps that I made using CrazyBump.
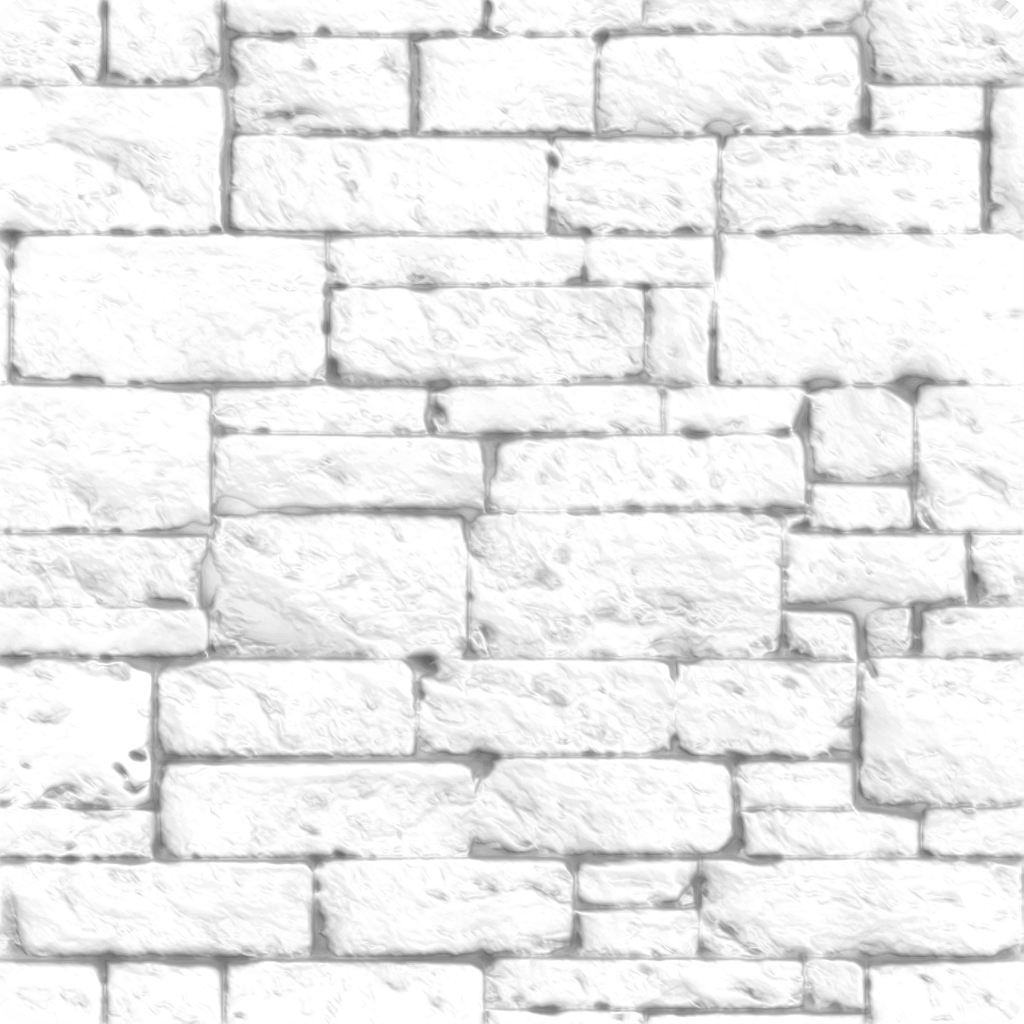
Original Normal Map
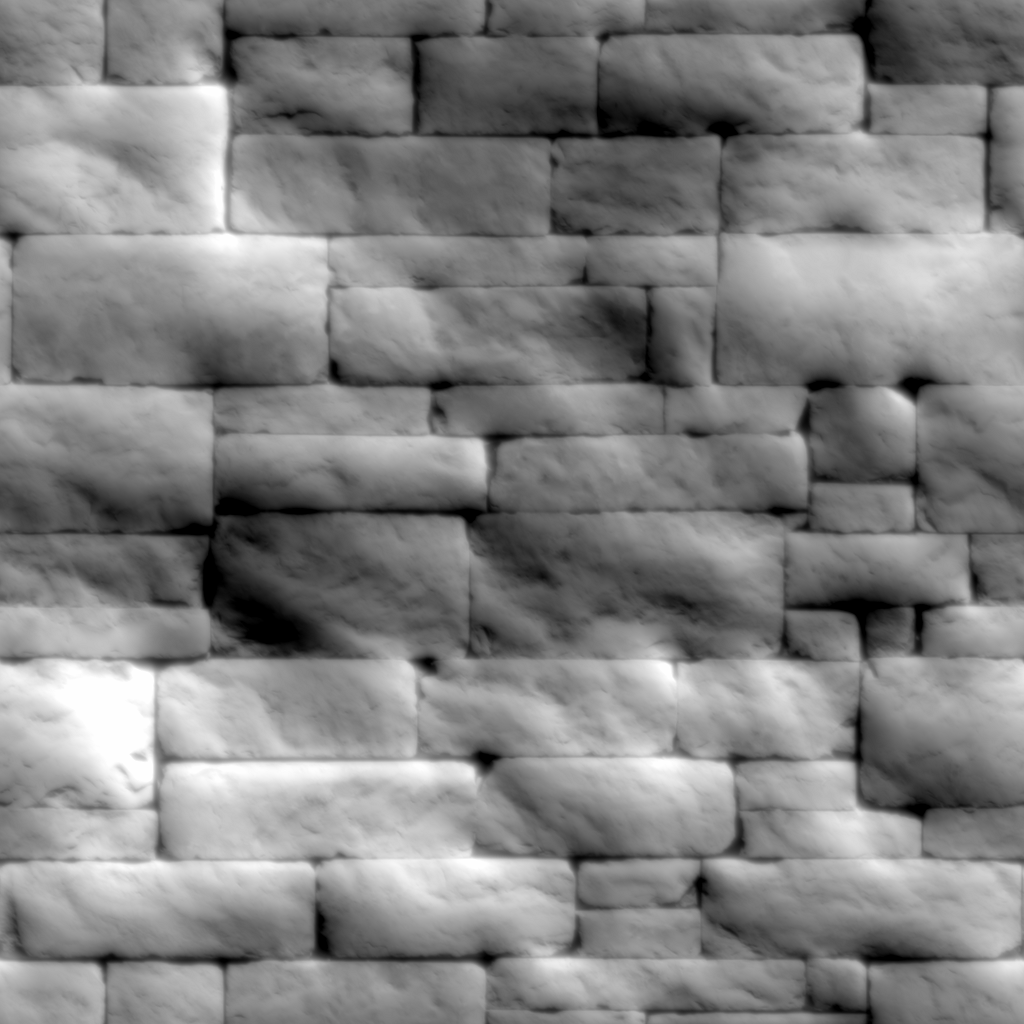
Original Height Map
Using them on the high poly plane mesh in Blender, and then baking the textures into the low poly version using xNormal, I was able to generate my new normal map, height map and ambient occlusion map.
Enhanced Normal Map
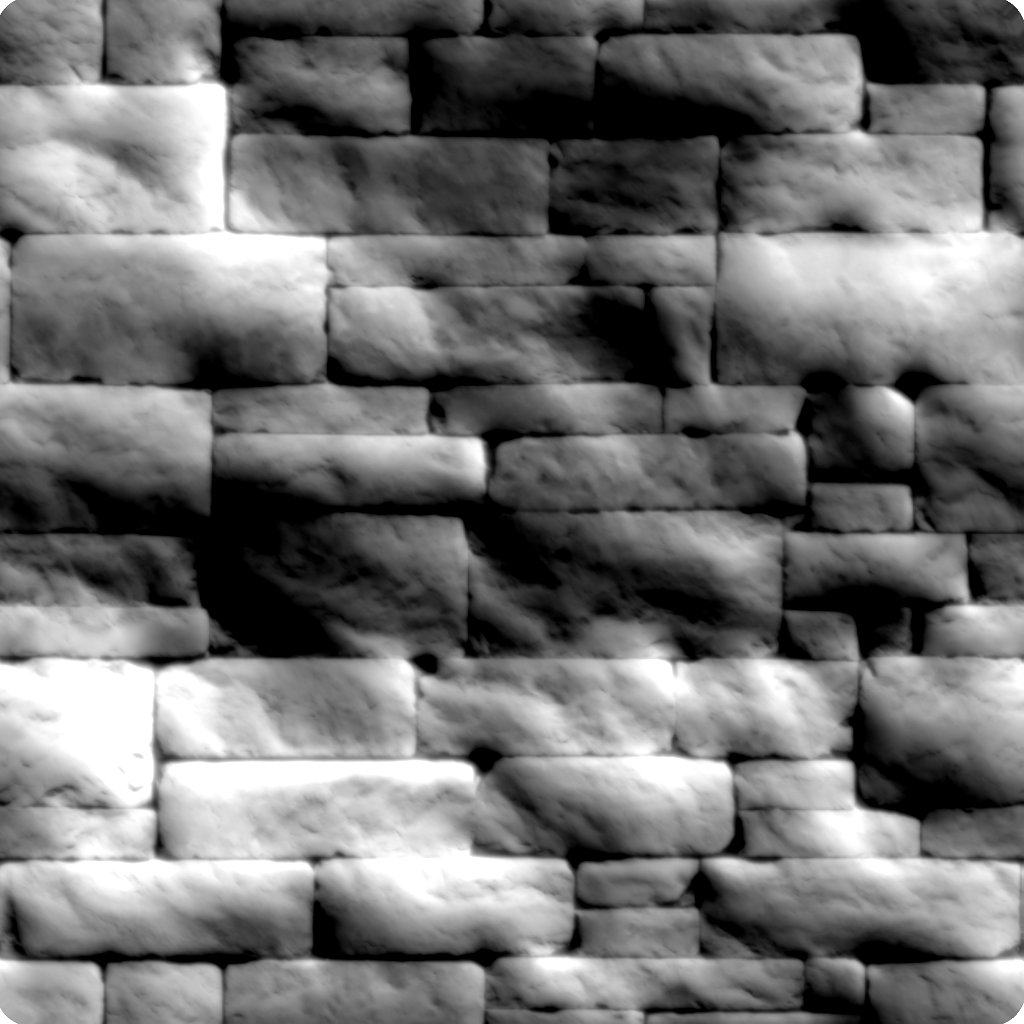
Enhanced Height Map
Enhanced A.O. map
I tested out these new textures on a plane mesh in Blender to see the rendered results before proceeding any further. Both using the default Blender Render as well as the Cycles Render.
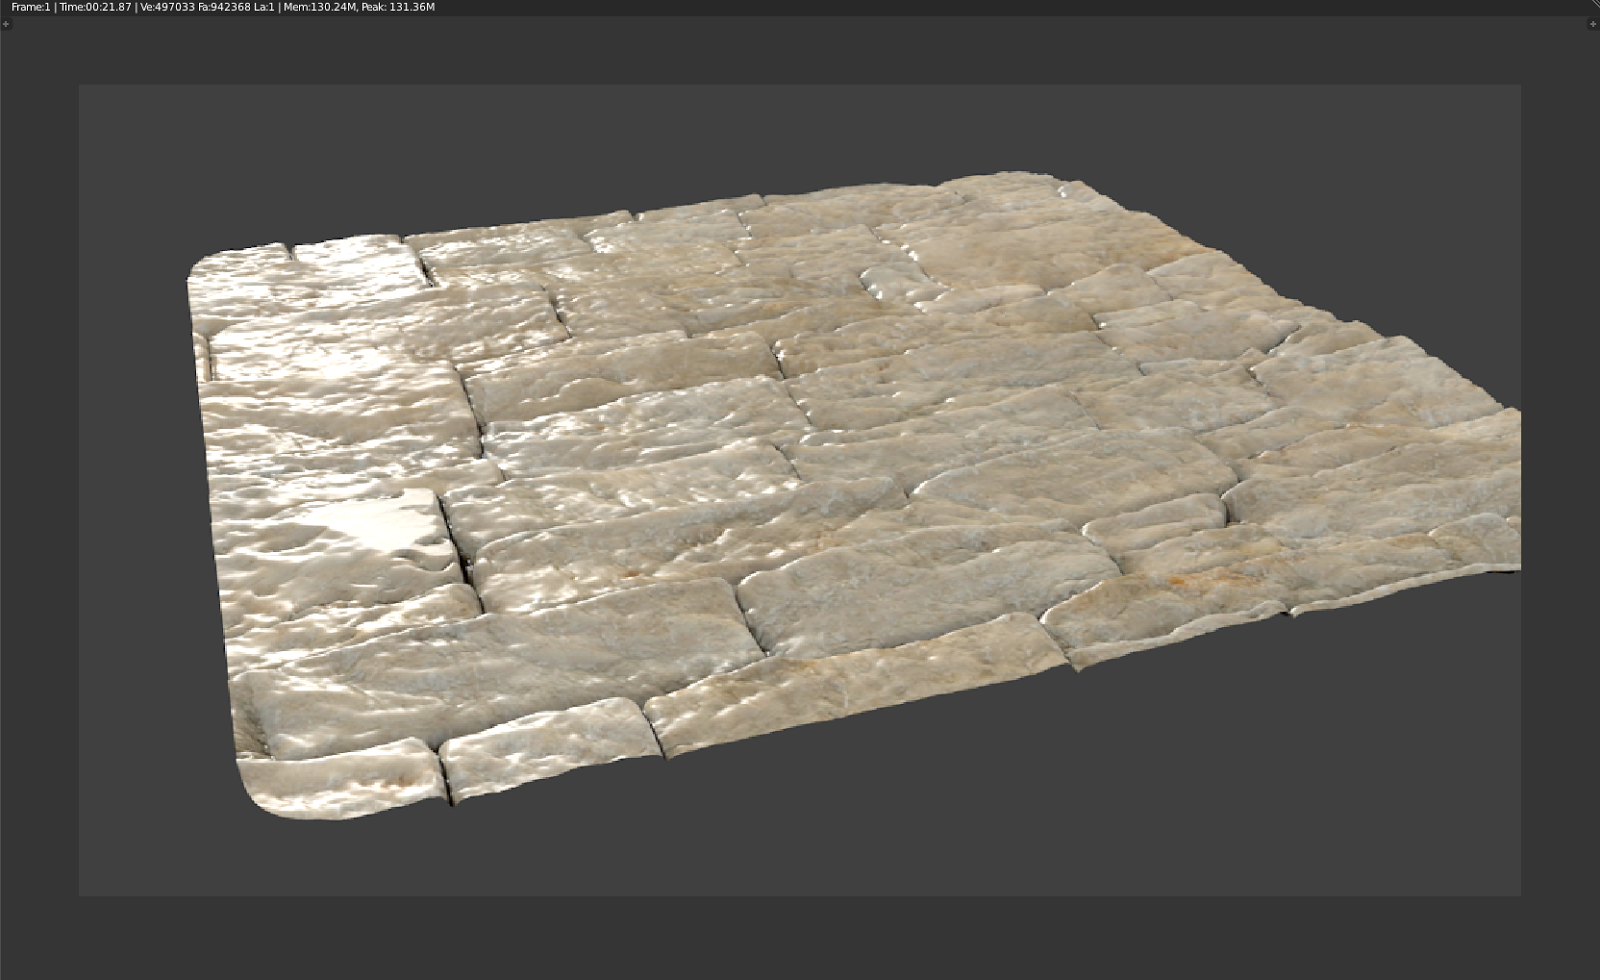
Blender Render
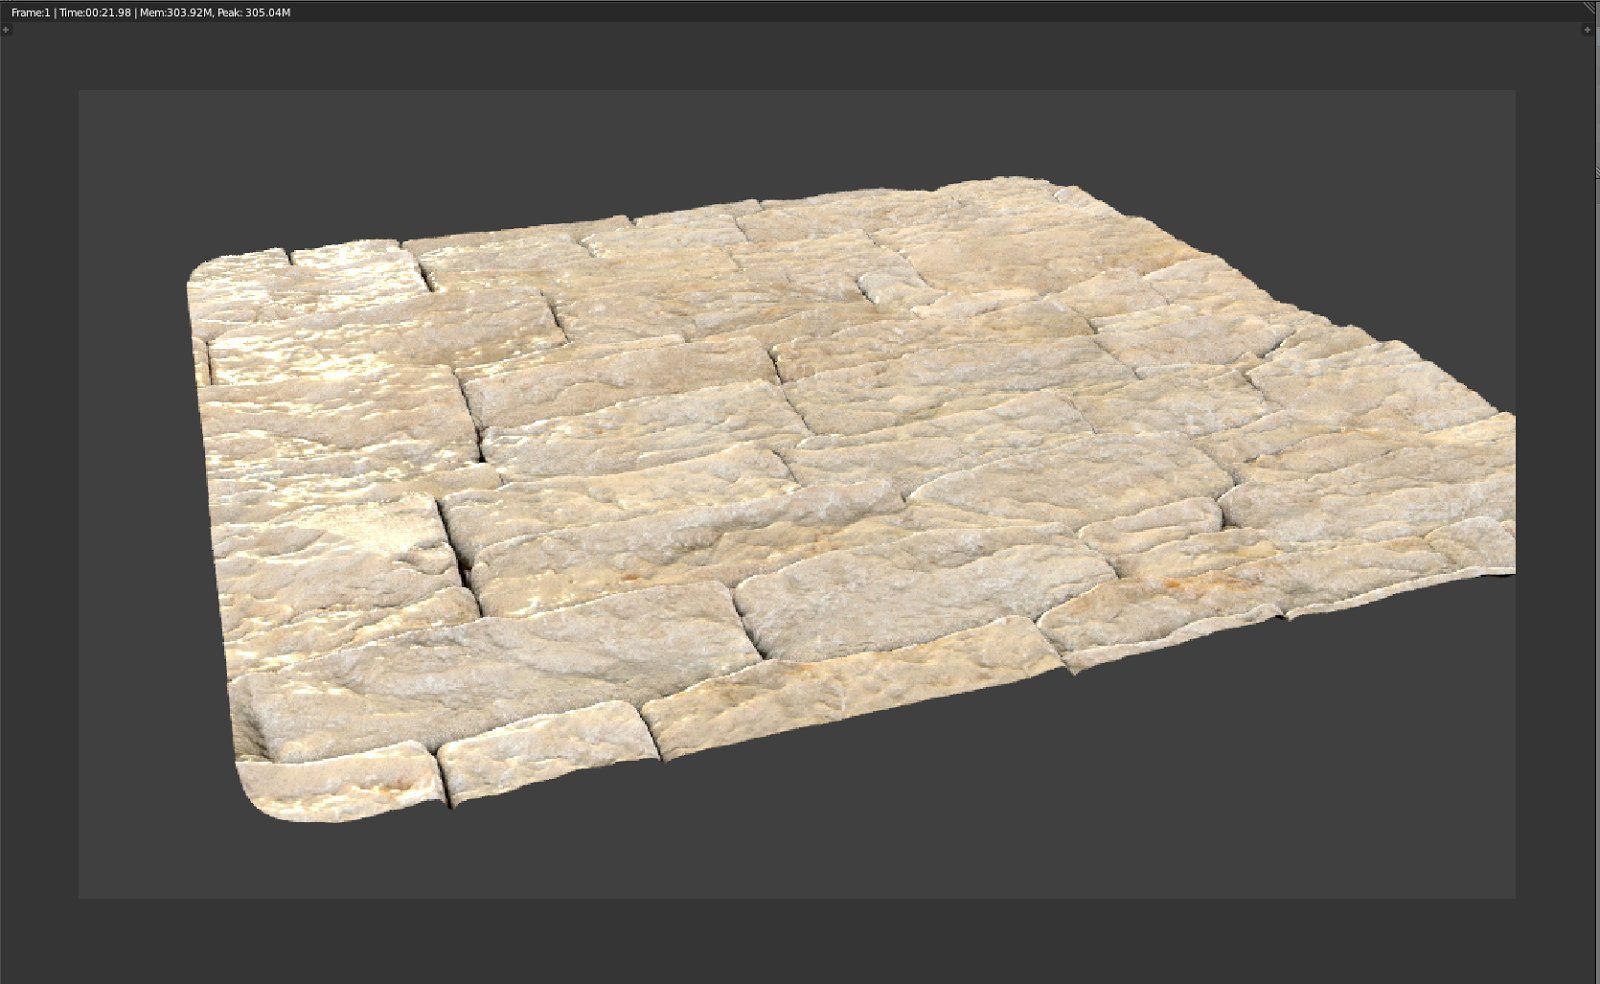
Cycles Render (Used A.O. map and controller specular effects, hence less concentrated reflection)
I was pretty satisfied with the results. But just out of curiosity, I applied the same process once more to see if it would provide better results.
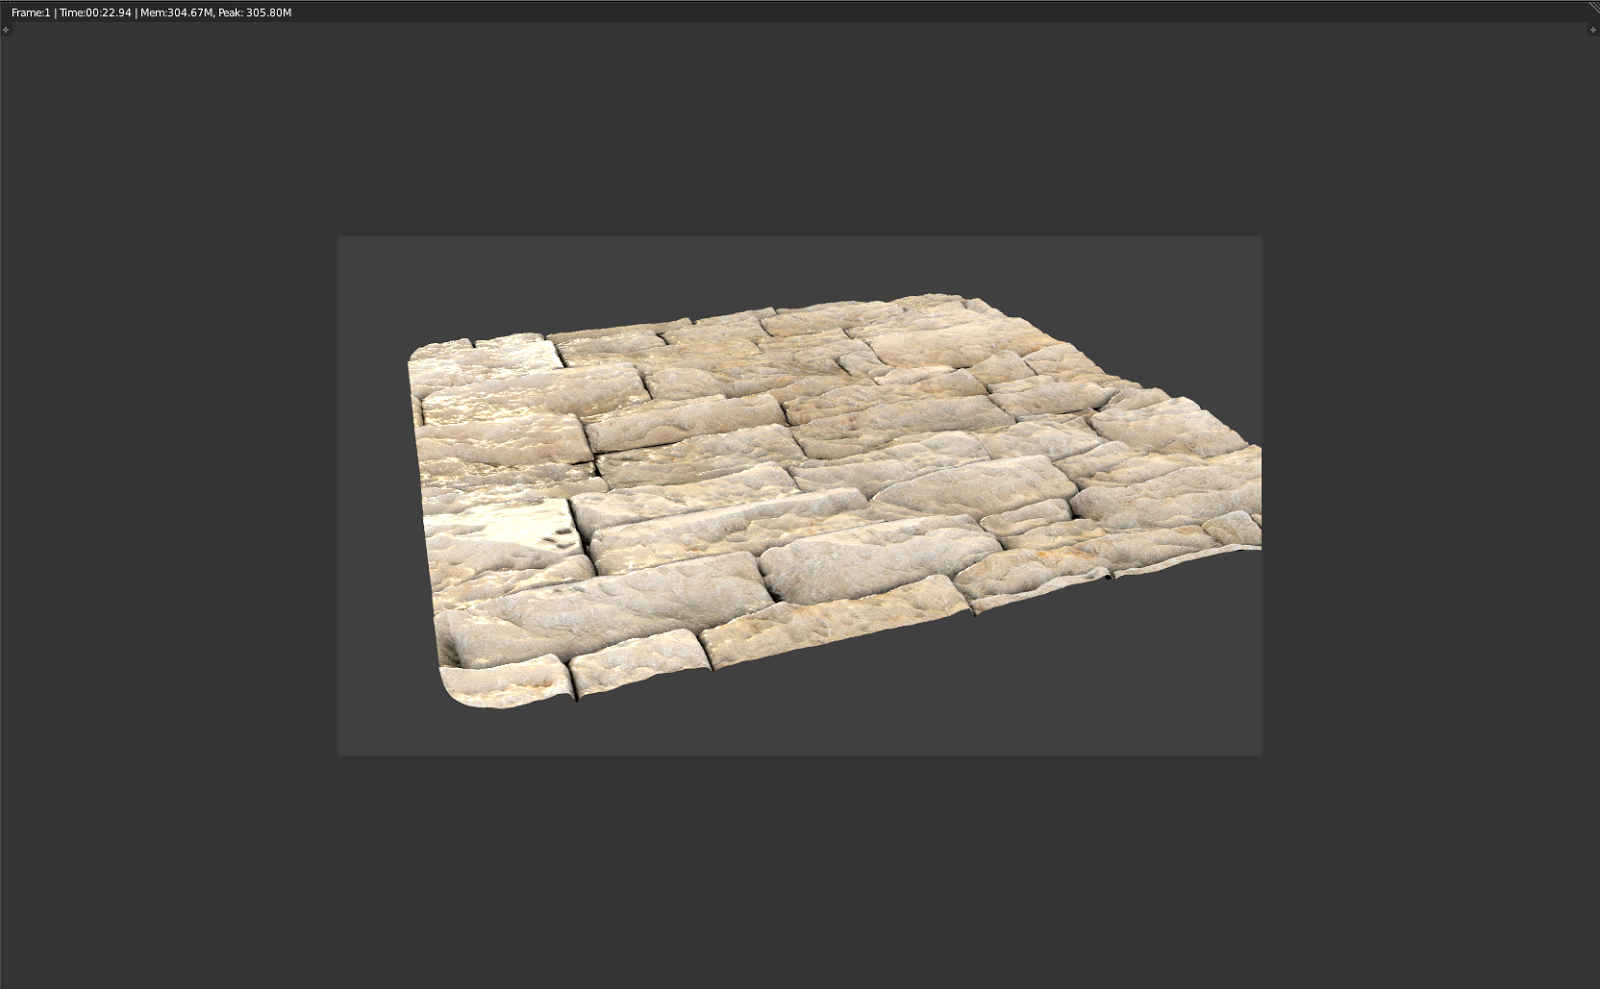
Another pass in Blender Render
There seems to be a noticeable increase in depth, but it kind of became overkill. There were just too many unnecessarily amplified distortions. So I just decided to stick with previous version. It had the right amount of beauty. This one seemed like it had an obvious layer of additional make-up. So basically I got my normal map, height map and A.O. map ready for use in the game. I made some changes to the original diffuse texture as well, but I'll give a detailed description about that in the next post. This post has already become a bit lengthy. Alright so that's it for now. Goodbye.
Enhanced Normal Map
Enhanced Height Map
Enhanced A.O. map
I tested out these new textures on a plane mesh in Blender to see the rendered results before proceeding any further. Both using the default Blender Render as well as the Cycles Render.
Blender Render
Cycles Render (Used A.O. map and controller specular effects, hence less concentrated reflection)
I was pretty satisfied with the results. But just out of curiosity, I applied the same process once more to see if it would provide better results.
Another pass in Blender Render
There seems to be a noticeable increase in depth, but it kind of became overkill. There were just too many unnecessarily amplified distortions. So I just decided to stick with previous version. It had the right amount of beauty. This one seemed like it had an obvious layer of additional make-up. So basically I got my normal map, height map and A.O. map ready for use in the game. I made some changes to the original diffuse texture as well, but I'll give a detailed description about that in the next post. This post has already become a bit lengthy. Alright so that's it for now. Goodbye.
I've been reading about UDK in general and I happened to come across some really useful hotkeys in UDK. So I thought I'll just share it, so that it may help people who are new to UDK or those do not know about them. This is not a complete list, but rather a set of hotkeys and tips that I thought would help to increase the productivity while using UDK.
- Ctrl + W/ Alt + Left Click Drag >> Duplicates objects.
- Home >> Centers all views on the selected object.
- End >> Drop objects down to the ground. (May result in floating objects occasionally)
- Ctrl + Alt + Left Click Drag >> Makes a selection box.
- Ctrl + Alt + Right Click Drag >> Deselect objects using a selection box.
- Ctrl + B >> Find in Content Browser.
- While moving around the viewport using the WASD keys & the Right Mouse button, the mouse scroll can be used to change the speed of the movement.
- With a mesh selected in the Content Browser, S + Left Click on the viewport to place it on the ground.
- With a mesh selected in the Content Browser, S + Left Click on the viewport to place it on the ground.
[If you like this post, you can check out my other posts at Unrealpossibilities.blogspot.in :) ]
Profile
