A great selection of brushes should be in the tool box of every artist. They can be used for textures, concepts, promotional pictures and many other things. There are probably tons of brushes that you can download online, but rather than giving you a fish for a day, I'm going to teach you how to catch fish for a lifetime - if you get my metaphor. I'm going to focus on grunge brushes, but this method work for any kind of brush really. You should have about intermediate skills in Adobe Photoshop for this, but even as a beginner you might learn something.
The workflow for creating a brush using this particular method goes like this:
Extract -> Import -> Tweak/Reform -> Save
.: Extraction :.
First of we need a source file that we can extract a grunge shape from. I suggest that you download a large, concrete texture from a texture database (or take your own photo). For this example I'm going to use a texture downloaded from www.cgtextures.com. If you don't have an account at CGtextures yet, then you should definetly go ahead and register one. You can download up to 15MB every 24 hours for free - which should be more than enough.
For this tutorial I'm going to use this one: New.cgtextures.com
Open up the texture in Photoshop (Ctrl+O). Next click "Select" at the top toolbar and select "Color Range..." Now when you have this window up, a color picker is activated and you can select/sample a color from the picture. I picked a dark one. At the top of this window you can also chose to do a selection based on a color, shadows or high- and midtones - don't do that for now. You can also turn on the selection preview at the bottom in order to display what will be selected. Last but not least: adjust the fuzziness slider and make sure that the "Localized color clusters" -box isn't checked. Try and get a selection like in the below picture.
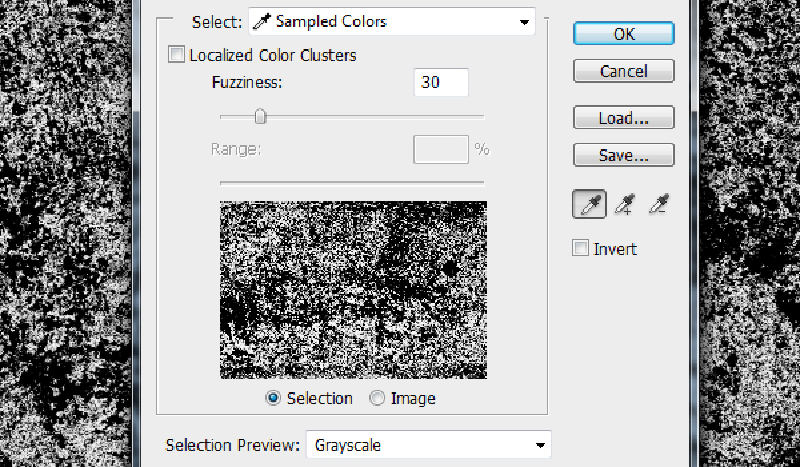
Click the OK button and the window will close and you will now have a selection active. Copy this selection (Ctrl+C).
.: Import :.
Open up a new document (Ctrl+N) and paste your selection into it (Ctrl+V). If the new document is smaller than what you selected, just repeat these last two steps. Now you should already have a white background (Layer called "Background") behind your imported grunge - but in case you don't have that: create a new layer (Ctrl+Shift+N), select everything (Ctrl+A), reset the colors (D), switch to white (X) and fill everything with the foreground color (Shift+F5). Then make sure that this white layer is behind your imported grunge. After the import, things should look like this:

.: Tweak/Reform :.
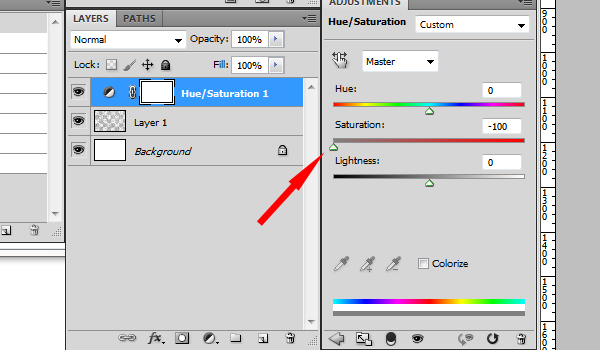
It's time to desaturate the picture. Now, I really don't think you should ever get into the habit of destructive image editing, so lets do this the non-destructive way and create an adjustment layer. Select "Layer 1" - your imported grunge texture - in the layer window and then click the black and white icon at the bottom of it. I've marked it with a red rectangle in the above picture.Create a Hue/Saturation adjustment layer and in the adjustment window drag down the Saturation meter to -100.
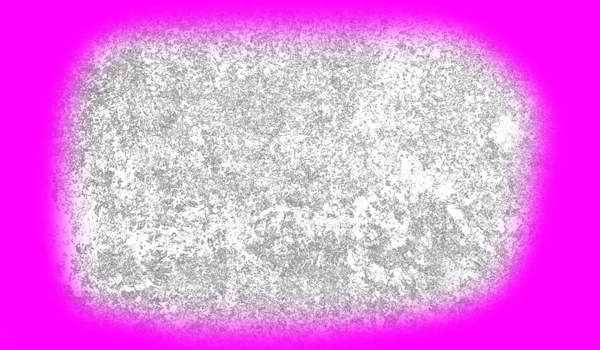
Next, create a new layer on top of the adjustment layer (Ctrl+Shift+N) and select a very soft, very large brush and start painting around the edges of the image - try to give it a rather round shape (see pic below). What color you chose doesn't matter since this is going to be a selector for a mask. I'm using magenta - also known as "magic pink".
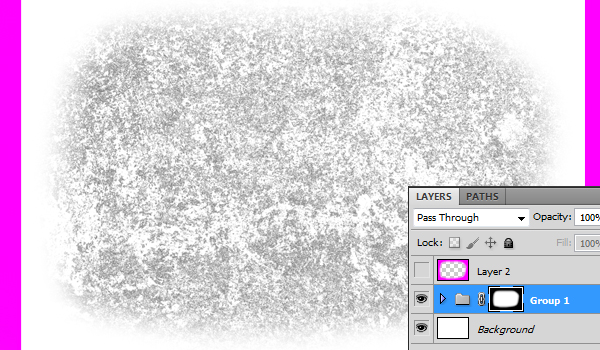
Now, select Layer 1 (imported grunge) and then Ctrl+click the Hue/Saturation 1 -layer (click the text) to mark it as well. With both of them selected, place them in a group (Ctrl+G). Ctrl+click the layer with the selector, and this time you click the image instead of the text. You now have a selection with the same shape as the selector (hence the name: selector). Now make sure that your group (Group 1) is selected and then click the icon to the LEFT of the adjustment layer -icon. This will add a mask to the group. You should also invert this mask (Ctrl+I). Now uncheck the visibility of the selector layer and the result should look like here below:
.: Save :.
Right-click the group in the layer window and select "Duplicate group". Then right-click again - this time on the copy - and select merge group. Right-click it again, this time on the mask area (highlighted with red in the below picture) and click "Apply layer mask". Also disable the visibility on the other layers - the background, the original group and the selector.

Select the layer with the grunge on it, and go to "Edit" on the top toolbar and click "Define Brush Preset". If "Define Brush Preset" is greyed out, then make sure that your image is no larger than 2500 pixels in any dimensions. Brushes can't be larger than that. Once the brush has been saved, there is one last thing left to do and that is to set the brush default settings. Open up the brush window (F5) and click the box next to "Shape dynamics". Inside the shape dynamics settings, make sure that the angle jitter is set to 100% - this will randomize the rotation of the brush when you use it. Also, click the box next to "Color dynamics" and set the brightness jitter to something like 10%. You can also drag up the saturation jitter to about 50% if you want - but consider that optional.

And last but not least it's time to save these settings. With the brush tool selected (B), right-click the canvas to open up the brush presets. Then click the tiny "Play"-button at the top right corner and select "New Brush Preset" - name it something. I called mine "My brush". Your brush has now been saved with these new default settings active.
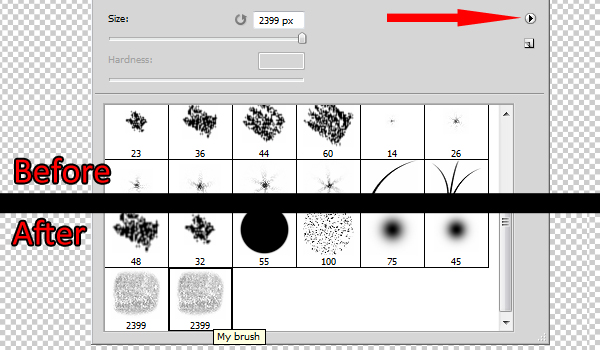
If you want to save your brush to a file (recommended) then just press the tiny "play" button again and enter the preset manager. Delete all brushes except the last one and then click "save set". For now, your brush "set" only contains one brush, but you can use the preset manager in the future to combine all your brushes into a single set.
I hope you learned something.

Thanks for the tutorial, I think that it is going to help a lot of people.
Thanks.
I hope it does. Making your own brushes is a lot cooler than just downloading other ppl's stuff :) So far I've made grunge brushes, leakage, glass cracks and over 100 splatter brushes - and more will come.
(My brushes can be downloaded on my deviant art profile)
Where? Thanks in advance :)
Niteshader.deviantart.com :)