Introduction
The aim of this tutorial is to show steps needed to make, texture and export a model from XSI Mod Tool into a physics prop model.
I'm not going to show how to model everything/anything, as there are plenty tutorials on modelling out there. The same goes for texturing there are plenty of photoshop tutorials on the web.
When deciding on the "test subject" to create for the tutorial I thought why not use something I need, so the next few pages describe how to make a cake and get it into HL2.
Modelling
First off after you've opened XSI I like to do a few things to get XSI how I like it , first thing is to turn off the evil Extended component selection, and one object in region selection.
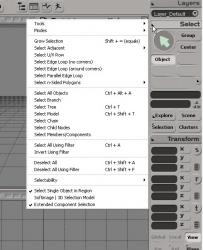
Simply click the "SELECT" button on the right of the screen [fig 1] and uncheck "Extended component selection" and "Select single object in region"
Now we're nearly ready to model the delicious cake first off click in the "camera" view and hit F12 or click the icon on the top right corner of the viewport.
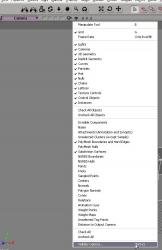
Before starting the modelling process there are 2 last things to set up to help you, number one is the poly counter so we can keep an eye on the ye olde polycount. Click the eye icon near the word "CAMERA" and choose "Visibility options.." [fig 2].
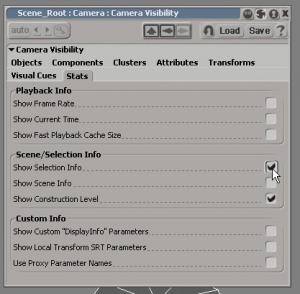
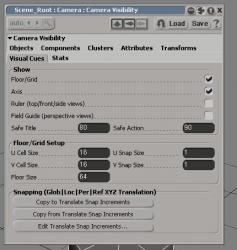
In the box that pops up go to the stats tab and check "Show Selection Info" [fig 3] ,this will kindly show you point and poly numbers of the selected object (just select all objects to determine over all poly count). Whilst we have the box up we may as well make the grid more helpfull. XSI and HL2 use the exact same units so 12 units in XSI is 12 units in HL2 and Hammer , at the moment the grid is showing 1*1 unit blocks and only covering a small 20 unit distance which is not really big in the HL2 world. In the box that's still up select the "Visual Cues" tab in the dialogue, increase the cell sizes to something more relevant and make the grid bigger, I chose 16*16 grid blocks on a 64 unit big grid [fig 4].
Fig 3
Fig 4
Wahoo it's now time to model that cake XD so lets get down to it!
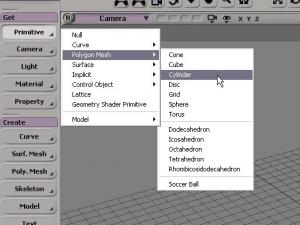
When modelling I like to start off with a primitive object, so we better go "get" one. Select "primitive" under the "Get" menu on the left [fig 5] select "Polygon Mesh">"Cylinder" as we will be making a round cake (choice of primitive is up to you and what your modelling, just play around and see which is a better starting point). Once you've placed the cylinder a dialogue will pop up, reduce the base/V divisions to 1 also if you fancy a smoother cake increase the U divisions.
Fig 5
"WTF wheres the cake its only a few lines ?"
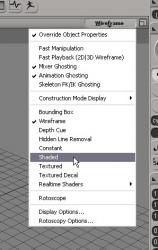
Well you need to turn shaded mode on to see it in "solid" form. In the top right corner click wireframe [fig 6] then select shaded mode.
Fig 6
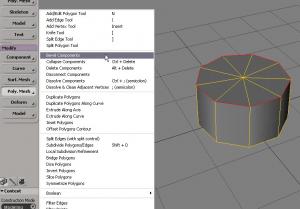
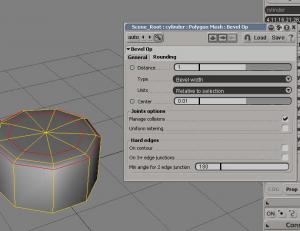
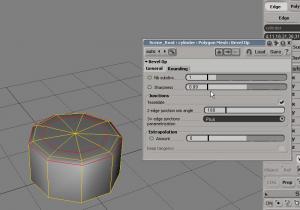
Now to make it more cake like we're going to give it a nice rounded edge, Hit I to go into "Raycast Edge select mode", holding down ALT, select one or two edges with the MIDDLE mouse button to do a "Loop Selection" you now should have selected the top ring of your cylinder. When its selected go into the left menu and select "Modify> PolyMesh> Bevel Components". Up the distance to something nice looking and up the rounding divisions in the rounding tab to 1.[fig 7]
This may not be perfect so alter it manually by loop selecting edges like before and moving ( HotKey V ) and scaling ( HotKey X ) them.
TIP: If your busy translating and you need to change the view just HOLD S move around like normal then when you release S you will return to the last tool you were using (in this case translate)
Fig 7a,b,c
Unwrapping
Before we can export this beast of a cake we need to skin it, this first envolves "Unwrapping" the mesh into like a big flat skin so we can paint on it.
There are many methods of unwrapping but I'm only going to show you mine :P
First off though to make the later unwrapping process easy and quicker we shall do all the various selections now and save them as "Clusters". Select major bits of your model which will need diffrent projections (Cyliderical Flat Spherical etc), In our case the cake has 3 different "parts" the flatish top, the flat bottom and the sides.
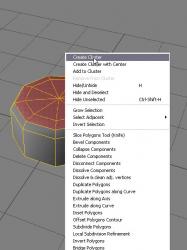
Hit U to go into "Raycast Poly Select" mode and select most of the top the ones mainly facing up, when there all selected right click and choose "Create Cluster" [fig 8] then straight after with the cluster (the polys you have just selected) appearing white hit Return and name it "CakeTop".
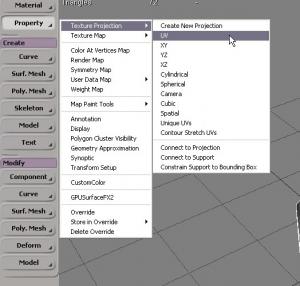
After creating "CakeTop" "Cakebottom" and "CakeSides" clusters in the same way it's time to give the cake a UV base, ie some basic UV's which we can alter.
In the Left menu under "Get" choose "Property"> "Texture projection"> "UV".[fig 9]
Fig 8
Fig 9
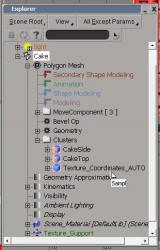
Hitting ALT+7 will bring up the Texture editior , hit 8 to bring up the explorer also. We shall now give the clusters projections, stretching them in a good way for us to "paint" on later.
In the explorer expand the "cylinder" segment down until you reach its clusters, there should be listed the clusters you made earlier.[fig 10]
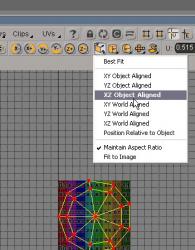
Click the "CakeTop" cluster in the explorer and it will show in the Texture editor, and be selected. Whist its selected click the "Planar Projection" button and choose, in our case "XZ Object aligned".[fig 11] Using the same hotkeys as in the 3d view move the projection over to the side and scale it a bit, we shall be placing it later.
Do the same for the bottom and choose the "Cylindrical> Best fit" method for the sides.
To make the next part easier choose "View> Dim Image" from the menu.
Fig 10
Fig 11
To make the "UVMap" neat as well as allround better we need to make it fit within the textured square. In the explorer select the cylinder so we can see all Clusters (if they dont appear hit the "A" button in the top right of the texture editor).
Hit the Island "ISL" button [fig 12] in the top right of the texture editor to make things easier, now seleting each piece one at a time scale and translate them to fit into the square like mine below [fig 13].
Fig 12
Fig 13

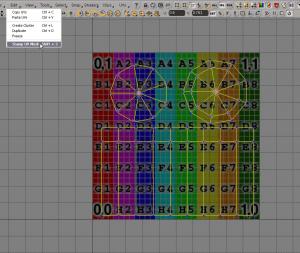
Woo! give yourself a pat on the back the UVMap is done now just select "Edit> Stamp UV" from the menu and save it as cakeSkin.tga and as a TGA of course :P.
Texture Basics
I'd love to spend (yeah right) ages telling you how to paint skins in Photoshop but I'm not going to this time.
Open your TGA up in photoshop , paint it add icing whatever like I did XD [fig 14] then using nems Photoshop plugin export it as a CompressedTexture (DXT1) in your materials directory (remeber where you placed this for later on).
After saving the .VTF resave the images as the TGA you created earlier, so we can place it on the model in XSI.
For the material to work within the source engine it needs a VMT file, so go to where you placed your .vtf inside your materials directory and make a txt file , rename it cakeSkin.vmt (this name should be the same as your .vtf) .
Place this code within the VMT file (open it with notepad)
"VertexLitGeneric"
{
"$basetexture" "url to vtf/cakeSkin"
}
The "url to vtf" is relevant to your materials folder, ie if you placed the vtf in "ModFolder/materials/models/cake" the url would be "models/cake".
So.. we have the texture ready to work in HL2 , we have a model with a UV map now it's just time to get it all together and export it
Fig 14

Final Steps
Let's start off by applying the texture. Select the cake and choose "Material> Blinn" from either the top menu or the side "Get" menu [fig 15]. Within the "Blinn" popup hit the little plug icon next to the diffuse channel and select "Image" [fig 16].
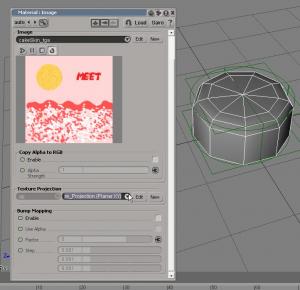
An "Image" dialogue pops up, press the "New" button and choose "New from file" and select the TGA you made earlier. Lower down the image dialogue choose the Texture coordinates map you made earlier from the drop down [fig 17].
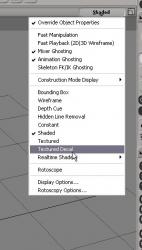
Test the textures applied by switiching your camera view over to textured decal (like how we changed it to shaded earlier)[fig 18].
Fig 15
Fig 16
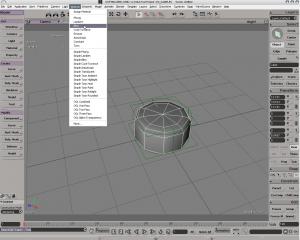
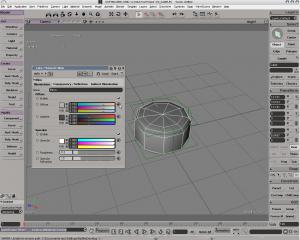
Fig 17
Fig 18
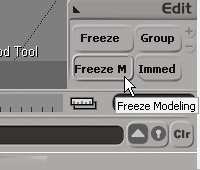
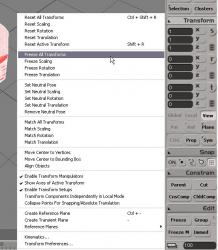
Next we'll have to prepare the model for exporting , for this it needs freezing (frozen cake ..yuck :sick:) Hit the "Freeze M" Button in the bottom right of your screen [fig 19], then freeze the transforms by hitting he "TRANSFORM" button and choosing "Freeze all transforms" [fig 20].
Fig 19
Fig 20
EXPORT TIME !! XD
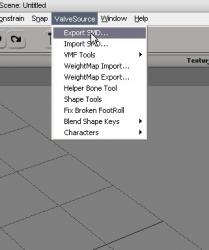
Select "ValveSource > Export SMD" from the top menu [fig 21](if its not there you ain't installed the valve plugin, silly you)
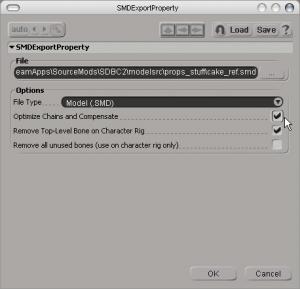
Export 3 SMDs, cake_ref as the "Model" file type [fig 22] , cake_idle as the "Skeletal Animation" file type and cake_phys as the "Physics" file type.
Fig 21
Fig 22
Export these into your modelsrc folder, in the same place as these create a text file and rename it cake.qc
In the file put this :
$modelname "props_stuff/cake.mdl"
 $scale 1.0

 $cd ".\"
 $body "Body" cake_ref.smd
 $cdmaterials "models\props_stuff" //This must be the location of your VMT texture file relevant to the materials folder as before
 $staticprop

 // 1 sequence
 $sequence idle "cake_idle" fps 5 ACT_IDLE 1

 $surfaceprop "flesh"

 $keyvalues { "prop_data" {"base" "flesh.small" }

 $collisionmodel "cake_phys.smd" {
 // Mass in kilograms

   $concave
   $mass 5.0
 }
Ive given the cake the "flesh.small" proptype, as its best suited for cakes, a list of proptypes can be found in propdata.txt within the source engine gcf or your mod folder in some cases.
Simply open up your qc with the "run_studiomdl.bat" file in your mod folder to compile it.
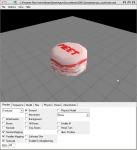
Find your .mdl file in your mod folder and open it with HLMV. XD
Here's mine :)[fig 23]
Fig 23
To test it in game simply place it as a prop_physics entity in your map in hammer, run your map and test it out in game.
That's it im afraid, good luck with creating your own cake or whatever you want. I'm happy to help any time if I can just wizz me off a PM
Handy XSI Hotkeys
This is just a page for you new to XSI who havent gone to the rouble yet of learning yourself basic and helpful Hotkeys, It took me various tutorials to find most of these listed. Its not a full of even large list just those that I personally use a lot.
------------------------------
Translation
==============================
X - Scale
C - Rotate
V - Translate
------------------------------
Navigation & selection
==============================
S - Navigation Tool (pressing this twice will return you to your last selection tool)
U - Raycast Polygon Select Mode
I - Raycast Edge Select Mode
Y - Rectangle Polygon Select Mode
T - Rectangle Point Select Mode
Change your select mode for component
F7 - Rectangle Select Mode
F8 - Lasso Select Mode
F9 - Freeform Select Mode
F10 - Raycast Select Mode
-----------------------------
Windows
=============================
8 - Explorer
9 - Schematic
7 - Render Tree
ALT+7 Texture Editor
-----------------------------
Polygon Tools
=============================
\ - Add/Create Edge (ie cut)
N - Add/Create Polygon
] - Knife tool
CTRL+D - Extrude (you will need to translate the polygons etc to see the extrusion)
M - Move Point Tool - works on Curve CV's and Polygon Points
----------------------------
Methods of selecting - With Extended Component Mode Off
============================
SHIFT + SELECT - Add to selection
CTRL + SELECT - Toggle Selection
CTRL + SHIFT + SELECT - Remove from selection
The following can be used in conjunction with above
ALT + Middle Mouse Button - Selects a loop of edges/ polygons
ALT + Left Mouse Button - Selects the range between the first and last click whilst alt is held
That's all the main ones I use for now, if you have any you use an awful lot feel free to PM me and I'll add them to this list.
Thank you for reading.


That was an excellent tutorial Stuffie! Finally someone gives noobs, such as myself, a chance to get started with the basics on a thorough step by step level. Rock on!
Now if only I can figure out how to export a proper mdl from Maya I’d really be set… I’m not much of a XSI fan.
no, the "rainbow texture" is default , XSI uses it to help you with UVing, its never applied to your model, It just looks that way.
This is so irritating to me and also very embarassing but I made it all the way to the part in the tutorial where your supposed to select Modify> PolyMesh> Bevel Components but the Model Menu on the side only shows Modify> Curve and then it cuts off... How do I scroll down :redface:
awsome tutorial yo. one thing that gave me trouble before i figured it out... it might be obvious to some people... hehe but not me...
before doing this step - In the Left menu under "Get" choose "Property"> "Texture projection"> "UV"."
you gotta do - "Get" choose "Property"> "Texture Map"> "Texture Map" to get that rainbow texture that the rest of the tutorial is based on..right?
Nice tutorial but why doesn't anyone explain how to export a character or weapon model?? *cry*
I thought it would say how to model HL2 weapons! That's whats most important to me...
I am having struggles though. For some reason, I cannot select the model sides, with RayCast select mode on, holding down ALT, and trying to select the sides with mouse 3. What am I doing wrong?
very nice tutorial
-props to you good sir
NICE
Mansemat, I actually made a tutorial on how to export HL2 characters, you can view it here: Meltingice.net
when i try to run studiomdl with my cake.qc i get an error?
ERROR : unknown command "$cdmaterials" ?
how can i fix this?
Nice hotkey list, very handy
Ok...could you maybe drop me an email at spawnofchaos at gmail.com...I'm having SERIOUS texturing/compiling problems...
Thanks alot !Very helpful for beginners like me!This tutorial resolved most of my problems with XSI mod tool !^^
ETHIS IS THE WORST MOST STRESSING TUTORIAL VE EVER DONE, I HOPE YOU FEEL DAMNED, BECAUSE YOU SIMPLY CANT WRITE A TUT PROPERLY, YOU SAY 'DO THIS' WITH 'THIS' BUTTON WHEN YOU DONT EXPLAIN HOW EVER!!!`
lIKE WHEN YOU SAID OPEN YOU MODEL WITH THE BATCH FILE, HOW ARE WE SUPPOSED TO KNOW WHERE THAT IS DUMB A'' IF THIS TUT IS FOR NOOBS THEN HOW WILL WE NO, YOU SAID IT IS IN THE MOD FOLDER, WHEN ITS NOT, WHAT YOU REALLY MEAN WAS IT WAS IN THE MOD'S CODE FOLDER, SO YOU JUST CAUSED ALOT OF CONFUSION, AND EVEN THEN, AFTER THAT WHOLE TUT, IM DOING IT RELEVANT TO HALF LIFE 2, THEN AT THE END YOU SAY ITS A DAMN MOD, MAKE YOUR MIND UP, SO NOW I HAVE GOT IT ALL MESSED UP COZ OF YOUR STUPID EXPLENATION!!!! DONT EVER DO A TUT AGAIN, UNLESS YOUR ACTUALLY NOT GUNNA BE LAZY AND YOUR ACTUALLY GUNNA EXPLAIN THINGS PROPERLY !!!!
**** A***** S*****
hey craziest dan i here what your saying! if anyone else is having problems with this tutorial simply go to the videos that come free with the xsi mod tool and watch the noesis version.
i felt that this tutorial assumed a broader knowledge of compiling already. if making tutorials in future try imagine that the person watching it has no knowledge what so ever of how to do it. any how thanks for the attempt :D
I'm having problems since fig11 I dont see the cake in the colour map. Help please, could u send me and email or something